Maytag MEDX700XW Installation Instructions
Maytag MEDX700XW Manual
 |
View all Maytag MEDX700XW manuals
Add to My Manuals
Save this manual to your list of manuals |
Maytag MEDX700XW manual content summary:
- Maytag MEDX700XW | Installation Instructions - Page 1
Dryer Installation Instructions 27" Wide Models - U.S.A. Only Para obtener acceso al manual . Table of Contents DRYER SAFETY 2 Installation Requirements 3 Tools and Parts 3 Location Requirements 3 Level Dryer 16 Complete Installation Checklist 16 DOOR REVERSAL 17 Troubleshooting 20 - Maytag MEDX700XW | Installation Instructions - Page 2
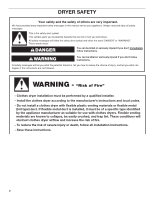
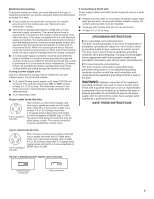
DRYER SAFETY 2 - Maytag MEDX700XW | Installation Instructions - Page 3
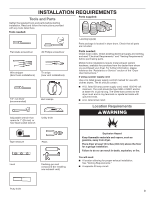
Requirements" before purchasing parts. Mobile home installations require metal exhaust system hardware, available for purchase from the dealer from whom you purchased your dryer. For further information, please reference the "Assistance or Service" section of the "Dryer User Instructions." If using - Maytag MEDX700XW | Installation Instructions - Page 4
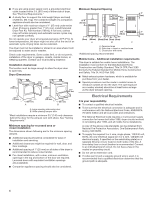
considered for ease of installation and servicing. ■■ Additional clearances might be required home - Additional installation requirements This dryer is suitable for mobile home installations. The installation must conform to the Manufactured Home Construction and Safety Standard, Title 24 CFR, Part - Maytag MEDX700XW | Installation Instructions - Page 5
instructions provided for it here. ■■ If local codes do not permit the connection of a neutral ground wire to the neutral wire, see "Optional 3-wire connection" section. ■■ This dryer for (1) new branch-circuit installations, (2) mobile homes, (3) recreational vehicles, and (4) areas where local - Maytag MEDX700XW | Installation Instructions - Page 6
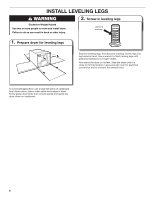
legs into leg holes by hand. Use a wrench to finish turning legs until diamond marking is no longer visible. Now stand the dryer on its feet. Slide the dryer until it is close to its final location. Leave enough room for electrical connection and to connect the exhaust vent. To avoid damaging - Maytag MEDX700XW | Installation Instructions - Page 7
Power Supply Cord Electrical Connection Direct Wire Electrical Connection Options 1. Choose electrical connection type Power supply cord 4-wire receptacle (NEMA Type 14-30R): Go to "4-wire Power Supply Cord Connection" section. Then, go to "Venting Requirements." Power supply cord 3-wire - Maytag MEDX700XW | Installation Instructions - Page 8
Supply Cord Connection IMPORTANT: A 4-wire connection is required for mobile homes and where local codes do not permit the use of 3-wire connections strain relief. The strain relief should have a tight fit with the dryer cabinet and be in a horizontal position. Do not further tighten strain relief - Maytag MEDX700XW | Installation Instructions - Page 9
neutral wire B C Connect remaining wires to outer terminal block screws. Tighten screws. Finally, reinsert tab of terminal block cover into slot of dryer rear panel. Secure cover with hold-down screw. Now, go to "Venting Requirements." 3-wire Power Supply Cord Connection IMPORTANT: Use where local - Maytag MEDX700XW | Installation Instructions - Page 10
Wire Connection IMPORTANT: A 4-wire connection is required for mobile homes and where local codes do not permit 3-wire connections. 1. (127 5" mm) Direct wire cable must have 5 ft. (1.52 m) of extra length so dryer may be moved if needed. Strip 5" (127 mm) of outer covering from end of cable, - Maytag MEDX700XW | Installation Instructions - Page 11
to neutral wire. 1. Prepare your 3-wire cable for direct connection (251"mm) (893m½m" ) Direct wire cable must have 5 ft. (1.52 m) of extra length so dryer may be moved if needed. Strip 31/2" (89 mm) of outer covering from end of cable. Strip insulation back 1" (25 mm). If using 3-wire cable - Maytag MEDX700XW | Installation Instructions - Page 12
terminal block screws (hooks facing right). Squeeze hooked ends together and tighten screws. Finally, reinsert tab of terminal block cover into slot of dryer rear panel. Secure cover with hold-down screw. Now, go to "Venting Requirements." Optional 3-wire Connection IMPORTANT: You must verify with - Maytag MEDX700XW | Installation Instructions - Page 13
dryer MUST BE EXHAUSTED OUTDOORS. IMPORTANT: Observe all governing codes and ordinances. Dryer exhaust must not be connected into any gas Must be fully extended and supported in final dryer location. ■■ Remove excess rigid metal or flexible metal vents. Review "Vent System Chart" and if necessary - Maytag MEDX700XW | Installation Instructions - Page 14
to the manufacturer's instructions. C D E A F G B Over-The-Top installation (also available with one offset elbow) A. Dryer B. Elbow C. Wall call 1-800-807-6777 or visit us at www.whirlpoolparts.ca. Part Number Descriptions 8171587RP 0-5" Metal vent periscope 4396037RP 0"-18" Metal vent - Maytag MEDX700XW | Installation Instructions - Page 15
a noncombustible portion of the mobile home structure and must not terminate beneath the mobile home. Terminate the exhaust vent outside. . Secure vent to exhaust hood with 4" (102 mm) clamp. Run vent to dryer location using straightest path possible. Avoid 90° turns. Use clamps to seal all joints - Maytag MEDX700XW | Installation Instructions - Page 16
with a damp cloth to remove any dust. q Read "Dryer Use" in your "Use and Care Guide." q Set the dryer on a full heat cycle (not an air cycle) for 20 minutes and start the dryer. If the dryer will not start, check the following: ■■ Controls are set in a running or "On" position. ■■ Start button has - Maytag MEDX700XW | Installation Instructions - Page 17
. 6. Rotate outer door Lift door until top screws in dryer cabinet are in large part of hinge slot. Pull door forward off screws. Set door (handle side up) on top of dryer. Remove top screws from dryer cabinet. Take outer door and rotate it 180º and set it back down on inner door. Be certain to - Maytag MEDX700XW | Installation Instructions - Page 18
hole is at the bottom of the hinge. NOTE: 2 people maybe needed to reinstall door. Insert screws into the bottom holes on left side of dryer cabinet. Tighten screws halfway. Position door so large end of door hinge slot is over screws. Slide door up so screws are in bottom of - Maytag MEDX700XW | Installation Instructions - Page 19
inner from outer door Lift door until top screws in dryer cabinet are in large part of hinge slot. Pull door forward off screws. Set door (handle side up) on top of dryer. Remove top screws from dryer cabinet. Holding door over towel on dryer, pry inner door and lift to separate it from outer - Maytag MEDX700XW | Installation Instructions - Page 20
from dryer cabinet and set aside. W10115226B W10115227B-SP © 2011 Whirlpool Corporation 2Al0l rights reserved Close door and check that door strike aligns with door catch. If it is needed, slide door catch left or right within slot to adjust alignment. Troubleshooting See the "Use and Care Guide
-
 1
1 -
 2
2 -
 3
3 -
 4
4 -
 5
5 -
 6
6 -
 7
7 -
8
-
9
-
10
-
11
-
12
-
13
-
14
-
15
-
16
-
17
-
18
-
19
-
20
 |
 |

W10115226B
W10115227B-SP
DRYER SAFETY
.........................................................................
2
INSTALLATION REQUIREMENTS
.............................................
3
Tools and Parts
......................................................................
3
LOCATION REQUIREMENTS
....................................................
3
ELECTRICAL REQUIREMENTS
................................................
4
INSTALL LEVELING LEGS
.........................................................
6
ELECTRICAL CONNECTION
....................................................
7
VENTING
...................................................................................
13
Venting Requirements
.........................................................
13
Plan Vent System
.................................................................
14
Venting Kits
..........................................................................
14
Install Vent System
..............................................................
15
Connect Vent
........................................................................
15
LEVEL DRYER
..........................................................................
16
COMPLETE INSTALLATION CHECKLIST
..............................
16
DOOR REVERSAL
....................................................................
17
TROUBLESHOOTING
..............................................................
20
ELECTRIC DRYER INSTALLATION INSTRUCTIONS
27" WIDE MODELS - U.S.A. ONLY
Para obtener acceso al manual de uso y cuidado en español, o para obtener información adicional acerca de su producto, visite:
www.whirlpool.com
Tenga listo su número de modelo completo. Puede encontrar el número de modelo y de serie dentro de la cavidad superior de la puerta.
Table of Contents