Maytag MER6751AAB Installation Instructions
Maytag MER6751AAB - Double Oven Ceramic Range Manual
 |
View all Maytag MER6751AAB manuals
Add to My Manuals
Save this manual to your list of manuals |
Maytag MER6751AAB manual content summary:
- Maytag MER6751AAB | Installation Instructions - Page 1
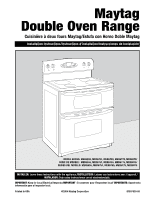
Maytag Double Oven Range Cuisinière à deux fours Maytag/Estufa con Horno Doble Maytag Installation Instructions/Instructions d'installation/Instrucciones de Instalación. MODEL SERIES: MER6555, MER6751, MER6755, MER6775, MER6875/ SÉRIE DE MODÈLE : MER6555, MER6751, MER6755, MER6775, MER6875/ SERIES - Maytag MER6751AAB | Installation Instructions - Page 2
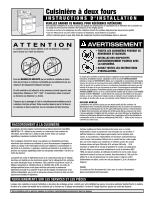
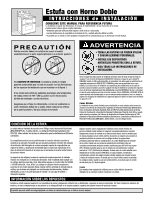
Double Oven Range INSTALLATION INSTRUCTIONS PLEASE KEEP THIS MANUAL FOR FUTURE REFERENCE This manual is intended to assist in the initial installation and adjustments of the range. • Only qualified personnel should install or service this range. • Read "Safety Instructions" in Use & Care book before - Maytag MER6751AAB | Installation Instructions - Page 3
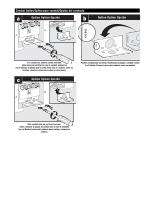
Conduit Option/Option pour conduit/Opción del conducto a Option Option Opción b CONDUIT CORD 2 CORD 1 1 CORD CORD Option Option Opción CONDUIT CONDUIT For conduit use, remove screws and slide plate down and out./Dans le cas de conduit, enlevez les vis et abaissez la plaque pour la sortir./ - Maytag MER6751AAB | Installation Instructions - Page 4
monter sur les portes des fours. Les instructions d'installation sont fournies pour des endroits où les murs ÈRE La cuisinière doit être installée conformément au National Electrical Code (NEC) ANSI/NFPA nº 70 contact avec votre détaillant ou agence de service autorisée. Veuillez fournir le numéro - Maytag MER6751AAB | Installation Instructions - Page 5
manual. PRECAUTIÓN Podrían ocurrirle daños a la estufa si se mueve o levanta sosteniéndola por la parte superiorprincipal o el protector posterior. ADVERTENCIA • TODAS LAS ESTUFAS SE PUEDEN VOLCAR Y CAUSAR LESIONES PERSONALES. • INSTALE un circuito separado desde el panel eléctrico principal de entrada - Maytag MER6751AAB | Installation Instructions - Page 6
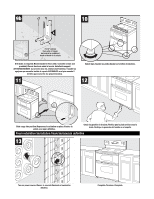
le support ANTIRENVERSEMENT au sol avec deux vis à béton (non fournies)./ Taladre los agujeros que necesite. Instale el soporte ANTIVUELCO en el piso usando 2 tornillos para concreto (no proporcionados). 11 Adjust legs./Ajustez les pieds./Ajuste los tornillos niveladores. 12 Slide range - Maytag MER6751AAB | Installation Instructions - Page 7
edge of range/ du bord de la cuisinière/ desde el borde de la estufa Drill 1/8" (3mm holes). Mount bracket to wall or floor with 2 screws./Percez des trous de 1/8 po (3 mm). Installez le support ANTIRENVERSEMENT au mur ou au sol avec deux vis./Taladre agujeros de 1/8" (3 mm). Instale el soporte - Maytag MER6751AAB | Installation Instructions - Page 8
eliminate the risk of burns or fire by reaching over heated surface units, cabinet storage space located above the surface units should be avoided. If cabinet storage is to be provided, the risk can be reduced by installing a range hood that projects horizontally a minimum of 5 inches (13cm) beyond - Maytag MER6751AAB | Installation Instructions - Page 9
-3.6/4c"m) (2795-.97/c8m") 26-(56/61.86-"6-92.27-c1m/)4"* * Excluding handle. Dimension given is from wall to front of oven door, and will vary based on electric outlet receptacle installation. * Sans la poignée. La dimension donnée est celle du mur à l'avant de la porte du four et variera selon - Maytag MER6751AAB | Installation Instructions - Page 10
ground strap MUST be cut out and removed./Une partie de la bande en cuivre de mise à la terre DOIT être coupée et enlevée./Una parte o la totalidad de la cinta de conexión a tierra DEBE ser cortada y descartada. D3 Attach lugs. See Torque specifications at right./Fixez les tenons. Consultez les - Maytag MER6751AAB | Installation Instructions - Page 11
Connect remaining wires./Raccordez les fils restants./ Conecte los alambres restantes. NOTE: The copper ground strap MUST stay connected between middle post and range./ REMARQUE : La bande en cuivre de mise à la terre DOIT rester branchée entre la borne centrale et la cuisinière./ NOTA: La cinta - Maytag MER6751AAB | Installation Instructions - Page 12
A B C D Use & Care Guide Installation Instructions Awareness Sheet 5/16" Included./Compris./Se incluye. Not included./Non inclus./ No se incluye. Tools needed./Outils nécessaires./ Herramientas necesarias. Identify Electrical Connection/Identifiez le raccordement électrique/Identifique la - Maytag MER6751AAB | Installation Instructions - Page 13
have electrical connection A1 A2 See NOTE. C Voyez REMARQUE. / Vea la NOTA. Pull service cord through./Passez le cordon électrique ici./ Tire del cordón elé NOTE: The copper ground strap MUST stay connected between middle post and range./ REMARQU : La bande en cuivre de mise à la terre DOIT - Maytag MER6751AAB | Installation Instructions - Page 14
enlevée./ Una parte o la totalidad de la cinta de conexión a tierra DEBE ser cortada y descartada. B3 2 Remove grounding screw, pull service cord through connection opening, with closed loop terminals and marked for use with ranges shall be used. REMARQUE : Remplacement du cordon - N'utilisez qu
-
 1
1 -
 2
2 -
 3
3 -
 4
4 -
 5
5 -
 6
6 -
 7
7 -
8
-
9
-
10
-
11
-
12
-
13
-
14
 |
 |

IMPORTANT:
Keep for Local Electrical Inspector/
IMPORTANT
: À conserver pour l’inspecteur local/
IMPORTANTE:
Guarde esta
información para el inspector local.
Printed in USA
©2004 Maytag Corporation
8101P630-60
Maytag
Double Oven Range
Cuisinière à deux fours Maytag/Estufa con Horno Doble Maytag
Installation Instructions/Instructions d’installation/Instrucciones de Instalación
.
INSTALLER:
Leave these instructions with the appliance./
INSTALLATEUR:
Laissez ces instructions avec l’appareil./
INSTALADOR:
Deje estas instrucciones con el electrodoméstic
.
MODEL SERIES: MER6555, MER6751, MER6755, MER6775, MER6875/
SÉRIE DE MODÈLE : MER6555, MER6751, MER6755, MER6775, MER6875/
SERIES DEL MODELO: MER6555, MER6751, MER6755, MER6775, MER6875