Maytag MER7775WB Owners Manual
Maytag MER7775WB Manual
 |
View all Maytag MER7775WB manuals
Add to My Manuals
Save this manual to your list of manuals |
Maytag MER7775WB manual content summary:
- Maytag MER7775WB | Owners Manual - Page 1
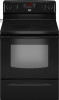
ELECTRIC RANGE USER INSTRUCTIONS THANK YOU for purchasing this high-quality product. If you should experience a problem not covered in TROUBLESHOOTING, please visit our website at www.maytag.com for additional information. If you still need assistance, call us at 1-800-688-9900. You will need your - Maytag MER7775WB | Owners Manual - Page 2
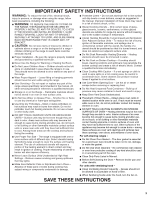
Tip Over Hazard A child or adult can tip the range and be killed. Connect anti-tip bracket to rear range foot. Reconnect the anti-tip bracket, if the range is moved. See the installation instructions for details. Failure to follow these instructions can result in death or serious burns to children - Maytag MER7775WB | Owners Manual - Page 3
while using the range. ■ User Servicing - Do not repair or replace any part of the range unless specifically recommended in the manual. All other servicing should be referred to a qualified technician. ■ Storage in or on the Range - Flammable materials should not be stored in an oven or near surface - Maytag MER7775WB | Owners Manual - Page 4
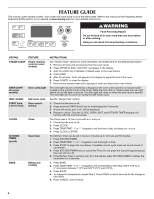
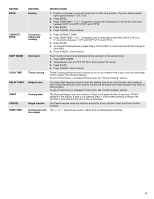
FEATURE GUIDE This manual covers several models. Your model may have some or all of the items listed. Refer to this manual or the Frequently Asked Questions (FAQs) section of our website at www.maytag.com for more detailed instructions. WARNING Food Poisoning Hazard Do not let food sit in oven more - Maytag MER7775WB | Owners Manual - Page 5
WARM COOK TIME DELAY START START CANCEL TEMP/TIME FEATURE Broiling Convection baking and roasting Hold warm Timed cooking Delayed start Cooking start Range function Temperature and time adjust INSTRUCTIONS 1. Position cookware in oven and close door to broil stop position. The door should remain - Maytag MER7775WB | Owners Manual - Page 6
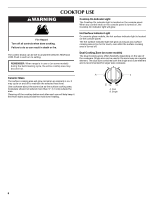
so can result in death or fire. The control knobs can be set to anywhere between HIGH and LOW. Push in and turn to setting. REMEMBER: When range is in use or (on some models) during the Self-Cleaning cycle, the entire cooktop area may become hot. Hot Surface Indicator Light On ceramic - Maytag MER7775WB | Owners Manual - Page 7
BAKE for 5 seconds until the oven display shows the current calibration, for example "0°F CAL" or "00." 2. Press the TEMP/TIME "+" or "-" keypads to increase or to decrease the temperature in 10°F (5°C) amounts. The adjustment can be set between 30°F (15°C) and -30°F (-15°C). 3. Press START. Options - Maytag MER7775WB | Owners Manual - Page 8
, and then lift out. Use the following illustration and charts as a guide. Baking Layer Cakes on 2 Racks For best results when baking cakes on 2 racks, use racks 2 and 4 for baking. Place the cakes on the racks as shown. 5 4 3 2 1 Oven Vent The oven vent releases hot air and moisture from the - Maytag MER7775WB | Owners Manual - Page 9
center of the oven rack. Close the Part Number 4396923. Convection Baking and Roasting During convection baking or roasting, the bake and broil elements or burners cycle on and off in intervals to maintain the oven Guide" section. Food Poisoning Hazard 1. Press BAKE. Do not let food sit in oven - Maytag MER7775WB | Owners Manual - Page 10
Vent" section. Do not clean, rub, damage or move the oven door gasket. Prepare Range ■ Remove the broiler pan, grid, cookware and bakeware, all cooking utensils, oven racks and aluminum foil and, on some models, the temperature probe from the oven. ■ Use a damp cloth to clean inside door edge and - Maytag MER7775WB | Owners Manual - Page 11
See cover for contact information. OVEN RACKS Cleaning Method: ■ Steel-wool pad ■ For racks that have discolored and are harder to slide, a light coating of vegetable oil applied to the rack guides will help them slide. STORAGE DRAWER OR WARMING DRAWER (on some models) Check that storage drawer or - Maytag MER7775WB | Owners Manual - Page 12
level? Level the range. See the Installation Instructions. Oven will not operate ■ Is the electronic oven control set correctly? See "Electronic Oven Controls" section. ■ Has a delay start been set? See "Timed Cooking" section. ■ On some models, is the oven control lockout set? See the control lock - Maytag MER7775WB | Owners Manual - Page 13
31463 ACCESSORIES Cooktop Cleaner (ceramic glass models) Order Part Number 31464 Cooktop Scraper (ceramic glass models) Order Part Number WA906B Stainless Steel Cleaner and Polish (stainless steel models) Order Part Number 31462 All-Purpose Appliance Cleaner Order Part Number 31682 Split-Rack with - Maytag MER7775WB | Owners Manual - Page 14
of your major appliance, to instruct you on how to use your major appliance, to replace or repair house fuses, or to correct house wiring or plumbing. 2. Service calls to repair or replace appliance light bulbs, air filters or water filters. Consumable parts are excluded from warranty coverage - Maytag MER7775WB | Owners Manual - Page 15
Notes 15 - Maytag MER7775WB | Owners Manual - Page 16
W10269526A SP PN W10269529A © 2009 All rights reserved. ®Registered Trademark/ ™ Trademark of Maytag Corporation or its related companies. 5/09 Printed in U.S.A.
-
 1
1 -
 2
2 -
 3
3 -
 4
4 -
 5
5 -
 6
6 -
 7
7 -
8
-
9
-
10
-
11
-
12
-
13
-
14
-
15
-
16
 |
 |

THANK YOU for purchasing this high-quality product. If you should experience a problem not covered in TROUBLESHOOTING,
please visit our website at
www.maytag.com
for additional information. If you still need assistance, call us at 1-800-688-9900.
You will need your model and serial number located on the oven frame behind the storage drawer panel.
Para obtener acceso a “Instrucciones para el usuario de la estufa eléctrica” en español, o para obtener información adicional acerca
de su producto, visite:
www.maytag.com
Tenga listo su número de modelo completo. Puede encontrar su número de modelo y de serie en la etiqueta, ubicada en el marco
del horno, detrás del panel del cajón de almacenamiento.
ELECTRIC RANGE
USER INSTRUCTIONS
Table of Contents
RANGE SAFETY
.......................................................................................
2
The Anti-Tip Bracket
.............................................................................
2
FEATURE GUIDE
.....................................................................................
4
COOKTOP USE
........................................................................................
6
OVEN USE
................................................................................................
7
Electronic Oven Controls
......................................................................
7
Aluminum Foil
........................................................................................
7
Positioning Racks and Bakeware
.........................................................
8
Oven Vent
..............................................................................................
8
Baking and Roasting
.............................................................................
8
Broiling
..................................................................................................
9
Convection Baking and Roasting
.........................................................
9
Timed Cooking
......................................................................................
9
RANGE CARE
.........................................................................................
10
Self-Cleaning Cycle
.............................................................................
10
Steam Clean (on some models)
..........................................................
10
General Cleaning
.................................................................................
11
Oven Light
...........................................................................................
11
TROUBLESHOOTING
............................................................................
12
ACCESSORIES
......................................................................................
13
WARRANTY
............................................................................................
14
W10269526A