Metabo W 24-230 MVT non-locking Operating Instructions
Metabo W 24-230 MVT non-locking Manual
 |
View all Metabo W 24-230 MVT non-locking manuals
Add to My Manuals
Save this manual to your list of manuals |
Metabo W 24-230 MVT non-locking manual content summary:
- Metabo W 24-230 MVT non-locking | Operating Instructions - Page 1
W 22-180 W 22-230 W 24-180 W 24-230 W 26-180 W 26-230 en Operating Instructions 5 fr Mode d'emploi 12 es Instrucciones de manejo 20 www.metabo.com Made in Germany - Metabo W 24-230 MVT non-locking | Operating Instructions - Page 2
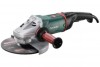
2 3 4 5 1 USA 2 6 7 8 9 CANADA 10 11 12 10 10 A 11 B 11 13 14 A B CANADA C 12 CANADA D 9 E - Metabo W 24-230 MVT non-locking | Operating Instructions - Page 3
W 22-180 W 22-230 W 24-180 W 24-230 W 26-180 W 26-230 14 Dmax tmax1; tmax3 M / l n I120 V HP m in (mm) 7 (180) 9 (230) 7 (180) 9 (230) 7 (180) 9 (230) in (mm) - / in (mm) min-1 (rpm) 9/16; 5/16 (14; 8 ) USA : 5/8" / 1 1/8 (28) CANADA: 5/8" / 15/16 (24) 8500 6600 8500 6600 8500 6600 A 15 15 - Metabo W 24-230 MVT non-locking | Operating Instructions - Page 4
USA (11) A B Dmax= 7" (180 mm) 6.30357 Dmax= 9" (230 mm) 6.30356 (11) C 341032060 D E 341101480 F 344160840 CANADA (11) (2) B J G H D I D D (12) (13) USA/CANADA Dmax= 7" (180 mm) 6.30357 Dmax= 9" (230 mm) 6.30356 K CANADA C USA 341032060 N L M 4 O 6.35000 E (5/8") 341101480 - Metabo W 24-230 MVT non-locking | Operating Instructions - Page 5
protection used for appropriate conditions will reduce personal injuries. and/or serious injury. Save all warnings and c) Prevent unintentional starting. Ensure the instructions for future reference! The term switch is in the off-position before "power tool" in the warnings refers to your mains - Metabo W 24-230 MVT non-locking | Operating Instructions - Page 6
a) Have your power tool serviced by a qualified repair person using only identical replacement parts. This will ensure that the safety of the power tool is maintained. 3. Special Safety Instructions 3.1 Safety Warnings Common for Grinding, Sanding, Wire Brushing or Abrasive Cutting-Off Operations - Metabo W 24-230 MVT non-locking | Operating Instructions - Page 7
may cause them to shatter. d) Always use undamaged wheel flanges that are of correct size and shape for your selected wheel. Proper wheel flanges support the wheel thus reducing the possibility of wheel breakage. Flanges for cut-off wheels may be different from grinding wheel flanges. e) Do not use - Metabo W 24-230 MVT non-locking | Operating Instructions - Page 8
and centrifugal forces. 3.7 Additional Safety Instructions Use elastic cushioning layers if they e.g. using clamps. Large workpieces must be sufficiently supported. If accessories with threaded inserts are used, before making any adjustments, converting or servicing the machine. A damaged or cracked - Metabo W 24-230 MVT non-locking | Operating Instructions - Page 9
the additional handle Always work with the additional handle attached (8)! Manually screw in the additional handle securely in the left, centre Placing the grinding wheel in position See illustration C on page 2. - Fit the support flange (10) on the spindle. The flange should not turn on the spindle - Metabo W 24-230 MVT non-locking | Operating Instructions - Page 10
trigger (5) and release. 7.2 Working instructions Grinding: Press down the machine evenly back from the cut out of control. Guide the machine evenly at a speed suitable ). 9. Troubleshooting - Switching included hub B Parting safety guard. C Raised support flange D Diamond discs (always use with - Metabo W 24-230 MVT non-locking | Operating Instructions - Page 11
is 100% recycled. Scrap power tools and accessories contain large amounts of valuable resources and plastics that can be recycled. These instructions are printed on chlorine-free bleached paper. 13. Technical Specifications Explanation of details on page 3. Subject to changes serving technical - Metabo W 24-230 MVT non-locking | Operating Instructions - Page 12
peut donner lieu à un choc électrique, un incendie et/ou une blessure sérieuse. Conserver tous les avertissements et toutes les instructions pour pouvoir s'y reporter ultérieurement! Le terme "outil" dans les avertissements fait référence à votre outil électrique alimenté par le secteur (avec - Metabo W 24-230 MVT non-locking | Operating Instructions - Page 13
sont moins susceptibles de bloquer et sont plus faciles à contrôler. g) Utiliser l'outil, les accessoires et les lames etc., conformément à ces instructions, en tenant compte des conditions de travail et du travail à réaliser. L'utilisation de l'outil pour des opérations différentes de celles FRAN - Metabo W 24-230 MVT non-locking | Operating Instructions - Page 14
fr FRANÇAIS l'accessoire a subi une chute, examiner les dommages éventuels ou installer un accessoire non endommagé. Après examen et installation d'un accessoire, placer toutes les personnes présentes à distance du plan de l'accessoire rotatif et faire marcher l'outil électrique à vitesse maximale à - Metabo W 24-230 MVT non-locking | Operating Instructions - Page 15
émarrer l'outil électrique dans la pièce à usiner. e) Prévoir un support de panneaux ou de toute pièce à usiner surdimensionnée pour réduire le risque doivent être conservées et manipulées avec soin, conformément aux instructions du fabricant. Ne jamais utiliser de meule à tronçonner pour les travaux - Metabo W 24-230 MVT non-locking | Operating Instructions - Page 16
fr FRANÇAIS la page 2 au chapitre 13. Caractéristiques techniques. Toujours porter des lunettes de protection. En cours de travail, et surtout s'il s'agit de métaux, il est possible que des poussières conductrices s'accumulent dans la machine. Il se peut alors qu'il y ait un transfert d'énergie é - Metabo W 24-230 MVT non-locking | Operating Instructions - Page 17
l'alésage gauche, central ou droit (selon les besoins). 5.2 Placement du capot de protection (pour les travaux avec des meules) Avant la mise en service : placer le capot de protection. Dans le cadre de travaux avec des disques à dégrossir, utiliser le capot de protection pour des raisons de sécurit - Metabo W 24-230 MVT non-locking | Operating Instructions - Page 18
capot de protection adapté) J Capot de protection de tronçonnage avec glissières de guidage (placer sur la machine et fixer avec une vis (f). (avec supports pour aspiration de la poussière de pierre produite lors de la coupe de plaque de pierre avec un aspirateur adapté.) K Gant de protection (pour - Metabo W 24-230 MVT non-locking | Operating Instructions - Page 19
11. Réparations Les travaux de réparation sur les outils électriques ne peuvent être effectués que par un spécialiste ! Les outils Metabo qui sont à réparer peuvent être expédiés à l'une des adresses indiquées sur la liste des pièces de rechange. Prière de joindre à l'outil expédié une description - Metabo W 24-230 MVT non-locking | Operating Instructions - Page 20
con carácter general y la información sobre seguridad incluida. 2. Instrucciones generales de seguridad AVISO: Para reducir el riesgo de lesiones, lea el manual de instrucciones. Para su propia protección y la de su herramienta eléctrica, observe las partes marcadas con este símbolo Instrucciones - Metabo W 24-230 MVT non-locking | Operating Instructions - Page 21
porta la herramienta eléctrica sujetándola por el interruptor de conexión/desconexión, o si introduce el enchufe en la toma de corriente con el aparato conectado, puede dar lugar a un accidente. d) Retire las herramientas de ajuste o llaves fijas antes de conectar la herramienta eléctrica. Una - Metabo W 24-230 MVT non-locking | Operating Instructions - Page 22
es ESPAÑOL g) No utilice herramientas de inserción dañadas. Antes de cada utilización, controle si las herramientas de inserción como los discos de amolar están astillados o agrietados, los discos abrasivos están agrietados o muy desgastados, o si los cepillos de alambre tienen alambres sueltos o - Metabo W 24-230 MVT non-locking | Operating Instructions - Page 23
d) Trabaje con especial cuidado en el área de esquinas, bordes afilados, etc. Evite que las herramientas de inserción reboten en la pieza de trabajo y se atasquen. La herramienta de inserción en movimiento tiende a atascarse en las esquinas, los bordes afilados o cuando rebota. Esto provoca una pé - Metabo W 24-230 MVT non-locking | Operating Instructions - Page 24
es ESPAÑOL Nunca utilice discos de tronzar para desbastar. Los discos de tronzar no deben someterse a presión lateral. La pieza de trabajo debe apoyarse firmemente y estar asegurada para evitar que se deslice, p.ej., con ayuda de dispositivos de sujeción. Las piezas de trabajo grandes deben tener - Metabo W 24-230 MVT non-locking | Operating Instructions - Page 25
11 Tuerca tensora * (CANADA) 12 Llave de dos agujeros* (CANADA) 13 Cierre bajo tensión (para el ajuste de la cubierta protectora sin herramientas) 14 Tornillo (para ajustar la fuerza de tensión del cierre bajo tensión) * según la versión/no incluido en el volumen de suministro 5. Puesta en marcha - Metabo W 24-230 MVT non-locking | Operating Instructions - Page 26
es ESPAÑOL 7. Manejo 7.1 Conexión y desconexión Sostenga siempre la herramienta con ambas manos. Conecte en primer lugar la herramienta de inserción y, a continuación acérquela a la pieza de trabajo. Evite que la herramienta aspire polvo y virutas en exceso. Antes de conectar y desconectar la - Metabo W 24-230 MVT non-locking | Operating Instructions - Page 27
M Disco de lijado de fibra (utilícese siempre con la protección para las manos montada). N Cepillo de alambre de acero (utilícese siempre con la protección para las manos montada) O Soporte de separación de metal Programa completo de accesorios disponible en www.metabo.com o en el catálogo principal - Metabo W 24-230 MVT non-locking | Operating Instructions - Page 28
Metabowerke GmbH, 72622 Nürtingen, Germany www.metabo.com 170 27 1820 - 0113
-
 1
1 -
 2
2 -
 3
3 -
 4
4 -
 5
5 -
 6
6 -
 7
7 -
8
-
9
-
10
-
11
-
12
-
13
-
14
-
15
-
16
-
17
-
18
-
19
-
20
-
21
-
22
-
23
-
24
-
25
-
26
-
27
-
28
 |
 |

www.metabo.com
Made in Germany
W 22-180
W 22-230
W 24-180
W 24-230
W 26-180
W 26-230
en
Operating Instructions
5
fr
Mode d'emploi
12
es
Instrucciones de manejo
20