Miele KWT1603SF Product Manual
Miele KWT1603SF Manual
 |
View all Miele KWT1603SF manuals
Add to My Manuals
Save this manual to your list of manuals |
Miele KWT1603SF manual content summary:
- Miele KWT1603SF | Product Manual - Page 1
Operating and Installation Instructions Wine Storage Unit To prevent accidents and appliance damage read these instructions before installation or use. en - US, CA M.-Nr. 09 920 900 - Miele KWT1603SF | Product Manual - Page 2
Contents IMPORTANT SAFETY INSTRUCTIONS 4 Guide to the wine storage unit 7 Before use 9 Before using for the first time 9 Turning the appliance On/Off 28 Changing the light bulbs 28 Frequently asked questions 30 Causes of noises 32 After sales service 33 Caring for the environment 35 2 - Miele KWT1603SF | Product Manual - Page 3
Contents Installation 36 Climate Range 36 Installation site 37 Base 37 Furniture/fixtures 37 Installation options 38 Adjusting the door opening angle (optional accessory 39 Dimensions 40 Installation 43 Before you begin 43 RemoteVision module installation 45 Home Security System (HSS 47 - Miele KWT1603SF | Product Manual - Page 4
instructions before installation and use to prevent accidents and machine damage. This appliance is intended for residential use only. Use only as described in this Operating manual qualified electrician if in doubt. ~ Before installation or service, disconnect the power supply to the work area by - Miele KWT1603SF | Product Manual - Page 5
. ~ This appliance must be installed and connected in compliance with the installation instructions. ~ Installation and repair work should be performed by a Miele authorized service technician. Work by unqualified persons could be dangerous and may void the warranty. ~ Do not operate any appliance - Miele KWT1603SF | Product Manual - Page 6
and imprisonment under provisions of environmental legislation. Make sure the CFC refrigerant is removed and disposed of by a qualified technician. SAVE THESE INSTRUCTIONS Disposal of your old appliance ~ Before disposing of an old appliance, first make the door latch or lock unusable. ~ Take off - Miele KWT1603SF | Product Manual - Page 7
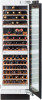
Guide to the wine storage unit a Circulation fans / Active charcoal filter b Wooden racks c Insulation panel to separate the upper and middle temperature zones d Bottle display rack e - Miele KWT1603SF | Product Manual - Page 8
Guide to the wine storage unit Control panel a Access button b Upper temperature zone c Middle temperature zone d Lower temperature zone e Temperature display: Allows you to set the - Miele KWT1603SF | Product Manual - Page 9
Before use Before using for the first time The stainless steel surface of the appliance is protected with a plastic film, which protects it during shipping. Do not remove this protective film until the appliance has been completely installed. After removing the protective film clean the exterior - Miele KWT1603SF | Product Manual - Page 10
Settings Using the settings This appliance is operated with the use of touch keys activated by a finger. - An available button will appear white. ^ To turn the display lighting on or off - A selected button will appear yellow.. when the door is closed, touch the "display light" sensor button. - Miele KWT1603SF | Product Manual - Page 11
settings In the custom settings mode you can select and change functions. The function possibilities are described in the respective chapters of this manual. ^ To leave the settings menu, touch the access button "p" so it turns white. The last settings entered are stored. The sensor buttons for - Miele KWT1603SF | Product Manual - Page 12
Settings Turning the button sound On/Off If you prefer the buttons to be silent when touched, the button sound can be turned off. ^ While holding down the X button, press the access button "p" once. Keep holding the X button down until the following appears in the display (approx. 5 seconds). ^ - Miele KWT1603SF | Product Manual - Page 13
Turning off for longer periods of time If the appliance is not going to be used for an extended time (for example, during a vacation) some precautions should be taken. ^ Turn the appliance off at the main switch ^ Unplug the appliance ^ Clean the interior ^ Leave the doors open to prevent odors - Miele KWT1603SF | Product Manual - Page 14
Alarm The appliance is equipped with an alarm system, to ensure that the temperature does not rise unnoticed because of energy loss or an open door. The alarm system is always operational, it does not need to be turned on. Temperature alarm If the temperature becomes too warm, an alarm sounds, the - Miele KWT1603SF | Product Manual - Page 15
Optimum temperature and air quality Wine will continue to mature depending on the surrounding conditions. The length of time which wine can be kept in good condition will therefore depend not only on the temperature but also on the air quality. The wine storage unit provides a constant temperature, - Miele KWT1603SF | Product Manual - Page 16
Optimum temperature and air quality Temperatures can be independently set in all three zones. The unit comes factory pre-set for white wine, red wine, and wine storage. The temperatures can be changed as desired. Once you have adjusted the temperature, check the temperature after a few hours. It - Miele KWT1603SF | Product Manual - Page 17
Optimum temperature and air quality Insulation panels for thermal separation The unit has two fixed insulation panels, to divide the interior into the three different temperature zones. This allows you to store three different types of wine, such as red wine, white wine and champagne. The correct - Miele KWT1603SF | Product Manual - Page 18
Optimum temperature and air quality Temperature unit (Fahrenheit/Celsius) The temperature can be displayed in degrees Fahrenheit (°F) or Celsius (°C). ^ While holding down the X button, press the access button "p" once. Keep holding the X button down until the following appears in the display ( - Miele KWT1603SF | Product Manual - Page 19
Optimum temperature and air quality Humidity Setting the humidity level In a conventional refrigerator, the humidity levels are too low for storing wines. High humidity levels (60 - 70 %) are very important for the storage of wine, so that the corks remain moist. Under low humidity, the corks dry - Miele KWT1603SF | Product Manual - Page 20
Optimum temperature and air quality ^ While holding down the X button, press the access button "p" once. Keep holding the X button down until the following appears in the display (approx. 5 seconds). ^ Tap the X button until 0 appears in the display. ^ Touch the access button "p" to confirm. ^ By - Miele KWT1603SF | Product Manual - Page 21
Storing wine Storage tips - Always unpack bottles - do not store wine in crates or boxes. - Always lay bottles on their side for storage. This keeps the corks moist from the inside, preventing air from entering. - Store similar wine varieties beside each other on the same shelf, to avoid restacking - Miele KWT1603SF | Product Manual - Page 22
Lay the wine bottles in the display rack, so that they touch the wooden guide-rail a. ^ To remove the display rack pull it up and out, then attach the wooden racks. Only the bottom-most level in each temperature zone can support a stack of bottles (remove the wooden rack). Maximum capacity The unit - Miele KWT1603SF | Product Manual - Page 23
Storing wine Display lighting The display lighting can be turned on if you wish the bottles to be lit up even when the door is closed. Duration of the display lighting The display lighting is factory pre-set to 30 minutes. Turning on ^ Touch the access button "p" so it turns yellow. ^ To change - Miele KWT1603SF | Product Manual - Page 24
Defrosting During normal operation, condensate and frost can form on the rear wall of the refrigerator and drawers. You do not need to remove this build-up, it will defrost and evaporate automatically with the heat generated by the appliance. 24 - Miele KWT1603SF | Product Manual - Page 25
. The data plate located inside the appliance must not be removed. It contains information which is required in the event of a service call. To better maintain your appliance avoid the following: - cleaners containing soda, ammonia, thinners, or chlorides - solvent based cleaning agents - stainless - Miele KWT1603SF | Product Manual - Page 26
Cleaning and care The stainless steel doors have a special coating that is soil-resistant. Do not wipe these with a stainless steel conditioner, it will leave visible streaks. Use a stainsteel conditioner to clean and maintain the stainless steel surfaces of the appliance. It contains material- - Miele KWT1603SF | Product Manual - Page 27
Cleaning and care Additional instructions for stainless steel appliances: - Appliance doors The appliance doors are finished with a high-quality surface coating. It protects them from soiling and makes cleaning easier. - Miele KWT1603SF | Product Manual - Page 28
Cleaning and care Active charcoal filters Changing the light bulbs Replacement filters are available from Miele. Do not remove the light covers for the display lighting. Should the lighting covers be damaged or need to be removed due to damage, do not look directly or with an optical instrument - Miele KWT1603SF | Product Manual - Page 29
Never touch a halogen bulb with bare fingers. When inserting a glass halogen bulb, always hold with a soft cloth. Cleaning and care ^ Pull the defective light bulb from the socket. ^ Place the new bulb in the socket. Halogen bulb type: 5 W/12 V/socket G 4. ^ Put the light cover back on and turn - Miele KWT1603SF | Product Manual - Page 30
Frequently asked questions With the aid of the following guide minor problems can be corrected without a service call. Repairs should only be carried out by a qualified and trained person in strict accordance with local and national safety regulations. Unauthorized repairs could cause - Miele KWT1603SF | Product Manual - Page 31
the time set. See "Display lighting". If the display lighting still does not turn on after 15 minutes with the door closed, contact Miele Technical Service. A white coating has formed around the wine corks. The corks are made of a material which The white coating can be removed with has caused - Miele KWT1603SF | Product Manual - Page 32
Causes of noises Normal noises What causes them? Brrrrr... A humming noise is made by the motor (compressor). This noise can get louder for brief periods when the motor switches on. Blub, blub.... A gurgling noise can be heard when the coolant circulates through the pipes. Click.... Clicking - Miele KWT1603SF | Product Manual - Page 33
quote the model and serial number of your appliance given on the data plate inside the appliance. MieleCare (USA only) MieleCare, our Extended Service Contract program; gives you the assurance of knowing that your appliance investment is covered by 5 years of worry-free ownership. MieleCare is the - Miele KWT1603SF | Product Manual - Page 34
Installation Instructions Information is subject to change. Please refer to our website to obtain the most current product specification, technical & warranty information. To prevent accidents and machine damage read these instructions before installation or use. - Miele KWT1603SF | Product Manual - Page 35
Caring for the environment Disposing of the packaging materials The packaging is designed to protect the appliance from damage during transportation. The packaging materials used are selected from materials which are environmentally friendly for disposal and should be recycled. Ensure that any - Miele KWT1603SF | Product Manual - Page 36
guaranteed. Have the appliance installed by a qualified technician, according to the enclosed installation instructions. ,WARNING This appliance is top-heavy and must be secured to prevent the possibility deteriorating and going off. Empty weight of your machine: KWT 16X3 SF 375 lbs (170 kg) 36 - Miele KWT1603SF | Product Manual - Page 37
to rise, resulting in damage. Base A fully loaded appliance is very heavy. The load-bearing capacity of your floor must meet the following requirements: KWT 16x3 SF 741 lbs (336 kg) To ensure that the appliance is installed securely and functions properly, the base must be flat, level and made of - Miele KWT1603SF | Product Manual - Page 38
Installation Installation niche To ensure safe, trouble-free installation and the best possible cosmetic result, check to will work with your appliance. For instructions on how to attach the appliances and install the heating mat, please refer to the instructions included with the "Merging Kit", - Miele KWT1603SF | Product Manual - Page 39
Installation Installation with partition using the "Merging Kit" The minimum thickness of the partition is 5/8" (16 mm). Side panels If one side of the appliance is visible, a side panel must be used. The side panel must be firmly secured to the wall, the floor and the overhead furniture/fixtures - Miele KWT1603SF | Product Manual - Page 40
Dimensions Door dimensions (open min. 90°) A KWT 16X3 SF 26 5/8" (677 mm) 40 - Miele KWT1603SF | Product Manual - Page 41
Niche dimensions Dimensions KWT 16x3 SF A 24 ½" (622.2 mm) B 24" (610 mm) 41 - Miele KWT1603SF | Product Manual - Page 42
Dimensions Power supply 1. Power supply A KWT 16X3 SF 12" (305 mm) ,Power bars or extension cords are not safe (risk of fire). Do not use them to connect the appliance to the power supply. 42 - Miele KWT1603SF | Product Manual - Page 43
plugs/screws depending on the type of wall. - several mounting brackets, if required. These installation instructions are intended for use by qualified installers. In addition to these instructions, the appliance must be installed in accordance with all local codes. In the absence of a local - Miele KWT1603SF | Product Manual - Page 44
Installation Aligning the housing unit Check the installation niche To ensure a safe, trouble-free installation and the best possible cosmetic result, check to be sure that the installation space complies with the installation requirements. The housing unit must - Miele KWT1603SF | Product Manual - Page 45
RemoteVision module installation (optional accessory) Always disconnect the appliance from the power supply when performing installation, maintenance or service work. Install the RemoteVision module before placing the appliance in its installation niche. Once connected the RemoteVision module will - Miele KWT1603SF | Product Manual - Page 46
not come on, installation of the module was unsuccessful. In that case, repeat the process. If that does not correct the problem, contact Miele. ^ Pull the antenna d straight out. ^ Guide the cover b over the antenna d and screw on the cover. ^ Angle the antenna d so that it faces to the right or - Miele KWT1603SF | Product Manual - Page 47
the Home Security System on the electronic board: Always disconnect the appliance from the power supply before performing installation, maintenance or service work. NC: normally closed Com: common NO: normally open Switching capacity: 120 V/250mA 30 V/1A ^ Continue with the appliance installation - Miele KWT1603SF | Product Manual - Page 48
Installation Preparing the installation niche ,Keep the appliance door closed until it is securely fastened in the niche. Tipping hazard. Anti-tip-brackets The anti-tip brackets a keep the appliance safely secured in the installation niche b and prevent it from tipping. Because of the size and - Miele KWT1603SF | Product Manual - Page 49
Installation In a cabinet with a back wall ^ Position the anti-tip brackets on the left and right in the installation niche so that there is no more than 3/8" (10 mm) of space between the brackets and the side walls. ^ Mark the drill holes in the anti-tip brackets on the back wall and on the - Miele KWT1603SF | Product Manual - Page 50
Installation In a cabinet without a back wall Securing an alternative anti-tip device If the anti-tip brackets cannot be attached securely, an alternative anti-tip device can be used. Ensure that there is no "give" between the appliance and the anti-tip device. If possible, always screw the wooden - Miele KWT1603SF | Product Manual - Page 51
the appliance into the installation niche If a side-by-side installation is desired, connect the two appliances together. See the Installation Manual included with the "Merging Kit". ^ Unscrew the plinth. ^ To protect the corners of the installation space, attach edge protectors where needed - Miele KWT1603SF | Product Manual - Page 52
Installation ^ Plug the appliance into the power outlet a. The plug of the appliance should be easily accessible after installation. If the plug is not accessible after the appliance has been installed, disconnection from the power supply should be completed via the circuit breaker. Aligning the - Miele KWT1603SF | Product Manual - Page 53
Installation ^ Unscrew the height-adjustable feet until the mark on the base has reached the indicated guide dimension 1 1/4" (32 mm). The guide dimension of 1 1/4" (32 mm) is related to a niche height of 84" (2134 mm). Attaching the appliance to the installation niche Important! The height- - Miele KWT1603SF | Product Manual - Page 54
Installation Attaching the toe-kick cover The maximum height of the toe-kick cover is 4" (102 mm) from the top of the floor. Do not cover ventilation slits in the plinth. Risk of damage to the appliance. ^ If required, cut the toe-kick cover to the required length and height. ^ Remove the foil - Miele KWT1603SF | Product Manual - Page 55
Installation Mounting the air separator The air separator keeps the supply and exhaust air separate. This prevents warm exhaust air from flowing into the machine, optimizing the energy performance of the unit. ^ Position the air separator in the center of the appliance door. ^ If necessary, - Miele KWT1603SF | Product Manual - Page 56
adapter. - Do not use an extension cord. Failure to follow these instructions can result in death, fire, or electrical shock. Improper connection of the grounded, have the appliance checked by a qualified electrician or service technician. Installation, repairs and other work by unqualified persons - Miele KWT1603SF | Product Manual - Page 57
a fault occurs, Miele's client service center will be notified and contact problem. For information on set-up and installation of the RemoteVision module see the "Installation" section of this manual. Be sure your wireless system meets the following requirements - A wireless router that supports - Miele KWT1603SF | Product Manual - Page 58
to the network when ; # appears in the display. If ; # does not appear, refer to the "Network options" section of the XKM 2000 Installation Instruction manual. ^ Press and hold the access button "p" for 2 seconds to confirm the change. ^ To return to the main menu, tap the X button until a solid - Miele KWT1603SF | Product Manual - Page 59
RemoteVision (optional accessory) MasterCool control panel options for RemoteVision Status indicators Description of function Flashing ; ~ Module booting phase Flashing ; ‡ Not connected to network Flashing ; | Connection to network established, no IP address assigned Solid ; # Connected to network - Miele KWT1603SF | Product Manual - Page 60
60 - Miele KWT1603SF | Product Manual - Page 61
61 - Miele KWT1603SF | Product Manual - Page 62
62 - Miele KWT1603SF | Product Manual - Page 63
63 - Miele KWT1603SF | Product Manual - Page 64
KWT 1603 SF KWT 1613 SF en - US, CA M.-Nr. 09 920 900 / 00
-
 1
1 -
 2
2 -
 3
3 -
 4
4 -
 5
5 -
 6
6 -
 7
7 -
8
-
9
-
10
-
11
-
12
-
13
-
14
-
15
-
16
-
17
-
18
-
19
-
20
-
21
-
22
-
23
-
24
-
25
-
26
-
27
-
28
-
29
-
30
-
31
-
32
-
33
-
34
-
35
-
36
-
37
-
38
-
39
-
40
-
41
-
42
-
43
-
44
-
45
-
46
-
47
-
48
-
49
-
50
-
51
-
52
-
53
-
54
-
55
-
56
-
57
-
58
-
59
-
60
-
61
-
62
-
63
-
64
 |
 |

Operating and Installation Instructions
Wine Storage Unit
To prevent accidents and appliance damage read these instructions
before
installation or use.
M.-Nr. 09 920 900
en - US, CA