NEC X552S Users Manual
NEC X552S Manual
 |
View all NEC X552S manuals
Add to My Manuals
Save this manual to your list of manuals |
NEC X552S manual content summary:
- NEC X552S | Users Manual - Page 1
User's Manual MultiSync X401S MultiSync X462S MultiSync X552S - NEC X552S | Users Manual - Page 2
-232C Remote Control English-32 Controlling the LCD monitor via LAN Control English-34 Connecting to a Network ...English-34 Network Setting by Using an HTTP Browser English-34 Features ...English-38 Troubleshooting...English-39 Specifications - X401S ...English-40 Specifications - X462S ...English - NEC X552S | Users Manual - Page 3
Party: NEC Display Solutions of America, Inc. Address: 500 Park Boulevard, Suite 1100 Itasca, Illinois 60143 Tel. No.: (630) 467-3000 Type of Product: Display Monitor Equipment Classification: Class B Peripheral Model: MultiSync X401S (X401S) MultiSync X462S (X462S) MultiSync X552S - NEC X552S | Users Manual - Page 4
SERVICING TO QUALIFIED SERVICE user that important literature concerning the operation and maintenance of this unit has been included. Therefore, it should be read carefully in order to avoid any problems. CAUTION: Please use the power cord provided with this monitor the MultiSync monitor with - NEC X552S | Users Manual - Page 5
Code (NEC), in particular Section 820.93, Grounding of Outer Conductive Shield of a Coaxial Cable. • The screen of the coaxial cable is intended to be connected to earth in the building installation. Immediately unplug your monitor from the wall outlet and refer servicing to qualified service - NEC X552S | Users Manual - Page 6
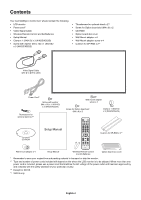
Contents Your new MultiSync monitor box* should contain the following: • LCD monitor • Power cord*1 • Video Signal Cable • Wireless Remote Control and AA Batteries • Setup Manual • Clamp x 1 (X401S)/ x 3 (X462S/X552S) • Screw with washer (M4 x 10) x 1 (X401S)/ x 3 (X462S/X552S) • Thumbscrew for - NEC X552S | Users Manual - Page 7
to insure that it is strong enough to support the weight of the unit so that the unit will be safe from harm. • Refer to the instructions included with the mounting equipment for detailed information. • Make sure there is no gap between the monitor and the bracket. Using an optional wall mount - NEC X552S | Users Manual - Page 8
monitor when attaching accessories. VESA Mounting Interface 300 mm LED Indicator Mounting location • The ceiling and wall must be strong enough to support the monitor other problems that may occur with the mounting apparatus. If a problem is detected, please refer to qualified personnel for service. - NEC X552S | Users Manual - Page 9
When using the display with the optional table top stand fasten the LCD to a wall using a cord or chain that can support the weight of the monitor in order to prevent the monitor from falling. Fasten the cord or chain to the monitor using the provided clamps and screws. For the X401S, the clamps and - NEC X552S | Users Manual - Page 10
attach the wires with washers* to the speakers (A, C). 5. Use the step screws* to attach the speakers to the monitor (B, D, E). To manage excess speaker wire: Coil the speaker wire and wrap it using clamps* (G). *: included in more information, please refer to the SP-RM2 Quick Start Guide. English-8 - NEC X552S | Users Manual - Page 11
the monitor. *: included in speaker. A. Flat head screw B. Pan head screw C. Mounting bracket D. Holder E. Pad F. Screw hole NOTE: NOTE: Do not use devices other than specified. Use the SP-RM1 for the X462S and the X552S. For more information, please refer to the SP-RM1 Quick Start Guide. English - NEC X552S | Users Manual - Page 12
sensor and Power Indicator Receives the signal from the remote control (when using the wireless remote control). See also page 13. Glows green when the LCD monitor is in active mode*. Glows red when the LCD is in POWER OFF mode. Glows amber when the monitor is in Power Save Mode. Green and Amber - NEC X552S | Users Manual - Page 13
connector does not support analog input. OUT port (RJ-45) LAN connection. See page 34. ¾ RS-232C (D-Sub 9 pin) IN connector: Connect RS-232C input from external equipment such as a PC in order to control RS-232C functions. OUT connector: Connect RS-232C output. To connect multiple MultiSync monitors - NEC X552S | Users Manual - Page 14
ON. ² KEYPAD Press buttons to set and change passwords, change channel and set REMOTE ID. ¶ ENT button*2 º DISPLAY button Turns on/off the information OSD. Increases or decreases audio output level. ƻ CH UP/DOWN button*2 Ƽ GUIDE button*2 ƽ MUTE button Turns on/off mute function. ƾ STILL button - NEC X552S | Users Manual - Page 15
on which option board you use. Refer to the option board's manual for further information. Operating Range for the Remote Control Point the top of the remote control toward the LCD monitor's remote sensor during button operation. Use the remote control within a distance of about 7 m (23 ft.) from - NEC X552S | Users Manual - Page 16
LCD monitor so as not to scratch the panel. 2. Install the remote control batteries The remote control is powered by two 1.5V AA batteries. To install or replace batteries: NEC equipment user manual for further information. NOTE: Do not connect/disconnect cables when turning on the monitor or - NEC X552S | Users Manual - Page 17
English 5. Switch on the power of all the attached external equipment When connected with a computer, switch on the power of the computer first. 6. Operate the attached external equipment Display the signal from the desired input source. 7. Adjust the sound Make volume adjustments when required. 8. - NEC X552S | Users Manual - Page 18
user manual included with each separate piece of equipment. Wiring Diagram Solid lines = video signal Dotted lines = audio signal Stereo Amplifier DVD player with HDMI out DVD player Second monitor DVI MODE: DVI-PC RAW/EXPAND*1 Input remote control DVI HDMI DVD/HD VIDEO S-VIDEO VIDEO DVD - NEC X552S | Users Manual - Page 19
clock over 162MHz may not display an image correctly. Your LCD monitor displays proper image by adjusting the factory preset timing signal manual for more information about your computer's video output requirements and any special identification or configuration your monitor's image and monitor - NEC X552S | Users Manual - Page 20
Basic Operation Power ON and OFF Modes The LCD monitor power indicator will turn green while powered on and will turn red or amber while powered off. NOTE: The Main Power Switch must be in the ON position in order to power up the monitor using the remote control or the Power Button on the - NEC X552S | Users Manual - Page 21
Blinking (See Troubleshooting page 39) *1 If "OFF" is selected in POWER INDICATOR (page 25), the LED will not light when the LCD monitor is in NOTE: Depending on the PC and video card used, this function may not operate. NOTE: It takes about 10 minutes for the monitor to go into power management - NEC X552S | Users Manual - Page 22
the DISPLAY button on the remote to bring up the Information OSD. ᕡ ID number assigned to current monitor*1 ᕢ ID number assigned monitor to be controlled via CINEMA AMBIENT1 AMBIENT2 HIGHBRIGHT AMBIENT Mode The backlight of the LCD screen can be set to increase or decrease depending on the - NEC X552S | Users Manual - Page 23
THE ENVIRONMENT. CARBON FOOTPRINT 86.0 % Goto Adjustment Return Close Key Guide Adjustment Settings Press UP or DOWN button to select sub-menu. Press select the function or setting to be adjusted. Press MENU or EXIT. Remote Control Press UP or DOWN button to select. Press INPUT button to - NEC X552S | Users Manual - Page 24
correction is handled by the LCD panel. NATIVE* (except sRGB setting) 2.2 Typical display gamma for use with a PC. 2.4 Good for video (DVD . DICOM GSDF curve simulated for LCD type. PROGRAMMABLE A programmable gamma curve can be loaded using NEC optional software. MOVIE SETTINGS NOISE - NEC X552S | Users Manual - Page 25
only V RESOLUTION Adjusts the vertical size of the image. - VGA input only INPUT RESOLUTION VGA input only If there is a problem with signal detection, this function forces the monitor to display the signal at the desired resolution. After selection, execute "AUTO SETUP" if required. If no - NEC X552S | Users Manual - Page 26
the following settings within the SCHEDULE menu back to factory setting: OFF TIMER, SCHEDULE SETTINGS and SCHEDULE LIST. PIP KEEP PIP MODE Allows the monitor to remain in "PIP" and "TEXT TICKER" mode after powering off. When Power is returned, PIP and TEXT TICKER appear without having to enter - NEC X552S | Users Manual - Page 27
"power on" mode. "POWER ON DELAY" can be set between 0 and 50 seconds. Turns ON or OFF the LED located at the front of the monitor. If "OFF" is selected, LED will not light when the LCD monitor is in active mode. 1 NORMAL 1 1 1 NO NO COMMON 0 Sec. ON Selects the control interface, RS-232C or - NEC X552S | Users Manual - Page 28
and TILE - MATRIX MEM. DISPLAY PROTECTION POWER SAVE Sets how long the monitor waits to go into power save mode after the signal is lost. ON expanded and moves in 4 directions (UP, DOWN, RIGHT, LEFT) at user determined intervals. You can set interval time and zooming ratio. This function is - NEC X552S | Users Manual - Page 29
monitor searches for a video signal from the other video input port. If the video signal is present in the other port, then the monitor switches the video source input port equipment which is connected to the DVI input. Select "DVI-PC" when PC or other computer equipment is connected. Select "DVI-HD" - NEC X552S | Users Manual - Page 30
off. Note: Warning message does not appear when monitor power is turned off by OFF TIMER setting or SCHEDULE setting. Monitor power is automatically "OFF" when connected PC is OFF or the monitor is in power save mode. When ON is selected, connected PC start-up. When ON is selected, it performs - NEC X552S | Users Manual - Page 31
not in use, please turn off the monitor by remote control, or use Power Management or use Schedule Functions. 3. Lower environmental temperatures prolong the lifespan of the monitor. When Protective surface (glass, acrylic) is installed over the LCD surface, the LCD surface is located in an enclosed - NEC X552S | Users Manual - Page 32
individual MultiSync monitors. For example: if there are many monitors being used in the same area, a remote control in normal mode would send signals to every monitor at the same time (see Figure 1). Using the remote in REMOTE CONTROL ID mode will only operate one specific monitor within the group - NEC X552S | Users Manual - Page 33
simultaneously, select "ALL" as the "Target ID." 4. Use the wireless remote controller to control the "SECONDARY" monitor while aiming at the "PRIMARY" monitor. The "MENU OSD" will appear on the selected target monitor. NOTE: If the "ID No." mode select OSD is showing, press the "DISPLAY" button - NEC X552S | Users Manual - Page 34
Connection LCD Monitor + PC MultiSync MultiSync PC (Out monitor or multiple monitors that are daisy-chained together please use the control command. Instructions for the control command can be found on the CD included with the display. The file is called "External_control.pdf". Multiple monitors - NEC X552S | Users Manual - Page 35
English 2) Control command diagram For other commands, please see "External_Control.pdf" file on the CD-ROM. Function (Monitor ID = 1) Power ON Power OFF Input Source Select DisplayPort Input 76 0d 01 30 41 30 45 30 41 02 30 30 36 30 30 30 30 46 03 04 0d 01 30 41 30 45 30 41 02 30 30 36 30 30 30 - NEC X552S | Users Manual - Page 36
be slowed down or operation may not be accepted depending the settings of your network. Should this happen, consult your network administrator. The LCD monitor may not respond if its buttons are repeatedly pressed in rapid intervals. Should this happen, wait a moment and repeat. If you still can - NEC X552S | Users Manual - Page 37
the display via that host name using a compatible browser. Example 1: When the host name of the monitor has been set to "pd.nec.co.jp", access is gained to the network setting by specifying http://pd.nec.co.jp/index.html for the address or the entry column of the URL. Example 2: When - NEC X552S | Users Manual - Page 38
error message notification will be sent when an error occurs in the monitor. Alert Mail Checking [ENABLE] will turn on the Alert Mail feature. used in the authentication of the e-mail. User Name This sets the user name for logging into the authentication server when .pdf" on the CD-ROM. English-36 - NEC X552S | Users Manual - Page 39
-FAN CONTROL) or please contact your supplier. Please check "No picture" in "Troubleshooting". Please contact your supplier. Sample: The following examples are content of Alert Mail that informs the temperature anomaly of monitor. Sample: The following examples are content of test mail by browser - NEC X552S | Users Manual - Page 40
, significantly expanding image size. VESA Standard (FDMIv1) Mounting Interface: Allows you to connect your LCD monitor to any VESA standard (FDMIv1) third party mounting arm or bracket. NEC recommends using mounting interface that comply with TÜV-GS and/or UL1678 standard in North America. DVI - NEC X552S | Users Manual - Page 41
LED on monitor is blinking • A certain failure might have occurred, please contact your nearest authorized NEC DISPLAY SOLUTIONS service facility. • If the monitor that a supported mode has been selected on the display card or system being used. (Please consult display card or system manual to change - NEC X552S | Users Manual - Page 42
LCD °F (Face up position/Face down position/with Slot 2 type PC) Humidity: 20 - 80% (without condensation) Altitude: 0 / 90% - 3.5% x (Temp - 40°C) regarding over 40°C Dimension 925.1 (W) x 537.1 (H) x 55.6 (D) mm / 36.4 Accessories Setup manual, Power Cord, Video Signal cable, Remote Control, AA - NEC X552S | Users Manual - Page 43
X462S Product Specifications LCD Module 46 Dimension 2 type PC) Humidity: 46.1 (D) mm / 41.7 (W) x 24.1 (H) x 1.8 (D) inches (without handle and stand holder) 20.7 kg (45.6 lbs) 300 mm x 300 mm (M6, 4 Holes) VESA DPM VESA DDC2B, DDC/CI, DisplayPort Setup manual, Power Cord, Video Signal cable, Remote - NEC X552S | Users Manual - Page 44
LCD Face up position/Face down position/with Slot 2 type PC) Humidity: 20 - 80% (without condensation) Altitude: Dimension 1254.5 (W) x 725.3 (H) x 65.5 (D) mm / 49.4 (W) x 28.6 (H) x 2.6 (D) inches (with handle) 1254.5 (W) x 725.3 (H) x 46 Setup manual, Power Cord, Video Signal cable, Remote Control - NEC X552S | Users Manual - Page 45
Mini D-SUB 15P 1 5 6 10 11 15 2) RS-232C input/output Pin No 1 2 3 4 5 6 7 8 9 Name NC RXD TXD NC GND NC NC NC NC D-SUB 9P 1 6 This LCD monitor uses RXD, TXD and GND lines for RS-232C control. 5 9 English-43 - NEC X552S | Users Manual - Page 46
activated. The monitor enters a single Energy Saving mode. Mode Power consumption Normal Operation*1 Approx. 110 W (X401S) Approx. 110 W (X462S) Approx. follow any agreements made between yourself and NEC. The mark on electrical and electronic products only applies to the current European Union
-
 1
1 -
 2
2 -
 3
3 -
 4
4 -
 5
5 -
 6
6 -
 7
7 -
8
-
9
-
10
-
11
-
12
-
13
-
14
-
15
-
16
-
17
-
18
-
19
-
20
-
21
-
22
-
23
-
24
-
25
-
26
-
27
-
28
-
29
-
30
-
31
-
32
-
33
-
34
-
35
-
36
-
37
-
38
-
39
-
40
-
41
-
42
-
43
-
44
-
45
-
46
 |
 |

User’s Manual
MultiSync X401S
MultiSync X462S
MultiSync X552S