Netgear GS108X Installation Guide
Netgear GS108X Manual
 |
View all Netgear GS108X manuals
Add to My Manuals
Save this manual to your list of manuals |
Netgear GS108X manual content summary:
- Netgear GS108X | Installation Guide - Page 1
Switch with 1 Dedicated 10G SFP+ Port (Model GS108X) • Power adapter (power plug varies by region) • Wall-mount installation kit • Rubber feet • Installation guide 1. Register the switch 1. From a computer or mobile device that is connected to the Internet, visit my.netgear.com. 2. Log in to your - Netgear GS108X | Installation Guide - Page 2
to 95% relative humidity, noncondensing 10,000 ft. (3,000 m) FCC class B device, EU-RoHS CB, CE class B, VCCI class B, C-Tick/RCM class B Supported Modules Model Description 1G Fiber SFP Transceivers AGM731F NETGEAR 1000BASE-SX SFP LC Transceiver (multimode, 1000m OM4, 550m OM3 50/125µm, 275m
-
 1
1 -
 2
2
 |
 |

Installation Guide
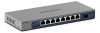
8-port Gigabit Ethernet Unmanaged Switch
with 1 Dedicated 10G SFP+ Port
Model GS108X
Package contents
•
NETGEAR 8-port Gigabit Ethernet Unmanaged Switch with 1 Dedicated
10G SFP+ Port (Model GS108X)
•
Power adapter (power plug varies by region)
•
Wall-mount installation kit
•
Rubber feet
•
Installation guide
1. Register the switch
1.
From a computer or mobile device that is connected to the Internet, visit
my.netgear.com.
2.
Log in to your NETGEAR account.
NOTE:
If you don’t have a free NETGEAR account, you can create one.
The Your Registered Products page displays.
3.
Click the
REGISTER NEW PRODUCT
button.
4.
In the
SERIAL NUMBER
field, type the serial number of your switch.
The serial number is 13 digits long. It is printed on the switch label.
5.
From the
PURCHASE DATE
menus, select the date that you purchased
the switch.
6.
Click the
REGISTER
button.
Your switch is registered to your NETGEAR account.
A confirmation email is sent to your NETGEAR account email address.
2. Connect the switch
Sample GS108X connections
NOTE:
We recommend that you use a Category 6a (Cat 6a) cable or
higher-rated cable for 10-Gigabit Ethernet connections, and a Category
5e (Cat 5e) cable or higher-rated cable for other Gigabit Ethernet
connections.
WARNING:
Before connecting this switch to outdoor cables or
devices, see https://kb.netgear.com/000057103 for safety and warranty
information.
This switch is designed for indoor use only. If you want to connect it to a
device located outdoors, the outdoor device must be properly grounded
and surge protected, and you must install an Ethernet surge protector
inline between the switch and the outdoor device. Failure to do so can
damage the switch.
October 2023
Power LED
On
Off
Gigabit Ethernet port LEDs for ports 1 through 8
1G link. Port LED lights green. Blinking LED indicates traffic activity.
100M/10M
link LED lights yellow. Blinking LED indicates traffic activity.
No link. Port LED off.
SFP
+
LED for port 9
10G link (LED lit green).
1G link (LED lit yellow).
No link. Port LED off.
10G
10G
Internet
XS508M with
10G Fiber Link
Storage
Servers
Computers
WAX610PA
GS108X
LED specifications
3. Mount the switch on a wall (optional)
We recommend that you use the wall-mount screws that are included. The
screws are 0.12 in. (3 mm) in diameter, 0.78 in. (20 mm) in length.
1.
Locate the two mounting slots on the bottom panel of the switch.
2.
Mark and drill two holes 4.25 in. (108 mm) apart, center-to-center in the
wall where you want to mount the switch.
Use a 3/16” (4.7mm) drill bit.
The switch must be mounted horizontally with the ports on the bottom.
3.
Insert the supplied anchors into the wall and tighten the screws with a
No. 2 Phillips screwdriver.
Leave about 0.15 in. (4 mm) of each screw protruding from the wall to fit
into the holes on the bottom panel.
4.
Position the switch so that the mount holes are directly over the screws,
and slide the switch down until the upper edge of each mount hole sits
directly on the screw, attaching the switch securely to the wall.