Netgear R7000P Installation Guide
Netgear R7000P Manual
 |
View all Netgear R7000P manuals
Add to My Manuals
Save this manual to your list of manuals |
Netgear R7000P manual content summary:
- Netgear R7000P | Installation Guide - Page 1
Quick Start Nighthawk AC2300 Smart WiFi Router Model R7000P Package Contents Router Antennas (3) NETGEAR installation assistant does not display, visit www.routerlogin.net. If a login window displays, enter admin for the user name and password for the password. Follow the onscreen instructions - Netgear R7000P | Installation Guide - Page 2
make management simple. Visit netgear.com/support/product/R7000P to download the apps. NETGEAR genie. Personal dashboard to Support Thank you for purchasing this NETGEAR product. You can visit www.netgear.com/support to register your product, get help, access the latest downloads and user manuals
-
 1
1 -
 2
2
 |
 |

Quick Start
Nighthawk
AC2300 Smart WiFi Router
Model R7000P
Unplug your modem, remove and replace the backup battery if it uses one, and
then plug the modem back in. Use the Ethernet cable to connect the modem to
the yellow Internet port on the router.
Note:
If your Internet connection does not require a modem, connect your
main Ethernet cable to the yellow Internet port on the router.
Connect the router to a power source. The router’s Power LED
lights amber
and then turns white when the router is ready.
Make sure that the router’s WiFi LED
is lit. Look on the router label for the
preassigned WiFi network name (SSID) and network key (password).
Open the WiFi connection manager on your WiFi‑enabled computer or mobile
device, find the router’s WiFi network name, and use the router’s password to
connect.
Launch a web browser. If the NETGEAR installation assistant does not display, visit
www.routerlogin.net
. If a login window displays, enter
admin
for the user name
and
password
for the password.
Follow the onscreen instructions to connect to the Internet.
The Internet LED
lights solid white when the router connects to the Internet.
Remove the antenna caps from the antenna posts on the router.
Attach and tighten the antennas on the threaded antenna posts.
Position the antennas as shown.
45°
45°
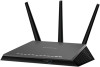
Package Contents
Router
Antennas (3)
Power adapter
(varies by region)
Ethernet cable
2. Restart Your Modem and Plug In Your Router
3. Connect to the Internet
1. Attach the Antennas