Netgear RN2120 Rackmount Hardware Manual
Netgear RN2120 Manual
 |
View all Netgear RN2120 manuals
Add to My Manuals
Save this manual to your list of manuals |
Netgear RN2120 manual content summary:
- Netgear RN2120 | Rackmount Hardware Manual - Page 1
NETGEAR ReadyNAS OS 6 Rack-Mount Storage Systems Hardware Manual Models: ReadyNAS 2120 ReadyNAS 2120 v2 ReadyNAS 3220 ReadyNAS 4220 December 2013 202-11272-03 350 East Plumeria Drive San Jose, CA 95134 USA - Netgear RN2120 | Rackmount Hardware Manual - Page 2
NETGEAR ReadyNAS OS 6 Rack-Mount Storage Systems Support Thank you for purchasing this NETGEAR product. After installing your device, locate the serial number on the label of your product and use it to register your product at https://my.netgear.com. You must register your product before you can use - Netgear RN2120 | Rackmount Hardware Manual - Page 3
Contents Chapter 1 Getting Started Additional Documentation 6 Setup Location 6 Supported Operating Systems 7 Supported Browsers 7 Diskless Storage System 7 Chapter 2 ReadyNAS 2120 and 2120 v2 Front Panel 9 Rear Panel 10 Status Information 11 Power On and Shut Down 12 Power On 12 Preferred - Netgear RN2120 | Rackmount Hardware Manual - Page 4
NETGEAR ReadyNAS OS 6 Rack-Mount Storage Systems Chapter 5 Maintenance Access the Inside of the Storage System 40 Replace a Fan 42 Replace the On-board Battery 45 Appendix A Defaults and Technical Specifications Factory Default Settings 48 ReadyNAS 2120 and 2120 v2 Technical Specifications 49 - Netgear RN2120 | Rackmount Hardware Manual - Page 5
on your purchase of a NETGEAR ReadyNAS® storage system. This manual describes the physical features of the ReadyNAS OS 6 rack-mount storage systems. This chapter contains the following sections: • Additional Documentation • Setup Location • Supported Operating Systems • Supported Browsers • Diskless - Netgear RN2120 | Rackmount Hardware Manual - Page 6
NETGEAR ReadyNAS OS 6 Rack-Mount Storage Systems Additional Documentation For detailed information about configuring, managing, and using your ReadyNAS storage system, see the ReadyNAS OS 6 Software Manual, which is available at http://support.netgear.com/product/ReadyNAS-OS6. For additional product - Netgear RN2120 | Rackmount Hardware Manual - Page 7
that are not supported, NETGEAR technical support will not provide assistance. For a list of supported disks, see the NETGEAR Hardware Compatibility List at http://www.netgear.com/readynas-hcl. If you are adding a previously formatted disk to your storage system, see the instructions in Previously - Netgear RN2120 | Rackmount Hardware Manual - Page 8
2. ReadyNAS 2120 and 2120 v2 2 This chapter describes the physical features of the ReadyNAS 2120 and the 2120 v2. It includes the following sections: • Front Panel • Rear Panel • Status Information • Power On and Shut Down • Boot Menu 8 - Netgear RN2120 | Rackmount Hardware Manual - Page 9
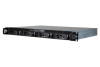
NETGEAR ReadyNAS OS 6 Rack-Mount Storage Systems Front Panel The following figure shows the front panel of the ReadyNAS 2120 and 2120 v2. 2 65 3 3 4 1 Figure 1. Front panel 1. Drive bays 2. Control panel 3. Mounting bracket 4. Fault LED 5. Disk Activity LED 6. Disk tray (For more information, - Netgear RN2120 | Rackmount Hardware Manual - Page 10
NETGEAR ReadyNAS OS 6 Rack-Mount Storage Systems Rear Panel The following figure shows the rear panel of the ReadyNAS 2120 and the 2120 v2. 1 2 3 Figure 3. Rear panel 1. Power cable socket 2. Power switch 3. Disk exhaust fans 4. E-SATA ports 5. USB 3.0 ports 6. LAN ports with LED status - Netgear RN2120 | Rackmount Hardware Manual - Page 11
NETGEAR ReadyNAS OS 6 Rack-Mount Storage Systems Status Information You can obtain information about the status of your ReadyNAS 2120 or 2120 determine the problem. For more information, see the ReadyNAS OS 6 Software Manual, which is available at http://support.netgear.com/product/ReadyNAS-OS6. • - Netgear RN2120 | Rackmount Hardware Manual - Page 12
to gracefully shut down your system using the ReadyNAS local admin page, see the ReadyNAS OS 6 Software Manual, which is available at http://support.netgear.com/product/ReadyNAS-OS6. To gracefully shut down your on the back panel of the system. The system shuts down. ReadyNAS 2120 and 2120 v2 12 - Netgear RN2120 | Rackmount Hardware Manual - Page 13
restart or troubleshoot your ReadyNAS storage system. support. Boots into a low-level diagnostic mode. Use the tech support boot mode only when a NETGEAR technical support representative instructs NETGEAR technical support representative to interpret memory test results. ReadyNAS 2120 and 2120 v2 13 - Netgear RN2120 | Rackmount Hardware Manual - Page 14
NETGEAR ReadyNAS OS 6 Rack-Mount Storage Systems • Test disk. Performs an offline full disk test. This process can take four hours or more, depending on the size of your disks. Any problems Boot menu Normal Factory default OS reinstall Tech support Volume read only Memory test Test disk Status - Netgear RN2120 | Rackmount Hardware Manual - Page 15
3. ReadyNAS 3220 and 4220 3 This chapter describes the physical features of the ReadyNAS 3220 and ReadyNAS 4220. It includes the following sections: • Front Panel • 3220 Rear Panel • 4220 Rear Panel • Status Information • Boot Menu • Rack-Mount Setup 15 - Netgear RN2120 | Rackmount Hardware Manual - Page 16
NETGEAR ReadyNAS OS 6 Rack-Mount Storage Systems Front Panel The following figure shows the front panel of the 3220 and 4220. 1 2 Reset button 5. Unit Identifier LED 6. Health LED 7. Ethernet LEDs 8. Disk Drive Power LED 9. Disk Drive Activity LED 10. USB 2.0 ports ReadyNAS 3220 and 4220 16 - Netgear RN2120 | Rackmount Hardware Manual - Page 17
NETGEAR ReadyNAS OS 6 Rack-Mount Storage Systems Each drive bay features a latch that releases the pop-out tray handle, as shown in the following figure. drives are installed in your system, ensure that all drive trays remain in the drive bays to maintain proper airflow. ReadyNAS 3220 and 4220 17 - Netgear RN2120 | Rackmount Hardware Manual - Page 18
NETGEAR ReadyNAS OS 6 Rack-Mount Storage Systems 3220 Rear Panel This following figure shows the rear panel of the 3220. PSU 1 1 status LEDs 3. Unit Identifier LED 4. SATA ports 5. 1-gigabit Ethernet ports with LED status indicators 6. VGA monitor port 7. USB 3.0 ports ReadyNAS 3220 and 4220 18 - Netgear RN2120 | Rackmount Hardware Manual - Page 19
NETGEAR ReadyNAS OS 6 Rack-Mount Storage Systems 4220 Rear Panel This following figure shows the rear panel of the 4220. PSU 1 1 Ethernet ports with status LED status indicators 6. VGA port 7. USB 2.0 ports 8. 10-gigabit Ethernet ports with status LED status indicators ReadyNAS 3220 and 4220 19 - Netgear RN2120 | Rackmount Hardware Manual - Page 20
states: • Red. The system needs attention. Use the local admin page to determine the problem. For more information, see the ReadyNAS OS 6 Software Manual, which is available at http://support.netgear.com/product/ReadyNAS-OS6. • Off. The system is healthy. LAN LEDs (control panel) The LAN LEDs have - Netgear RN2120 | Rackmount Hardware Manual - Page 21
NETGEAR ReadyNAS OS 6 Rack-Mount Storage Systems Boot Menu Use the boot menu to restart or troubleshoot your ReadyNAS storage system. Your storage Tech support. Boots into a low-level diagnostic mode. Use the tech support boot mode only when a NETGEAR technical support representative instructs you - Netgear RN2120 | Rackmount Hardware Manual - Page 22
NETGEAR ReadyNAS OS 6 Rack-Mount Storage Systems The system powers on. 4. Continue Normal Health LED lights. Factory default UI LED lights. OS reinstall UI and Health LEDs light. Tech support Power LED lights. Volume read only Power and Health LEDs light. Memory test Power and UI LEDs - Netgear RN2120 | Rackmount Hardware Manual - Page 23
NETGEAR ReadyNAS OS 6 Rack-Mount Storage Systems Rack-Mount Setup Use the rack-mount hardware included with your ReadyNAS 3220 or 4220 perform the rack mount installation with appropriate assistance. Installation Read these instructions in their entirety before you begin. Locate the shipping carton, - Netgear RN2120 | Rackmount Hardware Manual - Page 24
NETGEAR ReadyNAS OS 6 Rack-Mount Storage Systems 3. Use the provided mounting screws to mount the inner rails to the system chassis, as follows: the rails and push the chassis in. c. Secure the handles to the outer rails with screws. The rack-mount installation is complete. ReadyNAS 3220 and 4220 24 - Netgear RN2120 | Rackmount Hardware Manual - Page 25
about configuring disks on your storage system, see the ReadyNAS OS 6 Software Manual, which is available at http://support.netgear.com/product/ReadyNAS-OS6. This chapter includes the following topics: • Disk Tray • Supported Disks • Previously Formatted Disks • Add a Disk • Replace a Disk 25 - Netgear RN2120 | Rackmount Hardware Manual - Page 26
NETGEAR ReadyNAS OS 6 Rack-Mount Storage Systems Disk Tray The following figure shows the features of the disk tray. 6 7 5 1 2 34 Figure 9. Disk tray 1. Disk tray handle 2. Disk - Netgear RN2120 | Rackmount Hardware Manual - Page 27
NETGEAR ReadyNAS OS 6 Rack-Mount Storage Systems Supported Disks Use only supported SATA hard disk drives (HDDs) or solid-state drives (SSDs) in your ReadyNAS storage system. If you use disks that are not supported, NETGEAR technical support will not provide assistance. For a list of supported disks - Netgear RN2120 | Rackmount Hardware Manual - Page 28
NETGEAR ReadyNAS OS 6 Rack-Mount Storage Systems For more information, see Add a Disk on page of a volume to the new system, the system recognizes the disk as a degraded volume. If your ReadyNAS storage system is operating with one or more disks, you can add disks while the system is running. The - Netgear RN2120 | Rackmount Hardware Manual - Page 29
NETGEAR ReadyNAS OS 6 Rack-Mount Storage Systems Add a Disk You can add a 3.5-inch hard disk drive, 2.5-inch hard disk drive, or a 2.5-inch solid-state drive to an empty disk bay. If you want to add a previously formatted disk to your storage system, see the instructions in Previously Formatted - Netgear RN2120 | Rackmount Hardware Manual - Page 30
NETGEAR ReadyNAS OS 6 Rack-Mount Storage Systems 4. Remove the plastic air blocker from the disk tray. 5. Place the new 3.5-inch HDD in the disk tray. 6. Secure the - Netgear RN2120 | Rackmount Hardware Manual - Page 31
, the disk becomes available for use. You use the local admin page to manually configure the new disk. For more information about X-RAID2, Flex-RAID, and using the local admin page, see the ReadyNAS OS 6 Software Manual, which is available at http://support.netgear.com/product/ReadyNAS-OS6. Disks 31 - Netgear RN2120 | Rackmount Hardware Manual - Page 32
NETGEAR ReadyNAS OS 6 Rack-Mount Storage Systems To add a 2.5-inch hard disk drive (HDD) or 2.5-inch solid-state drive (SSD): 1. Determine whether you need to shut down - Netgear RN2120 | Rackmount Hardware Manual - Page 33
NETGEAR ReadyNAS OS 6 Rack-Mount Storage Systems 6. Secure the drive in the tray using the screws that came with your storage system. Make sure that the hard - Netgear RN2120 | Rackmount Hardware Manual - Page 34
Software Manual, which is available at http://support.netgear.com/product/ReadyNAS-OS6. ReadyNAS supports hot-swap drive bays, so you do not need to power down your storage system when replacing a disk. If you are replacing a disk with a previously formatted disk, see the instructions in Previously - Netgear RN2120 | Rackmount Hardware Manual - Page 35
NETGEAR ReadyNAS OS 6 Rack-Mount Storage Systems To replace a 3.5-inch hard disk drive (HDD): 1. Press the disk tray release latch. The disk tray handle pops out. 2. Pull - Netgear RN2120 | Rackmount Hardware Manual - Page 36
access is slower until the volume resynchronization finishes. For more information about RAID configurations, see the ReadyNAS OS 6 Software Manual, which is available at http://support.netgear.com/product/ReadyNAS-OS6. To replace a 2.5-inch hard disk drive (HDD) or 2.5-inch solid-state drive (SSD - Netgear RN2120 | Rackmount Hardware Manual - Page 37
NETGEAR ReadyNAS OS 6 Rack-Mount Storage Systems 2. Pull out the disk tray. 3. Remove the screws and the old 2.5-inch HDD or SSD from the tray. 4. Place the - Netgear RN2120 | Rackmount Hardware Manual - Page 38
. You can continue to use your storage system, although access is slower until the volume resynchronization finishes. For more information about RAID configurations, see the ReadyNAS OS 6 Software Manual, which is available at http://support.netgear.com/product/ReadyNAS-OS6. Disks 38 - Netgear RN2120 | Rackmount Hardware Manual - Page 39
5. Maintenance 5 This chapter describes how to perform maintenance activities like replacing a fan or on-board battery. It includes the following topics: • Access the Inside of the Storage System • Replace a Fan • Replace the On-board Battery 39 - Netgear RN2120 | Rackmount Hardware Manual - Page 40
NETGEAR ReadyNAS OS 6 Rack-Mount Storage Systems Access the Inside of the Storage System strictly follow this practice, out-of-warranty damage to the system can occur. To access the inside of a 2120: 1. If your system is mounted in a rack, grasp the two handles on either side and pull the system - Netgear RN2120 | Rackmount Hardware Manual - Page 41
NETGEAR ReadyNAS OS 6 Rack-Mount Storage Systems 4. Lift the top cover from the chassis. You now have full access to the inside of the system. To access - Netgear RN2120 | Rackmount Hardware Manual - Page 42
NETGEAR ReadyNAS OS 6 Rack-Mount Storage Systems 4. Lift the top cover from the chassis. You , so you do not need to power down your system when replacing a fan. To replace a fan on a 2120: 1. Remove the chassis cover. For more information, see Access the Inside of the Storage System on page 40. 2. - Netgear RN2120 | Rackmount Hardware Manual - Page 43
NETGEAR ReadyNAS OS 6 Rack-Mount Storage Systems 3. Pull up on the fan gently to remove it from the housing. 4. Remove the four pegs that hold the fan - Netgear RN2120 | Rackmount Hardware Manual - Page 44
NETGEAR ReadyNAS OS 6 Rack-Mount Storage Systems 8. Connect the replacement fan's power connections. If the system power is on, the hot-plug feature causes the fan to - Netgear RN2120 | Rackmount Hardware Manual - Page 45
NETGEAR ReadyNAS NETGEAR. Dispose of used batteries according to the manufacturer's instructions . DANGER: Installing the on-board battery upside down, which reverses its polarities, creates a risk of explosion. Take care to install the battery correctly. To replace the battery of a 2120 - Netgear RN2120 | Rackmount Hardware Manual - Page 46
NETGEAR ReadyNAS OS 6 Rack-Mount Storage Systems 3. Install the new battery. Take care to install the new battery with the correct side up. To replace the battery - Netgear RN2120 | Rackmount Hardware Manual - Page 47
A. Defaults and Technical Specifications This appendix includes the following sections: • Factory Default Settings • ReadyNAS 2120 and 2120 v2 Technical Specifications • ReadyNAS 3220 Technical Specifications • ReadyNAS 4220 Technical Specifications • Safety Warnings A 47 - Netgear RN2120 | Rackmount Hardware Manual - Page 48
NETGEAR ReadyNAS OS 6 Rack-Mount Storage Systems Factory Default Settings The following table lists factory default settings for ReadyNAS OS 6 rack-mount storage systems. Table 3. ReadyNAS OS 6 factory default settings Feature Login Default IP address Default The default IP address for the - Netgear RN2120 | Rackmount Hardware Manual - Page 49
NETGEAR ReadyNAS OS 6 Rack-Mount Storage Systems ReadyNAS 2120 and 2120 v2 Technical Specifications The ReadyNAS 2120 and 2120 v2 storage system meets the following technical specifications: General: • Marvell Armada XP 1.2 GHz (ReadyNAS 2120) • Marvell Armada XP 1.6 GHz (ReadyNAS 2120 v2) • 2 GB - Netgear RN2120 | Rackmount Hardware Manual - Page 50
NETGEAR ReadyNAS OS 6 Rack-Mount Storage Systems ReadyNAS 3220 Technical Specifications The ReadyNAS 3220 storage system meets the following technical specifications: General: • Intel i3-3220, 65W, 3.3 G • 4 GB memory • Twelve-bay storage • Two E-SATA ports • Two USB 2.0 ports (front) • - Netgear RN2120 | Rackmount Hardware Manual - Page 51
NETGEAR ReadyNAS OS 6 Rack-Mount Storage Systems ReadyNAS 4220 Technical Specifications The ReadyNAS 4220 storage system meets the following technical specifications: General: • Intel E3-1225V2, 95W, 3.2 G • 4 GB memory • Twelve-bay storage • Two E-SATA ports • Two USB 2.0 ports (front) • - Netgear RN2120 | Rackmount Hardware Manual - Page 52
NETGEAR ReadyNAS OS 6 Rack-Mount Storage Systems Safety Warnings 1. The equipment contains no operator access areas and is certified for installation only by trained personnel, according to the installation instructions provided with each storage system. 2. Install the socket-outlet near the - Netgear RN2120 | Rackmount Hardware Manual - Page 53
NETGEAR ReadyNAS ReadyNAS clean and free of clutter. • See the technical specifications in this manual for details about your specific ReadyNAS storage systems. • The ReadyNAS to the manufacturer's instructions. DANGER: Installing the correctly. • Only trained service technicians can replace the self - Netgear RN2120 | Rackmount Hardware Manual - Page 54
NETGEAR ReadyNAS OS 6 Rack-Mount Storage Systems Electrostatic Discharge (ESD) Precautions Electrostatic discharge (ESD) is generated the rack's front door and all panels and components on the servers closed when not servicing them to maintain proper cooling. Defaults and Technical Specifications 54
-
 1
1 -
 2
2 -
 3
3 -
 4
4 -
 5
5 -
 6
6 -
 7
7 -
8
-
9
-
10
-
11
-
12
-
13
-
14
-
15
-
16
-
17
-
18
-
19
-
20
-
21
-
22
-
23
-
24
-
25
-
26
-
27
-
28
-
29
-
30
-
31
-
32
-
33
-
34
-
35
-
36
-
37
-
38
-
39
-
40
-
41
-
42
-
43
-
44
-
45
-
46
-
47
-
48
-
49
-
50
-
51
-
52
-
53
-
54
 |
 |

350 East Plumeria Drive
San Jose, CA 95134
USA
December 2013
202-11272-03
NETGEAR ReadyNAS OS 6
Rack-Mount Storage Systems
Hardware Manual
Models:
ReadyNAS 2120
ReadyNAS 2120 v2
ReadyNAS 3220
ReadyNAS 4220