Netgear RN312 ReadyNAS OS 6 Installation Guide
Netgear RN312 Manual
 |
View all Netgear RN312 manuals
Add to My Manuals
Save this manual to your list of manuals |
Netgear RN312 manual content summary:
- Netgear RN312 | ReadyNAS OS 6 Installation Guide - Page 1
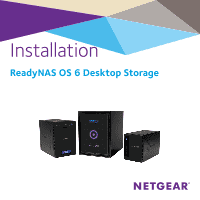
Installation ReadyNAS OS 6 Desktop Storage - Netgear RN312 | ReadyNAS OS 6 Installation Guide - Page 2
Contents Package Contents...3 Basic Setup...4 Reformat Disks...9 Additional Information 12 2 - Netgear RN312 | ReadyNAS OS 6 Installation Guide - Page 3
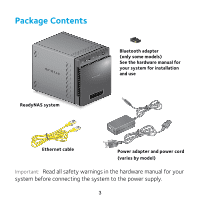
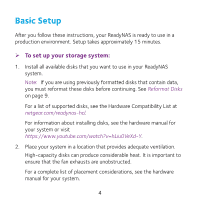
Package Contents ReadyNAS system Bluetooth adapter (only some models) See the hardware manual for your system for installation and use Ethernet cable Power adapter and power cord (varies by model) Important: Read all safety warnings in the hardware manual for your system before connecting the - Netgear RN312 | ReadyNAS OS 6 Installation Guide - Page 4
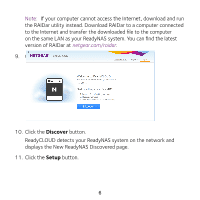
these disks before continuing. See Reformat Disks on page 9. For a list of supported disks, see the Hardware Compatibility List at netgear.com/readynas-hcl. For information about installing disks, see the hardware manual for your system or visit https://www.youtube.com/watch?v=hLiu0VeXd-Y. 2. Place - Netgear RN312 | ReadyNAS OS 6 Installation Guide - Page 5
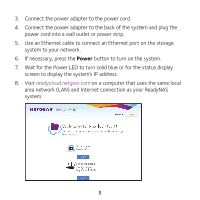
the system. 7. Wait for the Power LED to turn solid blue or for the status display screen to display the system's IP address. 8. Visit readycloud.netgear.com on a computer that uses the same local area network (LAN) and Internet connection as your - Netgear RN312 | ReadyNAS OS 6 Installation Guide - Page 6
file to the computer on the same LAN as your ReadyNAS system. You can find the latest version of RAIDar at netgear.com/raidar. 9. Click the Start button for setting up a new ReadyNAS. 10. Click the Discover button. ReadyCLOUD detects your ReadyNAS system on the network and displays the New - Netgear RN312 | ReadyNAS OS 6 Installation Guide - Page 7
the Next button, or click the Sign in to an Existing Account button and sign in to your account. b. Follow the prompts to configure your ReadyNAS system. 7 - Netgear RN312 | ReadyNAS OS 6 Installation Guide - Page 8
OK button. Note: You can change these credentials when you configure your system. We recommend that you change your password as soon as possible. The ReadyNAS local admin page displays in your browser and launches a setup wizard. b. Follow the prompts of the setup wizard to configure your - Netgear RN312 | ReadyNAS OS 6 Installation Guide - Page 9
if you are adding or replacing individual disks, even if the disks were previously formatted. See the ReadyNAS OS manual, available at netgear.com/support/product/ReadyNAS_OS_6, for information about formatted disks and already configured systems. ¾¾ To reformat previously formatted disks: 1. If - Netgear RN312 | ReadyNAS OS 6 Installation Guide - Page 10
For information about installing disks, see the hardware manual for your system. 3. Using a straightened paper clip, press and hold the Reset button. 4. Press the Power button. The system powers on. 5. Continue pressing the Reset - Netgear RN312 | ReadyNAS OS 6 Installation Guide - Page 11
of the disk test, the factory default process starts. The system returns to its factory default settings and reformats all installed disks for use with ReadyNAS OS 6. When the factory default process is complete, the reformatted disks are ready to use with your system. 11 - Netgear RN312 | ReadyNAS OS 6 Installation Guide - Page 12
the Power button three times. For more information about setting up, configuring, and using your system, see the software and hardware manuals for your system. Links to these manuals are available at netgear.com/support/product/ReadyNAS_OS_6 or through a link in the product's user interface. 12 - Netgear RN312 | ReadyNAS OS 6 Installation Guide - Page 13
- Netgear RN312 | ReadyNAS OS 6 Installation Guide - Page 14
- Netgear RN312 | ReadyNAS OS 6 Installation Guide - Page 15
- Netgear RN312 | ReadyNAS OS 6 Installation Guide - Page 16
get help, access the latest downloads and user manuals, and join our community. We recommend that you use only official NETGEAR support resources. Trademarks © NETGEAR, Inc., NETGEAR and the NETGEAR Logo are trademarks of NETGEAR, Inc. Any non‑NETGEAR trademarks are used for reference purposes only
-
 1
1 -
 2
2 -
 3
3 -
 4
4 -
 5
5 -
 6
6 -
 7
7 -
8
-
9
-
10
-
11
-
12
-
13
-
14
-
15
-
16
 |
 |

Installation
ReadyNAS OS 6 Desktop Storage