Netgear UTM150 UTM150 Installation Guide (PDF)
Netgear UTM150 Manual
 |
UPC - 606449077957
View all Netgear UTM150 manuals
Add to My Manuals
Save this manual to your list of manuals |
Netgear UTM150 manual content summary:
- Netgear UTM150 | UTM150 Installation Guide (PDF) - Page 1
VPN, firewall, and custom scanning. You can access the Reference Manual from the product management interface, via the Resource CD and from the NETGEAR support site: http://kbserver.netgear.com. Estimated time: 30 minutes. Verify the Package Contents • ProSecure™ UTM appliance. • Installation Guide - Netgear UTM150 | UTM150 Installation Guide (PDF) - Page 2
service license keys offer one year or three years of service. For additional information on licenses see the reference manual. Register and Activate the Licenses Note: Be sure the unit has Internet access before registering the licenses. 1. Log in to the unit. 2. Select Support > Registration
-
 1
1 -
 2
2
 |
 |

Installation Guide
Familiarize yourself with the connectors and controls on the back of the unit
.
Complete the Basic Setup
Follow these steps to quickly setup the UTM appliance.
Connect the Unit
For initial setup, connect the WAN Ethernet port to an active WAN connection such
as a broadband modern, connect a DHCP enabled PC to a LAN port, and turn on
the unit.
Verify the following:
•
Power LED
: It takes about a minute to boot. The power LED should turn solid
green. If it does not, see the Troubleshooting section of the
Reference Manual
.
•
Test LED
: When you first turn on the unit, the amber test LED will be lit for
approximately 2 minutes.
•
WAN Status LED
: The status LED on the connected WAN port should be lit. If
not, make sure the Ethernet cable is securely attached to the modem and the
WAN port, and that the modem is powered on.
•
LAN Status LED
: A LAN status LED should be lit. If not, ensure that the Ethernet
cable from the computer to the unit is securely attached at both ends, and that
the computer is turned on.
Log in to the Unit
1.
Use a browser to connect to
.
7. Kensington lock
8. Console port
9. Factory reset button
10. Power connector
7
10
9
8
2.
When prompted, enter
admin
for the User
Name and
password
for the Password.
Click
Login.
You are now connected. After 5 minutes of
inactivity (the default login time-out), you
are automatically logged out.
Note:
When the unit scans secure HTTPS
traffic, import its root CA certificate into client
browsers. Click the link at the bottom of the
login screen to download it.
Use the Setup Wizard for Basic Configuration
The Setup Wizard will guide you through the basic network and scanning setup.
Note:
If you choose to bypass the Setup Wizard, be sure to configure an alerts
email address and change the admin password.
1.
Start the Setup Wizard.
Select
Wizards > SetupWizard
to start the wizard.
For guidance on how to fill in
the wizard screens, refer to the
online help or the
Reference
Manual
via a link in the
Support
> Documentation
page.
2.
Use the Setup Wizard to configure these basic network and scanning settings:
•
LAN and WAN network settings.
•
System time (NTP server) and time zone.
•
Scanning of network protocols and services.
•
Default scan actions when the unit detects threats.
•
Scan exceptions like the maximum file size.
•
Specify the notification server and notices to be used in email notifications.
•
Scan engine and signature updates.
ProSecure™ Unified Threat Management (UTM) Appliance
Follow these instructions to configure your ProSecure Unified Threat Management
appliance to use a single WAN interface, and enable the default threat management
scanning. Then, consult the
Reference Manual
for instructions on configuring other
options such as multiple WAN settings, VPN, firewall, and custom scanning. You
can access the
Reference Manual
from the product management interface, via the
Resource CD
and from the NETGEAR support site:
Estimated time: 30 minutes.
Verify the Package Contents
•
ProSecure™ UTM appliance.
•
Installation Guide.
•
Resource CD.
•
Rubber feet (4) with adhesive backing.
•
Rack mount brackets (some models).
•
Power cord.
Familiarize Yourself with the Unit
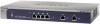
Familiarize yourself with the ports and status lights on the front of the unit.
1.
Green power LED
2.
Amber test LED
3.
USB port (for future use)
4.
Gigabit LAN ports
5.
LAN port 4 DMZ identifier
6.
Gigabit WAN ports, dual
WAN model shown
1
2
5
4
3
6