Oki C9600hnColorSignage Memory DIMM Installation Instructions
Oki C9600hnColorSignage Manual
 |
View all Oki C9600hnColorSignage manuals
Add to My Manuals
Save this manual to your list of manuals |
Oki C9600hnColorSignage manual content summary:
- Oki C9600hnColorSignage | Memory DIMM Installation Instructions - Page 1
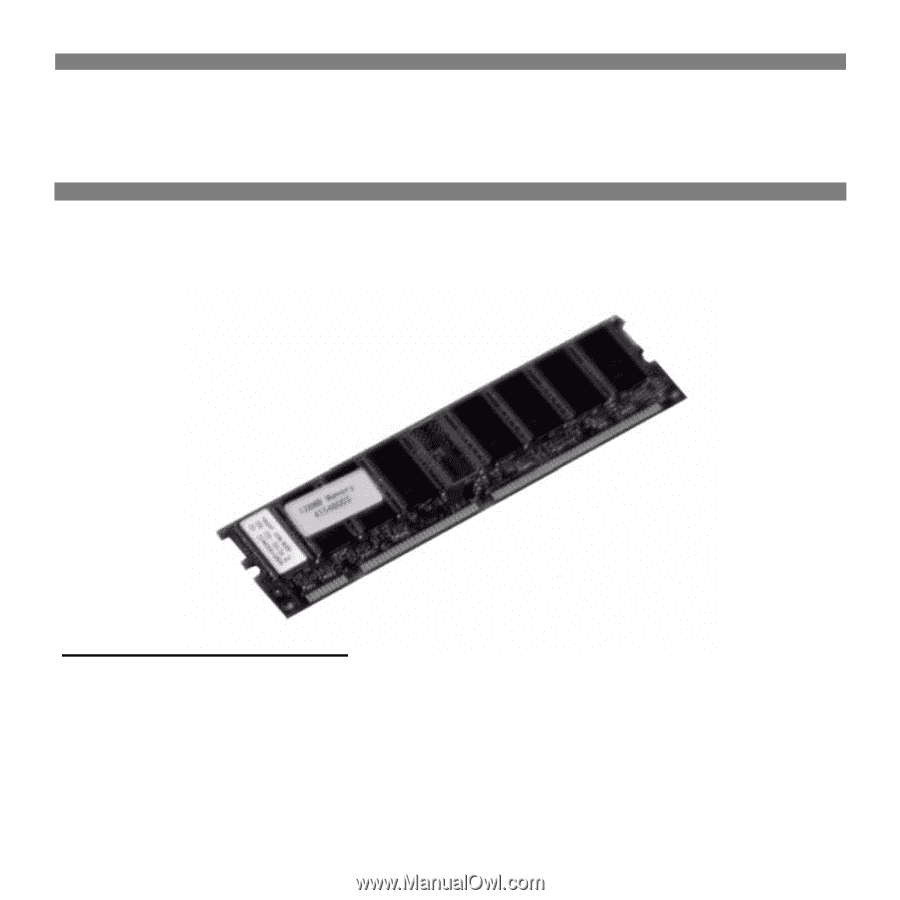
Memory DIMM Installation Instructions DIMM PART NUMBER 128MB: 70050201 256 MB: 70050301 512 MB: 70050401 - Oki C9600hnColorSignage | Memory DIMM Installation Instructions - Page 2
by Oki Data. Copyright 2005 by Oki Data Americas, Inc. All rights reserved. Written and produced by the Oki Data Training & Publications Department. For the latest product information, printer drivers, manuals, special offers, etc., we welcome you to visit our web site: http://www.okidata.com OKI is - Oki C9600hnColorSignage | Memory DIMM Installation Instructions - Page 3
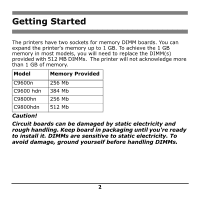
up to 1 GB. To achieve the 1 GB memory in most models, you will need to replace the DIMM(s) provided with 512 MB DIMMs. The printer will not acknowledge more than 1 GB of memory. Model Memory Provided C9600n 256 Mb C9600 hdn 384 Mb C9800hn C9800hdn 256 Mb 512 Mb Caution! - Oki C9600hnColorSignage | Memory DIMM Installation Instructions - Page 4
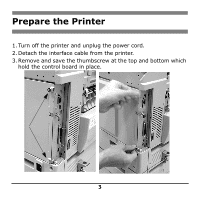
Prepare the Printer 1. Turn off the printer and unplug the power cord. 2. Detach the interface cable from the printer. 3. Remove and save the thumbscrew at the top and bottom which hold the control board in place. 3 - Oki C9600hnColorSignage | Memory DIMM Installation Instructions - Page 5
4. Open the control board cover by pulling out and toward the left. 4 - Oki C9600hnColorSignage | Memory DIMM Installation Instructions - Page 6
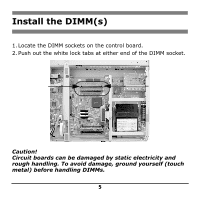
Install the DIMM(s) 1. Locate the DIMM sockets on the control board. 2. Push out the white lock tabs at either end of the DIMM socket. Caution! Circuit boards can be damaged by static electricity and rough handling. To avoid damage, ground yourself (touch metal) before handling DIMMs. 5 - Oki C9600hnColorSignage | Memory DIMM Installation Instructions - Page 7
3. Remove the DIMM from its shipping package. 4. Align the DIMM with the narrow strip (1) on its metallic contact edge toward the front of the control board, then carefully insert the DIMM in the socket. Press down firmly, until you feel the board engage the connector, then raise the white tabs to - Oki C9600hnColorSignage | Memory DIMM Installation Instructions - Page 8
Complete the Installation 1. Close the control board cover. 2. Reinstall the thumbscrews at the top and bottom of the board. 3. Reattach the computer interface cable. 4. Plug the power cord into the power outlet and turn on the printer. ©Oki Data Americas, Inc. 59375001
-
 1
1 -
 2
2 -
 3
3 -
 4
4 -
 5
5 -
 6
6 -
 7
7 -
8
 |
 |
Memory DIMM
Installation Instructions
DIMM PART NUMBER
128MB: 70050201
256 MB: 70050301
512 MB: 70050401