Onkyo HT-S3100 Owner Manual
Onkyo HT-S3100 Manual
 |
View all Onkyo HT-S3100 manuals
Add to My Manuals
Save this manual to your list of manuals |
Onkyo HT-S3100 manual content summary:
- Onkyo HT-S3100 | Owner Manual - Page 1
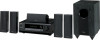
5.1ch Home Theater System HT-S3100 HT-S3105 AV Receiver (HT-R340) Speaker Package HTP-360 (North American and Asian models) HTP-318 (European models) Instruction Manual Thank you for purchasing an Onkyo 5.1ch Home Theater System. Please read this manual thoroughly before making connections and - Onkyo HT-S3100 | Owner Manual - Page 2
servicing) instructions in the literature accompanying the appliance. Important Safety Instructions 1. Read these instructions. 2. Keep these instructions. 3. Heed all warnings. 4. Follow all instructions fied by the manufacturer. 12. Use only with the cart set 10 cm (4") away from the rear panel - Onkyo HT-S3100 | Owner Manual - Page 3
systems around the world. Before you plug in such a model, make sure that the voltage selector is set , have it checked by your Onkyo dealer. 6. Handling Notes • device, pursuant to Part 15 of the the instructions, may receiving antenna. • Increase the separation between the equipment and receiver. - Onkyo HT-S3100 | Owner Manual - Page 4
an AC outlet in order to charge the backup system. Once it has been charged, the AV receiver will retain the settings for several weeks, although this depends on the environment and will be shorter in humid climates. 4 Speaker Precautions Placement • The subwoofer cabinet is made out of wood and is - Onkyo HT-S3100 | Owner Manual - Page 5
Digital Theater Systems, Inc. *3. OptiResponse, and OR-EQ are trademarks of Onkyo Corporation. *4. Apple and iPod are trademarks of Apple Computer, Inc., registered in the U.S. and other countries. SKW-318 Bass Reflex Subwoofer • 8" (20 cm) cone woofer • Max. input power:130 W • Color-coded speaker - Onkyo HT-S3100 | Owner Manual - Page 6
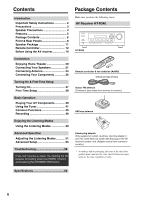
Introduction Important Safety Instructions 2 Precautions 3 Speaker Precautions 4 Features 5 Package Contents 6 Front & Rear Panels 8 Speaker Package 11 Remote Controller 12 Before Using the AV receiver 19 Connection Enjoying Home Theater 20 Connecting Your Speakers 21 Connecting Antenna - Onkyo HT-S3100 | Owner Manual - Page 7
(White) (Green) Speaker cable for front speakers and center speaker 11 ft. (3.5 m) (Blue) (Gray) Speaker cables for surround speakers 30 ft. (9 m) (Purple) Speaker cables for subwoofer 15 ft. (4.5 m) Subwoofer (SKW-360) 16 thin rubber stoppers, 12 thick rubber stoppers Speaker Package HTP - Onkyo HT-S3100 | Owner Manual - Page 8
button is used to set the AV receiver to On or Standby. B STANDBY indicator (37) This indicator lights up when the AV receiver is in Standby mode, and it flashes while a signal is being received from the remote controller. C Remote-control sensor (19) This sensor receives control signals from the - Onkyo HT-S3100 | Owner Manual - Page 9
lights up when Auto Tuning is selected and disappears when Manual Tuning is selected. RDS (European model only) (43): This indicator lights up when the AV Receiver is tuned to a radio station that supports RDS (Radio Data System). MEMORY (42): This indicator lights up when presetting radio stations - Onkyo HT-S3100 | Owner Manual - Page 10
& SUBWOOFER SPEAKER These push terminals are for connecting speaker set A. H VOLTAGE SELECTOR (only some models) This voltage selector provides compatibility with power systems around the world. I This (Remote Interactive) jack can be connected to the jack on another Onkyo component. The AV receiver - Onkyo HT-S3100 | Owner Manual - Page 11
the HT-R340 with the supplied speaker cables. The supplied speaker cables are color-coded for easy identification. Simply connect each cable to the same-colored positive speaker terminal. B Keyhole slots These keyhole slots can be used to wall-mount the speaker. See page 22 for mounting instructions - Onkyo HT-S3100 | Owner Manual - Page 12
described in this manual may not work as expected with other components. RECEIVER Mode RECEIVER mode is used to control the AV receiver. To set the remote controller to RECEIVER mode, press the [RECEIVER] REMOTE MODE button. A 2 3 4 5 6 7 8 ON/STANDBY REMOTE MODE RECEIVER DVD TAPE INPUT - Onkyo HT-S3100 | Owner Manual - Page 13
is used to turn on the OptiResponse Equalizer, which optimizes performance when the HT-R340 is used with the speakers included in the HTP-360/HTP-318 Home Theater Speaker Package. When the OptiResponse Equalizer is on, you can enjoy a powerful sound with movies or music even at low volume levels. 13 - Onkyo HT-S3100 | Owner Manual - Page 14
To set the remote controller to DVD mode, press the [DVD] REMOTE MODE button. 1 2 3 4 5 6 7 8 9 J ON/STANDBY REMOTE MODE RECEIVER DVD TAPE INPUT SELECTOR 1 2 3 C D V1 V2 V3 4 5 6 MD MULTI CH DVD 7 8 9 CDR TAPE TUNER C D +10 0 CLR HDD --/--- DIMMER SLEEP CH DISC ALBUM - Onkyo HT-S3100 | Owner Manual - Page 15
RECEIVER 9 C D To set the remote controller to CD mode, press the [CD] REMOTE MODE button. 1 2 3 4 ✽ 5 ON/STANDBY REMOTE MODE RECEIVER DVD TAPE INPUT SELECTOR 1 2 3 C D V1 V2 V3 4 5 6 MD MULTI CH DVD 7 8 9 CDR TAPE TUNER C D +10 0 CLR HDD --/--- DIMMER SLEEP CH DISC - Onkyo HT-S3100 | Owner Manual - Page 16
set the remote controller to MD or CDR mode, press the [MD] or [CDR] REMOTE MODE button. 1 2 3 ✽ 4 ON/STANDBY REMOTE MODE RECEIVER DVD TAPE INPUT SELECTOR 1 2 3 C D V1 V2 V3 4 5 6 MD MULTI CH DVD 7 8 9 CDR TAPE TUNER C D +10 0 CLR HDD --/--- DIMMER SLEEP CH DISC ALBUM - Onkyo HT-S3100 | Owner Manual - Page 17
controlling an Apple iPod in an Onkyo RI Dock that's connected via . To select an Onkyo RI Dock that's connected via as the input source, press: RECEIVER 7 TAPE or 3 V3 * You must change the Input Display (see page 38). See page 34 for more information. To set the remote controller to HDD - Onkyo HT-S3100 | Owner Manual - Page 18
Mode To select your Cassette deck as the input source, press: RECEIVER 7 TAPE TAPE mode is used to control an Onkyo cassette recorder connected to the AV receiver via . To set the remote controller to TAPE mode, press the [RECEIVER] REMOTE MODE button. For twin cassette decks, only deck B can be - Onkyo HT-S3100 | Owner Manual - Page 19
Before Using the AV receiver Setting the Voltage Selector (on some models) Some models have a voltage selector switch for compatibility with power systems around the world. Before you plug in this model, make sure that the voltage selector is set to the correct voltage for your area. If it isn't, - Onkyo HT-S3100 | Owner Manual - Page 20
room and offers 2-channel stereo playback. AV receiver A SPEAKERS B Remote controller or SP A / B Speaker set A On Off Speaker set B On Off On Off Indicator AB A B Output Set A: 2.1 channels Set B: 2 channels Set A: 5.1 channels Set B: 2 channels No sound Center speaker (SKC-360C) This - Onkyo HT-S3100 | Owner Manual - Page 21
to several terminals. Connecting Speaker The AV receiver's positive (+) speaker terminals are color-coded for ease of identification. (The negative (-) speaker terminals are all black.) Speaker terminal Front left Front right Center Surround left Surround right Subwoofer Color White Red Green - Onkyo HT-S3100 | Owner Manual - Page 22
speaker for wall-mounting with commercially available speaker mounts or brackets. North American models require 1/4-inch screws. Other models require M5 (5 mm) screws. Refer to the manual (217 mm) Caution: A mounting screw's ability to support a speaker depends on how well it's anchored to the wall. - Onkyo HT-S3100 | Owner Manual - Page 23
, and thin stoppers for the other speakers. Thin rubber stoppers Bottom of the SKF-360F/ SKM-360S Bottom of the SKF-318F/ SKM-318S Thick rubber stoppers Bottom of the SKC-360C/ SKC-318C 2-3/16" (55 mm) 1/2" (12 mm) Using the Floor Pads for Subwoofer If the subwoofer is placed on a hard floor - Onkyo HT-S3100 | Owner Manual - Page 24
adjust the position of the AM antenna to achieve the best possible reception. Keep the antenna as far away as possible from your AV receiver, TV, speaker cables, and power cords. If you cannot achieve good reception with the supplied indoor AM loop antenna, try using it with a commercially available - Onkyo HT-S3100 | Owner Manual - Page 25
's best not to use the same antenna for both FM and TV reception, as this can cause interference problems. If circumstances demand it, use a TV/FM antenna splitter, as shown. Outdoor AM antennas work best prevent electrical shock hazards. TV/FM antenna splitter To AV receiver To TV (or VCR) 25 - Onkyo HT-S3100 | Owner Manual - Page 26
audio and video cables away from power cords and speaker cables. Right! Wrong! AV Cables & Jacks Video Component video cable Composite video Note: The AV receiver does not support SCART plugs. Description Offers the best sound quality and allows you to enjoy surround sound (e.g., Dolby Digital - Onkyo HT-S3100 | Owner Manual - Page 27
AV receiver. : Signal Flow Video Video Audio DVD player, etc. Audio Speakers (see page 21 for connection information) TV, projector, etc. Which Connections Should I Use? The AV receiver supports IN AV Receiver Optical Coaxial Coaxial Analog Multi-channel Analog Multi-channel AV Receiver - Onkyo HT-S3100 | Owner Manual - Page 28
component video input jacks, connect your DVD player to the AV receiver's DVD IN VIDEO jack. And connect the AV receiver's MONITOR OUT VIDEO jack to your TV. COMPONENT VIDEO IN Y PB PR VIDEO IN TV, projector, etc. HT-R340 BA B A B Y PB PR COMPONENT VIDEO OUT VIDEO OUT DVD player - Onkyo HT-S3100 | Owner Manual - Page 29
instead of coaxial one, connect it to the AV receiver's DIGITAL IN OPTICAL 1 or 2 jack, and set the DIGITAL INPUT assignment to OPT1 or OPT 2 , and SUBWOOFER jacks. Use a multichannel analog cable or several normal audio cables. You can enjoy DVD-Audio or SACD with this connection. HT-R340 b a - Onkyo HT-S3100 | Owner Manual - Page 30
a Connect your VCR's audio output jacks to the AV receiver's VIDEO 1 IN L/R jacks. COMPONENT VIDEO IN Y PB PR VIDEO IN TV, projector, etc. Antenna input (e.g., RF IN) HT-R340 B A C Coaxial feed B A Coaxial feed from TV antenna or set-top box a C Y PB PR COMPONENT VIDEO OUT VIDEO - Onkyo HT-S3100 | Owner Manual - Page 31
's VIDEO 1 OUT jack to your VCR's video input jack. Step 2: Audio Connection a Connect the AV receiver's VIDEO 1 OUT L/R jacks to your VCR's audio input jacks. HT-R340 : Signal Flow A VIDEO IN L AUDIO a IN VCR, DVD recorder R Connecting a Camcorder, Games Console, or Other Device Step - Onkyo HT-S3100 | Owner Manual - Page 32
TV's video input jack. B If your VCR and TV have component video jacks, connect your set-top box's component video output to the AV receiver's COMPONENT VIDEO VIDEO 2 IN jacks, and connect the AV receiver's COMPONENT VIDEO OUT jacks to your TV's component video in jacks. This offers better picture - Onkyo HT-S3100 | Owner Manual - Page 33
a coaxial output jack instead of an optical one, connect it to the AV receiver's DIGITAL IN COAXIAL jack, and set the DIGITAL INPUT assignment to COAX (see page 38). Coaxial connections perform the same as optical ones. HT-R340 Connect one or the other : Signal Flow b OPTICAL OUT COAXIAL OUT - Onkyo HT-S3100 | Owner Manual - Page 34
which iPod models are supported by the RI Dock, see the RI Dock's instruction manual. ■ If Your iPod Doesn't Support Video: HT-R340 Connect one or the other ■ If Your iPod Supports Video: HT-R340 VIDEO 3 V IN L R VIDEO 3 REMOTE CONTROL Supplied cable IN IN L R TAPE VIDEO 3 Supplied AV cable - Onkyo HT-S3100 | Owner Manual - Page 35
). c If your recorder has an optical output jack instead of a coaxial one, connect it to the AV receiver's DIGITAL IN OPTICAL 1 or 2 jack and set the DIGITAL INPUT assignment to OPT1 or OPT2 (see page 38). HT-R340 Connect one or the other OPTICAL OUT : Signal Flow c COAXIAL OUT b L OUT PLAY - Onkyo HT-S3100 | Owner Manual - Page 36
to hear all channels (see page 40), as the Direct Change function only selects the FRONT DVD IN jacks. ■ Remote Control You can use the AV receiver's remote controller to control your other -capable Onkyo components, pointing the remote controller at the AV receiver's remote control sensor instead - Onkyo HT-S3100 | Owner Manual - Page 37
TAPE TUNER C D +10 0 CLR HDD --/--- DIMMER SLEEP CH DISC ALBUM VOL Turning On the AV Receiver 1 AV receiver Remote controller STANDBY/ON RECEIVER or Press the [STANDBY/ON] button. Alternatively, press the remote controller's [RECEIVER] button followed by the [ON/STANDBY] button. The - Onkyo HT-S3100 | Owner Manual - Page 38
Display If you connect an -capable Onkyo MiniDisc recorder, CD recorder, or RI Dock to the TAPE IN/OUT or VIDEO 3 IN jacks, for to work properly, you must change this setting. This setting can only be changed on the AV receiver. STANDBY/ON A SPEAKERS B PHONES TUNING / PRESET STANDBY ENTER TONE - Onkyo HT-S3100 | Owner Manual - Page 39
use the MASTER VOLUME control, or the remote controller's [VOL] button. The AV receiver is designed for home theater enjoyment and has a wide volume range for precise adjustment. Note: The maximum master volume level is affected by the subwoofer volume level. 5 Select a suitable listening mode and - Onkyo HT-S3100 | Owner Manual - Page 40
fed to the front left, front right, center, surround left, and surround right speakers and subwoofer regardless of those settings. Displaying Source Information RECEIVER DISPLAY ON/STANDBY REMOTE MODE RECEIVER DVD TAPE INPUT SELECTOR 1 2 3 C D V1 V2 V3 5 6 AUDIO SUBTITLE TEST TONE CH - Onkyo HT-S3100 | Owner Manual - Page 41
setting is changed, all radio presets are deleted. 1 Press the [SETUP] button to dis- play "0. Hardware Setup," kHz steps for AM. For other models it's 0.05 MHz steps for FM and 9 kHz or 10 kHz to Manual Tuning mode and listen to the station in mono. Note: • You can also use the remote controller's - Onkyo HT-S3100 | Owner Manual - Page 42
SETUP CLEAR DVD VIDEO 1/VCR VIDEO 2 VIDEO 3 TAPE TUNER CD MASTER VOLUME Deleting Presets 2 STANDBY/ON A SPEAKERS /ON A SPEAKERS B PHONES TUNING MEMORY TUNING MODE RETURN SETUP CLEAR DVD VIDEO 1/ STANDBY/ON A SPEAKERS B PHONES MEMORY TUNING MODE RETURN SETUP CLEAR DVD VIDEO 1/VCR - Onkyo HT-S3100 | Owner Manual - Page 43
indicator appears. RDS indicator ■ What is RDS? RDS stands for Radio Data System and is a method of transmitting data in FM radio signals. It was (e.g., news, sport, rock, etc.). The AV receiver supports four types of RDS information: PS (Program Service) When tuned to an RDS station that's - Onkyo HT-S3100 | Owner Manual - Page 44
SPEAKERS B PHONES TUNING / PRESET STANDBY ENTER TONE MULTl CH + STEREO LISTENING MODE DISPLAY DIGITAL INPUT RT/PTY/TP MEMORY TUNING MODE RETURN SETUP the display. Notes: • The message "Waiting" may appear while the AV receiver waits for RT information. • If the message "No Text Data" - Onkyo HT-S3100 | Owner Manual - Page 45
bass or treble for speaker set A's front speakers, except when the Direct listening mode is selected. 1 AV receiver TONE Press the AV receiver's [TONE] button repeatedly to select either Bass or Treble. Use the TONE [-]/[+] buttons to adjust. + ■ Bass You can boost or cut low-frequency sounds - Onkyo HT-S3100 | Owner Manual - Page 46
the OptiResponse Equalizer When using the HT-R340 with the speakers included in the HTP-360/HTP-318 Home Theater Speaker Package, by turning on the OptiResponse equalizer, you can enjoy a powerful sound with movies or music. Remote controller OR-EQ Press the remote controller's [OR-EQ] button to - Onkyo HT-S3100 | Owner Manual - Page 47
is selected, you can adjust the level of each 5.1 channel input individually, from -12 dB to +12 dB. (-30 to +12 dB for the subwoofer.) • These settings are stored when the AV receiver is set to Standby. • Individual speaker levels can also be adjusted in "3. MultiLevel Setup" (see page 54). 47 - Onkyo HT-S3100 | Owner Manual - Page 48
input VIDEO 3 TAPE TUNER source are output by the VIDEO 1 OUT CD and TAPE OUT jacks. You can listen to the source while recording. The AV receiver's VOL- Remote controller UME control has no effect on recording. V1 V2 V3 DVD TAPE TUNER C D Recording from Different - Onkyo HT-S3100 | Owner Manual - Page 49
to the AV receiver with a set A is off. STEREO STANDBY/ON A SPEAKERS B PHONES TUNING / PRESET STANDBY ENTER TONE MULTl CH + STEREO LISTENING MODE DISPLAY DIGITAL INPUT RT/PTY/TP MEMORY TUNING MODE RETURN SETUP DTS ✔ ✔ Mono Movie Orchestra Onkyo Unplugged Original Studio-Mix ✔ ✔ - Onkyo HT-S3100 | Owner Manual - Page 50
-in surround-sound decoders and DSP programs, the AV receiver can transform your home listening room into a movie theater or concert hall. This illustration shows which speakers are active in each listening mode. Front left Center Front right Surround left Surround right Subwoofer Direct The - Onkyo HT-S3100 | Owner Manual - Page 51
all speaker configurations. Audio Adjust provides various functions for adjusting the sound. 1 RECEIVER Press the [RECEIVER] button followed by the [SETUP] button. SETUP The Audio Adjust functions are explained below. Input Channel Settings ■ Multiplex This setting determines which channel is - Onkyo HT-S3100 | Owner Manual - Page 52
. If you're using a center speaker, the center channel sound is output by only the center speaker. (If you're not using a center speaker, the center channel sound will be distributed to the front left and right speakers to create a phantom center). This setting controls the front left, right, and - Onkyo HT-S3100 | Owner Manual - Page 53
Advanced Setup Advanced Speaker Settings ENTER RETURN ON/STANDBY REMOTE MODE RECEIVER DVD TAPE INPUT SELECTOR 1 2 3 C D V1 V2 V3 4 5 6 MD MULTI CH DVD 7 8 9 CDR TAPE TUNER C D +10 0 CLR HDD --/--- DIMMER SLEEP CH DISC ALBUM VOL TOP MENU MENU SP A / B PLAYLIST - Onkyo HT-S3100 | Owner Manual - Page 54
levels cannot be adjusted while a pair of headphones is connected, speaker set B is on, or the AV receiver is muted. 1 RECEIVER Press the [RECEIVER] button followed by the [SETUP] button on the remote controller. SETUP 2 ENTER Use the Up and Down [ ]/[ ] buttons to select "3. Level Cal," and - Onkyo HT-S3100 | Owner Manual - Page 55
changed on page 56. Cone diameter 1 RECEIVER Press the [RECEIVER] button followed by the [SETUP] button. SETUP 6 2 Use the Up and Down [ ]/[ ] buttons to select "1. SP Config," and then press the [ENTER] but- ton. ENTER 3 While the Subwoofer setting is selected, use the Left and Right - Onkyo HT-S3100 | Owner Manual - Page 56
8 9 SETUP Double Bass With the Double Bass function, you can boost bass output by feeding bass sounds from the front left and right channels to the subwoofer. This function can be set only if the Subwoofer setting (step 3) is set to Yes, and the Front setting (step 4) is set to Large in the Speaker - Onkyo HT-S3100 | Owner Manual - Page 57
indicators for each supported digital signal format. Format Dolby Digital DTS PCM Display PCM Normally, the AV receiver detects the signal format automatically. However, if you experience either of the following issues when playing PCM or DTS material, you can manually set the signal format - Onkyo HT-S3100 | Owner Manual - Page 58
is correct, and that the bare wires are in contact with metal part of each speaker terminal (page 21) • Make sure that the speaker cables are not shorting. 58 • Check the volume. The AV receiver is designed for home theater enjoyment and has a wide volume range for precise adjustment (page 39 - Onkyo HT-S3100 | Owner Manual - Page 59
DVD input is selected and speaker set B is on, speaker set A is reduced to 2-channel playback, so the subwoofer outputs no sound. • On the AV receiver, the subwoofer setting in the speaker configuration is set to No. Set the subwoofer setting to Yes. There's no sound with a certain signal format - Onkyo HT-S3100 | Owner Manual - Page 60
controller to work properly, you must set the Input Display to MD, CDR, or HDD (see page 38). • To control an Onkyo component that's connected via , point the remote controller at the AV receiver. RI Dock for the iPod There's no sound • Make sure your iPod is actually playing. • Make sure your - Onkyo HT-S3100 | Owner Manual - Page 61
Troubleshooting-Continued The AV receiver contains a microcomputer for signal wall outlet, wait at least five seconds, and then plug it back in again. Onkyo is not responsible for damages (such as CD rental fees) due to unsuccessful recordings from the wall outlet, set the AV receiver to Standby. 61 - Onkyo HT-S3100 | Owner Manual - Page 62
channel, 6 ohm loads, at 1 kHz, with a maximum total harmonic distortion of 1% (Subwoofer) 125 watts minimum continuous power per channel, 6 ohm loads, 1 channel kHz/ +1 dB-3 dB (Direct mode) ±10 dB, 80 Hz (BASS) Signal to Noise Ratio Speaker Impedance ±10 dB, 20 kHz (TREBLE) 100 dB (LINE, IHF - Onkyo HT-S3100 | Owner Manual - Page 63
Specifications-Continued 5.1ch Home Theater Speaker Package ■ Passive Subwoofer (SKW-360/SKW-318) Type: Bass-reflex type Passive subwoofer Impedance: 6 Ω Maximum input power: 130 W Output sound pressure level: 83 dB/m/w Frequency response: 30 Hz-150 Hz Cabinet capacity: Dimensions (W × H × - Onkyo HT-S3100 | Owner Manual - Page 64
Suite 1, Gregories Court, Gregories Road, Beaconsfield, Buckinghamshire, HP9 1HQ UNITED KINGDOM Tel: +44-(0)1494-681515 Fax: +44(0)-1494-680452 ONKYO CHINA LIMITED Unit 1&12, 9/F, Ever Gain PlazaTower 1, 88, Container Port Road, Kwai Chung, N.T., HONG KONG Tel: 852-2429-3118 Fax: 852-2428-9039
-
 1
1 -
 2
2 -
 3
3 -
 4
4 -
 5
5 -
 6
6 -
 7
7 -
8
-
9
-
10
-
11
-
12
-
13
-
14
-
15
-
16
-
17
-
18
-
19
-
20
-
21
-
22
-
23
-
24
-
25
-
26
-
27
-
28
-
29
-
30
-
31
-
32
-
33
-
34
-
35
-
36
-
37
-
38
-
39
-
40
-
41
-
42
-
43
-
44
-
45
-
46
-
47
-
48
-
49
-
50
-
51
-
52
-
53
-
54
-
55
-
56
-
57
-
58
-
59
-
60
-
61
-
62
-
63
-
64
 |
 |

E
n
5.1ch Home Theater System
HT-S3100
HT-S3105
AV Receiver (HT-R340)
Speaker Package
HTP-360
(North American and Asian models)
HTP-318
(European models)
Instruction Manual
Thank you for purchasing an Onkyo 5.1ch Home
Theater System. Please read this manual thoroughly
before making connections and plugging in the unit.
Following the instructions in this manual will enable
you to obtain optimum performance and listening
enjoyment from your new 5.1ch Home Theater Sys-
tem.
Please retain this manual for future reference.
Contents
Introduction
.....................................
2
Connection
....................................
20
Turning On & First Time Setup
.....
37
Basic Operation
Playing your AV components
.......
39
Using the Tuner
............................
41
Enjoying the Listening Modes
.....
49
Advanced Operation
.....................
51
Troubleshooting
............................
58
Specifications
................................
62