Oregon Scientific BAR339DPA User Manual
Oregon Scientific BAR339DPA Manual
 |
View all Oregon Scientific BAR339DPA manuals
Add to My Manuals
Save this manual to your list of manuals |
Oregon Scientific BAR339DPA manual content summary:
- Oregon Scientific BAR339DPA | User Manual - Page 1
EN Weather Day & Night Model: BAR339DP / BAR339DPA / BAR339DPU / BAA339DPH USER MANUAL CONTENTS Overview 2 Front View 2 Back View 3 Remote Sensor 3 Getting Started 3 Main Unit Installation 3 Remote Sensor Installation 4 Clock 5 Clock Reception 5 Manually set Clock 6 Alarm 6 Weather - Oregon Scientific BAR339DPA | User Manual - Page 2
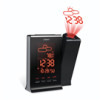
minimum temperature display; clear records 1. SNOOZE: Activate snooze alarm; turn on backlight; flip projected image 180º 2. Weather forecast 3. Outdoor remote sensor battery low 4. Radio controlled clock reception icon 5. PM: Indicates PM (12 hour mode) 6. Indicate alarm time is displayed - Oregon Scientific BAR339DPA | User Manual - Page 3
unit to default settings 1. FOCUS Wheel: Adjust projection focus 2. AC/DC Adaptor socket 3. / : Decrease / increase value of the setting; enable / disable clock reception 4. SEARCH: Initiate sensor search 2. EU / UK Switch (RTHN318D sensor only) 3. Channel Switch 4. Double sided adhesive tape - Oregon Scientific BAR339DPA | User Manual - Page 4
. 2. Insert the batteries, matching the polarities. NOTE Batteries should not be exposed to excessive heat such as sunshine or fire. REMOTE SENSOR INSTALLATION 1. Slide open the battery door. 2. Slide channel switch to channel 1. 3. Select EU/UK. (RTHN318D only) 4. Insert the battery, matching the - Oregon Scientific BAR339DPA | User Manual - Page 5
and consumer grade lithium batteries in temperatures below freezing. CLOCK CLOCK RECEPTION This product is designed to synchronize its clock automatically with a clock signal received from provided remote sensor. For best results: • Place the sensor within 30 m (100 ft) of the main unit. • Place - Oregon Scientific BAR339DPA | User Manual - Page 6
offset setting, this will give you your local time plus one hour. If you are in the US (BAR339DPA only) set the clock to: This product forecasts the next 12 to 24 hours of weather within a 30-50 km (19-31 mile) radius with a 75% accuracy. 0 for Pacific time +2 for Central time +1 for - Oregon Scientific BAR339DPA | User Manual - Page 7
unit: Press °C / °F. To auto-scan between sensors: Press and hold TEMP. To project weather forecast and time: • Press SNOOZE when PROJECTION switch is in OFF mode OR • Slide PROJECTION switch to CLOCK mode for continuous display. To project weather forecast and activate toggling display of time - Oregon Scientific BAR339DPA | User Manual - Page 8
52 oz) without battery 5V AC adaptor 2 x CR2032 batteries (for backup) REMOTE RF CLOCK THERMO SENSOR TYPE DESCRIPTION L x W x H 64 x 25 x 98 mm (2.52 x Oregon Scientific will not be responsible. Consult the furniture manufacturer's care instructions for information. • The contents of this manual - Oregon Scientific BAR339DPA | User Manual - Page 9
visit: www2.oregonscientific.com/service/support.asp For international inquiries, please visit: www2.oregonscientific.com/about/international.asp EU-DECLARATION OF CONFORMITY Hereby, Oregon Scientific, declares that this Weather Day & Night (Model: BAR339DP / BAR339DPA / BAR339DPU / BAA339DPH) is in - Oregon Scientific BAR339DPA | User Manual - Page 10
at www2. oregonscientific.com/service for all enquiries. We Name: Address: Telephone No.: Oregon Scientific, Inc. 19861 SW 95th Ave.,Tualatin, Oregon 97062 USA 1-800-853-8883 declare that the product Product No.: BAR339DP / BAR339DPA / BAR339DPU / BAA339DPH Product Name: Weather Day & Night
-
 1
1 -
 2
2 -
 3
3 -
 4
4 -
 5
5 -
 6
6 -
 7
7 -
8
-
9
-
10
 |
 |

E N
1
Weather Day & Night
Model: BAR339DP / BAR339DPA /
BAR339DPU / BAA339DPH
USER MANUAL
CONTENTS
Overview
...................................................................
2
Front View
..............................................................
2
Back View
..............................................................
3
Remote Sensor
......................................................
3
Getting Started
.........................................................
3
Main Unit Installation
.............................................
3
Remote Sensor Installation
....................................
4
Clock
.........................................................................
5
Clock Reception
.....................................................
5
Manually set Clock
.................................................
6
Alarm
........................................................................
6
Weather Forecast
....................................................
6
Temperature
............................................................
7
Projection
.................................................................
7
Backlight
..................................................................
7
Reset
.........................................................................
7
Specifications
..........................................................
8
Main Unit
................................................................
8
Remote RF Clock Thermo Sensor
.........................
8
Precautions
..............................................................
8
About Oregon Scientific
.........................................
9
EU-Declaration of Conformity
................................
9
FCC Statement
.........................................................
9
Declaration of Conformity
....................................
10
BAR339DP_M_EN_R6.indd
1
6/18/08
12:29:43 PM