Oregon Scientific RM308PA User Manual
Oregon Scientific RM308PA Manual
 |
View all Oregon Scientific RM308PA manuals
Add to My Manuals
Save this manual to your list of manuals |
Oregon Scientific RM308PA manual content summary:
- Oregon Scientific RM308PA | User Manual - Page 1
: www2.oregonscientific. com/service/support.asp For international inquiries, please visit: www2.oregonscientific. com/about/international.asp EU-DECLARATION OF CONFORMITY Hereby, Oregon Scientific, declares that this Classic dual-alarm projection clock (model: RM308P / RM308PA / RM308PU / RA308PH - Oregon Scientific RM308PA | User Manual - Page 2
com/service/support.asp Pour des renseignements internationaux, rendez vous sur le site: www2.oregonscientific.com/about/international.asp EUROPE - DÉCLARATION DE CONFORMITÉ Par la présente Oregon Scientific déclare que l'appareil Réveil projecteur à double alarme (modèle: RM308P / RM308PA / RM308PU
-
 1
1 -
 2
2
 |
 |
Classic dual-alarm projection clock
Model: RM308P / RM308PA /
RM308PU / RA308PH
USER MANUAL
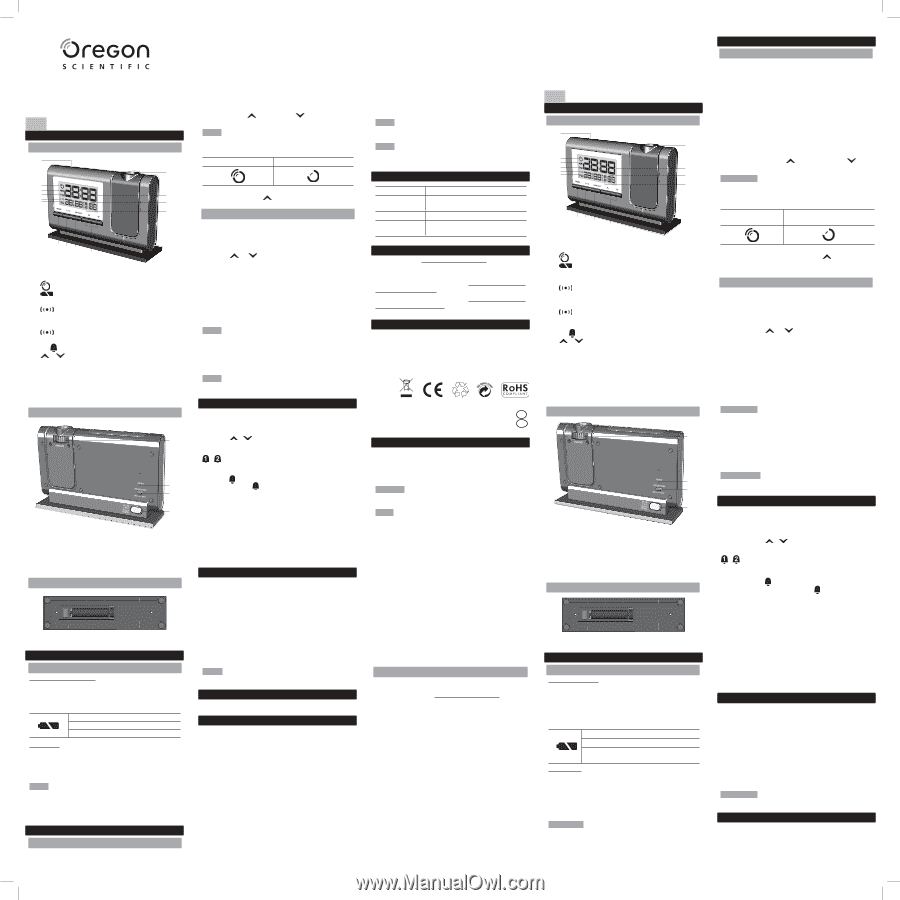
OVERVIEW
FRONT VIEW
1
2
11
12
13
14
3
4
5
6
7
8
9
10
1.
SNOOZE / LIGHT
: activate snooze alarm; activate
backlight
2.
: signal reception indicator
3.
: main unit batteries low / no battery
4.
PM: indicate PM
5.
: alarm time is displayed
6.
Alarm time / calendar
7.
MODE
: change settings / display
8.
: view alarm status; set alarm; change to alarm /
calendar display
9.
ON
OFF
: activate / deactivate alarm function
10.
/
: increase / decrease values of the selected
setting; enable / disable clock reception signal
11. Projector:
project time / alarm status
12. Clock with seconds / weekday
13. Time zone offset
14. Alarm 1, 2 is ON
REAR VIEW
1
2
3
4
1.
FOCUS
: focus the projected image
2.
RESET
: reset unit to default settings
3.
PROJECTION ON/OFF
: enable / disable continuous
projection
4.
AC adaptor socket
BOTTOM VIEW
1.
Battery compartment
GETTING STARTED
POWER SUPPLY
2 x UM-4 (AAA) batteries
To insert batteries:
1.
Remove the battery compartment cover.
2.
Insert the batteries, matching the polarities (+/ -).
3.
Press
RESET
after each battery change.
MEANING
Battery is low in power
No battery installed – only AC adaptor
1 x adaptor
Alternatively, use the adaptor supplied to power the unit.
For
continuous use of projector, adaptor must be installed.
Make sure the adapter is not obstructed and is easily
accessible to the unit.
NOTE
The main unit and adaptor should not be exposed to
wet conditions. No objects filled with liquid, such as vases,
should be placed on the main unit and adaptor.
To completely disconnect from power, the adaptor should be
disconnected from the mains.
CLOCK
CLOCK RECEPTION
This product is designed to synchronize its clock automatically
with a clock signal.
RM308P:
•
EU: DCF-77 signal: within 1500 km (932 miles) of
Frankfurt, Germany.
RM308PA:
•
US: WWVB-60 signal: within 3200km (2000 miles) of
Fort Collins Colorado.
RM308PU:
•
UK: MSF-60 signal: within 1500 km (932 miles) of
Anthorn, England.
To enable / disable signal reception:
Press and hold
to enable or
to disable signal
reception.
NOTE
Reception takes 2-10 minutes. If the signal is weak,
it can take up to 24 hours to get a valid signal.
Clock signal reception indicator:
Strong signal
Weak / No signal
If signal reception is unsuccessful, place your unit next to a
window, press and hold
to force another signal search.
MANUALLY SET CLOCK
To set the clock manually, disable the clock signal reception
first.
1.
Press and hold
MODE
to enter.
2.
Press
MODE
to toggle between displays.
3.
Press
or
to increase / decrease values of the
selected setting.
4.
Press
MODE
to confirm.
The settings order is: time zone offset, 12/24 hr format,
hour, minute, year, month-day / day-month, month, day and
language.
Time zone offset sets the clock +/- 23 hours from the received
clock signal time. If you have deactivated the clock signal
reception, do not set a value for time zone.
NOTE
If you enter +1 in the time zone setting, this will give
you your regional time plus 1 hour.
If you are in the US (RM308PA only) set the clock to:
PA for Pacific time
MO for Mountain time
CE for Central time
EA for Eastern time
NOTE
The language options are English (E), German (D),
French (F), Italian (I), and Spanish (S).
ALARM
To set the alarm:
1.
Press
ALARM
to toggle between Alarm 1 / 2.
2.
Press and hold
ALARM
to enter alarm setting.
3.
Press
/
to set hour / minute.
4.
Press
ALARM
or
MODE
to confirm.
/
indicates alarm is ON.
To activate / deactivate alarm 1 and / or 2:
1.
Press
to select Alarm 1 or 2.
2.
Press and hold
.
To silence the alarm:
•
Press
SNOOZE
/
LIGHT
to silence it for 8 minutes
OR
•
Press any other key
to turn the alarm off and activate it
again after 24 hours.
To select display mode:
•
Press
MODE
to toggle between displays (alarm,
calendar with seconds and calendar with weekday).
PROJECTION
To activate projection / backlight:
•
Press
SNOOZE / LIGHT
.
To activate / deactivate continuous projection:
•
Slide
PROJECTION
switch to ON/OFF when adaptor is
connected.
To flip image 180° (while image is projected):
•
Within 5 seconds of pressing
SNOOZE / LIGHT
, press
SNOOZE / LIGHT
again.
To focus image:
•
Turn
FOCUS
wheel.
NOTE
If projection is illuminated, do not look directly into
the projector.
RESET
Press
RESET
to return to the default settings.
PRECAUTIONS
•
Do not subject the unit to excessive force, shock, dust,
temperature or humidity.
•
Do not cover the ventilation holes with any items such as
newspapers, curtains etc.
•
Do not immerse the unit in water. If you spill liquid over
it, dry it immediately with a soft, lint-free cloth.
•
Do not clean the unit with abrasive or corrosive
materials.
•
Do not tamper with the unit’s internal components. This
invalidates the warranty.
•
Only use fresh batteries. Do not mix new and old
batteries.
•
Images shown in this manual may differ from the actual
display.
•
When disposing of this product, ensure it is collected
separately for special treatment and not as normal
household waste.
•
Placement of this product on certain types of wood
EN
may result in damage to its finish for which Oregon
Scientific will not be responsible. Consult the furniture
manufacturer's care instructions for information.
•
The contents of this manual may not be reproduced
without the permission of the manufacturer.
•
Do not dispose old batteries as unsorted municipal
waste. Collection of such waste separately for special
treatment is necessary.
•
Please note that some units are equipped with a
battery safety strip. Remove the strip from the battery
compartment before first use.
NOTE
The technical specifications for this product and the
contents of the user manual are subject to change without
notice.
NOTE
Features and accessories will not be available in all
countries. For more information, please contact your local
retailer.
SPECIFICATIONS
TYPE
DESCRIPTION
L x W x H
145 x 94 x 40 mm
(5.7 x 3.7 x 1.6 in)
Weight
157 g ( 5.5 oz) without battery
Power
AC/DC 4.5V adaptor
2 x UM-4 (AAA) 1.5 V batteries
ABOUT OREGON SCIENTIFIC
Visit our website (www.oregonscientific.com) to learn more
about Oregon Scientific products.
If you’re in the US and would like to contact our Customer
Care department directly, please visit: www2.oregonscientific.
com/service/support.asp
For international inquiries, please visit: www2.oregonscientific.
com/about/international.asp
EU-DECLARATION OF CONFORMITY
Hereby, Oregon Scientific, declares that this Classic dual-alarm
projection clock (model: RM308P / RM308PA / RM308PU /
RA308PH) is in compliance with the essential requirements
and other relevant provisions of Directive 1999/5/EC. A copy of
the signed and dated Declaration of Conformity is available on
request via our Oregon Scientific Customer Service.
COUNTRIES RTTE APPROVAL COMPLIED
All EU countries, Switzerland
CH
and Norway
N
FCC STATEMENT
This device complies with Part 15 of the FCC Rules. Operation
is subject to the following two conditions: (1) This device may
not cause harmful interference, and (2) This device must
accept any interference received, including interference that
may cause undesired operation.
WARNING
Changes or modifications not expressly approved
by the party responsible for compliance could void the user’s
authority to operate the equipment.
NOTE
This equipment has been tested and found to comply
with the limits for a Class B digital device, pursuant to Part
15 of the FCC Rules. These limits are designed to provide
reasonable protection against harmful interference in a
residential installation.
This equipment generates, uses and can radiate radio
frequency energy and, if not installed and used in accordance
with the instructions, may cause harmful interference to
radio communications. However, there is no guarantee
that interference will not occur in a particular installation. If
this equipment does cause harmful interference to radio or
television reception, which can be determined by turning the
equipment off and on, the user is encouraged to try to correct
the interference by one or more of the following measures:
•
Reorient or relocate the receiving antenna.
•
Increase the separation between the equipment and
receiver.
•
Connect the equipment into an outlet on a circuit different
from that to which the receiver is connected.
•
Consult the dealer or an experienced radio / TV
technician for help.
DECLARATION OF CONFORMITY
The following information is not to be used as contact for
support or sales. Please call our customer service number
(listed on our website at www.oregonscientific.com), or on the
warranty card for this product) for all inquiries instead.
We
Name:
Oregon Scientific, Inc.
Address:
19861 SW 95
th
Ave.,Tualatin,
Oregon 97062 USA
Telephone No.:
1-800-853-8883
declare that the product
Product No.:
RM308P / RM308PA / RM308PU /
RA308PH
Product Name:
Classic dual-alarm projection clock
Manufacturer:
IDT Technology Limited
Address:
Block C, 9/F, Kaiser Estate,
Phase 1, 41 Man Yue St.,
Hung Hom, Kowloon,
Hong Kong
is in conformity with Part 15 of the FCC Rules. Operation is
subject to the following two conditions: 1) This device may not
cause harmful interference. 2) This device must accept any
interference received, including interference that may cause
undesired operation.
Réveil projecteur à double alarme
Modèle: RM308P / RM308PA /
RM308PU / RA308PH
MANUEL DE L’UTILISATEUR
VUE D’ENSEMBLE
FACE AVANT
1
2
11
12
13
14
3
4
5
6
7
8
9
10
1.
SNOOZE / LIGHT (Rappel d’alarme)
: active le rappel
d’alarme et le rétro-éclairage
2.
: indicateur de réception du signal
3.
: les piles de l’appareil principal sont faibles /
aucune pile
4.
PM: indique PM
5.
: heure de l’alarme affichée
6.
Heure de l’alarme / calendrier
7.
MODE
: modifie les réglages / l’affichage
8.
: permet d’afficher le statut de l’alarme ; de régler
l’alarme ; d’alterner entre l’affichage de l’alarme /
calendrier
9.
ON
OFF
: permet d’activer / désactiver l’alarme
10.
/
: augmente / diminue les valeurs du réglage
sélectionné ; active / désactive le signal de réception de
l’horloge
11. Projecteur:
projette l’heure et le statut de l’alarme
12. Horloge avec affichage des secondes / jours de la
semaine
13. Fuseau horaire
14. Alarme 1/2 activée
FACE ARRIERE
1
2
3
4
1.
FOCUS
: mise au point de l’image projetée
2.
RESET
(REINITIALISER):
réinitialise l’appareil aux
réglages par défaut
3.
PROJECTION ON/OFF
: active / désactive la projection
continue
4.
Prise adaptateur CA
VUE DU BAS
1.
Compartiment des piles
POUR COMMENCER
ALIMENTATION
2 piles UM-4 (AAA)
Pour insérer les piles :
1.
Retirez le couvercle du compartiment des piles.
2.
Insérez les piles, en respectant les polarités (+/-).
3.
Appuyez sur
RESET
(REINITIALISER)
après chaque
changement de pile.
SIGNIFICATION
L’alimentation de la pile est faible
Aucune pile n’est installée - seul
l’adaptateur CA est branché
1 adaptateur
Vous pouvez également utiliser l’adaptateur fourni pour
alimenter l’appareil.
Si vous désirez utiliser continuellement
le projecteur et le rétro éclairage, branchez l’adaptateur
secteur.
Assurez-vous que l’adaptateur ne soit pas obstrué et qu’il
soit facilement accessible à l’appareil.
REMARQUE
N’exposez ni l’adaptateur ni l’appareil principal
à l’humidité. Ne placez aucun récipient rempli d’eau comme
les vases sur l’appareil principal ou l’adaptateur.
Pour être entièrement déconnecté de l’alimentation électrique,
l’adaptateur doit être débranché de la prise électrique.
HORLOGE
RÉCEPTION DE L’HORLOGE
Ce produit est conçu pour synchroniser automatiquement
l’horloge avec le signal de réception.
RM308P
: Union européenne : Signal DCF-77 : dans un
rayon de 1 500 km (932 miles) depuis Frankfort, Allemagne.
RM308PA
: États-Unis: Signal WWVB-60 : dans un rayon de
3 200 km (2 000 miles) de Fort Collins, Colorado.
Régler
l’heure manuallement pour choisir la zone horaire (Pacific,
Mountain, Central ou Eastern).
RM308PU
: Royaume-Uni : Signal MSF-60 : dans un rayon
de 1 500 Km (932 miles) de Anthorn, Angleterre.
Pour activer / désactiver le signal de réception de
l’horloge :
Appuyez et maintenez
pour activer, ou
pour
désactiver le signal de réception de l’horloge.
REMARQUE
La réception prend de 2 à 10 minutes.
Si le
signal est faible, 24 heures peuvent être nécessaires pour
obtenir un signal valide.
Indicateur de réception du signal de l’horloge :
SIGNAL FORT
SIGNAL FAIBLE / AUCUN
SIGNAL
Si la réception échoue, positionnez votre appareil à proximité
d’une fenêtre, appuyez et maintenez
pour forcer la
recherche de signal.
RÉGLER MANUELLEMENT L’HORLOGE
Pour régler manuellement l’horloge, vous devez, tout
d’abord, désactiver la réception du signal.
1.
Appuyez et maintenez la touche
MODE
pour entrer
dans les réglages.
2.
Appuyez sur
MODE
pour alterner entre.
3.
Appuyez sur
ou
pour augmenter / diminuer les
valeurs le réglage sélectionné.
4.
Appuyez sur
MODE
pour confirmer.
Les réglages s’effectuent dans l’ordre suivant : Fuseau
horaire, format 12/24 heures, heure, minutes, année, format
jour-mois/mois-jour, mois et langue.
La fonction de fuseau horaire règle l’horloge à +/- 23 heures
de l’heure du signal reçu. Si vous avez désactivé la réception
du signal de l’horloge, ne configurez pas de valeur pour le
fuseau horaire.
REMARQUE
Si vous entrez +1 dans le réglage du fuseau
horaire, vous obtiendrez votre heure locale plus une heure.
Si vous êtes aux Etats-Unis (modèle RM308PA) réglez
l’horloge sur :
PA pour l’heure pacifique
MO pour l’heure des montages
CE pour l’heure centrale
EA pour l’heure de la côte est
REMARQUE
Les options de langue sont Anglais (E),
Alemand (D), Français (F), Italien (I), et Espagnol (S).
ALARME
Pour régler l’alarme :
1.
Appuyez
ALARM
pour alterner entre l’alarme 1 / 2.
2.
Appuyez et maintenez la touche
ALARM
pour entrer
dans le réglage de l’alarme.
3.
Appuyez sur
/
pour régler l’heure / les minutes.
4.
Appuyez sur
ALARM
ou
MODE
pour confirmer.
/
indique que l’alarme est activée.
Pour activer / désactiver l’alarme 1 et/ou 2 :
1.
Appuyez sur
pour sélectionner l’alarme 1 ou 2.
2.
Appuyez et maintenez le bouton
.
Pour couper le son de l’alarme :
•
Appuyez sur
SNOOZE / LIGHT,
pour couper le son
pendant 8 minutes
OU
•
Appuyez sur n’importe quelle touche pour éteindre
l’alarme et pour qu’elle se déclenche 24 heures plus
tard.
Pour sélectionner le mode d’affichage :
Appuyez sur
MODE
pour alterner entre les différents
affichages (alarme, calendrier avec secondes et calendrier
avec jour de la semaine).
PROJECTION
Pour activer le rétro-éclairage :
•
Appuyez sur
SNOOZE / LIGHT
.
Pour activer / désactiver la projection continue :
•
Appuyez sur l'interrupteur
PROJECTION
une fois
l’adaptateur connecté.
Pour renverser l’image à 180° (en projection) :
•
Dans les 5 secondes après avoir appuyé sur
SNOOZE
/ LIGHT,
appuyez une nouvelle fois sur
SNOOZE /
LIGHT
.
Mettre au point l’image :
•
Tournez la molette
FOCUS.
REMARQUE
Si la projection est activée, ne regardez pas
directement dans le projecteur.
RÉINITIALISATION DU SYSTÈME
Appuyez sur
RESET
pour que l’appareil revienne aux
réglages par défaut.
FR