Oregon Scientific RMR391PA User Manual
Oregon Scientific RMR391PA Manual
 |
View all Oregon Scientific RMR391PA manuals
Add to My Manuals
Save this manual to your list of manuals |
Oregon Scientific RMR391PA manual content summary:
- Oregon Scientific RMR391PA | User Manual - Page 1
EN Slim Projection Clock with Indoor/ Outdoor Temperature Model: RMR391P / RMR391PA / RMR391PU USER MANUAL Specifications 8 About Oregon Scientific 8 EU-Declaration of conformity 8 FCC Statement 9 CONTENTS Overview 2 Front view 2 Back view 2 Bottom view 3 Remote sensor 3 Getting started 3 - Oregon Scientific RMR391PA | User Manual - Page 2
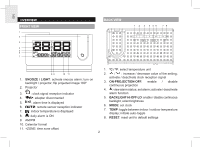
3 4 56 7 8 89 10 11 1. SNOOZE / LIGHT: activate snooze alarm; turn on backlight / projector; flip projected image 180º 2. Projector 3. : clock signal reception indicator 4. : adapter disconnected 5. : alarm time is displayed 6. : remote sensor reception indicator 7. : indoor temperature - Oregon Scientific RMR391PA | User Manual - Page 3
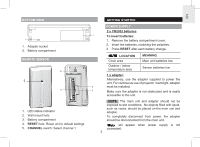
1. Remove the battery compartment cover. 2. Insert the batteries, matching the polarities. 3. Press RESET after each battery change. LOCATION Clock area Outdoor / indoor temperature area MEANING Main unit batteries low Sensor batteries low 1 x adapter: Alternatively, use the adapter supplied - Oregon Scientific RMR391PA | User Manual - Page 4
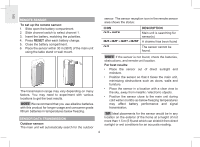
EN REMOTE SENSOR To set up the remote sensor: 1. Slide open the battery compartment. 2. Slide channel switch to select channel 1. 3. Insert the battery, matching the polarities. 4. Press RESET after each battery change. 5. Close the battery compartment. 6. Place the sensor within 30 m (98 ft) of - Oregon Scientific RMR391PA | User Manual - Page 5
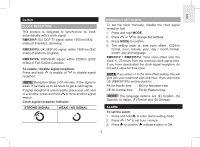
This product is designed to synchronize its clock automatically with a clock signal. RMR391P: EU: DCF-77 signal: within 1500 km (932 miles) of Frankfurt, Germany. RMR391PU: UK: MSF-60 signal: within 1500 km (932 miles) of Anthorn, England. RMR391PA: WWVB-60 signal: within 3200km (2000 miles - Oregon Scientific RMR391PA | User Manual - Page 6
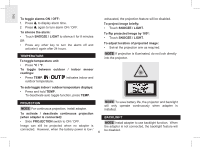
life, the projector and backlight will only operate continuously when adapter is installed. To activate / deactivate continuous projection (when adapter is connected): BACKLIGHT • Slide PROJECTION switch to ON / OFF. NOTE Install adapter to use backlight function. When Image can still be - Oregon Scientific RMR391PA | User Manual - Page 7
on certain types of wood may result in damage to its finish for which Oregon Scientific will not be responsible. Consult the furniture manufacturer's care instructions for information. • The contents of this manual may not be reproduced without the permission of the manufacturer. RESET Press RESET to - Oregon Scientific RMR391PA | User Manual - Page 8
.oregonscientific.com/service/support.asp For international inquiries, please visit: www2.oregonscientific.com/about/international.asp EU-DECLARATION OF CONFORMITY Hereby, Oregon Scientific, declares that this Slim Projection Clock with Indoor/Outdoor Temperature (Model: RMR391P / RMR391PA / RMR391PU - Oregon Scientific RMR391PA | User Manual - Page 9
support or sales. Please visit our website at www2. WARNING Changes or modifications not expressly oregonscientific.com/service RMR391P / RMR391PA / frequency energy and, if not installed and used in RMR391PU accordance with the instructions, may cause harmful Product Name: Slim Projection Clock
-
 1
1 -
 2
2 -
 3
3 -
 4
4 -
 5
5 -
 6
6 -
 7
7 -
8
-
9
 |
 |

1
EN
Slim Projection Clock with Indoor/
Outdoor Temperature
Model: RMR391P / RMR391PA /
RMR391PU
USER MANUAL
CONTENTS
Overview
..................................................................
2
Front view
.............................................................
2
Back view
.............................................................
2
Bottom view
..........................................................
3
Remote sensor
.....................................................
3
Getting started
.........................................................
3
Power supply
.........................................................
3
Remote sensor.
.....................................................
4
Sensor data transmission
.....................................
4
Clock
........................................................................
5
Clock reception
....................................................
5
Manually set clock
................................................
5
Alarm
........................................................................
5
Temperature
.............................................................
6
Projection
................................................................
6
Backlight
.................................................................
6
Reset
........................................................................
7
Precautions
.............................................................
7
Specifications
........................................................
8
About Oregon Scientific
.........................................
8
EU-Declaration of conformity
................................
8
FCC Statement
.........................................................
9