Panasonic AK-HC931B Operating Instructions
Panasonic AK-HC931B Manual
 |
View all Panasonic AK-HC931B manuals
Add to My Manuals
Save this manual to your list of manuals |
Panasonic AK-HC931B manual content summary:
- Panasonic AK-HC931B | Operating Instructions - Page 1
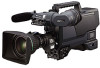
Multi-format camera AK-HC931BP Before attempting to connect, operate or adjust this product, please read these instructions completely. - Panasonic AK-HC931B | Operating Instructions - Page 2
operating and maintenance (service) instructions in the literature accompanying the appliance. For CANADA This class A digital apparatus complies with Canadian and if not installed and used in accordance with the instruction manual, may cause harmful interference to radio communications. Operation - Panasonic AK-HC931B | Operating Instructions - Page 3
and the point where they exit from the apparatus. 4) Follow all instructions. 5) Do not use this apparatus near water. 6) Clean only with when unused for long periods of time. 14) Refer all servicing to qualified service personnel. Servicing is required when the apparatus has been damaged in any way - Panasonic AK-HC931B | Operating Instructions - Page 4
connections 1 (with multi-format camera 19 System connections 2 (with build-up unit) ...20 System connections 3 (with MSU) ...21 Status displays on viewfinder screen ...22 Menu operations ...23 Setting menu configuration ...25 How to select the video format ...28 AK-HC931BP connector pin assignment - Panasonic AK-HC931B | Operating Instructions - Page 5
be output and RET images and PROMPT signals can be input by connecting the multi-format camera to the CCU (AK-HCU931P, optional accessory). In terms of controlling the camera's functions, the ROP (AK-HRP931P) or MSU (AK-MSU930P), also available as an optional accessory, can be connected to the CCU - Panasonic AK-HC931B | Operating Instructions - Page 6
Controls and their functions 6 - Panasonic AK-HC931B | Operating Instructions - Page 7
Controls and their functions 7 - Panasonic AK-HC931B | Operating Instructions - Page 8
Tripod mount Before securing the multi-format camera to a tripod, attach the tripod HD SDI] The camera main line's HD-SDI images are output from this connector. Optional video output connector (BNC) [AUX OUT] When the camera D/C unit (AK-HDC931, optional accessory) has been installed, the camera - Panasonic AK-HC931B | Operating Instructions - Page 9
filter selector switch [FILTER LOCAL] This is pressed to adjust the optical filter manually. When it is pressed again, the optical filter can be controlled by or TEST). It is not effective when the CCU is connected to the camera. White balance selector switch [W.BAL] This is set when there is no - Panasonic AK-HC931B | Operating Instructions - Page 10
is also switched. It is not effective when the CCU is connected to the camera. AWB/ABB start switch [AUTO W/B BAL] This switch is operated when the be adjusted automatically. It is not effective when the CCU is connected to the camera. VTR start/RET selector switch [VTR/RET] This is used as the - Panasonic AK-HC931B | Operating Instructions - Page 11
LENS connector For details on handling the lens, refer to the instructions that accompany the lens. Depending on the lens mounted, it may be necessary to perform the following lens and camera adjustments. 1. Flange back adjustment for the lens 2. Auto iris operation speed adjustment - Panasonic AK-HC931B | Operating Instructions - Page 12
instructions that accompany the lens. About 10 ft (3 m) 1 Mount the lens on the camera. Do not forget to connect the lens cable at this time. 2 Set the lens iris to manual 5 Set the zoom ring to the telephoto position either by manual or electrical means. 6 Shoot the flange back adjustment chart, - Panasonic AK-HC931B | Operating Instructions - Page 13
that it is fully and securely inserted. Mounting plate supplied to AK-HC931BP 3 Pull up the knob on the mounting plate and slide the plate to attach the viewfinder. Pull up the knob. Detaching the viewfinder 1 Check that the camera's POWER switch is at the OFF position. 2 Loosen the stopper screw - Panasonic AK-HC931B | Operating Instructions - Page 14
Performing the viewfinder adjustments (The viewfinder is an optional accessory.) Left or right position adjustment 1 Loosen the stopper screw. Stopper screw Forward or backward position adjustment 1 Rotate the viewfinder forward/backward position fixing lever towards the outside to release it from - Panasonic AK-HC931B | Operating Instructions - Page 15
2 Mount the microphone and tighten up the clamp screw. Clamp screw AUDIO IN switch 3 Connect the microphone cable to the MIC IN connector on the camera. MIC IN connector 15 - Panasonic AK-HC931B | Operating Instructions - Page 16
the back. Tripod attachment Red lever Black lever If the pin of the tripod attachment fails to return to its original position after the camera has been detached, push the red lever again and simultaneously move the black lever in the direction of the arrow to return the pin to - Panasonic AK-HC931B | Operating Instructions - Page 17
diagram Large lens Build-up unit AK-HBU931P Master setup unit AK-MSU930P Microphone kit AJ-MC700P 2 black-and-white viewfinder AJ-HVF20P Handy lens Multi-format camera AK-HC931BP Tripod attachment SHAN-TM700 8 LCD viewfinder AK-HVF931P Camera control unit AK-HCU931P ROP cable SD memory - Panasonic AK-HC931B | Operating Instructions - Page 18
SD system 1 Camera control unit (CCU: AK-HCU931P) This is the multi-format camera's camera control unit. It is connected to the multi-format camera using an optical fiber cable (optional accessory). As a standard feature, it supports SD video input and output, and it can also support HD video input - Panasonic AK-HC931B | Operating Instructions - Page 19
1 (with multi-format camera) 2 viewfinder AJ-HVF20P Lens Multi-format camera AK-HC931BP Camera control unit AK-HCU931P ROP cable Remote operation panel AK-HRP931P Before proceeding with the connections, set the CCU power switch to the OFF position. Connect the multi-format camera to the - Panasonic AK-HC931B | Operating Instructions - Page 20
System connections 2 (with build-up unit) Large lens Build-up unit AK-HBU931P Multi-format camera AK-HC931BP 8 LCD viewfinder AK-HVF931P Camera control unit AK-HCU931P ROP cable Remote operation panel AK-HRP931P 20 - Panasonic AK-HC931B | Operating Instructions - Page 21
3 (with MSU) Multi-format camera AK-HC931BP Camera control unit 1 AK-HCU931P Master setup unit AK-MSU930P Multi-format camera AK-HC931BP Remote operation panel 1 AK-HRP931P Camera control unit 14 AK-HCU931P Multi-format camera AK-HC931BP Camera control unit 15 AK-HCU931P Remote operation - Panasonic AK-HC931B | Operating Instructions - Page 22
displays on viewfinder screen Besides the images, multi-format camera settings and messages indicating operating statuses appear Gain display Audio CH1 and CH2 displays Iris f-number display Camera warning or message display Focus position display Zoom position display MONI SEL - Panasonic AK-HC931B | Operating Instructions - Page 23
Menu operations Basic setting menu operations Displaying the menus User menu 1 Press the MENU button. The camera's USER menu screen now appears on the viewfinder or monitor. The currently selected format is displayed at the bottom of the menu screen. Entering the menu data After accessing the - Panasonic AK-HC931B | Operating Instructions - Page 24
Menu operations Entering the menu data (continued) When the setting flashes one character at a time, press the JOG dial to move the flashing toward the right. 1 When the JOG dial is pressed, flashing moves toward the right. 2 Turn the JOG dial to change the setting. 3 When the JOG dial is now - Panasonic AK-HC931B | Operating Instructions - Page 25
Setting menu configuration Hierarchical menus 25 - Panasonic AK-HC931B | Operating Instructions - Page 26
Setting menu configuration Hierarchical menus 26 - Panasonic AK-HC931B | Operating Instructions - Page 27
Setting menu configuration Hierarchical menus 27 - Panasonic AK-HC931B | Operating Instructions - Page 28
selection will be canceled.) Select the same video format for the camera control unit (AK-HCU931P) as well. The images cannot be output properly if different video formats are used with the camera and the camera control unit. 3 Select "FORMAT SEL" and press the JOG dial. "Yes?" and "No - Panasonic AK-HC931B | Operating Instructions - Page 29
AK-HC931BP connector pin assignment CN# in the Instructions OPT FIBER EDW.3K.93C.TLC (Hirakawa) Pin# 01 02 1 2 3 4 Signal 12V UNREG_GND MONI-OUT MONI-OUT_GND IRIS_CONT IRIS_POSI ZOOM_POSI FOCUS_POS/L_RXD S_IRIS_A-R/L_TXD HD SDI BNC(75)J-PL72J-BPA (Hirose) Pin# 1 2 Signal SDI_OUT SDI_OUT_GND - Panasonic AK-HC931B | Operating Instructions - Page 30
External dimension drawings 14-3/8(365 mm) Unit: inch (mm) 5(126 mm) 9-1/8(231.5 mm) 11-1/16 (280 mm) 30 - Panasonic AK-HC931B | Operating Instructions - Page 31
Gain selected by switch 2) INCOM: 0 dBm/600 ohms (XLR 5-pin, female2) (Mixing is controlled separately for PGM1 and PGM2.) 3) Monitor output: HD signals = 1Vp-p, 75 ohms (BNC) Output signals can be selected using the monitor output selector switch. 4) QTV output: VBS signal = 1 Vp-p, 75 - Panasonic AK-HC931B | Operating Instructions - Page 32
. Fax (800) 334-4880 Emergency after hour parts orders (800) 334-4881 TECHNICAL SUPPORT: Emergency 24 Hour Service (800) 222-0741 Panasonic Canada Inc. 5770 Ambler Drive, Mississauga, Ontario L4W 2T3 (905) 624-5010 Panasonic de Mexico S.A. de C.V. Av angel Urraza Num. 1209 Col. de Valle 03100 Mexico
-
 1
1 -
 2
2 -
 3
3 -
 4
4 -
 5
5 -
 6
6 -
 7
7 -
8
-
9
-
10
-
11
-
12
-
13
-
14
-
15
-
16
-
17
-
18
-
19
-
20
-
21
-
22
-
23
-
24
-
25
-
26
-
27
-
28
-
29
-
30
-
31
-
32
 |
 |

Multi-format camera
AK-HC931BP
Before attempting to connect, operate or adjust this product,
please read these instructions completely.