Panasonic PT-D6000UK Functional Instructions
Panasonic PT-D6000UK - XGA DLP Projector Manual
 |
UPC - 791871111864
View all Panasonic PT-D6000UK manuals
Add to My Manuals
Save this manual to your list of manuals |
Panasonic PT-D6000UK manual content summary:
- Panasonic PT-D6000UK | Functional Instructions - Page 1
Functional Instructions DLP™Based Projector Commercial Use Model No. PT-DZ6710 PT-DZ6700 PT-DW6300 PT-D6000 The information of these instructions are shared use with multiple models of DZ6710 series, DZ6700 series, DW6300 series and D6000 series. TQBJ0299 ENGLISH - Panasonic PT-D6000UK | Functional Instructions - Page 2
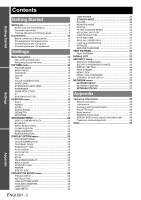
22 BLANKING 22 INPUT RESOLUTION 22 CLAMP POSITION 22 PROJECTOR SETUP menu 28 PROJECTOR ID 28 INSTALLATION 28 HIGH ALTITUDE MODE 28 COOLING CONDITION 28 LAMP SELECT 29 LAMP RELAY 29 ENGLISH - 2 LAMP POWER 29 STANDBY MODE 29 RS-232C 29 REMOTE2 MODE 29 STATUS 30 FILTER COUNTER RESET - Panasonic PT-D6000UK | Functional Instructions - Page 3
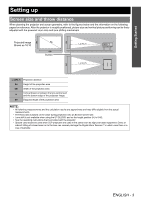
on the value during projection onto an 80-inch screen size. • Lens shift is not available when using the ET-DLE055, and so the height position (H) is SH/2. • See the operating instructions that is provided with the projector. • Special care should be used when DLP projectors are used in the same - Panasonic PT-D6000UK | Functional Instructions - Page 4
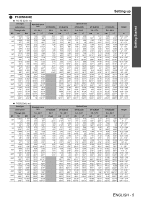
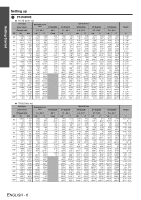
Getting Started Setting up J Projection distance by projection lens Q PT-DZ6710E/PT-DZ6700E 16:10 (Unit: m) Lens type Lens names Standard zoom lens ET-DLE055 Through ratio 1.8 - 2.4:1 0.8:1 SD 50'' 60'' 70'' 80'' 90'' 100'' 120'' 150'' 200'' 250'' 300 350'' 400'' 500'' 600'' SH 0.673 - Panasonic PT-D6000UK | Functional Instructions - Page 5
Getting Started Setting up Q PT-DW6300E 16:10 (Unit: m) Lens type Lens names Standard zoom lens ET-DLE055 Through ratio 1.8 - 4'2'' 1.46 4'9'' 1.65 5'4'' 1.84 6' 2.22 7'3'' 2.79 9'1'' 3.73 12'2'' Optional lens ET-DLE150 ET-DLE250 ET-DLE350 ET-DLE450 1.4 - 2.0:1 LW 1.49 4'10'' 1.8 5'10 - Panasonic PT-D6000UK | Functional Instructions - Page 6
Getting Started Setting up Q PT-D6000E 16:10 (Unit: m) Lens type Lens names Standard zoom lens ET-DLE055 Through ratio 1.8 - 2.4:1 12.05 39'6'' 14.07 46'1'' 16.08 52'9'' 20.12 66' 24.15 79'2'' Optional lens ET-DLE250 ET-DLE350 ET-DLE450 2.4 - 3.7:1 LW 2.36 7'8'' 2.85 9'4'' 3.34 10'11 - Panasonic PT-D6000UK | Functional Instructions - Page 7
J Calculation formulas for projection distance by lens types Setting up Getting Started Names Type • PT-DZ6710E/PT-DZ6700E Standard zoom lens ET-DLE055 Fixed-focus lens ET-DLE150 Wide-angle zoom lens ET-DLE250 Intermediate-focus zoom lens ET-DLE350 Long-focus zoom lens ET-DLE450 Ultra- - Panasonic PT-D6000UK | Functional Instructions - Page 8
VERTICAL KEYSTONE (Side view) Screen VERTICAL ARC (Side view) HORIZONTAL KEYSTONE (Top view) Screen HORIZONTAL ARC (Top view) Screen Screen Screen L2: Projection distance (Side view) R2: Radius of the circle (Top view) Screen Arc Keystone and arc Keystone correction correction correction L3 - Panasonic PT-D6000UK | Functional Instructions - Page 9
adjusters and throwing angle You can screw up/down the front leg adjusters to control the angle of the projector for adjusting the throwing angle. STANDBY(RED)/ ON(GREEN) LAMP TEMP FILTER NOTE: • Heated air comes out of the air exhaust port. Do not touch the air exhaust port directly. ENGLISH - Panasonic PT-D6000UK | Functional Instructions - Page 10
connection to the projector Read and follow the operating and connecting instructions of each peripheral device. The peripheral devices must be turned off. Use cables that match each peripheral device to be connected. If the input signal is affected by signal jitter, the projected image may have - Panasonic PT-D6000UK | Functional Instructions - Page 11
: • For the specifications of the RGB signals that can be applied from the computer, see the data sheet of the operating instructions that is provided with the projector. • If your computer has the resume feature (last memory), the computer may not function properly until the resume capability is - Panasonic PT-D6000UK | Functional Instructions - Page 12
SUB KEYSTONE LINEARITY GEOMETRY:CURVED LENS THROW RATIO VERTICAL KEYSTONE PT-DW6300E and PT-D6000E only) VERTICAL KEYSTONE VERTICAL SUB KEYSTONE LINEARITY ADVANCED MENU DIGITAL CINEMA REALITY page 22 AUTO 25p FIXED OFF 30p FIXED BLANKING page 22 UPPER LEFT LOWER RIGHT INPUT RESOLUTION - Panasonic PT-D6000UK | Functional Instructions - Page 13
LAMP2 page 29 OFF LAMP POWER 00:00 - 23:00 page 29 HIGH LOW STANDBY MODE page 29 NORMAL RS-232C ECO page 29 (IN) BAUDRATE (IN) PARITY (OUT) BAUDRATE (OUT) PARITY RESPONSE(ID ALL) GROUP RESPONSE(ID GROUP) REMOTE2 MODE page 29 DEFAULT STATUS USER page 30 FILTER COUNTER RESET page 30 NO - Panasonic PT-D6000UK | Functional Instructions - Page 14
Menu Navigation SECURITY SECURITY PASSWORD page 35 OFF ON SECURITY PASSWORD CHANGE DISPLAY SETTING OFF LOGO1 TEXT CHANGE TEXT LOGO2 MENU LOCK OFF ON MENU LOCK PASSWORD CONTROL DEVICE SETUP CONTROL PANEL ENABLE DISABLE REMOTE CONTROLLER ENABLE DISABLE page 35 page 35 page 35 page - Panasonic PT-D6000UK | Functional Instructions - Page 15
ADVANCED MENU DISPLAY LANGUAGE DISPLAY OPTION PROJECTOR SETUP TEST PATTERN SIGNAL LIST SECURITY escape from the menu mode and return to the projection. J Operating procedure 1. Press F G to scroll the next level will be displayed. You can reset some setting values to factory default by pressing the - Panasonic PT-D6000UK | Functional Instructions - Page 16
I H Setting range: -31 to +31 Darker Brighter TINT You can adjust the skin tone in the projected image. Call up the bar scale by pressing I, H or the ENTER button, and press I H may be displayed abnormally. Press the DEFAULT button to reset the selected item to the default setting. • Adjust - Panasonic PT-D6000UK | Functional Instructions - Page 17
High SHARPNESS You can adjust the sharpness of the projected image. Call up the bar scale by pressing projector detects the colour system and selects the matched setting automatically, or you can select manually the Operating Instructions that provided with the projector. SDI terminal (PT-DZ6710E - Panasonic PT-D6000UK | Functional Instructions - Page 18
basis. Effective with S-VIDEO and NTSC signals. Q THROUGH The image will be displayed with the resolution of input signal. Q 16:9 When a 16:10, 16:9 or 15:9 signal is detected, the image will be projected without any change, and other signals will be adjusted to 16:9. Q 4:3 When a 4:3 or 5:4 signal - Panasonic PT-D6000UK | Functional Instructions - Page 19
IN/RGB 2 IN/DVI-D IN and SDI (PT-DZ6710E only) DEFAULT H THROUGH H 16:9 H projected image when distorted to a curved surface. For performing geometry correction from a connected computer. NOTE: • GEOMETRY adjustment should be carried out by a person who is familiar with the projector or by a service - Panasonic PT-D6000UK | Functional Instructions - Page 20
button to display the options. LENS THROW RATIO Press I H to adjust throw ratio of the attached lens. VERTICAL KEYSTONE VERTICAL SUB KEYSTONE • When GEOMETRY setting is set, displayed menu or startup logo might be projected outside of the actual image area. • When GEOMETRY is selected, EDGE - Panasonic PT-D6000UK | Functional Instructions - Page 21
projected outside of the actual image area. • You can correct the distortion ± 30 degrees from the plane. For a better quality image, installing the projector with a minimum of distortion is recommended. • Some distortion may be retained for lens shift adjustment - Panasonic PT-D6000UK | Functional Instructions - Page 22
at the ends of the screen or the image protrudes out of the screen during image projection using a VCR and so on. Press F G to select the edge to adjust PT-DZ6710E/PT-DZ6700E PT-DW6300E PT-D6000E Vertical 0 - 599 0 - 399 0 - 383 Horizontal 0 - 959 0 - 639 0 - 511 INPUT RESOLUTION Input resolution - Panasonic PT-D6000UK | Functional Instructions - Page 23
in edge blending feature allows multiple projector images to be seamlessly overlapped by adding a brightness ramp. Press F G to select the required option. OFF Deactive Adds a brightness ramp to the ON overlapped area and adjustable the overlapping position manually. Q Adjusting EDGE BLENDING - Panasonic PT-D6000UK | Functional Instructions - Page 24
to be discontinuous depending on the viewing position. RASTER POSITION When there is gap between the image area and the projecting area, you can move the image inside of the projecting area. VERTICAL HORIZON Press F G to move the image up or down. Press I H to move the image to the left or - Panasonic PT-D6000UK | Functional Instructions - Page 25
the colour range of the projector, the colours will not be projected correctly. • When each colour person who is familiar with the projector or by a service person because a high level of of the projecting area. Press I H to adjust the value. PT-DZ6710E/PT-DZ6700E PT-DW6300E PT-D6000E Setting - Panasonic PT-D6000UK | Functional Instructions - Page 26
USER For 4:3 or 5:4 signals Applicable resolution: 640 x 400, 640 x480, instructions of the connected equipment. • DVI signal is very sensitive, and malfunction may occur or other problems PT projector switched off. ON OFF Memorise the menu cursor position. Reset the cursor position. J INPUT GUIDE - Panasonic PT-D6000UK | Functional Instructions - Page 27
PANASONIC logo. NOTE: • Special software is required to define the LOGO1 image. Contact to an Authorised Service Centre. STARTUP LOGO You can switch the logo on/off that is displayed when starting up the projector SIDE BY SIDE (PT-DZ6710E/PT-DZ6700E/PT-DW6300E only) You can project the image and - Panasonic PT-D6000UK | Functional Instructions - Page 28
remote control. NOTE: • See "Remote control ID" in the operating instructions booklet that is provided with the projector. INSTALLATION When installing the projector, select the projection method according to the projector position. Press I H to cycle through the options. FRONT/FLOOR FRONT - Panasonic PT-D6000UK | Functional Instructions - Page 29
projection lamp can be changed depending on user's needs or the viewing conditions. HIGH LOW Set when high brightness is necessary. Set when high brightness is not necessary. NOTE: • When set to LOW, it is possible to reduce power consumption, reduce operating noise and extend lamp service life - Panasonic PT-D6000UK | Functional Instructions - Page 30
button. 3. The REMAINING FILTER of STATUS will be reset to "0". Display the STATUS and confirm the figure. NOTE: • See "Replacing the Auto Cleaning Filter (ACF)" in the operating instructions booklet that is provided with the projector. NO SIGNAL SHUT-OFF You can set the timer to switch off the - Panasonic PT-D6000UK | Functional Instructions - Page 31
press the ENTER button. 4. The projector returns to the standby mode to reflect the saved data. INITIALIZE You can reset the settings to the factory defaults by LOGO will return to factory settings. SERVICE PASSWORD SERVICE PASSWORD is for a service person. Input the password with the numeric - Panasonic PT-D6000UK | Functional Instructions - Page 32
TEST PATTERN Remote control See "Navigating through the menu" on page 15. See "Main menu and Sub-menu" on page 12. TEST PATTERN You can use 7 test patterns to adjust the signal image. 1. Display an input signal image. 2. Press the MENU button to display the main menu. 3. Select TEST PATTERN menu. - Panasonic PT-D6000UK | Functional Instructions - Page 33
signal data and any corresponding sub memory data. • The signals supporting the installed input module are input and their data registered. • The names a signal to the list When a new format input signal is applied to the projector, press the MENU button to register to the SIGNAL LIST. NOTE: • The - Panasonic PT-D6000UK | Functional Instructions - Page 34
to the previous step by pressing the MENU button. 3. Select OK and press the ENTER button. Displays sub memory status and return to the projection. MEMORY NO. indicates as follows. A5 (1-2) Q Displaying the sub memory list and restoring the settings 1. Press I or H while the menu is cleared from - Panasonic PT-D6000UK | Functional Instructions - Page 35
Displays user defined text in TEXT CHANGE on the screen while projecting. Displays user defined image over the image. Displays PANASONIC logo over the image. TEXT CHANGE You can enter your original required to define the LOGO1 image. Contact to an Authorised Service Centre. Settings ENGLISH - 35 - Panasonic PT-D6000UK | Functional Instructions - Page 36
factory default password is "AAAA". • The factory default password is valid until you change the password in MENU LOCK PASSWORD menu. • When the projector is initialised, the password will be changed to the factory default setting, "AAAA". MENU LOCK PASSWORD You can change the password for MENU LOCK - Panasonic PT-D6000UK | Functional Instructions - Page 37
acquire an IP ADDRESS. OFF: IP ADDRESS need to be entered manually. Enter correct IP ADDRESS numbers. When DHCP is ON, automatically filled ask the network administrator. NETWORK CONTROL You can switch on/off the projector network controlling method. 1. Select the required item to change. 2. - Panasonic PT-D6000UK | Functional Instructions - Page 38
displaying status of the projector and transmission of E-mail messages if there is a problem with the projector. Computer Projector LAN cable (straight) LAN cable which supports category 5 or above. • The length of LAN cable must be 100 m or shorter. LAN terminal LAN LINK/ACT lamp (green) Lights - Panasonic PT-D6000UK | Functional Instructions - Page 39
) or "admin" (administrator privileges) for the user name and panasonic (lowercase) for the password. J Change password Q Administrator mode 1. Select Administrator to change and click NEXT. 4. Click OK and display the Projector Control Window. 5. Click the required item button on the left - Panasonic PT-D6000UK | Functional Instructions - Page 40
will be displayed. Adjustable items POWER Switches projector ON or STANDBY. SHUTTER Temporary halt the projection. OSD Turn on/off the on screen ASPECT See "ASPECT" on page 18. Numeric buttons Numeric buttons LENS FOCUS/ZOOM/SHIFT TEST PATTERN TEST PATTERN See "TEST PATTERN" on page 32. - Panasonic PT-D6000UK | Functional Instructions - Page 41
FUNCTION BUTTON" on page 30. *1. See the operation instruction booklet that is provided with the projector. J Detailed set up Q Network config Click the port Description Select the authentication method specified by your internet service provider. Select the required option for when SMTP Auth - Panasonic PT-D6000UK | Functional Instructions - Page 42
E-mail address of the projector control. (maximum 63 characters) Enter the information to identify the MEMO projector, such as location. ( LAMP1 RUNTIME Sends E-mail when lamp runtime of the lamp1 reaches the set time. LAMP2 RUNTIME Sends E-mail when lamp runtime of LAMP2 RUNTIME the lamp2 - Panasonic PT-D6000UK | Functional Instructions - Page 43
unit cover is not attached securely. Check the lamp unit compartment. ACF UNIT The air cleaning filter (ACF) is not installed or trouble has occurred. See the operating instructions booklet that is provided with the projector. FILTER REMAIN The filter remaining is getting less. See the operating - Panasonic PT-D6000UK | Functional Instructions - Page 44
parameters. "11 12 21 22 31" for PT-DZ6700E, PT-DW6300E and PT-D6000E "11 12 21 22 31 32" for PT-DZ6710E The name set for PROJECTOR NAME in NETWORK menu. INF1 ? INF2 ? Manufacturer name query Model name query "Panasonic" is returned. "DZ6710, DZ6700, DW6300 or D6000 is returned. INF0 ? Other - Panasonic PT-D6000UK | Functional Instructions - Page 45
which is connected to this connecter. J Connection Q Single projector Computer Connecting terminals on projector D-Sub 9-pin (female) Communication cable (straight) Q Multiple projectors D-Sub 9-pin (male) Connecting terminals on projector 1 D-Sub 9-pin (female) Connecting terminals on - Panasonic PT-D6000UK | Functional Instructions - Page 46
sent from the projector to the personal computer. • Projector ID supported on the RS PT-DZ6710E only) 0 = DUAL 2 = Only LAMP 1 is on 1 = SINGLE 3 = Only LAMP 2 is on SINGLE will use the lamp (LAMP 1 or LAMP 2) with shorter operating hours. 0 = DUAL 2 = Only LAMP 1 is on 1 = SINGLE 3 = Only LAMP - Panasonic PT-D6000UK | Functional Instructions - Page 47
location where infrared remote control signal cannot be received. Remote terminal External control Remote terminal/External control Standby ON LAMP Projector set up in a meeting room J Pin assignments and control Control panel located in a different room Pin No. 1 2 3 4 5 6 7 8 9 Signal - Panasonic PT-D6000UK | Functional Instructions - Page 48
OK N/A N/A N/A OK N/A N/A Still OK OK OK OK OK OK N/A N/A N/A DVI-D Movie OK N/A OK N/A N/A N/A N/A N/A N/A SDI*1 OK N/A OK N/A N/A N/A N/A N/A N/A *1. PT-DZ6710E only. Q Movie signals 525i, 625i, 525p, 625p, 1 080/60i, 1 080/50i, 1 080/60p, 1 080/50p, 720/60p - Panasonic PT-D6000UK | Functional Instructions - Page 49
Technical Information Trademark acknowledgements VGA and XGA are trademarks of International Business Machines Corporation. S-VGA is a registered trademark of the Video Electronics Standards Association. The font used in the on-screen displays is a Ricoh bitmap font, which is manufactured and sold - Panasonic PT-D6000UK | Functional Instructions - Page 50
F FILTER COUNTER RESET 30 FREEZE 27 Front leg adjusters 9 FUNCTION BUTTON 30 G GEOMETRY 19 CURVED 20 Geometric adjustment 8 KEYSTONE 20 H HIGH ALTITUDE MODE 28 I INITIALIZE 31 INPUT GUIDE 26 INPUT RESOLUTION 22 INSTALLATION 28 K KEYSTONE 21 L LAMP POWER 29 LAMP RELAY 29 LAMP SELECT - Panasonic PT-D6000UK | Functional Instructions - Page 51
Serial Basic format 46 Cable specifications 46 Communication settings 45 Control commands 46 Pin assignments 45 Serial terminal 45 SERVICE PASSWORD 31 SHARPNESS 17 SHIFT 18 SIDE BY SIDE 27 Combination table 48 SIGNAL LIST 33 STANDBY MODE 29 STARTUP LOGO 27 STATUS 30, 43 - Panasonic PT-D6000UK | Functional Instructions - Page 52
Printed in Japan S0209-1039B
-
 1
1 -
 2
2 -
 3
3 -
 4
4 -
 5
5 -
 6
6 -
 7
7 -
8
-
9
-
10
-
11
-
12
-
13
-
14
-
15
-
16
-
17
-
18
-
19
-
20
-
21
-
22
-
23
-
24
-
25
-
26
-
27
-
28
-
29
-
30
-
31
-
32
-
33
-
34
-
35
-
36
-
37
-
38
-
39
-
40
-
41
-
42
-
43
-
44
-
45
-
46
-
47
-
48
-
49
-
50
-
51
-
52
 |
 |

E
NGLISH
Functional Instructions
DLP™Based Projector
Model No.
PT-DZ6710
PT-DZ6700
PT-DW6300
PT-D6000
The information of these instructions are shared use with multiple models of DZ6710 series, DZ6700 series, DW6300 series
and D6000 series.
TQBJ0299
Commercial Use