Panasonic SAAK66 SAAK62 User Guide
Panasonic SAAK66 - MINI HES W/CD PLAYER Manual
 |
View all Panasonic SAAK66 manuals
Add to My Manuals
Save this manual to your list of manuals |
Panasonic SAAK66 manual content summary:
- Panasonic SAAK66 | SAAK62 User Guide - Page 1
The illustrations show SC-AK77. CD Stereo System Operating Instructions Model No. SC-AK77 SC-AK66 SC-AK62 P PC Before connecting, operating or adjusting this product, please read these instructions completely. Please keep this manual for future reference. RQT5769-4P - Panasonic SAAK66 | SAAK62 User Guide - Page 2
instructions, however, fundamentally explain the operation of system SC-AK77. System Main unit Front Speakers Surround Center SC-AK77 SA-AK77 SB-AK77 SB-PS70A SB-PC70A SC-AK66 SA-AK66 SB-AK66 SB-PS70A SB-PC70A SC-AK62 SA or relocate the receiving antenna. ¡ panasonic.com). AC power supply - Panasonic SAAK66 | SAAK62 User Guide - Page 3
the sound quality with the manual equalizer 28 Varying the sound quality Troubleshooting guide 36 Maintenance 36 Servicenter List (U.S.A 37 Warranty (U.S.A 38 Specifications 39 Product Service of important operating and maintenance (servicing) instructions in the literature accompanying the - Panasonic SAAK66 | SAAK62 User Guide - Page 4
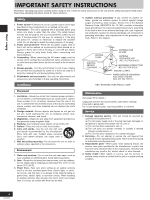
No. 70-1990, provides information about grounding of the mast and supporting structure, grounding of the lead-in wire to an antenna discharge Servicing -Do not attempt to service the unit beyond that described in these operating instructions. Refer all other servicing to authorized servicing - Panasonic SAAK66 | SAAK62 User Guide - Page 5
to be attached should be capable of supporting a weight of 5 kg. Caution • Use the speakers only with the recom- mended system. Failure to do so may lead to damage to the amplifier and/or the speakers, and may result in the risk of fire. Consult a qualified service person if damage has occurred or - Panasonic SAAK66 | SAAK62 User Guide - Page 6
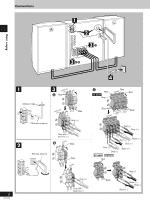
3 A Gray Adhesive tape FM ( ANT) 1 GND 2 FM indoor antenna Blue Gray (+) Gray with blue line (-) 2 B Gray AM loop antenna Blue C Red SC-AK77 Gray Blue Gray Red Black Red (+) Gray (+) Red (+) Black (-) Blue (-) Gray (+) Blue (-) Black (-) SC-AK66 SC-AK62 Red AM ANT LOOP EXT - Panasonic SAAK66 | SAAK62 User Guide - Page 7
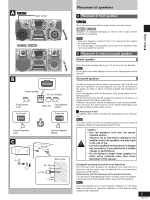
position where radio signals are received with the least amount of AK77 only LF: Low Frequency HF: High Frequency Incorrect connection can damage the unit. Caution Use only the supplied speakers. The combination of the main unit and speakers provide the best sound. Using other speakers - Panasonic SAAK66 | SAAK62 User Guide - Page 8
disc player/ DVD player without 5.1 ch OUT (not included) AUDIO OUT SC-AK77 SC-AK66 SC-AK62 R L AUX 1 AUX 2 Rear panel of this unit (not included) Connections External unit connection • For details, refer to the manual of the units which are to be connected. • When units other than - Panasonic SAAK66 | SAAK62 User Guide - Page 9
Before using A R6, AA, UM-3 B Remote control signal sensor 30˚ Transmission window 30˚ About 7 meters in front of the signal sensor Concerning the remote control A Battery installation Insert the batteries observing the correct polarities (e, d). Use of batteries • Align the poles (+ and -) - Panasonic SAAK66 | SAAK62 User Guide - Page 10
open button (c DECK 2 OPEN 21 # Deck 2 cassette holder 21 $ CD open/close button (c OPEN/CLOSE 17 % Headphone jack (PHONES 35 B Center console & Remote control signal sensor 9 ( SC-AK77 AUX 1/2 button (AUX 1/2 35 SC-AK66 SC-AK62 AUX button (AUX 35 ) Tuner/band select button (TUNER, BAND 14 - Panasonic SAAK66 | SAAK62 User Guide - Page 11
2 Standby/on button (f 13 ^ Auto off button (AUTO OFF 12 _ Numeric buttons (≥10, 1-9, 0 15, 18 { Program button (PROGRAM 19 | Cancel button (CANCEL 19 ( SC-AK77 AUX 1/2 button (AUX 1/2 35 SC-AK66 SC-AK62 AUX button (AUX 35 ) Tuner/band select button (TUNER 14 ? EQ select button (EQ 27 = SC - Panasonic SAAK66 | SAAK62 User Guide - Page 12
Before using A DISPLAY/ DEMO DISPLAY/ DEMO B A Turning the demo function off If the clock has not been set, a demonstration of the display is shown when the unit is switched to standby. This function is set to on at the time of purchase. Press and hold [-DISPLAY/-DEMO] until "NO DEMO" is displayed - Panasonic SAAK66 | SAAK62 User Guide - Page 13
Before using 1 2 4 1 2 3 SC-AK77 SC-AK66 SC-AK62 Setting the time This is a 12-hour display clock. This example in the figure shows how to set the time for 4: - Panasonic SAAK66 | SAAK62 User Guide - Page 14
press the button: 4 MANUAL ↔ PRESET. Press [TUNE/TIME ADJ (3) or (4)] to select the 3 frequency of the required station. "TUNED" is displayed when a radio station is tuned. "STEREO" ("ST" for SC-AK66 and SC-AK62) is displayed when a stereo FM broadcast is being received. Adjust the volume - Panasonic SAAK66 | SAAK62 User Guide - Page 15
Radio operations A SC-AK77 MEMO SC-AK66 SC-AK62 B 2 1 3 1 2 Presetting radio broadcasts There are two methods of presetting stations. Automatic presetting : All the stations the tuner can receive are preset. Manual presetting : You can select the stations to preset and the order they are preset - Panasonic SAAK66 | SAAK62 User Guide - Page 16
Compact disc operations xxxxxxxxxxxx xxxxxxx xx xxxxxxxxxxxxxxxxxxxxx xx xxxxxxxxxx A XXXX XXXX XXXXX XXXX XX XXXX XXXX XXXXX XXXX XXXX XXXXX XXXX XXXX B How to hold CDs C How to clean CDs Do not touch the recorded surface. Wipe from inside outward. D E Concerning compact discs With - Panasonic SAAK66 | SAAK62 User Guide - Page 17
must face upward. 3 CD 1 CD 2 CD 3 CD 4 CD 5 DISC Track number DISC Elapsed playing time (Of current track number) 4 A Number of tracks DISC B SC-AK77 Disc number 1234 5678 9 10 11 12 13 14 15 Total playing time SC-AK66 SC-AK62 1 2345 6 7 8 9 10 11 12 Listening to compact discs - Panasonic SAAK66 | SAAK62 User Guide - Page 18
Compact disc operations 2 1 2 3 A B 18 RQT5769 Listening to compact discs Direct access play 1 by remote control only 3 Press [DISC]. (within 10 seconds or so) Press [1] - [5] to select the disc you want. Press the numeric button to select the desired track number. The CD will be played from - Panasonic SAAK66 | SAAK62 User Guide - Page 19
4 2 1 2 3 4 5 7 A B Compact disc operations 3 5 1 7 DISC PRGM DISC Specified disc number DISC Specified track number Program order DISC DISC DISC Indicates program mode DISC Listening to compact discs Program play bbyy rreemmoottee ccoonnttrrooll oonnllyy You can program up to 24 tracks. Press [ - Panasonic SAAK66 | SAAK62 User Guide - Page 20
DISC 2 Compact disc operations 3 CD 1 CD 2 CD 3 CD 4 CD 5 Specified disc number 4 5 20 RQT5769 DISC Specified track number DISC SC-AK77 DISC SC-AK66 SC-AK62 CD MANAGER 7 DISC Listening to compact discs To listen to special CDs and tracks (CD Manager function) This function makes - Panasonic SAAK66 | SAAK62 User Guide - Page 21
and insert the tape. Insert the tape with the exposed tape facing down. Close the holder by hand. SC-AK77 only Press [REV MODE] to select the reverse mode. Every time you press the button: Front side Tape around the revolving parts. Always read the instructions provided with your tapes. 21 RQT5769 - Panasonic SAAK66 | SAAK62 User Guide - Page 22
(Deck 2 only) Types of tapes which can be recorded correctly SC-AK77 Use normal and high position tapes. Metal position tapes can be used, sound 1. Press [TAPE, DECK 1/2]. 2. Insert the recorded tape into deck 2. 3. SC-AK77 only Press [REV MODE] to select reverse mode. 4. Press [a REC/STOP]. Notes - Panasonic SAAK66 | SAAK62 User Guide - Page 23
, DECK 1/2]. Press [c OPEN] on both decks and insert the tapes. For playback: Into deck 1 For recording: Into deck 2 Close the holders by hand. SC-AK77 only Press [REV MODE] to select the reverse mode. Every time you press the button: :One side records only. , :Both sides record (front ¡ reverse - Panasonic SAAK66 | SAAK62 User Guide - Page 24
radio broadcasts Wind up the leader tape so recording can begin immediately. Press [c DECK 2 OPEN] and insert the tape. Close the holder by hand. SC-AK77 only Press [REV MODE] to select the reverse mode. Every time you press the button: : One side, only, records. , : Both sides record (front side - Panasonic SAAK66 | SAAK62 User Guide - Page 25
[c DECK 2 OPEN] and insert the tape. Close the holder by hand. SC-AK77 only Press [REV MODE] to select the reverse mode. Every time you press the 2 ~ 6 on page 19). 2. Press [a REC/STOP] to start recording. SC-AK77 To start recording on the reverse side Load a tape and change the tape direction as - Panasonic SAAK66 | SAAK62 User Guide - Page 26
before stopping Press [L]. The CD will stop automatically too. • To stop recording without a silent interval Press [a REC/STOP]. The CD will stop automatically too. SC-AK77 • A While recording, if a track is cut off in the middle at the end of the front side, it is re-recorded from the beginning, on - Panasonic SAAK66 | SAAK62 User Guide - Page 27
to produce the atmosphere of a great concert hall. 7 SC-AK77 only MANUAL (see page 28) 8 SC-AK77 only AI-EQ (see page 28) The original display is out. SC-AK77 only S. WOOFER B Boosting the super woofer SC-AK7474 only Press [S.WOOFER]. • When listening to the sound through the speakers MID (medium - Panasonic SAAK66 | SAAK62 User Guide - Page 28
SOFT HEAVY SHARP LIGHT SOFT HEAVY SHARP LIGHT SOFT HEAVY SHARP LIGHT Varying the sound quality with the manual equalizer SC-AK77 only Dial [SOUND EQ] to display "MANUAL". When it is turned clockwise, the settings are selected in the following sequence. 1 HEAVY 2 CLEAR 3 SOFT 4 DISCO - Panasonic SAAK66 | SAAK62 User Guide - Page 29
PRO LOGIC SURROUND "DTS" and "DTS Digital Surround" are trademarks of Digital Theater Systems, Inc. Note All the features are only effective if speakers are used. No discernible effect will be heard through headphones. • This system was developed to get a better sense of presence from sources - Panasonic SAAK66 | SAAK62 User Guide - Page 30
SELECT]. Select the speaker channel to be adjusted. Lch: Front speaker (Left) Cch: Center speaker Rch: Front speaker (Right) RSch: Surround speaker (Right) LSch: Surround speaker (Left) SWch: this unit. Sound quality/sound field operations 30 RQT5769 SC-AK77 SC-AK66 SC-AK62 SC-AK77 SC-AK66 SC-AK62 - Panasonic SAAK66 | SAAK62 User Guide - Page 31
SC-AK66 SC-AK62 SC-AK77 SC-AK66 SC-AK62 SC-AK77 SC-AK66 SC-AK62 Enjoying sound with DOLBY PRO LOGIC (DOLBY -D symbol and "Pro Logic" are trademarks of Dolby Laboratories. To adjust the volume of each speaker Preparation: Press [p PL] to turn the light on. Sit in the normal listening position and - Panasonic SAAK66 | SAAK62 User Guide - Page 32
(off) Playback the source. To turn off the SURROUND mode Press [SURROUND] to select "STEREO SOUND". To adjust the volume of surround speakers 1 You can change the output level of surround speakers manually. While enjoying the desired source: 1 Press [CH SELECT]. The output level of surround - Panasonic SAAK66 | SAAK62 User Guide - Page 33
the volume. • For the record timer, check the cassette's erasure prevention tabs (A page 22: B), insert the tape in deck 2, select the reverse mode (for SC-AK77) (A page 24) and tune to the radio station (A page 14) or select the aux source (A page 35). You cannot record when [6CH INPUT] is selected - Panasonic SAAK66 | SAAK62 User Guide - Page 34
these preset conditions. However, the Disc numbers and reverse mode (for SC-AK77) do not get stored in the timer memory. 1. After step 4, start component, set the component's timer to the same time. (See the instruction manual that came with the component.) Timer and others 34 RQT5769 While enjoying - Panasonic SAAK66 | SAAK62 User Guide - Page 35
system will come on automatically. 2. Start playback from the external source. (For details, refer to the owner's manual of the equipment.) Recording from an external source 1. SC-AK77 Press [AUX 1/2]. SC-AK66 SC-AK62 Press [AUX]. 2. Press [a REC/STOP] (recording starts). 3. Start playback from the - Panasonic SAAK66 | SAAK62 User Guide - Page 36
Troubleshooting guide Before requesting service, make the checks below. If you can't fix the system as described below, or if something not listed here occurs, refer to the enclosed directory to locate an Authorized Service Center convenient to you or contact your dealer. For detailed instructions, - Panasonic SAAK66 | SAAK62 User Guide - Page 37
Servicenter List (U.S.A.) 37 RQT5769 Reference - Panasonic SAAK66 | SAAK62 User Guide - Page 38
receiver/amplifiers, speakers), RACK SYSTEMS (receivers, tuners, amplifiers, cassette decks, CD players, equalizers, rack system speakers service in the U.S.A. can be obtained during the warranty period by contacting a Panasonic Services dealer or Servicenter. If the problem is not handled to your - Panasonic SAAK66 | SAAK62 User Guide - Page 39
DAC) SPEAKER SECTION • Front speakers SB-AK77 Type 3 way speaker system Speaker(s) servicing to qualified personnel only. Product information For product service, product information or assistance with product operation, refer to the servicenter directory. In the U.S.A., contact the Panasonic - Panasonic SAAK66 | SAAK62 User Guide - Page 40
Electronics Company, Division of Matsushita Electric Corporation of America One Panasonic Way Secaucus, New Jersey 07094 http://www.panasonic.com © 2000 Matsushita Electric Industrial Co., Ltd. Printed in Singapore Panasonic Sales Company, Division of Matsushita Electric of Puerto Rico, Inc
-
 1
1 -
 2
2 -
 3
3 -
 4
4 -
 5
5 -
 6
6 -
 7
7 -
8
-
9
-
10
-
11
-
12
-
13
-
14
-
15
-
16
-
17
-
18
-
19
-
20
-
21
-
22
-
23
-
24
-
25
-
26
-
27
-
28
-
29
-
30
-
31
-
32
-
33
-
34
-
35
-
36
-
37
-
38
-
39
-
40
 |
 |
RQT5769-4P
P
CD Stereo System
Operating Instructions
Model No.
SC-AK77
SC-AK66
SC-AK62
Before connecting, operating or adjusting this product, please read these
instructions completely.
Please keep this manual for future reference.
PC
The illustrations show SC-AK77.