Pfaff 294 Owner's Manual
Pfaff 294 Manual
 |
View all Pfaff 294 manuals
Add to My Manuals
Save this manual to your list of manuals |
Pfaff 294 manual content summary:
- Pfaff 294 | Owner's Manual - Page 1
- Pfaff 294 | Owner's Manual - Page 2
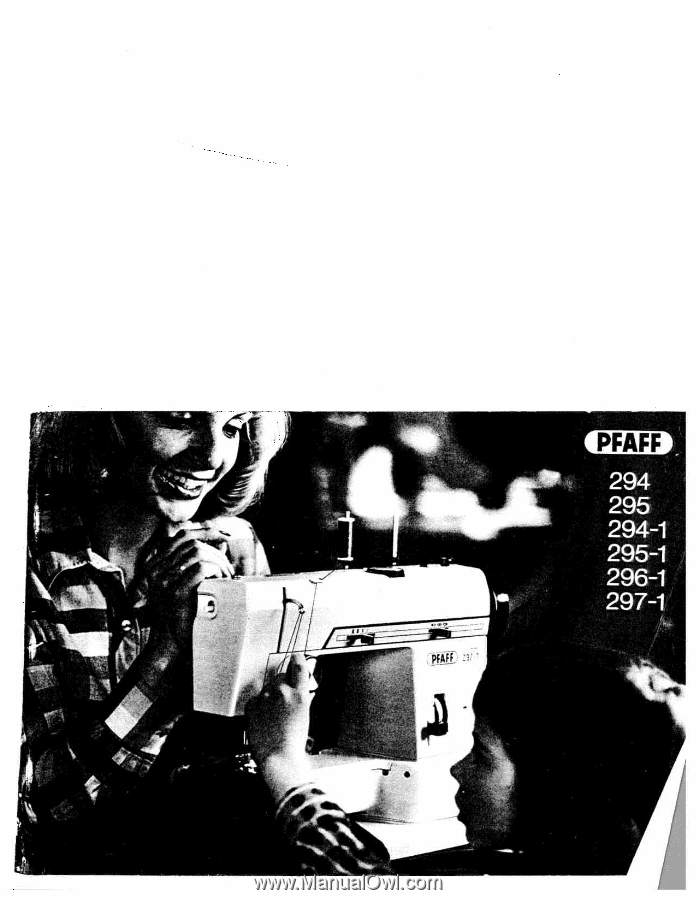
d I I 1 \\ 4 CPFAFFD 294, 295, 294-1, 295-1, 296-1, 297-1 Foreword Your new Pfaff sewing machine NiH enable you to master such iork your machine. if you nave any sewing problems, please do not hesitate to contact your Pfaff dealer who will be glad to help you - Pfaff 294 | Owner's Manual - Page 3
294, 294-1 and 296-1 12 3 4 5{-6----- 7 17- I -________ 2O 18 19 22 16 23 15 0 14 13 2 295' jio 1 Thread retainer stud 2 Take-up lever 3 Thread guide set screw 23 Sewing foot 24 Drop-feed button Parts of the Pfaff 295, 295-1 and 297-1 12 3 4 5-6---'7 8 17 H-_-,+ I E 18 - Pfaff 294 | Owner's Manual - Page 4
Push plug A into the receptacle on the back of the machine and the plug at the other end of the cord into wall outlet. If your machine is foot-operated. push the plug of the sewlight cord into the wall out let p 9 To switch on the sewlight, push the button on the face cover (see ill.). 4 Place - Pfaff 294 | Owner's Manual - Page 5
wne unt me nec a a at ts nign-st point On the Pfaff 294, 294-1 and 296-1 mmove the bed cover 13,, as ifljstrat,zi ..ft cold the case by Is open atch. When ou release atcr k. the emotv b000in amos out On the Pfaff 295. 295-1 and 297-1 tOe bobbin case s removed as on '3 290 anc 296-1. er ceot that - Pfaff 294 | Owner's Manual - Page 6
spr ng (3). As you oull the thread. The nobn should rotate c ockwise (al. Leave anout tkree inches or tnread hanging trorn the oobbin case. 2 3 4 Pfatf 294/294-1/296-1 Ptatf 295/295-1 /297-1 To insert the bobbin case na orate the Dalance :jneei nL :be eece 5 a: ts highest pont. cdt the atc- anc - Pfaff 294 | Owner's Manual - Page 7
the locking stud snaps into the nole in the free arm. Press the workplate support against the machine base until it snaps into place (Fig. 3). To remove the the baseplate of the machine. 3 3 4 The sewing area of the Pfaff 294, 294-1 and 297-1 Portable is enlarged with the aid ot an extension (4). - Pfaff 294 | Owner's Manual - Page 8
A B The sewing foot is raised and lowered by operating the presser bar lifter on the back of the machine (see ill.). A = Presser bar lifter up 8 - Presser bar lifter down To draw up the bobbin thread, hold the needle thread and lower the sewing foot Turn the balance wheel toward you a full turn. - Pfaff 294 | Owner's Manual - Page 9
Tj th s end oush 'he stitch vidth oontroi to thenghtasfaraStWUlgoFg.l' - To sew longer straight-stitch seams, turn utility-stitch control (5) until the straight- stitch symbol is opposite the dot (see Fig. 2). 14 2 To sew in reverse or dacktack the ena of a seam. simoly press down the ringer tm - Pfaff 294 | Owner's Manual - Page 10
Balanced tensions are essential icr sewing Both tensions are correctly balanced f the needle and dobbin threads interlock .n the center of the material The bobbin thread tension is regulated by turning the small knurled screw on the bob bin case (Fig. 1). Turn this screw right (with your thumb nail) - Pfaff 294 | Owner's Manual - Page 11
To prepare your macnine for darnnc. pro ceed as follows: Darning toot No 93-106103-91 Replace he ordinary sewing foot by darn ing foot No. 93-106103-91. attaching it from the rear so that soring clip c rests on needle set screw i22l Tighten sewing foot thumb screw (16). Lower the presser bar - Pfaff 294 | Owner's Manual - Page 12
zipoer 'or about 3 cm (11, guiding the right -. Attach zipoer root without quiit il ii,,, 'Ii >\ 20 2 Flat felled seams Attach felling foot No, 93-847 561 -00 (available from your Pfaff dealer> Stitch length 1.5- 2mm F at felled seams are used to durably io two nieces of fabr c and are usually - Pfaff 294 | Owner's Manual - Page 13
-847675-00 with 5 grooves or medium-heavy fabrics, and cording foot No. 93-847680-00 with 0 grooves for ightweignt mater ala. 295/295-1/297-1 / /7 Ii 294/294-1/296-1 23 - Pfaff 294 | Owner's Manual - Page 14
the needle noles t has made n the fabric previously. ToMu car orccuce a nice nemsttching effect along the -iemmed ecge of the facric see Fig. 1) by guiding :ne material so that tne irg needle 'ollows the hemline and the ordinary needle stitches into the fabric close to the nem. Hemstitct'r:ng erfec - Pfaff 294 | Owner's Manual - Page 15
as indicated above. Then press the seam open. This seam is particularly well suited for stretch fabrics. When sewing synthetic stretch fabrics, please note the instructions given for regulating the tension on p. 16. 27 - Pfaff 294 | Owner's Manual - Page 16
C CD (I) -H s)000 C) .n fl Q 5S a 5 a - C 0 C O ) 0C)Ct pCD0C0C) 0C CDL g 55 Us SC) a 0 NCD cOCOw CD NQ 0° N y(C) r-n-IDV N OD.pDaCI) D)CD - C): CD a-P C) C ap nD -Crs 0 g CI) 1 O C C) ?C C)S Cs D aID CD C) C) C)) 0 £a - C aa -I-Ia a r I) I) 4 H: -o 0 C) C) CD - Pfaff 294 | Owner's Manual - Page 17
Regu ate the stitci atn to su t u u sewing the monogram. Remove the foot and drop the ma chine feed Attach the darning foot and lower the presser bar lifter Insert a No. 70 needle and use No. 50 embroidering and darning thread. Ease the needle thread tension somewhat. Trace the monogram on - Pfaff 294 | Owner's Manual - Page 18
.se outtonnole too: 'to. 3-3i' i5 6-DO or univorsai se.'i oot No. O3-1OO1'9-OO Settings Set utifty-stoch cOntrol for zigzag stitcning. lice ng 'be neecle 2) ann put positon the st tch ieier to the left widTh control in notch R 1 iFig 3). Stitch length setting Set the sttcn density so that - Pfaff 294 | Owner's Manual - Page 19
/1 1/ 5/ II SI iS IS IS IS I'll/Ill Si II SI SI I Blind stitch 294, 294-1 295, 295-1. 296-1 and 297-1 Orna mental elastic stitch 296-1 and 297-1. J\ I,- - the fabric under the sewing foot so that the folded edge s guided by the guide edge of toe foot (ill at right). Regulate the sttch width - Pfaff 294 | Owner's Manual - Page 20
view sewing foot No. 93-100179-00 or ordinary sewing foot No. 93-838954-00. Turn utility-stitch control (5) to blind-stitch symbol on models 294 to 295-i, or to shelledge stitch symbol on models 296-1 and 297-1. Stitch length: ito 2 Stitch width control (18): 4 Shell edging makes a nice trimming on - Pfaff 294 | Owner's Manual - Page 21
- - Pfaff 294 | Owner's Manual - Page 22
2. If the fabriD as a urn selvaged edges need not he folded and Simply olace oorh pieces under ng foot with 'heir edges soutting them as instructed hove edge. the oressed. 'ftp sew and oin Mending hems Apply the ordinary sewing foot. Turn ,t,iity-st'tcn contro '5) to elast c-stitch svmnoi. Stitch - Pfaff 294 | Owner's Manual - Page 23
stress (e.g. on ski pants). Sew the elastic press-open seam with the machine set as ndicated above. Elastic triple zigzag stitch Models 294-1, 295-1, 296-1 and 297-1. Attach ordinary sewing foot. L Turn utility-stitch control (5) to symbol of elastic triple zigzag stitch. Turn stitch length - Pfaff 294 | Owner's Manual - Page 24
its grooves. Stretch the strands during sewing. The more you stretch the elastic strands the more the fabric will be gathered. Pullover stitch Models 294-1. 295-1 296-1 and 297-1 l3 183 954 Affach ordina sewing foot. Turn utili-stitch control 5)to pullover-stitch symbol. Turn stitch length control - Pfaff 294 | Owner's Manual - Page 25
A. Overlock stitch Models 296-1 and 297-1. . . E P - Attach ordinary sewing foot. Turn utility-stitch control (5) to overlock-stitch symbol. Turn stitch length control to red triple-stitch symbol. Stitch Wi 0th: maximum Feather stitch Models 296-1 and 297-1. Attach ordinary or clear-view - Pfaff 294 | Owner's Manual - Page 26
only the sewing hook vhich has to oe cOca regularly om ime to time, put a drop of cil toe nook raceway 'see liristrat ons Delowl Pfaff 294/294-1/296-1 Pfaff 295/295-1/297-1 1' 4 Pcsn t oulo n a the Wrn t to the then pci it ot ta socket. nseh oulb so :nat ts mrs slice into The - Pfaff 294 | Owner's Manual - Page 27
and puil the cover out lengthwise of the arm (1 & 2). Pfaff machines 294, 294-1 and 296-1 art tIred back On oorable machines, loosen tne screw on the bottom of the machine base ano tilt the nacnine back caut'o.s; a 2 Trouble - Pfaff 294 | Owner's Manual - Page 28
bobbin case Workolate of the . . Pfaff 295, 295-1 and 297-1 Workplate of the Pfaff 294. 294-1 and 297-1 Upper threading . . . . Changing the light bulb Removing the face cover . . Macf-inc care . Clean ng . Trouble shooting . . . . 23 24 . . 25 . 26 27 43 28 29 30 30 . 31
-
 1
1 -
 2
2 -
 3
3 -
 4
4 -
 5
5 -
 6
6 -
 7
7 -
8
-
9
-
10
-
11
-
12
-
13
-
14
-
15
-
16
-
17
-
18
-
19
-
20
-
21
-
22
-
23
-
24
-
25
-
26
-
27
-
28
 |
 |