Philips 47PFL7422D User manual
Philips 47PFL7422D - 47" LCD TV Manual
 |
View all Philips 47PFL7422D manuals
Add to My Manuals
Save this manual to your list of manuals |
Philips 47PFL7422D manual content summary:
- Philips 47PFL7422D | User manual - Page 1
- and thanks for investing in a PHILIPS product. Know these safety symbols CAUTION RISK OF ELECTRIC SHOCK DO NOT OPEN CAUTION: TO REDUCE THE RISK OF ELECTRIC SHOCK, DO NOT REMOVE COVER (OR BACK). NO USER-SERVICEABLE PARTS INSIDE. REFER SERVICING TO QUALIFIED SERVICE PERSONNEL. t This "bolt of - Philips 47PFL7422D | User manual - Page 2
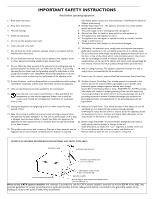
Such items could unsuspectingly fall from the top of the set and cause product damage and/or personal injury. 18. Wall or Ceiling Mounting - The appliance should be mounted to a wall or ceiling only as recommended by the manufacturer. 19. Power Lines - An outdoor antenna should be located away from - Philips 47PFL7422D | User manual - Page 3
a favorite list 20 9 Electronic Program Guide 21 10 Multimedia browser 21 10.1 To view content from a USB device 21 10.2 Multimedia Browser menu 21 11 To connect and operate accessory devices 23 11.1 Side panel overview 23 11.2 To make video and audio connections 24 11.3 Connect a recorder - Philips 47PFL7422D | User manual - Page 4
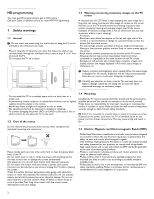
get HD programming to get an HD picture ! Call your Cable or Satellite service to order HDTV Programming. 1 Safety warnings 1.1 General ç Do not insert the power plug in a wall socket or hang the TV to the wall before all connections are made. - Place or hang the TV wherever you want, but make - Philips 47PFL7422D | User manual - Page 5
has effective pixels of 99,999% or more, black dots or bright points of light (red, green or blue) may appear constantly on the screen.This is a structural property of the display (within common industry standards) and is not a malfunction Your TV is equipped with a Kensington Security Slot, to - Philips 47PFL7422D | User manual - Page 6
it on the wall, first connect your accessory devices. ) Do not insert the power plug into the mains at the bottom of the TV and in a wall socket before all connections are made. USB 14 13 R AUDIO L 12 VIDEO S VIDEO 42"-47"-52" 10 9 8 7 6 L R AUDIO OUT DISPLAY SYNCHRONIZED DISPLAY SYNC. OUT - Philips 47PFL7422D | User manual - Page 7
inserted in the TV mains socket and the wall socket. 2.1.5 Remote control Insert the 2 batteries supplied (Type R03-1,5V). Be sure the (+) and (-) ends of the batteries line up correctly (inside of case is marked.) VIDEO L AUDIO R AV 2 AV2 L + R + VIDEO ANTENNA CABLE OUT Set top box RF - Philips 47PFL7422D | User manual - Page 8
. 19 Due to the sensitivity of the remote control, you may experience a delayed operation at start up of the TV. After a short while your remote control will work smoothly. 1 POWER Press to turn the TV on/off. 2 FAVORITES - VIEW To display the last selected list.You can create up to four favorite - Philips 47PFL7422D | User manual - Page 9
minimal distortion. Automatic (Not for PC.) Enlarges the picture automatically to fill the screen. Subtitles remain visible. Press the POWER B switch to turn the TV on. The MENU button can be used to summon or exit the TV menu without the remote control. Use the VOLUME + and - buttons to adjust the - Philips 47PFL7422D | User manual - Page 10
the instructions on screen. Step 3 - Settings assistant: select your TV settings The Settings assistant will help you to select your preferred picture and sound settings. Finally you will arrive at a complete setting which satisfies you. ‡ Press the green color button on your remote control to - Philips 47PFL7422D | User manual - Page 11
button on the remote control. VIEW DEMO OPTION INFO OK EXIT MENU EXIT MENU FORMAT > The main menu appears on the screen. Television Multimedia TV menu Channel list Program guide USBdevice 1 ◊Press the MENU button to exit the main menu. 5.2 Use of the TV menu settings The TV menu allows you - Philips 47PFL7422D | User manual - Page 12
Info TV menu TV settings Settings assistant Reset to standard Picture Sound Info Picture Contrast Brightness Color Tint Sharpness Color temperature Perfect Pixel HD 120 Hz Clear LCD Dynamic contrast Noise reduction MPEG artefact reduction Color enhancement Active Control Light sensor Picture - Philips 47PFL7422D | User manual - Page 13
quality of the sound. ‡ Press the MENU button on the remote control. > The main menu appears. ® Select TV menu and press the cursor right. > The TV Menu is moved to the left. Ò Select TV settings and press the cursor right. > The TV settings menu is moved to the left panel. † Select Sound and press - Philips 47PFL7422D | User manual - Page 14
turn to the best surround sound mode the broadcaster transmits. 6 Adjust Feature menu settings The Features menu allows you to control the settings of special TV functions, features and accessory equipment. ‡ Press the MENU button on the remote control. > The main menu appears. ® Select TV menu - Philips 47PFL7422D | User manual - Page 15
.The list will have values from 0 to 180 minutes.You can always turn off your TV earlier or select another time set. 6.6 Child lock With a 4-digit code, you are able to lock TV channels and external sources to prevent children from watching certain programs. ‡ Select Child lock. TV menu Features - Philips 47PFL7422D | User manual - Page 16
cursor down. TV menu / Features Child lock Lock after Channel lock TV ratings lock Movie ratings lock Region ratings lock TV ratings lock All None TV-Y TV-Y7 TV-G TV-PG TV-14 TV-MA Info > A list appears, showing the age-based TV ratings and a corresponding content-based ratings list. ® Press the - Philips 47PFL7422D | User manual - Page 17
. TV menu Features Closed captions Caption service Digital caption service Digital caption options Sleeptimer Child lock Set/Change PIN On timer Demo Info Set/Change PIN Please enter yoru current PIN. > If no PIN-code exists yet, the menu item is set to Set PIN. Follow the instructions on screen - Philips 47PFL7422D | User manual - Page 18
menu This menu will adjust settings related to the installation of the TV channels. DEMO OPTION INFO OK EXIT MENU EXIT MENU FORMAT ‡ Press the MENU button on the remote control. > The main menu appears. Television Multimedia TV menu Channel list Program guide USBdevice 1 ® Select TV menu - Philips 47PFL7422D | User manual - Page 19
cable TV provider and connection of equipment are completed. ◊Press the green corresponding color button on the remote control for 'Next'. ç All channels must be unlocked in order to autoprogram. If requested, enter your PIN code to unlock all channels. See Chapter 6 Adjust features menu settings - Philips 47PFL7422D | User manual - Page 20
remote control. Ò Select the characters with the cursor up/down. Select the following position with the cursor right. † Press the green color button or the OK button when finished. 7.4 Set your preferences This menu contains items that can set or adjust various special TV functions and that will - Philips 47PFL7422D | User manual - Page 21
single cable to the TV's digital audio out. See Chapter 11.1 To make Video and Audio connections, Home theater amplifier 7.6 Set your clock This allows you to set the time and day. ç Adjusting the clock is necessary for the correct working of Lock after (See Chapter 6 Adjust feature menu settings - Philips 47PFL7422D | User manual - Page 22
cursor down. TV menu Installation Language Channel installation Preferences Connections Clock Reset AV settings Reset AV settings Reset Info ® Press the cursor right. Ò Press the OK button to erase settings and reset them to their default values. 8 Create your favorite list This allows - Philips 47PFL7422D | User manual - Page 23
The Multimedia browser lets you display pictures or play audio files stored on a USB device.The Multimedia browser application is invoked from the main menu. ‡ Press the MENU button on the remote control. Television Multimedia TV menu Channel list Program guide USBdevice 1 ® Select Multimedia and - Philips 47PFL7422D | User manual - Page 24
switch back to the Multimedia menu. Ú Press one of the color buttons on the remote control to perform the corresponding function mentioned at the bottom of the screen. à The blue color button can, if necessary, be used to let the color buttons reappear. ç The playback will continue to play even if - Philips 47PFL7422D | User manual - Page 25
on the remote control. 1 2 3 SOURCE 4 5 6 7 8 9 SOURCE 0 . 11.1 Side panel overview R AUDIO L VIDEO S VIDEO 3.5 mm AUDIO L/R 2 VIDEO 1a S VIDEO 1b AUDIO L/R VIDEO S VIDEO 11.2.1 Camera, Camcorder, Game, PC Do not connect cable 1a and 1b at the same time.This may cause picture - Philips 47PFL7422D | User manual - Page 26
L AUDIO R R AUDIO L AV1 Side No à - If you experience a discolored line on the left or right side of the set, adjust the picture position to the center of the screen with the cursor buttons. - Cables are often color-coded to connectors. Connect red to red, white to white.... - Component video - Philips 47PFL7422D | User manual - Page 27
RECORDER CABLE 11.5 Connect a DVD player/DVD recorder, Set top box, game console,... with a HDMI (High Definition Multimedia Interface) connector à HDMI is the leading new standard for Digital Video and audio interconnection. Sound and picture interruptions ? See Chapter 12 Problems. DISPLAY - Philips 47PFL7422D | User manual - Page 28
to stereo adapter (not supplied) for sound reproduction via all internal loudspeakers. 11.11 Connect digital source devices with Component Video Output connectors (YPbPr) This TV is capable of displaying 1080i, 1080p, 720p and 480p DTV signals when connected to a DTV tuner cable box. Select the - Philips 47PFL7422D | User manual - Page 29
AUDIO AV1 / AV3 : AUDIO L + R AV 3 L AUDIO R Y Pb Pr VIDEO L AUDIO R AV 2 VIDEO L AUDIO R AV1 / AV3 : YPbPr 2b S VIDEO Y Pb Pr 1 AV 1 DVD / Set top box 11.12 Connect a Home Theater Amplifier 11.12.1 Digital Home Theater Amplifier L R AUDIO OUT DISPLAY SYNCHRONIZED DISPLAY - Philips 47PFL7422D | User manual - Page 30
in their menu systems. If the TV cursor controls run out of range before the picture is correctly positioned, the receiver box controls will need to be adjusted. No photo, music or video play or in poor quality only • Verify if the source complies with a supported code. No sound • Increase the - Philips 47PFL7422D | User manual - Page 31
Philips on-line support CC Analog Caption Service DTV A new technology for transmitting and receiving broadcast television signals. DTV provides higher resolution and improved sound quality over analog television. DV Digital Video (from a camera) EAS Emergency Alert System Method for use by cable - Philips 47PFL7422D | User manual - Page 32
.ALB, test.alb, ... ‡ Press the MENU button on the remote control after having inserted a USB device and turned on the TV. The following syntax should be used to create the text file: Television Multimedia TV menu Channel list Program guide ® Select Multimedia and press the cursor right - Philips 47PFL7422D | User manual - Page 33
off the USB interface. Make sure that the USB interface is turned on before connecting to the TV. - If you have a digital camera with only internal memory (no removable memory) you can try to copy the content manually to a USB memory device using a personal computer. - Some digital cameras allow - Philips 47PFL7422D | User manual - Page 34
, you can adjust the picture position to the center of the screen with the cursor buttons. - Due to legal requirements, it is possible that with certain copy protected PCM audio qualities from a an accessory device connected to the HDMI input, the Digital audio output signal is muted. - Proper - Philips 47PFL7422D | User manual - Page 35
menu appears. TV menu Software update Update assistant Current software info Local updates Update assistant Start now ‡ Insert the USB memory device in the USB slot of the TV. ® The TV turns off.The screen stays black for about 10 seconds. Please, wait and do not use the POWER switch on the TV - Philips 47PFL7422D | User manual - Page 36
◊Press the POWER button on the remote control. Do not press more than once. Local updates For Service use only. POWER POWER ç Do not use the POWER switch on the TV. ‹ The TV turns off.The screen stays black for about 10 seconds. Please, wait. ≈The TV turns back on again. The update is done. - Philips 47PFL7422D | User manual - Page 37
cursor 6 MENU 6 MUTE 6 OK 6 POWER 6 Brightness 10 C Cable 5 Care of the screen 2 Clock 19 Closed captions 12 service 13 options 13 Camera 23 Channels uninstall 18 edit 18 installation 17 store 17 Code Set 15 Change 15 Color 10 buttons 6 temperature 10 Connections 19 side 23 audio/video 24 Connector - Philips 47PFL7422D | User manual - Page 38
, there is no guarantee that interference will not occur in a particular installation. If this equipment does cause harmful interference to radio or television reception, which can be determined by turning the equipment off and on, the user is encouraged to try to correct the interference by one or - Philips 47PFL7422D | User manual - Page 39
antenna systems outside of the product. • Product repair and/or part replacement because of improper installation, connections to improper voltage supply, abuse, neglect, misuse, accident, unauthorized repair or other cause not within the control of Philips. • Damage or claims for products not being - Philips 47PFL7422D | User manual - Page 40
38
-
 1
1 -
 2
2 -
 3
3 -
 4
4 -
 5
5 -
 6
6 -
 7
7 -
8
-
9
-
10
-
11
-
12
-
13
-
14
-
15
-
16
-
17
-
18
-
19
-
20
-
21
-
22
-
23
-
24
-
25
-
26
-
27
-
28
-
29
-
30
-
31
-
32
-
33
-
34
-
35
-
36
-
37
-
38
-
39
-
40
 |
 |

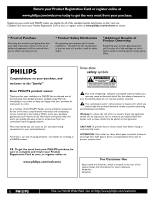
Return your Product Registration Card or register online at
www.philips.com/welcome today to get the very most from your purchase.
Registering your model with PHILIPS makes you eligible for all of the valuable benefits listed below, so don’t miss out.
Complete and return your Product Registration Card at once, or register online at
www.philips.com/welcome
to ensure:
* Proof of Purchase
Returning the enclosed card guarantees that
your date of purchase will be on file, so no
additional paperwork will be required from
you to obtain warranty service.
* Product Safety Notification
By registering your product you’ll receive
notification - directly from the manufacturer -
in the rare case of a product recall or safety
defect.
* Additional Benefits of
Product Ownership
Registering your product guarantees that
you’ll receive all of the privileges to which
you’re entitled, including special money-saving
offers.
Congratulations on your purchase, and
welcome to the “family!”
Dear PHILIPS product owner:
Thank you for your confidence in PHILIPS.You’ve selected one of
the best-built,best-backed products available today.We’ll do
everything in our power to keep you happy with your purchase for
many years to come.
As a member of the PHILIPS “family,” you’re entitled to protection
by one of the most comprehensive warranties and outstanding
service networks in the industry.What’s more, your purchase
guarantees you’ll receive all the information and special offers for
which you qualify, plus easy access to accessories from our
convenient home shopping network.
Most importantly, you can count on our uncompromising
commitment to your total satisfaction.
All of this is our way of saying welcome - and thanks for investing in
a PHILIPS product.
P.S. To get the most from your PHILIPS purchase,be
sure to complete and return your Product
Registration Card at once, or register online at:
www.philips.com/welcome
For Customer Use
Enter below the Serial No., which is located on the rear of the
cabinet. Retain this information for future reference.
Model No.
Serial No.
Know these
safety
symbols
This “bolt of lightning” indicates uninsulated material within your
unit may cause an electrical shock. For the safety of everyone in
your household, please do not remove product covering.
The “exclamation point” calls attention to features for which you
should read the enclosed literature closely to prevent operating
and maintenance problems.
Warning
:To reduce the risk of fire or electric shock, this apparatus
should not be exposed to rain or moisture and objects filled with
liquids, such as vases, should not be placed on this apparatus.
CAUTION
:To prevent electric shock, match wide blade of plug to
wide slot, fully insert.
ATTENTION
: Pour éviter les chocs électriques, introduire la lame la
plus large de la fiche dans la borne correspondante de la prise et
pousser jusqu’au fond.
CAUTION
RISK OF ELECTRIC SHOCK
DO NOT OPEN
CAUTION: TO REDUCE THE RISK OF ELECTRIC SHOCK, DO NOT
REMOVE COVER (OR BACK). NO USER-SERVICEABLE PARTS
INSIDE. REFER SERVICING TO QUALIFIED SERVICE PERSONNEL.
t
s
Visit our World Wide Web Site at http://www.philips.com/welcome