Philips SPC200NC Quick start guide (English)
Philips SPC200NC - SPC PC Camera Web Manual
 |
UPC - 026616000722
View all Philips SPC200NC manuals
Add to My Manuals
Save this manual to your list of manuals |
Philips SPC200NC manual content summary:
- Philips SPC200NC | Quick start guide (English) - Page 1
-01-2005 12:55 Pagina 1 Philips SPC 200NC PC Camera Quick Install Guide 4 Fmulal nPuDaFl opnroCdDuct Guide d'installation rapide 6 Guía de instalación rápida 8 Schnellinstallationsanleitung 10 Korte installatiehandleiding 12 Guida rapida all'installazione 14 Manual de utilização rápido 16 - Philips SPC200NC | Quick start guide (English) - Page 2
QIG_SPC200NC.qxd 04-01-2005 12:55 Pagina 2 Additional information available at our website: www.philips.com/pcstuff Specifications subject to change without notice. All dimensions shown are approximate. - Philips SPC200NC | Quick start guide (English) - Page 3
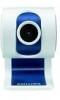
QIG_SPC200NC.qxd 04-01-2005 12:55 Pagina 3 6 1 2 3 1 5 7 4 2 - Philips SPC200NC | Quick start guide (English) - Page 4
4 GB Quick Install Guide - Functional overview 1 Rotating lens For manually changing the vertical angle of the camera. 2 Focus ring For adjusting the focus of the image manually. 3 Desktop stand For stable desktop placement of the SPC 200NC PC Camera. 4 USB cable For connecting the camera to the USB - Philips SPC200NC | Quick start guide (English) - Page 5
at least the 'SPC 200NC PC Camera driver'. 4 Follow the instructions on the screen to complete the installation. 5 Restart your computer when you have finished installing all of the above software. Where to go for information and support? Please visit our website: www.philips.com for the latest - Philips SPC200NC | Quick start guide (English) - Page 6
6 F Guide d'installation rapide - Présentation des fonctionnalités 1 Objectif rotatif Il vous permet de modifier l'angle vertical de la caméra manuellement la caméra pour PC SPC 200NC sur le bureau. 4 Câble USB Il vous permet de brancher la caméra au port USB du PC. La caméra est alimentée par le PC - Philips SPC200NC | Quick start guide (English) - Page 7
, ouvrez l'Explorateur Windows et double-cliquez sur l'icône du fichier 'Autorun.exe' dans le répertoire du CD-ROM. > L'écran d'installation du logiciel apparaît. 3 Sélectionnez au moins les options 'SPC 200NC PC Camera driver' (pilote SPC 200NC PC Camera). 4 Suivez les instructions à l'écran pour - Philips SPC200NC | Quick start guide (English) - Page 8
de la imagen manualmente. 3 Soporte de sobremesa Para la colocación estable de la cámara de PC SPC 200NC sobre la mesa. 4 Cable USB Permite la conexión de la cámara al puerto USB del PC. La cámara se alimentará del PC cuando se establezca la conexión USB. 5 Botón de captura Permite hacer fotos sin - Philips SPC200NC | Quick start guide (English) - Page 9
no aparece automáticamente, abra el Explorador de Windows y haga doble clic en el icono 'Autorun.exe' del directorio del CD-ROM. > A continuación, aparecerá la pantalla de instalación del software. 3 Seleccione al menos SPC 200NC PC Camera 4 Siga las instrucciones en pantalla para completar la - Philips SPC200NC | Quick start guide (English) - Page 10
2005 12:55 Pagina 10 D Schnellinstallationsanleitung - Übersicht über die Funktionen 1 Schwenkbares Objektiv Zum manuellen Ändern des vertikalen Kamerawinkels. 2 Fokussierring Zum manuellen Einstellen des Bildfokus. 3 Standfuß Zur stabilen Desktop-Aufstellung der SPC 200NC PC-Kamera. 4 USB USB-Kabel - Philips SPC200NC | Quick start guide (English) - Page 11
Sprachauswahl nicht automatisch erscheint, öffnen Sie den Windows Explorer und doppelklicken Sie auf das Symbol 'Autorun.exe' im CD-ROM-Verzeichnis. > Jetzt erscheint die Anzeige zur Software-Installation. 3 Wählen Sie mindestens 'SPC 200NC PC Camera'. 4 Befolgen Sie die angezeigten Anweisungen, um - Philips SPC200NC | Quick start guide (English) - Page 12
beeld handmatig scherp te stellen. 3 Bureauhouder Voor een stabiele bureauopstelling van de SPC 200NC pc-camera. 4 USB-kabel Om de camera te verbinden met de USB-poort van de pc. Als de USB-verbinding gemaakt is dan wordt de camera gevoed door de pc. 5 Foto-toets Om foto's te maken zonder uw muis te - Philips SPC200NC | Quick start guide (English) - Page 13
taalkeuze niet automatisch verschijnt, ga dan naar de Windows Verkenner en dubbelklik in de map van het CD-ROM-station op het programma 'Autorun.exe'. > Het scherm voor het installeren van de software verschijnt. 3 Selecteer minimaal 'SPC 200NC PC Camera'. 4 Volg de instructies op het scherm om het - Philips SPC200NC | Quick start guide (English) - Page 14
. 3 Supporto da tavolo Per una solida posizione della fotocamera per PC SPC 200NC sulla scrivania. 4 Cavo USB Per collegare la camera alla porta USB del PC. Quando la camera è collegata alla porta USB, verrà alimentata dal PC. 5 Tasto Istantanea Per scattare una foto senza utilizzare il mouse - Philips SPC200NC | Quick start guide (English) - Page 15
'Strumenti SPC 200NC PC Camera' (driver). 4 Seguite le istruzioni che compaiono sullo schermo per completare l'installazione. 5 Riavviate il computer al termine dell'installazione di tutto il software. Per ulteriori informazioni e assistenza? Si invita a visitare il nostro sito web: www.philips.com - Philips SPC200NC | Quick start guide (English) - Page 16
:55 Pagina 16 P Manual de utilização rápido - Panorâmica das funções 1 Objectiva rotativa Para regular manualmente o ângulo vertical da câmara. 2 Anel de focagem Para regular manualmente a focagem da imagem. 3 Base de secretária Para um posicionamento estável da câmara de PC SPC 200NC na secretária - Philips SPC200NC | Quick start guide (English) - Page 17
! Se o ecrã 'Language Selection' não aparecer automaticamente, abra o Explorador do Windows e clique duas vezes no ícone 'Autorun.exe' no directório do CD-ROM. > Aparece agora o ecrã de instalação do software. 3 Seleccione pelo menos 'SPC 200NC PC Camera'. 4 Siga as instruções no ecrã até completar - Philips SPC200NC | Quick start guide (English) - Page 18
översikt 1 Vridbart objektiv För manuell inställning av kamerans vinkel i vertikalled. 2 Fokuseringsring För manuell fokusering. 3 Bordsställ För stabil placering av SPC 200NC PC-kamera på ett skrivbordet. 4 USB-kabel För att ansluta kameran till datorns USB-port. Kameran strömförsörjs från datorn - Philips SPC200NC | Quick start guide (English) - Page 19
minst 'SPC 200NC PC Camera'. 4 Följ anvisningarna på skärmen för att slutföra installationen. 5 Starta om datorn när du installerat alla program som nämns ovan. Vart vänder jag mig för information och support? Vart vänder jag mig för information och support? Besök vår webbplats www.philips.com - Philips SPC200NC | Quick start guide (English) - Page 20
QIG_SPC200NC.qxd 04-01-2005 12:55 Pagina 20 - Philips SPC200NC | Quick start guide (English) - Page 21
QIG_SPC200NC.qxd 04-01-2005 12:55 Pagina 21 - Philips SPC200NC | Quick start guide (English) - Page 22
Philips Electronics N.V. All rights reserved. Reproduction, copying, usage, modifying, hiring, renting, public performance, transmission and/or broadcasting in whole or part is prohibited without the written consent of Philips Electronics N.V. 9082 100 04691 for Philips SPC 200NC PC Camera
-
 1
1 -
 2
2 -
 3
3 -
 4
4 -
 5
5 -
 6
6 -
 7
7 -
8
-
9
-
10
-
11
-
12
-
13
-
14
-
15
-
16
-
17
-
18
-
19
-
20
-
21
-
22
 |
 |

Quick Install Guide
4
Guide d’installation rapide
6
Guía de instalación rápida
8
Schnellinstallationsanleitung
10
Korte installatiehandleiding
12
Guida rapida all’installazione 14
Manual de utilização rápido
16
Snabb bruksanvisning
18
Philips SPC 200NC PC Camera
Full PDF product
manual on CD
QIG_SPC200NC.qxd 04-01-2005 12:55 Pagina 1