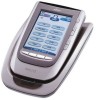
Philips TSU600099 User manual
Philips TSU600099 Manual
 |
View all Philips TSU600099 manuals
Add to My Manuals
Save this manual to your list of manuals |
Philips TSU600099 manual content summary:
- Philips TSU600099 | User manual - Page 1
Frequency 39 ProntoPro Edit 44 Troubleshooting 46 General Problems 46 Programming Problems 47 Recharging Problems 48 FAQ 49 Maintaining the Remote Control 51 Important notices 51 Cleaning the Remote Control 51 Overview of Symbols 52 Specifications 55 Index 56 User Guide 1 - Philips TSU600099 | User manual - Page 2
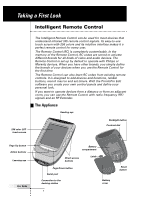
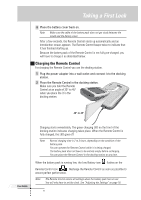
, you can use the Remote Control with radio frequency (RF) signals and an RF Extender. The Appliance Sending eye Backlight button Contrast dial Page Up button Action buttons Learning eye User Guide Battery compartment Direct-access buttons Latch Page Down button Serial port Connection to the - Philips TSU600099 | User manual - Page 3
is used: • to charge the Remote Control; • to connect your Remote Control to your computer. The serial port on the docking station can be used as an alternative for the serial port on the Remote Control. Connection for the Remote Control User Guide Charging LED 3 Serial port Adapter connector - Philips TSU600099 | User manual - Page 4
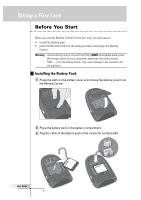
to the connector and the appliance. Installing the Battery Pack 1 Press the latch on the battery cover and remove the battery cover from the Remote Control. 2 Place the battery pack in the battery compartment. 3 Plug the cable of the battery pack in the connector as illustrated. User Guide 4 - Philips TSU600099 | User manual - Page 5
cover back on. Note Make sure the cable of the battery pack does not get stuck between the mould and the battery cover. After a few seconds, the Remote Control starts up automatically and an Introduction screen appears. The Remote Control beeps twice to indicate that it has finished starting up - Philips TSU600099 | User manual - Page 6
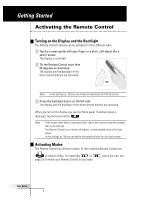
Remote Control more than 50 degrees as illustrated. The display and the backlight of the direct- Remote Control has different modes. In Use mode the Remote Control icon is entirely visible. If a label (like or page 23 to switch your Remote Control to Use mode. ) covers the icon, see User Guide - Philips TSU600099 | User manual - Page 7
have to define the brand before you can operate them with the Remote Control. 1 Select a device on the Home panel. The following screen appears. User Guide 2 When the brand of your device is Philips or Marantz, click No. The Remote Control switches to Use mode. To operate the device in Use mode - Philips TSU600099 | User manual - Page 8
codes are stored in the Remote Control's memory. You have to select your brand from the list. Because not every device of a certain brand uses the same RC codes, you might also have to select a set of RC codes tap exactly the character you need. User Guide After you have tapped the character, the - Philips TSU600099 | User manual - Page 9
brand is highlighted. The Search button switches into Next. 4 Tap Next. When your brand uses only one set of RC codes, the Remote Control switches to Try mode. Continue with step 5. When there are several code sets for your brand, a list of code sets for the selected brand appears. User Guide 9 - Philips TSU600099 | User manual - Page 10
Search. The Remote Control automatically searches through all available RC code sets to find the matching codes for your device. 2 Tap Next to start sending appropriate commands for the selected device. The progress bar indicates how many of the available code sets have been tried out. User Guide 10 - Philips TSU600099 | User manual - Page 11
with the selected code set, tap Back to select another code set. When the RC codes for your device are installed, the Remote Control beeps and returns to Use mode. Your brand is now defined for the selected device. 8 Define all other devices on the Home panel you want to operate. User Guide 11 - Philips TSU600099 | User manual - Page 12
RC code sets to find the matching codes for your device. 3 Tap Next to start sending appropriate commands for the selected device. The progress bar indicates how many of the available code sets have been tried out. 4 Tap OK when the device reacts. The Remote Control switches to Try mode. User Guide - Philips TSU600099 | User manual - Page 13
codes the Remote Control is sending. Note Even when the device is responding to the current code set, it is advised to try out other code sets. When your device responds to more than one code a device on the Home panel User Guide Note You can customize the Home panel by adding (see p. 31) or - Philips TSU600099 | User manual - Page 14
icon: To activate the Macro menu Home button: To navigate to the Home panel Device control panel: To operate the device Go to page 15 and the following to learn how Home button: To navigate to the Home panel Macro control panel: To operate macros and timers Go to page 35 and the following to - Philips TSU600099 | User manual - Page 15
on the Home panel. The first control panel of the selected device appears. Operating and Page Down buttons (below the touch screen); • Direct-access buttons (to the right of the touch screen). From within any device control panel, tap the Device tab next to the Remote Control icon. The Device - Philips TSU600099 | User manual - Page 16
of the active device is indicated on the Device tab. User Guide Selecting a device without affecting other devices When you select a device that is programmed with a device action (see p. 27), the following happens: • the Remote Control sends commands to the selected device to execute the device - Philips TSU600099 | User manual - Page 17
this procedure: 1 Tap the Device tab open the Device menu. next to the Remote Control icon to 2 Press and hold one of the action buttons (labeled NO IR). The Remote Control icon turns around , indicating that it will not send IR codes to the selected device so that none of your devices will be - Philips TSU600099 | User manual - Page 18
Direct-access Buttons Mute, Channel and Volume can be operated at any time, even without turning on the touch screen. Adjusting the Settings Most of the Remote Control's features can be set to your own wishes. 1 Touch and hold the Remote Control display the second and third setup panel. User Guide 18 - Philips TSU600099 | User manual - Page 19
buttons . Tap the day button and use the action buttons . Tap the LCD button and use the action buttons . Tap the Button Light button and use battery life time will be reduced. When you set the brightness level below the default level (3), battery life time will be prolonged. User Guide 19 - Philips TSU600099 | User manual - Page 20
. Tap the Button button repeatedly. Tap the Calibrate button and follow the on-screen instructions. Tap the Revert button and follow the on-screen instructions. Note Activating the Pick Up sensor will turn on the Remote Control more often and will reduce the battery life time. User Guide 20 - Philips TSU600099 | User manual - Page 21
Mode Tap the Remote Control icon . The Remote Control switches to Use mode. Note When you tap the Device tab, the Macro tab or the Home button from within the Setup panel, you exit Setup Mode and the Remote Control immediately switches to the selected menu or to the Home panel. User Guide 21 - Philips TSU600099 | User manual - Page 22
commands. For adding new devices.and macros. For deleting buttons, actions, devices and macros. For changing the order in a menu. For defining brands using the Remote Control's database. For configuring the Remote Control to operate devices with RF or IR signals. User Guide 22 - Philips TSU600099 | User manual - Page 23
Maximum out of it Switching to another mode 1 Tap the Remote Control icon at the top of the touch screen. The Mode menu appears. User Guide 2 Tap the mode you want to use. The label of the active mode appears on the Remote Control icon . You can now work in the selected mode. Disabling - Philips TSU600099 | User manual - Page 24
mode via the Remote Control icon . The Device menu appears. 2 Select the device for which you want to redefine the brand. 3 Complete instructions 1 to 7 in "Selecting Brands and Code Sets" on page 8. -or- Complete instructions 1 to 7 in "Searching Brands and Code Sets" on page 12. User Guide 24 - Philips TSU600099 | User manual - Page 25
Remote Control directly. You have to program them via ProntoPro Edit. You cannot program Home panel buttons directly. You have to program them via the Device menu (see p. 27). The Remote Control also offers empty control panel buttons which you can program reuse them for other commands. User Guide 25 - Philips TSU600099 | User manual - Page 26
the Remote Control icon. If the Remote Control has not learned the command successfully, you hear a short buzz and FAIL appears on the Remote Control icon. 6 Program all other buttons you want and relabel them if necessary (see p. 29). 7 Return to Use mode via the Remote Control icon. User Guide 26 - Philips TSU600099 | User manual - Page 27
time you select the device. Note When you program a device action, RC codes are sent the moment you select the device. This User Guide 5 Touch and hold either the Remote Control's left or right action button (both labeled Device) and tap the device you want to program. Even when you want to program - Philips TSU600099 | User manual - Page 28
the touch screen, press the direct-access button or the action button you want to program. The label for the direct-access button you have pressed (e.g. chan +) starts flashing on the Remote Control icon. The label above the action button you have pressed (e.g. play) starts flashing. User Guide 28 - Philips TSU600099 | User manual - Page 29
label Home panel buttons directly. You have to label them via the Device menu (see p. 30). 1 Navigate to the panel containing the button you want to label. 2 Switch to Label mode via the Remote Control icon . 3 Tap , allowing you to tap exactly the character or symbol you need. User Guide 29 - Philips TSU600099 | User manual - Page 30
return to Use mode via the Remote Control icon. Labeling Devices, Macro Groups and Timer Groups 1 Switch to Label mode via the Remote Control icon . 2 Tap the keyboard. 3 Complete instructions 4 to 6 in "Labeling Control Panel Buttons, Action Buttons, Macros and Timers" on page 29. User Guide 30 - Philips TSU600099 | User manual - Page 31
Getting the Maximum out of it Adding and Moving User Guide Adding Devices If you have a device that is not provided in the Device menu, you can add it to the Remote Control. You cannot add devices to the Home panel directly. You have to add them via the Device menu. 1 Make sure the Device tab - Philips TSU600099 | User manual - Page 32
Deleting and Restoring User Guide Deleting You can delete the following elements: • control panel buttons and actions associated with a direct-access or an Elements" on page 29) 1 Switch to Delete mode via the Remote Control icon . 2 Tap the button you want to delete. 3 Tap Delete - Philips TSU600099 | User manual - Page 33
buttons and button actions you want and return to Use mode via the Remote Control icon. Deleting device actions 1 Switch to Delete mode via the Remote Control icon . 2 Tap the Device tab to open the Device menu. groups you want and return to Use mode via the Remote Control icon. User Guide 33 - Philips TSU600099 | User manual - Page 34
Direct-access and Action Buttons" on page 28. Restoring buttons and button actions 1 Switch to Learn mode via the Remote Control icon . The empty buttons become visible. 2 Complete instructions 3 to 7 in "Learning Control to record the macros and set the timers again in Edit mode. User Guide 34 - Philips TSU600099 | User manual - Page 35
Up and Page Down buttons below the touch screen. 3 In the Macro menu select a macro group. User Guide 4 Switch to Edit mode via the Remote Control icon . Empty macro buttons appear in the macro control panel. 5 Tap the button you want to use for your macro. 6 Enter the sequence of commands - Philips TSU600099 | User manual - Page 36
you have recorded. 1 Open the macro group that contains the macro. 2 Switch to Edit mode via the Remote Control icon . 3 Tap the macro you want to edit. The contents of the macro appear. User Guide 4 Edit the macro. You can move or delete listed commands or you can record new commands. You can - Philips TSU600099 | User manual - Page 37
the Remote Control icon . Empty timer buttons appear in the timer control panel. 4 Tap the button you want to set a timer for. The first timer control panel either a single command or a macro. You can navigate to whatever control panel you want, just as you do in Use mode. 6 Tap the - Philips TSU600099 | User manual - Page 38
User Guide 7 Tap one or more day buttons to select or deselect days for the timer. You can choose to repeat the timer weekly. 8 Scroll down to display the second timer control group that contains the timer. 2 Switch to Edit mode via the Remote Control icon . 3 Tap the timer you want to edit. The - Philips TSU600099 | User manual - Page 39
or Timer Group" on page 31. Using the Remote Control with Radio Frequency User Guide Warning To use the Remote Control with radio frequency (RF) you need an RF Extender, which is not included with the Remote Control. By default, the Remote Control uses infrared (IR) signals to operate devices - Philips TSU600099 | User manual - Page 40
signals either directly from the Remote Control or from the RF Extender. Changing the Remote Control's RF with RF signals, you have to change the Remote Control's RF IR settings for those devices. 1 . 2 Switch to RF IR mode via the Remote Control icon . The Device menu appears. 3 Select the - Philips TSU600099 | User manual - Page 41
the instructions as described in "Changing the Extender ID". Note The ID on the RF Extender has to match the Extender ID on the Remote Control. red. 2 Press the action buttons to change the Extender ID. The Remote Control offers 16 Extender ID's. 5 Tap Accept to save the RF IR settings - Philips TSU600099 | User manual - Page 42
out of it 6 Repeat instructions 3 to 5 for all devices for which you want to change the RF IR settings. 7 Tap Close. The Remote Control switches back to Use mode. The Remote Control is configured to operate the 3 Tap . The button label turns red indicating that the button is active. User Guide 42 - Philips TSU600099 | User manual - Page 43
Channel. The Remote Control offers 4 RF Channels. Note The Channel (CH) on the RF Extender has to match the Channel on the Remote Control. 5 Tap without changing the Channel. 6 Tap Close. The Remote Control switches back to Use mode. The Remote Control is configured to operate the devices you have - Philips TSU600099 | User manual - Page 44
Edit is the Remote Control's companion software that you find on the included CD-ROM. For more information, go to http://www.pronto.philips.com. With ProntoPro Edit you can: • upload and download new configurations to and from your Remote Control. You do this with the serial cable included with your - Philips TSU600099 | User manual - Page 45
to create new buttons and designs; • personalize configuration files to optimize the use of your Remote Control. When you become familiar with ProntoPro Edit, you can achieve results like: User Guide Minimum System Requirements • PC • Windows 95/98/ME, Windows NT 4.0/2000, Windows XP • 16 MB - Philips TSU600099 | User manual - Page 46
Troubleshooting User Guide General Problems The display is black • Tap the screen to make sure the Remote Control is turned on. Tilt the Remote Control to make sure the Remote Control is turned on. Press the Backlight button to make sure the Remote Control and the backlight are turned on. See " - Philips TSU600099 | User manual - Page 47
about using the RF Extender. The Remote Control beeps 4 times after installing the battery pack • Four beeps indicate an invalid software version. Use ProntoPro Edit to update the Remote Control's software (ProntoPro Edit > Tools > Update). Programming Problems Buttons are not sending the correct - Philips TSU600099 | User manual - Page 48
or the Philips customer service: • Can't open configuration file; • Configuration file error; • No configuration file found; • Invalid configuration file version. Recharging Problems The battery pack will not recharge • Make sure the battery pack is properly installed in your Remote Control (see - Philips TSU600099 | User manual - Page 49
to indicate it is ready for use. User Guide How do I revert to the original configuration? Reverting to the original configuration restores the Remote Control's devices and commands to its state when you purchased it. This means that all programming is lost permanently. Normally, you never have - Philips TSU600099 | User manual - Page 50
hold the Remote Control icon The Remote Control switches to Setup mode. for three seconds. 2 Scroll to the second setup panel. 3 Tap the Calibrate button . The first instruction "Touch case, you have to reconfigure the Remote Control to operate the device with IR signals again. User Guide 50 - Philips TSU600099 | User manual - Page 51
Remote Control Use a soft, damp cloth to clean the Remote Control. If the touch screen of the Remote Control is spoiled, clean it with a soft cloth moistened with a diluted window-cleaning solution. Do not use a corrosive detergent or an abrasive sponge. Avoid the use of abundant water. User Guide - Philips TSU600099 | User manual - Page 52
run; fast speed Fast run; fast speed Slow run; slow speed Slow run; slow speed Eject Recording, general Key Navigate Still mode Tape running direction Next track Previous track Fast forward to index Rewind to index Frame by frame, general Frame by frame, general Subtitle Cancel picture Picture-in - Philips TSU600099 | User manual - Page 53
User Guide Overview of Symbols Page number up Page number down Page enlargement TV and text mixed 1st or 2nd language Last view; previous program Stand-by Zone focus: long distance Zone focus: very short distance Single or multi-digit selection Brightness; brilliance Contrast Brightness/contrast - Philips TSU600099 | User manual - Page 54
Overview of Symbols Read data from store Write data into store Page hold Sound muting Additional information on screen Viewing angle Spatial sound effect Television; video Sound; audio Surround sound Picture size adjustment Active control User Guide 54 - Philips TSU600099 | User manual - Page 55
brightness control Large touch screen Nine programmable direct-access buttons Backlighting for LCD and direct-access buttons Pick Up sensor Infrared sending and learning eyes 3-wire (RS232) serial port connector Software Dynamic, animated interface with 256 colors Built-in Philips-Marantz RC codes - Philips TSU600099 | User manual - Page 56
Index User Guide A action buttons, 2, 17 deleting, 32 labeling, 29 learning globally, 28 learning per device, 28 restoring, 34 activating the Remote Control, 6 Add mode, 22, 31, 38 adding delays, 36 devices, 31 devices to the Home panel, 31 macro groups, 38 timer groups, 38 adjusting the settings, - Philips TSU600099 | User manual - Page 57
User Guide Copy Existing Group, 39 Create New Device, 31 Create New Group, 39 customizing. See ProntoPro Edit. See learning. See redefining brands D day setting, 19 defining brands searching brands and code sets, 12 selecting brands and code sets, 8 selecting brands and searching code Remote Control - Philips TSU600099 | User manual - Page 58
labeling buttons, 29 devices, 30 LCD setting, 19 Learn mode, 22, 25 learning action buttons globally, 28 action buttons per device, 28 commands from existing remote controls, 25 control panel buttons, 26 device actions, 27 direct-access buttons globally, 28 direct-access buttons per device, 28 empty - Philips TSU600099 | User manual - Page 59
User Guide power adapter, 5 powering charging the Remote Control, 5 installing the battery pack, 4 ProntoPro Edit, 44 ProntoPro Emulator, 44 R radio frequency (RF), 39 RC codes installing, 11, 13 responding, 11, 13 searching, 10, 12 selecting, 10 sending, 10, 12 recharging. See charging recording - Philips TSU600099 | User manual - Page 60
, 11, 13 turning on backlight, 6 display, 6 U uploading new configurations, 44 Use mode, 22 using the Remote Control with RF, 39 Z Zoom in and out (virtual keyboard), 8, 29 User Guide 60 Documentation concept and elaboration: The Human Interface Group, de Regenboog 11, 2800 Mechelen, http://www
-
 1
1 -
 2
2 -
 3
3 -
 4
4 -
 5
5 -
 6
6 -
 7
7 -
8
-
9
-
10
-
11
-
12
-
13
-
14
-
15
-
16
-
17
-
18
-
19
-
20
-
21
-
22
-
23
-
24
-
25
-
26
-
27
-
28
-
29
-
30
-
31
-
32
-
33
-
34
-
35
-
36
-
37
-
38
-
39
-
40
-
41
-
42
-
43
-
44
-
45
-
46
-
47
-
48
-
49
-
50
-
51
-
52
-
53
-
54
-
55
-
56
-
57
-
58
-
59
-
60
 |
 |

User Guide
1
Taking a First Look
2
Intelligent Remote Control
2
Before You Start
4
Getting Started
6
Activating the Remote Control
6
Defining the Brands of Your Devices
7
Working with the Home Panel
13
Operating a Device
15
Adjusting the Settings
18
Getting the Maximum out of it
22
Introduction
22
Redefining Brands
24
Learning Commands
25
Labeling Elements
29
Adding and Moving
31
Deleting and Restoring
32
Recording Macros and Setting Timers
35
Using the Remote Control with Radio Frequency
39
ProntoPro Edit
44
Troubleshooting
46
General Problems
46
Programming Problems
47
Recharging Problems
48
FAQ
49
Maintaining the Remote Control
51
Important notices
51
Cleaning the Remote Control
51
Overview of Symbols
52
Specifications
55
Index
56
Table of Contents