ProForm 400 C Treadmill Uk Manual
ProForm 400 C Treadmill Manual
 |
View all ProForm 400 C Treadmill manuals
Add to My Manuals
Save this manual to your list of manuals |
ProForm 400 C Treadmill manual content summary:
- ProForm 400 C Treadmill | Uk Manual - Page 1
or write: ICON Health & Fitness, Ltd. Customer Service Department Unit 4 Revie Road Industrial Estate Revie Road Beeston Leeds, LS118JG UK email: [email protected] CAUTION Read all precautions and instructions in this manual before using this equipment. Save this manual for future reference. USER - ProForm 400 C Treadmill | Uk Manual - Page 2
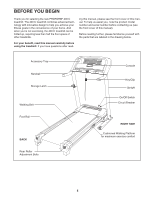
6 OPERATION AND ADJUSTMENT 13 HOW TO FOLD AND MOVE THE TREADMILL 18 TROUBLESHOOTING 20 CONDITIONING GUIDELINES 22 HOW TO ORDER REPLACEMENT PARTS Back Cover Note: An EXPLODED DRAWING and a PART LIST are attached in the center of this manual. PROFORM is a registered trademark of ICON IP, Inc. 2 - ProForm 400 C Treadmill | Uk Manual - Page 3
wear loose clothes that could become caught in the treadmill. Athletic support clothes are recommended for both men and women. Always wear athletic plug is damaged, or if the treadmill is not working properly. (See TROUBLESHOOTING on page 20 if the treadmill is not working properly.) 14. Read, - ProForm 400 C Treadmill | Uk Manual - Page 4
manual. Never remove the motor hood unless instructed to do so by an authorized service representative. Servicing other than the procedures in this manual should be performed by an authorized service or persons with pre-existing health problems. Read all instructions before using. ICON assumes no - ProForm 400 C Treadmill | Uk Manual - Page 5
PROFORM® 400 C treadmill. The 400 C treadmill combines advanced technology with innovative design to help you achieve your fitness goals in the convenience of your home. And when you're not exercising, the 400 below. For your benefit, read this manual carefully before using the treadmill. If you - ProForm 400 C Treadmill | Uk Manual - Page 6
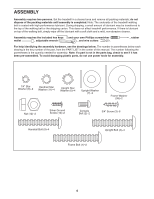
drawings below. The number in parentheses below each drawing is the key number of the part, from the PART LIST in the center of this manual. The number following the parentheses is the quantity needed for assembly. Note: If a part is not in the parts bag, check to see if it - ProForm 400 C Treadmill | Uk Manual - Page 7
1. Make sure that the power cord is unplugged. 1 Identify the Right Upright (39), which has a square hole in the location shown. Orient the Right Upright (39) and the Base (37) as shown. Attach the Right Upright to the Base with two Upright Bolts (4) and two Upright Star Washers (6); do not tighten - ProForm 400 C Treadmill | Uk Manual - Page 8
4. Raise the Uprights (38, 39). 4 See the left inset drawing. Identify the two Frame Spacers (96). Open the included packet of grease, and apply grease to both sides of both Frame Spacers. Next, identify the outer side of each Frame Spacer. Hold a Frame Spacer (96) and a Frame Washer (99) between - ProForm 400 C Treadmill | Uk Manual - Page 9
6. Pull the wire through the Right Upright (39) until 6 the Upright Wire (69) extends from both ends of the Right Upright. Then, disconnect and discard the wire. Wire 69 39 7. Route the Upright Wire (69) through one of the Handrails (40). Attach the Handrail to the Right Upright (39) with two - ProForm 400 C Treadmill | Uk Manual - Page 10
8. Have a second person raise and hold the treadmill Frame (36). Identify the Gas Spring (83). Note that the Gas Spring has a piston end and a cylinder end. See the two small inset drawings. Locate the Spring Clip (90) in the piston end of the Gas Spring. Using your fingernail or the end of a - ProForm 400 C Treadmill | Uk Manual - Page 11
10. Attach the ground wire on the Console Base (67) to the right Handrail (40) with a Silver Ground 10 Screw (10). Connect the wire harness on the Console Base (67) to the Upright Wire (69) as shown in the inset drawing. Important: If the connectors are oriented correctly, they will slide - ProForm 400 C Treadmill | Uk Manual - Page 12
13. Attach the ground wire on the Upright Wire (69) 13 to the indicated hole in the Base (37) with a Silver Ground Screw (10). Press the indicated grommet into the Right Upright (39). Grommet 39 69 37 Ground Wire 10 14. Carefully raise the Uprights (38, 39). 14 Attach the Latch Housing (91) - ProForm 400 C Treadmill | Uk Manual - Page 13
OPERATION AND ADJUSTMENT THE PRE-LUBRICATED WALKING BELT Your treadmill features a walking belt coated with high-performance lubricant. IMPORTANT: Never apply silicone spray or other substances to the walking belt or the walking platform. Such substances will deteriorate the walking belt and cause - ProForm 400 C Treadmill | Uk Manual - Page 14
On Position The console also features five preset programs. Each program controls the speed and incline of the treadmill as it guides you through an effective workout. To use the manual mode of the console, follow the steps beginning on page 15. To use a preset program, see page 16. Next, stand on - ProForm 400 C Treadmill | Uk Manual - Page 15
THE INFORMATION MODE/DEMO MODE on page 17). For simplicity, all instructions in this section refer to kilometers. To stop the walking belt, 5 Follow your progress with the display. When the manual mode is selected, a track representing 400 meters (1/4 mile) will appear in the upper right corner - ProForm 400 C Treadmill | Uk Manual - Page 16
6 Measure your heart rate if desired. Before using the handgrip pulse sensor, remove the sheets of clear plastic from the metal contacts. In addition, make sure that your hands are clean. Metal Contacts To measure your heart rate, stand on the foot rails and place your hands on the metal contacts - ProForm 400 C Treadmill | Uk Manual - Page 17
will then slow to a stop. If the speed or incline setting for the current period is too high or too low for you, you can manually override the setting by pressing the Speed or Incline buttons. Every few times a Speed button is pressed, an additional indicator will appear or disappear in - ProForm 400 C Treadmill | Uk Manual - Page 18
HOW TO FOLD AND MOVE THE TREADMILL HOW TO FOLD THE TREADMILL FOR STORAGE Before folding the treadmill, adjust the incline to the lowest position. If this is not done, the treadmill may be permanently damaged. Next, unplug the power cord. CAUTION: You must be able to safely lift 20 kg (45 lbs.) to - ProForm 400 C Treadmill | Uk Manual - Page 19
HOW TO LOWER THE TREADMILL FOR USE 1. Hold the treadmill with your right hand as shown. Pull the latch knob to the left and hold it. Pivot the frame down until it is past the latch pin. 2. Hold the metal frame firmly with both hands, and lower it to the floor. CAUTION: To decrease the possibility of - ProForm 400 C Treadmill | Uk Manual - Page 20
TROUBLESHOOTING Most treadmill problems can be solved by following the steps listed below. Find the symptom that applies, and follow the steps listed. If you need further assistance, please see the front cover of this manual. PROBLEM: The power does not turn on SOLUTION: a. Make sure that the - ProForm 400 C Treadmill | Uk Manual - Page 21
the walking belt is properly tightened. b 5-7cm Rear Roller Bolts c. If the walking belt still slows when walked on, see the front cover of this manual. PROBLEM: The walking belt is off-center or slips when walked on SOLUTION: a. If the walking belt is off-center, first remove the key a and - ProForm 400 C Treadmill | Uk Manual - Page 22
intensity level can be found by using your heart rate as a guide. The chart below shows recommended heart rates for fat burning and aerobic increase the flexibility of your muscles and will help prevent postexercise problems. EXERCISE FREQUENCY To maintain or improve your condition, complete three - ProForm 400 C Treadmill | Uk Manual - Page 23
SUGGESTED STRETCHES The correct form for several basic stretches is shown at the right. Move slowly as you stretch-never bounce. 1. Toe Touch Stretch Stand with your knees bent slightly and slowly bend forward from 1 your hips. Allow your back and shoulders to relax as you reach down toward - ProForm 400 C Treadmill | Uk Manual - Page 24
, Ltd. office, or write: ICON Health & Fitness, Ltd. Customer Service Department Unit 4, Revie Road Industrial Estate Revie Road Beeston Leeds, LS118JG UK the NAME of the product (PROFORM 400 C treadmill) • the SERIAL NUMBER of the product (see the front cover of this manual) • the KEY NUMBER and - ProForm 400 C Treadmill | Uk Manual - Page 25
REMOVE THIS EXPLODED DRAWING AND PART LIST FROM THE MANUAL Save this EXPLODED DRAWING and PART LIST for future reference. Note: Specifications are subject to change without notice. For information about ordering replacement parts, see the back cover of the User's Manual. 34 - ProForm 400 C Treadmill | Uk Manual - Page 26
Rear Roller Bracket Motor Bracket Console Support Bracket Stop Bracket Belt Guide Isolator Belly Pan Frame Pivot Spacer , 2F # 1 8" Black Wire, M/F # 1 4" Black Wire, 2Ring # 1 10" Red Wire, M/F # 1 User's Manual #These parts are not illustrated Specifications are subject to change without notice. - ProForm 400 C Treadmill | Uk Manual - Page 27
56 3 26 54 26 88 20 26 35 47 32 26 48 17 82 87 21 22 43 19 8 32 57 22 13 14 21 22 86 8 19 26 43 32 58 22 67 18 63 6 18 10 97 28 16 80 10 62 28 44 61 23 7 59 78 29 50 10 85 98 70 24 12 25 30 41 12 46 31 60 12 73 9 11 71 40 53 93 91 68 53 3 2 8 92 3 34 3 45
-
 1
1 -
 2
2 -
 3
3 -
 4
4 -
 5
5 -
 6
6 -
 7
7 -
8
-
9
-
10
-
11
-
12
-
13
-
14
-
15
-
16
-
17
-
18
-
19
-
20
-
21
-
22
-
23
-
24
-
25
-
26
-
27
 |
 |
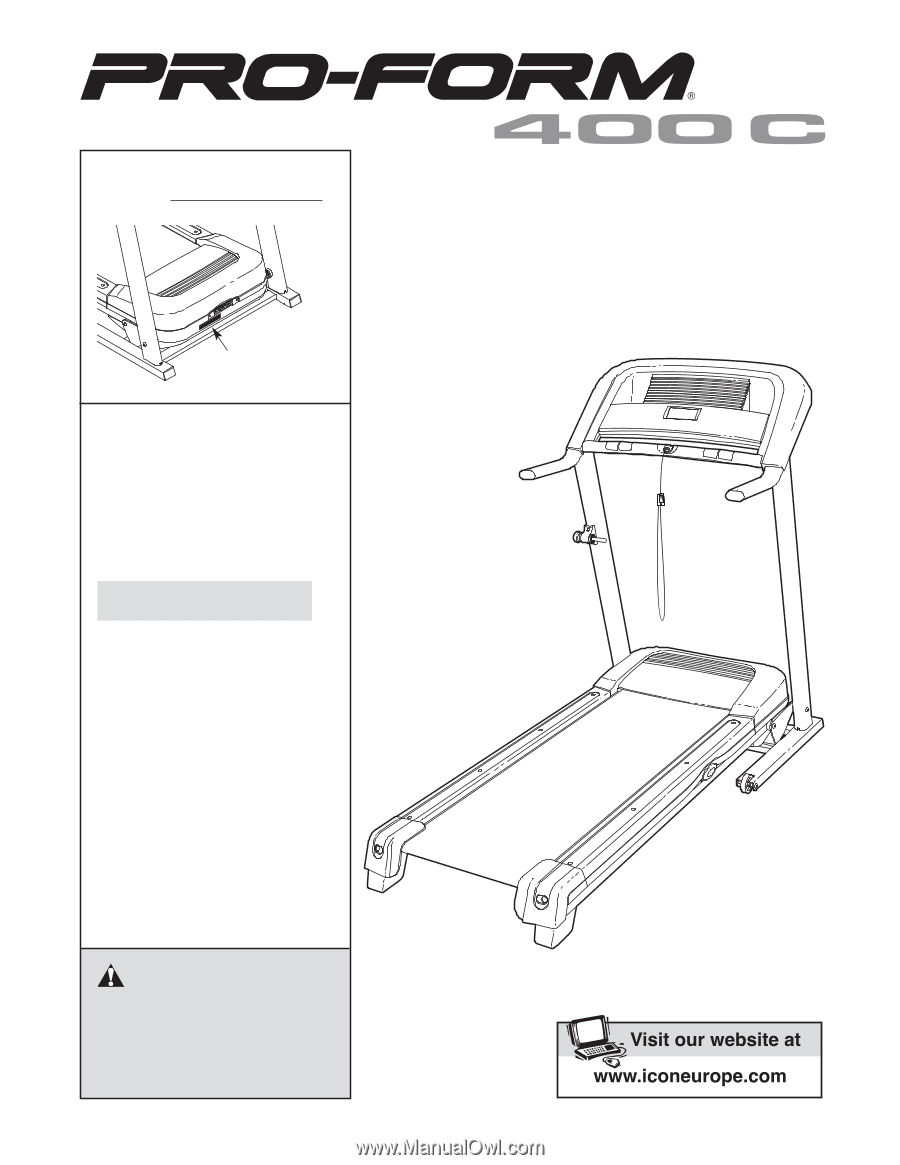
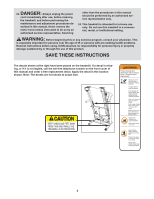
Model No. PETL30506.1
Serial No.
CAUTION
Read all precautions and instruc-
tions in this manual before using
this equipment. Save this manual
for future reference.
Serial Number
Decal
USER'S MANUAL
QUESTIONS?
As a manufacturer, we are com-
mitted to providing complete
customer satisfaction. If you
have questions, or if there are
missing or damaged parts,
please call:
or write:
ICON Health & Fitness, Ltd.
Customer Service Department
Unit 4
Revie Road Industrial Estate
Revie Road
Beeston
Leeds, LS118JG
UK
email: [email protected]
08457 089 009