Pyle PLDVRCAM74 Instruction Manual
Pyle PLDVRCAM74 Manual
 |
View all Pyle PLDVRCAM74 manuals
Add to My Manuals
Save this manual to your list of manuals |
Pyle PLDVRCAM74 manual content summary:
- Pyle PLDVRCAM74 | Instruction Manual - Page 1
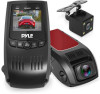
PLDVRCAM74 DUAL CAMERA DVR KIT Vehicle Dash Camera Recording System with Full HD 1080p USER MANUAL - Pyle PLDVRCAM74 | Instruction Manual - Page 2
GETTING STARTED Device Layout 2 www.PyleUSA.com - Pyle PLDVRCAM74 | Instruction Manual - Page 3
To connect the rear lens to host with adapter cable to get 11 Microphone Rreeacroimrdaaguedio with microphone while recording 12 Micro SD Memory Card Slot Supports 32G MAX 13 RESET Press to restart in case of system crash. 3 www.PyleUSA.com - Pyle PLDVRCAM74 | Instruction Manual - Page 4
Status Icons Icon Meaning Video Resolution Wide Dynamic Range Charging via USB Charger Battery Power Level Microphone Mute Microphone On Video Recording Mode Video Playback Mode Photo Mode Loop Recording Memory Card Inserted G- Sensor Sensitivity White Balance License plate number 4 www.PyleUSA. - Pyle PLDVRCAM74 | Instruction Manual - Page 5
Installation 1. Attaching the front camera to the window mount Before the device can be used in a car, it is essential to rst install a properly attached window mount. Make sure that you place the recorder in a safe, appropriate location where it will not obstruct the driver's view. Clean windshield - Pyle PLDVRCAM74 | Instruction Manual - Page 6
3. Inserting a memory card Insert a memory card before recording. The recorder supports Micro SD cards with a capacity of up to 32GB. For reliable operation, use a Class 10 memory card with a capacity of at least 8GB. 4. Connecting the - Pyle PLDVRCAM74 | Instruction Manual - Page 7
seconds. To turn on the device again, you will need to do so manually by pressing the ON / OFF button. • If the battery is completely discharged not charging properly, take the device and the charger to an authorized Service Center. Connecting the charger improperly may cause serious damage to the - Pyle PLDVRCAM74 | Instruction Manual - Page 8
INSERTING THE MEMORY CARD Your device accepts memory cards with a maximum capacity of 128GB. Depending on the memory card manufacturer and type, some cards may not be compatible with your device. Using an incompatible card may damage the device or the memory card, or corrupt the data stored on it. - Pyle PLDVRCAM74 | Instruction Manual - Page 9
REMOVING THE MEMORY CARD Before removing memory card from your unit, you must rst remove the unit from the mount. Before removing a memory card from your device: 1. Press the REC button to stop the device from recording 2. Press and hold the ON/OFF button to switch o the device 3. Gently push the - Pyle PLDVRCAM74 | Instruction Manual - Page 10
TURNING THE DEVICE ON AND OFF Press and hold the ON/OFF button for a few seconds to turn on the device. A welcome message will be displayed on screen as shown in the image below. To turn o the device, again press and hold the ON/OFF button for a few seconds. A goodbye message will be displayed on - Pyle PLDVRCAM74 | Instruction Manual - Page 11
LOOP RECORDING Recommend Setting: 3 Minutes With Loop Recording Mode enabled, the device will continuously erase older video as it records new video, keeping only the images captured over a user-selected time range. All video older than this range will be replaced with new video. (Note: any locked - Pyle PLDVRCAM74 | Instruction Manual - Page 12
TIME LAPSE RECORD Recommend Setting: O Time-lapse photography is a technique whereby the frequency at which lm frames are captured (the frame rate) is much lower than that used to view the sequence. When played at normal speed, time appears to be moving faster and thus lapsing. 1. Press MENU once to - Pyle PLDVRCAM74 | Instruction Manual - Page 13
EXPOSURE Recommend Setting: +0.0 Adjust the camera exposure value for brighter or darker recorded video, according to your preference. 1. Press MENU once to enter Video Settings 2. Press the UP or DOWN button to navigate to the "Exposure" option 3. Press OK to view the current selection: +0.0, +1/3, - Pyle PLDVRCAM74 | Instruction Manual - Page 14
DATE STAMP You have the option to display the date and time in your videos. Note that the date and time stamp cannot be removed from videos if this feature was enabled at the time of recording. 1. Press MENU once to enter Video Settings 2. Press the UP or DOWN button to navigate to the "Date Stamp" - Pyle PLDVRCAM74 | Instruction Manual - Page 15
, the device will perform an automatic le lock. (Locked video les cannot be erased during Loop Recording; they remain on the memory card until manually deleted or the card is reformatted.) We recommend that you use the "Low" setting for this feature. 1. Press MENU once to enter Video Settings - Pyle PLDVRCAM74 | Instruction Manual - Page 16
5. Press OK to move to the next date/time segment and repeat step 4 6. Press OK again to con rm your entry 7. Press MENU to exit System Settings Note: If the battery remains fully discharged or is removed from the device, the time and date will be reset. Auto Power O When enabled, this option allows - Pyle PLDVRCAM74 | Instruction Manual - Page 17
LANGUAGE Use the following procedure to change the device's time and date. Language availability may vary depending on the region. 1. Press MENU twice to enter System Settings 2. Press the DOWN button to navigate to the "Language" option 3. Press OK to view the current language selection 4. Press - Pyle PLDVRCAM74 | Instruction Manual - Page 18
Saver Recommend Setting: 15 Seconds Select a time duration for the screen to stay lit after recording starts. (If you cannot nd this option, please follow instructions for installing the latest rmware update.) 1. Press MENU twice to enter System Settings 18 www.PyleUSA.com - Pyle PLDVRCAM74 | Instruction Manual - Page 19
2. Press the UP or DOWN button to navigate to the "Screen Saver" option 3. Press OK to view the current selection: 15 Secs / 1 min / 3 min/ OFF 4. Press the UP or DOWN button to make your selection 5. Press OK to con rm your entry 6. Press MENU to exit System Settings Alternatively, you can use a - Pyle PLDVRCAM74 | Instruction Manual - Page 20
4. Press OK to start playback for the selected video 5. Press OK again to pause playback 6. Press MODE to stop playback 7. FAST FORWARD: While video is playing, press the UP button one or more times to set fast playback speed ( 2X / 4X / 8X ) 8. FAST REWIND: While video is playing, press the DOWN - Pyle PLDVRCAM74 | Instruction Manual - Page 21
PHOTO SETTINGS Resolution This option allows you to set the pixel resolution for captured images. 1. Press MODE once to enter Photo Mode 2. Press MENU once to enter Photo Settings 3. Press the UP or DOWN button to navigate to the "Resolution" option 4. Press OK to view current selection: 12M - Pyle PLDVRCAM74 | Instruction Manual - Page 22
Sequence Mode This feature allows you to capture a sequence of 3 quick photos with one button press. 1. Press MODE once to enter Photo Mode 2. Press MENU once to enter Photo Settings 3. Press the UP or DOWN button to navigate to the "Sequence" option 4. Press OK to view the current ON/OFF status for - Pyle PLDVRCAM74 | Instruction Manual - Page 23
Sharpness This feature will automatically enhance captured images for a clearer, more distinct picture. 1. Press MODE once to enter Photo Mode 2. Press MENU once to enter Photo Settings 3. Press the UP or DOWN button to navigate to the "Sharpness" option 4. Press OK to view the current selection: - Pyle PLDVRCAM74 | Instruction Manual - Page 24
Color This feature allows you to choose color e ect for captured images. 1. Press MODE once to enter Photo Mode 2. Press MENU once to enter Photo Settings 3. Press the UP or DOWN button to navigate to the "Color" option 4. Press OK to view the current selection: Color / Black & White / Sepia 5. - Pyle PLDVRCAM74 | Instruction Manual - Page 25
Exposure This setting allows you to adjust the brightness level of captured images. The "+0.0" setting is recommended. 1. Press MODE once to enter Photo Mode 2. Press MENU once to enter Photo Settings 3. Press the UP or DOWN button to navigate to the "Color" option 4. Press OK to view the current - Pyle PLDVRCAM74 | Instruction Manual - Page 26
Quick Review Enabling this feature will allow you to immediately view each captured image for a few seconds before taking the next photo. 1. Press MODE once to enter Photo Mode 2. Press MENU once to enter Photo Settings 3. Press the UP or DOWN button to navigate to the "Quick Review" option 4. Press - Pyle PLDVRCAM74 | Instruction Manual - Page 27
Playback Mode (Photo) Follow these steps to view captured images as a continuous slide show. 1. Press MODE twice to enter Photo View Mode 2. Press the UP or DOWN button to navigate through the stored image les 3. Press MENU to view options for the selected le: Delete / Protect / Slide Show 4. Press - Pyle PLDVRCAM74 | Instruction Manual - Page 28
-
 1
1 -
 2
2 -
 3
3 -
 4
4 -
 5
5 -
 6
6 -
 7
7 -
8
-
9
-
10
-
11
-
12
-
13
-
14
-
15
-
16
-
17
-
18
-
19
-
20
-
21
-
22
-
23
-
24
-
25
-
26
-
27
-
28
 |
 |

DUAL CAMERA DVR KIT
Vehicle Dash Camera Recording
System with Full HD 1080p
USER MANUAL
PLDVRCAM74