Pyle PMD24 PMD24 Manual 1
Pyle PMD24 Manual
 |
View all Pyle PMD24 manuals
Add to My Manuals
Save this manual to your list of manuals |
Pyle PMD24 manual content summary:
- Pyle PMD24 | PMD24 Manual 1 - Page 1
/Voltage/Stud Detector Instruction Manual The Pyle PMD24 uses electronic signals to locate the exact position of studs, ceiling joists, AC wires, and metal through drywall, concrete and other common wall materials. Once the edge of a stud has been detected, the unit emits audio and visual signals
-
 1
1
 |
 |

spot.
The
middle
of
the
metal
is
the
center
point
between
the
two
marks.
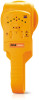
PYLE®
www.pyleaudio.com
PMD24
Metal/Voltage/Stud
Detector
Instruction
Manual
The
Pyle
PMD24
uses
electronic
signals
to
locate
the
exact
position
of
studs,
ceiling
joists,
AC
wires,
and
metal
through
drywall,
concrete
and
other
common
wall
materials.
Once
the
edge
of
a
stud
has
been
detected,
the
unit
emits
audio
and
visual
signals
(LED
Display)
that
allow
you
to
easily
pinpoint
its center
position.
PMD24
offers
quick
calibration
and
heavy-duty
ABS
construction.
The
ergonomically
designed
shape
increases
user
comfort
and
safety
during
use.
OPERATING
INSTRUCTIONS
1.
RED
LED
2.
GREEN
LED
3.
FUNCTION
SWITCH:
0
STUD
0
METAL
0
VOLTAGE
4.
ON/OFF
BUTTON
5.
STUD
ADJUSTMENT
6.
POWER
LED
7.
METAL/VOLTAGE
ADJUSTMENT
8.
EDGE
GROOVE
8
EDGE
GROOVE
6
POWER
LED
1
RED
LED
2
GREEN
LED
FUNCTION
SWTCH
7
METAL/VOLTAGE
oltKO
STUD
ADJ
ADJ.
A
A
Battery:
Open
door
on
back
of
unit
and
connect
a
9
-volt
battery
to
clip.
Place
battery
back
into
case
and
put
battery
door
on.
Calibration:
Calibrate
the
unit
on
the
surface
being
tested
before
scanning.
Unless
it
is
known
that
No
live
AC
wires
are
present,
detect
the
AC
wires
fi
rst.
Calibration
&
Detection
for
Wood:
Press
the
ON/OFF
button,
set
the
function
switch
to
"
STUD"
position,
then
adjust
the
left
knob
until
the
first
two
side
green
LEDs
lights
on
the
bottom
turn
on,
then
switch
the
knob
back
until
the
LED
lights
turn
off;
the
unit
is
now
calibrated
for
wood.
Slowly
slide
unit
horizontally
across
the
wall,
right
or
left.
As
you
begin
to
approach
a
stud,
the
green
LEDs
will
light
successively,
from
bottom
to
top.
When
the
center
two
red
LEDs
are
lit
and
a
steady
tone
sounds,
you
have
located
the
edge
of
the
stud.
Mark
this
spot.
Continue
scanning
beyond
marked
spot
until
target
LEDs
go
out.
Slide
unit
in
reverse
direction
to
locate
the
other
edge
of
stud.
Mark
this
second
spot.
Middle
of
stud
is
centered
between
the
two
marks.
Calibration
and
Detection
for
Metal:
Press
the
ON/OFF
button,
set
the
switch
to"
METAL"
position,
then
adjust
the
left
knob
until
the
fi
rst
two
side
green
LED
lights
on
the
bottom
turn
on,
then
switch
the
knob
back
until
the
LED
lights
turn
off;
the
unit
is
now
calibrated
for
metal.
To
set
the
depth
sensitivity
of
the
unit,
place
the
sensor
over
a
metal
object
at
the
desired
depth,
turn
the
unit
on,
then
adjust
the
left
knob
until
the
first
two
side
green
LED
lights
on
the
bottom
turn
on,
then
switch
the
knob
back
until
the
LED
lights
turn
off;
the
unit
will
be
set
to
the
desired
depth.
The
actual
depth
will
vary
with
type
and
size
of
metal
used.
Slowly
slide
unit
horizontally
across
the
wall,
right
or
left.
As
you
begin
to
approach
a
metal,
the
green
LEDs
will
light
successively,
from
bottom
to
top.
When
the
center
two
red
LEDs
are
lit
and
a
steady
tone
sounds,
you
have
located
the
edge
of
the
metal.
Mark
this
spot.
Continue
scanning
beyond
the
marked
spot
until
target
LEDs
go
out.
Slide
unit
in
reverse
direction
to
locate
the
other
edge.
Mark
this
second
When
metal
sensing
is
set
to
maximum
depth
sensitivity
and
the
sensed
metal
object
is
close
to
the
unit
(example;
metal
behind
1/2
inch
wallboard)
the
apparent
width
of
the
sensed
metal
can
be
very
wide.
To
locate
the
true
metal
size,
place
the
unit
in
the
approximate
center
of
the
indicated
area
and
re
-calibrate
the
unit.
Then
re
-scan
the
area.
Repeat
this
procedure
until
the
size
of
the
metal
is
determined.
Calibration
and
Detecting
live
Wires:
"Set
the
function
switch
to
"U
VOLTAGE"
position,
then
adjust
the
right
knob
until
the
two
red
LED
lights
turn
on,
then
switch
the
knob
back
until
the
LED
lights
turn
off.
The
unit
is
now
calibrated
for
voltage.
Its
AC
voltage
sensing
is
set
to
Maximum
sensitivity.
Slowly
slide
unit
horizontally
across
the
wall,
right
or
left.
When
the
center
two
red
LEDs
fl
ash
and
the
tone
sounds
continuously,
you
have
located
the
AC line.
Reduce
the
sensitivity
by
turning
back
the
knob.
Then
re
-scan
to
get
an
accurate
location
of
the
AC
line"
To
be
safe,
detect
the
AC
live
wires
first
unless
it
is
known
that
no
live
AC
li
nes
are
present.
WARNING
Shielded
wires
or
live
wires
in
metal
conduits,
casings,
metalized
walls
or
thick,
dense
walls
will
not
be
detected.
Always
turn
AC
power
off
when
working
near
wiring.
PMD24
is
designed
to
detect
110
and
220
volts
AC
in
live
electrical
wires.
It
will
also
detect
the
presence
of
live
wires
greater
than
220
volts.
CAUTION
You
should
always
use
caution
when
nailing,
cutting
or
drilling
in
walls,
ceilings
and
fl
oors
that
may
contain
wiring
or
pipes
near
the
surface.
Shielded,
dead,
telephone,
TV
cable
or
non
-powered
wiring
will
not
be
detected
as
live
wires.
Always
remember
that
studs
or
joists
are
normally
spaced
16
inches
or
24
inches
apart
and
are
typically
1
1
/
2
inches
in
width.
To
avoid
surprises,
be
aware
that
anything
closer
together
or
of
a
different
width
may
be
an
additional
stud,
ceiling
joist,
pipe
or
fire
break.
When
working
near
AC
electrical
wires,
always
turn
off
the
power.
Prevent
Interference
To
ensure
best
performance
from
the
PMD24,
the
unit
should
be
held
properly
with
the
hand
on
the
lower
portion
of
the
unit.
Keep
your
free
hand
at
least
6
inches
away
from
the
unit
while
testing
or
scanning
surfaces.
Conventional
Construction
Doors
and
windows
are
commonly
constructed
with
additional
studs
and
headers
for
added
stability.
PMD24
detects
the
edge
of
these
double
studs
and
solid
headers
and
emits
and
holds
an
audio
signal
as
it
crosses
them.
Surface
Differences
Wallpaper
-
There
will
be
no
difference
in
the
function
of
PMD24
on
surfaces
covered
with
wallpaper
or
fabric
unless
the
covering
used
contains
metallic
foil
or
fi
bers.
Concrete
-
Metal
up
to
3/4
inches
deep
can
be
detected.
If
surface
is
rough,
use
of
a
piece
of
cardboard
as
outlined
under
Ceilings
is
recommended.
Ceilings
-
When
dealing
with
a
rough
surface
such
as
a
sprayed
ceiling
utilize
a
piece
of
cardboard
when
scanning
the
surface.
Run
through
the
calibration
technique
described
earlier
WITH
the
piece
of
cardboard
in
place
to
assure
best
performance
of
the
unit.
Also,
it
is
particularly
important
in
this
application
to
remember
to
keep
your
free
hand
away
from
the
unit.
Specifications
Utilizing
the
procedure
of
scanning
and
marking
from
two
sides,
PMD24
will
find
the
center
of
wood
or
metal
studs
or
live
wires
through
3/4
inch
surfaces
within
1/8
inch
accuracy.
Battery
Life:
1
year
with
normal
use
Water
Resistance:
Water
resistant,
but
not
waterproof.
Operating
Temperature:
+20°F
to
+
120°F
(-7°C
to
+49°C)
Storage
Temperature:
-20°F
to
+
150°F
(-29°C
to
+66°C)
Dimension:
(LxWxH):
8.730*
3.6
*
1.8
(in.)
Weight
(with
battery):
250g
(0.11
LBS)