Pyle SLTRA5BL Instruction Manual
Pyle SLTRA5BL Manual
 |
View all Pyle SLTRA5BL manuals
Add to My Manuals
Save this manual to your list of manuals |
Pyle SLTRA5BL manual content summary:
- Pyle SLTRA5BL | Instruction Manual - Page 1
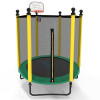
SLTRA5BL 5ft Outdoor & Indoor Mini Kid Trampoline with Enclosure Safety Net Basketball Hoop Outdoor & Indoor Jumping Fun Trampoline for Kids/Children, Basketball Hoop, Safety Net Cage (5 ft.) - Pyle SLTRA5BL | Instruction Manual - Page 2
precautions and instructions in this manual before using this equipment. Save this manual for future reference. Introduction You have chosen a high quality product. Familiarize yourself with the product before using it for the rst time. In addition, please refer to the operating instructions and the - Pyle SLTRA5BL | Instruction Manual - Page 3
are no persons, animals or objects on or under the trampoline! There is a risk of injury to the animal as well as the user! SAFETY INSTRUCTIONS FOR TRAMPOLINES • Do not use if the jumping mat is wet. • Empty your hands and pockets before jumping. • Always jump in the middle of the - Pyle SLTRA5BL | Instruction Manual - Page 4
by at least two adults in accordance with the assembly instructions, and then examined before being used for the rst time Defective parts must be replaced with original replacement parts only. Contact our customer service to obtain these. d. Replace the safety net, jumping mat, padding cover - Pyle SLTRA5BL | Instruction Manual - Page 5
Remove all parts from the packaging and check whether all parts are fully present. If there are any parts missing, please contact our customer service. WARNING! Due to its size, the trampoline must be assembled and installed by at least two adults. WARNING! Wear protective gloves when assembling the - Pyle SLTRA5BL | Instruction Manual - Page 6
the frame. The surface of the mat is smoother than the other side. • To make sure the tension on the mat balanced, please follow the instructions below to attach the springs. • Select an arbitrary point on Frame Tube (#1) and designate it as point 1. To hook the rst Spring (#3), attach one end - Pyle SLTRA5BL | Instruction Manual - Page 7
• From point 1, count exactly 7 holes on the Frame Tube (#1) and 7 triangle rings on the Jumping Mat (#4), attach the second spring. Repeat the same step to hook the 3rd, 4th and 5th spring to point 13, 19 and 25. • Again, count 4 holes from point 1 to attach the 6th spring. Repeat the step then - Pyle SLTRA5BL | Instruction Manual - Page 8
STEP 3. FRAME COVER ASSEMBLY • Place the Padding Cover (#5) over the frame and springs. • Tie the elastic strap underneath the cover to Frame Tube (#1) as shown. • To make sure there's no gap left between the Jumping Mat (#4) and the Padding Cover (#5) to prevent foot getting caught during use, "sew - Pyle SLTRA5BL | Instruction Manual - Page 9
STEP 4. SAFETY POLES ASSEMBLY • Plastic Caps (#20, 21) are pre-attached to the top of Upper Net Poles (#7, 8). • Slide the Upper Net Poles (#7) into Lower Net Poles (#9), 5 sets in total. • Connect Upper Net Pole(for putting up basketball hoop) (#8) to Lower Net Pole (#9) with Inner Hexagonal Bolt - Pyle SLTRA5BL | Instruction Manual - Page 10
#20 #7 #20 #7 #9 #9 #21 #20 #8 #20 #7 #20 #7 #9 #9 #7 #9 #9 Note: 1. Compared with Plastic Cap A (#20), Plastic Cap B (#21) is open-ended for xing Basketball Hoop Connecting Tube (#22). 2. Upper Net Pole (#7) and Lower Net Pole (#9) are connected by an inserted one-ended snap. 3. - Pyle SLTRA5BL | Instruction Manual - Page 11
STEP 5. SAFETY NET ASSEMBLY • Attach the 6 straps sewn on top of Safety Net (#16) around the thinnest part of Plastic Cap A & B (#20, 21). • Attach the plastic hooks on the bottom of Safety Net (#16) to the triangle rings of Jumping Mat (#4). #21 #20 #20 #7 #20 #7 #9 #8 #20 #9 #7 #7 #20 #7 - Pyle SLTRA5BL | Instruction Manual - Page 12
STEP 6. BASKETBALL SYSTEM ASSEMBLY • Connect the Rim (#24), Basketball Backboard (#23) and Basketball Hoop Connecting Tube (#22) with Inner Hexagonal Bolt M6*25mm (#28), Washer (#13) and Locknut (#29), tighten them with L-Shape wrench (#17) and Wrench (#18). • Put the assembled Basketball backboard - Pyle SLTRA5BL | Instruction Manual - Page 13
and help on trampoline use are provided below. The instructions must be carefully followed for the safety of the users, as well as people and animals nearby. NOTE: Before getting on the trampoline, perform some - Pyle SLTRA5BL | Instruction Manual - Page 14
d. You must practise aborting jumps before you attempt more complicated jumps! Slightly bend your knees when you land on the trampoline. e. Limit the duration of continuous use. Take regular breaks. Aborting a Jump If you would like to abort a jump,slightly bend your knees when landing on the jump - Pyle SLTRA5BL | Instruction Manual - Page 15
Sitting Jump (Fig. 3) 1. Jump up in the same manner as the basic jump. Do not jump too high! 2. Try to land in a sitting position. Do not lock your elbows, but keep your arms and hands loosely by your hips. 3. Try to get back on your feet when jumping back up. Fig. 3 TRANSPORTING You can move the - Pyle SLTRA5BL | Instruction Manual - Page 16
MAINTENANCE Maintenance is important for preserving the quality and safety of the trampoline. Observe the following important information to enjoy your trampoline over a long period of time. • Keep all sharp-edged and pointy objects away from the trampoline, as they may damage the jump mat. • Do not - Pyle SLTRA5BL | Instruction Manual - Page 17
www.SereneLifeHome.com 17 - Pyle SLTRA5BL | Instruction Manual - Page 18
Questions? Comments? We are here to help! Phone: (1) 718-535-1800 Email: [email protected]
-
 1
1 -
 2
2 -
 3
3 -
 4
4 -
 5
5 -
 6
6 -
 7
7 -
8
-
9
-
10
-
11
-
12
-
13
-
14
-
15
-
16
-
17
-
18
 |
 |

5ft Outdoor & Indoor Mini Kid Trampoline
with Enclosure Safety Net Basketball Hoop
Outdoor & Indoor Jumping Fun Trampoline
for Kids/Children, Basketball Hoop, Safety Net Cage (5 ft.)
SLTRA5BL