Ridgid GP90135 Owners Manual
Ridgid GP90135 Manual
 |
View all Ridgid GP90135 manuals
Add to My Manuals
Save this manual to your list of manuals |
Ridgid GP90135 manual content summary:
- Ridgid GP90135 | Owners Manual - Page 1
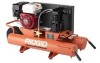
GP90135 OPERATOR'S MANUAL WHEELBARROW AIR COMPRESSOR ! WARNING: To reduce the risk of injury, the user must read and understand the Operator's Manual before using this product. IN610402AV 12/05 Printed in U.S.A. - Ridgid GP90135 | Owners Manual - Page 2
of Contents 2 Safety Instructions 3 Safety Signal Words 3 Before Using the Air Compressor 3 Spraying Precautions 5 Breathable Air Warning 5 Warning Labels 6 Glossary of Terms 7 Unpacking and Checking Content 7 Getting to Know Your Air Compressor 8 Operating Your Air Compressor . . .10 - Ridgid GP90135 | Owners Manual - Page 3
the air compressor and other components (pump, spray guns, filters, lubricators, hoses, etc.) used make up a high pressure pumping system, the following safety precautions must be observed at all times: 1. Read all manuals includ- ed with this product care- fully. Be thoroughly famil- MANUAL - Ridgid GP90135 | Owners Manual - Page 4
Safety Instructions (continued) 10. Keep fingers away from a running compressor; fast moving and hot parts will cause injury and/or burns. 11. If the equipment should start to vibrate abnormally, STOP the engine/motor and check immediately for the cause. Vibration is generally a warning of trouble. - Ridgid GP90135 | Owners Manual - Page 5
chemicals, follow the instructions provided by the chemical manufacturer. ! DANGER: Breathable Air Warning This compressor/pump is not equipped and should not be used "as is" to supply breathing quality air. For any application of air for human consumption, the air compressor/pump will need to - Ridgid GP90135 | Owners Manual - Page 6
Safety Instructions (continued) Warning Labels Find and read all warning labels found on the air compressor shown below DK724100AV 10 6 - Ridgid GP90135 | Owners Manual - Page 7
the entire operator's manual. Do not operate unit if damaged during shipping, handling or use. Damage may result in bursting and cause injury or property damage. ! WARNING: To reduce the risk of injury, if any parts are missing, do not attempt to assemble the air compressor until the missing - Ridgid GP90135 | Owners Manual - Page 8
Your Air Compressor 1 Beltguard 2 Air Filter 3 Dipstick 4 Handles 7 Air Storage Tank 6 Unloader 5 Tank Drain Valve 8 Regulated Outlet Gauge 9 Regulator Knob 10 Tank Pressure Gauge 11 ASME Safety Valve 12 Air Outlet Fittings ridgid.com 1-800-474-3443 DK724300AV 0104 Model/Serial Number - Ridgid GP90135 | Owners Manual - Page 9
parts and directs cooling air to the compressor pump 2. Air Filter. The air filter keeps dirt and debris from entering the compressor pump and reduces compressor before changing air tools or disconnecting hose from outlet. 9. Regulator Knob. This knob controls air pressure to an air operated tool or - Ridgid GP90135 | Owners Manual - Page 10
Your Air Compressor NOTICE: Before starting the compressor, thoroughly read all component instruction manuals, especially the engine manual. All lubricated compressor pumps discharge some condensed water and oil with the compressed air. Install appropriate water/oil removal equipment and controls - Ridgid GP90135 | Owners Manual - Page 11
surface. 1. Fill engine with oil and gasoline per instructions furnished with engine. 2. Remove the compressor dipstick breather and fill pump to the proper oil level. 3. Turn regulator knob counterclockwise to open air flow. 4. Turn manual unloader lever up to a horizontal position to allow the - Ridgid GP90135 | Owners Manual - Page 12
move the choke lever to the open position. See gas engine manual for more details. 8. Run the compressor unloaded for approximately 30 minutes to break in the clockwise. The compressor will begin to pump air into the tank. When maximum tank pressure is reached, the compressor automatically unloads, - Ridgid GP90135 | Owners Manual - Page 13
pressure from the system before attempting to install, service, relocate or perform any maintenance. ! DANGER: Do not attempt to tamper with the ASME safety valve! In order to maintain efficient operation of the compressor system, check the air filter weekly (per maintenance schedule), oil level - Ridgid GP90135 | Owners Manual - Page 14
Maintenance (continued) Tank ! DANGER: Never attempt to repair or modify a tank! Welding, drilling or any other modification will weaken the tank resulting in damage from rupture or explosion. Always replace worn, cracked or damaged tanks. NOTICE: Drain liquid from tanks daily. The tanks should be - Ridgid GP90135 | Owners Manual - Page 15
guard. 1/2" Deflection Belt Straight Edge Touch Rim of Flywheel in Two Places Straight Edge Parallel With Belt Storage 1. When not in use, hose and compressor should be stored in a cool, dry place. 2. Tanks should be drained of moisture. 3. Hose should be disconnected and hung with open ends down - Ridgid GP90135 | Owners Manual - Page 16
safety do not try and run the air compressor while troubleshooting. TROUBLE Low discharge pressure PROBABLE CAUSE 1. Air leaks 2. Leaking valves 3. Restricted air intake 4. Slipping belts 5. Blown gaskets 6. Low compression REMEDY 1. Listen for escaping air. Apply soap solution to all fittings - Ridgid GP90135 | Owners Manual - Page 17
TROUBLE Overheating PROBABLE CAUSE 1. Poor ventilation 2. Dirty cooling surfaces REMEDY 1. Relocate the compressor to an area where an ample supply of cool, clean, dry and well-circulated air is available 2. Clean the cooling surfaces of pump and motor/engine Excessive belt wear 1. Pulley out of - Ridgid GP90135 | Owners Manual - Page 18
Troubleshooting TROUBLE Excessive noise (knocking) Continued Oil in the discharge air PROBABLE CAUSE 5. Worn bearings 6. Piston hitting the valve plate 7. Noisy check valve REMEDY 5. Replace worn bearings and change oil 6. Remove the compressor head and valve plate and inspect for carbon deposits - Ridgid GP90135 | Owners Manual - Page 19
Notes 19 - Ridgid GP90135 | Owners Manual - Page 20
Repair Parts 40 44 39 20 41 47 32 33 43 42 30 38 31 29 27 28 37 1 2 46 3 45 4 26 5 34 6 35 8 25 36 24 7 20 21 8 22 23 9 10 18 19 12 17 16 15 14 13 11 12 20 - Ridgid GP90135 | Owners Manual - Page 21
Parts For Repair Parts, Call 1-800-4-RIDGID Please provide following information: -Model number -Serial number (if any) -Part description and number as shown in parts list 10" Pneumatic wheel 1 CV006412AV Throttle control 1 ST128415AV Throttle unloader 1 GA016900AV Gauge, outlet - Ridgid GP90135 | Owners Manual - Page 22
Repair Parts 21 13 20 11 12 19 11 10 18 8 9 16 17 15 5 1 2 14 7 6 4 3 22 - Ridgid GP90135 | Owners Manual - Page 23
Parts For Repair Parts, Call 1-800-4-RIDGID Please provide following information: -Model number -Serial number (if any) -Part description and number as shown in parts list Ref. Catalog Part seal 1 17 18183 ST076840AV M6-1.00 x 10 cap screw 4 18 - G Cylinder gasket 1 19 service kit 2 23 - Ridgid GP90135 | Owners Manual - Page 24
The model and serial numbers may be found on your Serial No RIDGID" AIR COMPRESSOR LIMITED THREE YEAR WARRANTY This product is manufactured by Campbell Hausfeld. The trademark is licensed from Ridgid, Inc. All warranty communications should be directed to RIDGID air compressor technical service
-
 1
1 -
 2
2 -
 3
3 -
 4
4 -
 5
5 -
 6
6 -
 7
7 -
8
-
9
-
10
-
11
-
12
-
13
-
14
-
15
-
16
-
17
-
18
-
19
-
20
-
21
-
22
-
23
-
24
 |
 |

GP90135
OPERATOR’S MANUAL
WHEELBARROW
AIR
COMPRESSOR
To reduce the risk of injury, the user
must read and understand the
Operator’s Manual before using this
product.
!
WARNING:
IN610402AV 12/05
Printed in U.S.A.