Rocketfish RF-GSL010A Quick Setup Guide (English)
Rocketfish RF-GSL010A Manual
 |
View all Rocketfish RF-GSL010A manuals
Add to My Manuals
Save this manual to your list of manuals |
Rocketfish RF-GSL010A manual content summary:
- Rocketfish RF-GSL010A | Quick Setup Guide (English) - Page 1
DJ Hero™ Stand Package contents Center crossbar Top supports (2) Top cradle bars (2) 2 Insert one stand foot into the longer arm on the center stand feet upright. Higher Lower 5 Repeat Steps 1 through 4 to attach the second stand foot. RF-GSL010A QUICK SETUP GUIDE Higher level Lower level - Rocketfish RF-GSL010A | Quick Setup Guide (English) - Page 2
stand by the posts. 9 Snap the top supports onto the cradle bars. Make sure that the rounded clips on the supports are on top of the cradle bars. Specifications for details. © 2010 BBY Solutions, Inc. All rights reserved. ROCKETFISH is a trademark of BBY Solutions, Inc. All other products and
-
 1
1 -
 2
2
 |
 |

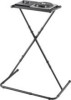
Package contents
Center crossbar
Top supports (2)
Top cradle bars (2)
Base bar
Stand feet (2)
Bolt clips (4)
Quick Setup Guide
Product features
•
Designed for use with DJ Hero™ turntables for PlayStation®2,
PlayStation®3, Xbox 360®, and Wii™
•
Made of sturdy, durable material
•
Adjustable stand provides two height levels
•
Easy assembly
Setting up the stand
1
Hold the stand feet upright.
RF-GSL010A
2
Insert one stand foot into the longer arm on the center crossbar.
3
Locate the two holes on the center crossbar. These holes determine
the height of the stand.
4
Align the two holes in the crossbar with the holes in the feet to set
the height, then insert a bolt clip through each of the holes.
5
Repeat Steps 1 through 4 to attach the second stand foot.
QUICK SETUP GUIDE
DJ Hero™ Stand
Higher level
Lower level
Higher
Lower