Ryobi A981202 User Manual
Ryobi A981202 Manual
 |
View all Ryobi A981202 manuals
Add to My Manuals
Save this manual to your list of manuals |
Ryobi A981202 manual content summary:
- Ryobi A981202 | User Manual - Page 1
Symbols 4 Features 5 Assembly 5 Operation 6-8 Maintenance 9 Illustrations 10-11 Parts Ordering and Service Back page INCLUT : Perceuses à percussion, poignée auxiliaire, manual del utilisation TABLE DES MATIÈRES Avertissements de sécurité générales relatives aux outils - Ryobi A981202 | User Manual - Page 2
be drawn into air vents. Do not use on a ladder or unstable support. Stable footing on a solid surface enables better control of the power tool in and do not allow persons unfamiliar with the power tool or these instructions to operate the power tool. Power tools are dangerous in the hands - Ryobi A981202 | User Manual - Page 3
the safety of the power tool is maintained. When servicing a power tool, use only identical replacement parts. Follow instructions in the Maintenance section of this manual. Use of unauthorized parts or failure to follow Maintenance instructions may create a risk of shock or injury. HAMMER DRILL - Ryobi A981202 | User Manual - Page 4
. SYMBOL NAME DESIGNATION/EXPLANATION Safety Alert Indicates a potential personal injury hazard. Read Operator's Manual To reduce the risk of injury, user must read and understand operator's manual before using this product. Eye Protection Always wear eye protection with side shields marked - Ryobi A981202 | User Manual - Page 5
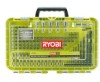
FEATURES PRODUCT SPECIFICATIONS No Load Speed 0-375/0-1,600 r/min. (RPM) Clutch 24 position Torque 600 in.lb. Hammer Speed (Blows per minute 0-5,600/0-24,000 BPM ASSEMBLY UNPACKING This product requires assembly. n Carefully remove the tool and any accessories from the box. All items listed - Ryobi A981202 | User Manual - Page 6
pack is secured in the product before beginning operation. Depress the latches to remove the battery pack. For complete charging instructions, see the operator's manuals for your battery pack and charger. INSTALLING/REMOVING BITS See Figures 4 - 5, page 10. The arrows on the keyless chuck indicate - Ryobi A981202 | User Manual - Page 7
OPERATION WARNING: Do not hold the chuck sleeve with one hand and use the power of the drill to tighten the chuck jaws on the drill bit. The chuck body could slip in your hand, or your hand could slip and come in contact with the rotating drill bit. This could cause an accident resulting in - Ryobi A981202 | User Manual - Page 8
OPERATION DRILLING/DRIVING SCREWS See Figure 9, page 11. WARNING: Always use the auxiliary handle when using this tool to help resist torque reactions. Binding or stalling of this product could lead to serious personal injury. Install the auxiliary handle. Check the direction of rotation - Ryobi A981202 | User Manual - Page 9
MAINTENANCE WARNING: When servicing, use only identical replacement parts. Use of any other parts could create a hazard or cause product damage. GENERAL MAINTENANCE Avoid using solvents when cleaning plastic - Ryobi A981202 | User Manual - Page 10
es d'aération. Ne pas utiliser l'outil sur une échelle ou un support instable. Une bonne tenue et un bon équilibre permettent de mieux contrôler familiarisé avec l'outil ou ces instructions utiliser l'outil. Dans les mains de personnes n'ayant pas reçu des instructions adéquates, les outils sont - Ryobi A981202 | User Manual - Page 11
moins 10 minutes, puis contacter immédiatement un médecin. Le respect de cette règle réduira les risques de blessures graves. Conserver ces instructions. Les consulter fréquemment et les utiliser pour instruire les autres utilisateurs éventuels. Si cet outil est prêté, il doit être accompagné de - Ryobi A981202 | User Manual - Page 12
SYMBOLES Les termes de mise en garde suivants et leur signification ont pour but d'expliquer le degré de risques associé à l'utilisation de ce produit. SYMBOLE SIGNAL SIGNIFICATION DANGER : Indique une situation extrêmement dangereuse qui, si elle n'est pas évitée, aura pour conséquences des - Ryobi A981202 | User Manual - Page 13
CARACTÉRISTIQUES FICHE TECHNIQUE Vitesse à vide 0 - 375 / 0 - 1 600 r/min (RPM) Embrayage 24 positions Couple 67,8 Nm (600 po-lb) Vitesse de percussion (Coups par minute 0 à 5 600 / 0 à 24 000 cpm ASSEMBLAGE DÉBALLAGE Ce produit nécessite un assemblage. n Avec précaution, sortir l'outil et - Ryobi A981202 | User Manual - Page 14
UTILISATION AVERTISSEMENT : Ne pas laisser la familiarité avec l'outil faire oublier la prudence. Ne pas oublier qu'une fraction de seconde d'inattention peut entraîner des blessures graves. AVERTISSEMENT : Toujours retirer la bloc-pile de l'outil au moment d'assembler des pièces, d'effectuer des - Ryobi A981202 | User Manual - Page 15
UTILISATION AVERTISSEMENT : Ne pas tenir le corps du mandrin d'une main et utiliser la force du moteur pour serrer les mors du mandrin sur le foret ou l'embout. Le mandrin pourrait glisser de la main et celle-ci risquerait d'être heurtée par le foret en rotation. Ceci pourrait entraîner des - Ryobi A981202 | User Manual - Page 16
UTILISATION PERÇAGE/VISSER DE VIS Voir la figure 9, page 11. AVERTISSEMENT : Toujours utiliser la poignée auxiliaire pendant l'utilisation de l'outil pour prévenir les réactions causées par le couple. La déformation par torsion ou le blocage de ce produit peut entraîner des blessures graves. - Ryobi A981202 | User Manual - Page 17
ENTRETIEN AVERTISSEMENT : Utiliser exclusivement des pièces d'origine pour les réparations. L'usage de toute autre pièce pourrait créer une situation dangereuse ou endommager l'outil. ENTRETIEN GÉNÉRAL Éviter d'utiliser des solvants pour le nettoyage des pièces en plastique. La plupart des matiè - Ryobi A981202 | User Manual - Page 18
ADVERTENCIAS DE SEGURIDAD GENERALES PARA LA HERRAMIENTA ELÉCTRICA ADVERTENCIA Lea todas las advertencias de seguridad y las instrucciones. El incumplimiento de las advertencias e instrucciones puede ocasionar descarga eléctrica, fuego o lesiones graves. Guarde todas las advertencias e instrucciones - Ryobi A981202 | User Manual - Page 19
metálicas expuestas de la herramienta y da una descarga eléctrica al operador. Familiarícese con su herramienta eléctrica. Lea cuidadosamente el manual del operador. Aprenda sus usos y limitaciones, así como los posibles peligros específicos de esta herramienta eléctrica. Con el cumplimiento de - Ryobi A981202 | User Manual - Page 20
DENOMINACIÓN/EXPLICACIÓN Alerta de seguridad Indica un peligro posible de lesiones personales. Lea el manual del operador Para reducir el riesgo de lesiones, el usuario debe leer y comprender el manual del operador antes de usar este producto. V min no .../min Protección ocular Alerta de - Ryobi A981202 | User Manual - Page 21
CARACTERÍSTICAS ESPECIFICACIONES DEL PRODUCTO Velocidad en vacío 0-375 / 0-1 600 r/min. (RPM) Embrague 24 posiciones Fuerza de torsión 67,8 Nm (600 lb. pulg.) Velocidad de percusión Golpes por minuto 0-5 600 / 0-24 000 GPM ARMADO DESEMPAQUETADO Este producto requiere armarse. n Extraiga - Ryobi A981202 | User Manual - Page 22
antes de comenzar a utilizarla. Oprima los pestillos para extraer el paquete de baterías. Para obtener instrucciones específicas de carga, lea el manual del operador que se incluye con el cargador y la batería. INSTALACIÓN / DESMONTAR DE LAS BROCAS Vea las figuras 4 y 5, página 10. Las flechas en - Ryobi A981202 | User Manual - Page 23
FUNCIONAMIENTO ADVERTENCIA: No sujete el cuerpo del portabrocas con una mano para usar la potencia del taladro con el fin de apretar la broca en las mordazas. El cuerpo del portabrocas podría resbalársele en la mano, o la mano misma podría resbalarse y llegar a tocar la broca girante. Esto podría - Ryobi A981202 | User Manual - Page 24
FUNCIONAMIENTO TALADRADO/INTRODUCCIÓN DE TORNILLOS Vea la figura 9, página 11. ADVERTENCIA: Siempre utilice el mango auxiliar cuando emplee esta herramienta para resistir mejor las reacciones de fuerza de torsión. Si este producto se atora o se cala, se podrían producir lesiones personales graves. - Ryobi A981202 | User Manual - Page 25
MANTENIMIENTO ADVERTENCIA: Al dar servicio a la unidad, sólo utilice piezas de repuesto idénticas. El empleo de piezas diferentes puede causar un peligro o dañar el producto. MANTENIMIENTO GENERAL Evite el empleo de solventes al limpiar piezas de plástico. La mayoría de los plásticos son - Ryobi A981202 | User Manual - Page 26
P214 D C B A G H F Fig. 1 C A B Fig. 2 D A - Keyless chuck (mandrin sans clé, portabrocas de apriete sin llave) B - Torque adjustment ring (bague de réglage du couple, anillo de ajuste de fuerza de torsión) C - Quick mode selector (sélecteur de mode rapide, selector de modo rápido) D - - Ryobi A981202 | User Manual - Page 27
Fig. 6 A B C Fig. 9 A - Two-speed gear train [HIGH (2) - LOW (1)] [train d'engrenages à deux vitesses (haute et basse, engranaje de dos velocidades (altabaja)] B - Low speed (basse vitesse, velocidad baja) C - High speed (haute vitesse, velocidad alta) Fig. 7 B D CA A - Quick mode selector - Ryobi A981202 | User Manual - Page 28
VOLT HAMMER DRILL MANUEL D'UTILISATION PERCEUSE À PERCUSSION DE 18 V MANUAL DEL OPERADOR TALADRO DE PERCUSIÓN DE 18 V P214 To request service, purchase replacement parts, locate an Authorized Service Center and obtain Customer or Technical Support: Visit www.ryobitools.com or call 1-800-525-2579 If
-
 1
1 -
 2
2 -
 3
3 -
 4
4 -
 5
5 -
 6
6 -
 7
7 -
8
-
9
-
10
-
11
-
12
-
13
-
14
-
15
-
16
-
17
-
18
-
19
-
20
-
21
-
22
-
23
-
24
-
25
-
26
-
27
-
28
 |
 |

OPERATOR’S MANUAL
MANUEL D’UTILISATION
MANUAL DEL OPERADOR
18 VOLT HAMMER DRILL
PERCEUSE À PERCUSSION
DE 18 V
TALADRO DE PERCUSIÓN
DE 18 V
P214
WARNING:
To reduce the
risk of injury, the user must read and
understand the operator’s manual
before using this product.
SAVE THIS MANUAL FOR
FUTURE REFERENCE
ADVERTENCIA:
Para reducir
el riesgo de lesiones, el usuario debe leer
y comprender el manual del operador
antes de usar este producto.
AVERTISSEMENT :
Pour
réduire les risques de blessures,
l’utilisateur doit lire et veiller à bien
comprendre le manuel d’utilisation avant
d’employer ce produit.
GUARDE ESTE MANUAL
PARA FUTURAS CONSULTAS
CONSERVER CE MANUEL
POUR FUTURE RÉFÉRENCE
INCLUDES:
Hammer Drill, Auxiliary Handle
Assembly, Operator’s Manual
TABLE OF CONTENTS
****************
General Power Tool Safety Warnings
........................................................
2-3
Hammer Drill Safety Warnings
...........
3
Symbols
..............................................
4
Features
..............................................
5
Assembly
............................................
5
Operation
.........................................
6-8
Maintenance
.......................................
9
Illustrations
..................................
10-11
Parts Ordering and Service
............................................
Back page
INCLUT :
Perceuses à percussion, poignée
auxiliaire, manual del utilisation
TABLE DES MATIÈRES
****************
Avertissements de sécurité générales
relatives aux outils électriques
........
2-3
Avertissements de sécurité relatifs
perceuses à percussion
.....................
3
Symboles
............................................
4
Caractéristiques
.................................
5
Assemblage
........................................
5
Utilisation
........................................
6-8
Entretien
.............................................
9
Illustrations
..................................
10-11
Commande de pièces et dépannage
.........................................
Page arrière
INCLUYE:
Taladros de impacto, mango
auxiliar, manual del operador
ÍNDICE DE CONTENIDO
****************
Advertencias de seguridad para
herramientas eléctrica
...................
2-3
Advertencias de seguridad de
taladro-destornillador
........................
3
Símbolos
............................................
4
Características
...................................
5
Armado
..............................................
5
Funcionamiento
.............................
6-8
Mantenimiento
...................................
9
Illustraciones
..............................
10-11
Pedidos de piezas y servicio
......................................
Pág. posterior