Ryobi AP1305 User Manual 5
Ryobi AP1305 Manual
 |
View all Ryobi AP1305 manuals
Add to My Manuals
Save this manual to your list of manuals |
Ryobi AP1305 manual content summary:
- Ryobi AP1305 | User Manual 5 - Page 1
give you years of rugged, trouble-free performance. CAUTION: Carefully read through this entire operator's manual before using your new planer. enjoy years of safe, reliable service. Please fill out and return the Warranty Registration Card so we can be of future service to you. Thank you again for - Ryobi AP1305 | User Manual 5 - Page 2
Operation ...13-14 I Maintenance ...15-16 I Troubleshooting ...17 I Parts Ordering/Service ...18 INTRODUCTION Your portable planer has many features to maintain and operate. CAUTION: Carefully read through this entire operator's manual before using your new tool. Pay close attention to the Rules - Ryobi AP1305 | User Manual 5 - Page 3
knowing how your tool works. READ ALL INSTRUCTIONS I KNOW YOUR POWER TOOL. Read the operator's manual carefully. Learn the machine's applications and part that is damaged must be properly repaired or replaced by an authorized service center to avoid risk of personal injury. I DIRECTION OF FEED. Feed - Ryobi AP1305 | User Manual 5 - Page 4
the cutter head knife path. I SUPPORT THE WORKPIECE ADEQUATELY at all times during service center. I DO NOT attempt to turn cutter-head with hands. I WHEN SERVICING INSTRUCTIONS. Refer to them frequently and use them to instruct other users. If you loan someone this tool, loan them these instructions - Ryobi AP1305 | User Manual 5 - Page 5
nearest RYOBI AUTHORIZED SERVICE CENTER for repair. When servicing, use only identical Ryobi replacement parts. WARNING: Do not attempt to operate this tool until you have read thoroughly and understand completely all instructions, safety rules, etc., contained in this manual. Failure to comply - Ryobi AP1305 | User Manual 5 - Page 6
cord or plug is necessary, do not connect the equipment-grounding conductor to a live terminal. Check with a qualified electrician or service personnel if the grounding instructions are not completely understood, or if in doubt as to whether the tool is properly grounded. Repair or replace a damaged - Ryobi AP1305 | User Manual 5 - Page 7
injury. LOOSE PARTS LIST The following items are included with your Portable Planer: I Hex Key I Dust Chute I Dust Chute Knobs I Operator's Manual I Warranty Registration Card HEX KEY DUST CHUTE DUST CHUTE KNOBS Fig. 2 WARNING: The use of attachments or accessories not listed might be - Ryobi AP1305 | User Manual 5 - Page 8
FEATURES KNOW YOUR PORTABLE PLANER See Figure 3. Before attempting to use your planer, familiarize yourself with all operating Features and Rules for Safe Operation. WARNING: Do not allow familiarity with your planer to make you careless. Remember that a careless fraction of a second is sufficient - Ryobi AP1305 | User Manual 5 - Page 9
off, remove the switch key, and unplug the planer before servicing or making adjustments could result in accidental starting causing possible serious mounting the planer to a workbench, holes should be drilled through the supporting surface of the workbench. I Mark holes on workbench where planer is - Ryobi AP1305 | User Manual 5 - Page 10
table extension is properly seated. I Tighten lock nuts securely when adjustments are complete. Note: Four screws attach table extensions to support bars; loosening these screws may aid in leveling table extensions. BLADE HEIGHT ADJUSTMENT CUTTER HEAD ASSEMBLY See Figure 7. Raising and lowering - Ryobi AP1305 | User Manual 5 - Page 11
ADJUSTMENTS THICKNESS SCALE ADJUSTMENT See Figure 8. Located on the right front of the planer, the thickness scale shows the depth of the finished workpiece. Inaccurate cuts can be prevented by routinely checking the alignment of the thickness scale. I Table extensions must be level with planer - Ryobi AP1305 | User Manual 5 - Page 12
ADJUSTMENTS CUTTER BLADE SIDEWAYS ADJUSTMENT See Figures 10 and 11. During the use of your planer, tiny nicks may appear on the cutter blades. This is a result of picking up sand or other particles on the workpiece and then running the workpiece through the planer. To eliminate any imperfections - Ryobi AP1305 | User Manual 5 - Page 13
thin test cuts on a scrap piece of wood first to determine potential problems with the workpiece. PLANING Thickness planers work best if at least one prolong their wear. Refer to the Maintenance Section of this operator's manual for instructions on how to remove and replace or turn the cutter blades. - Ryobi AP1305 | User Manual 5 - Page 14
workpiece by cutter blades, can occur when the board is not properly supported. Engaging the cutter lock before planing will minimize snipe. Although snipe 48 in. (122 cm), greater care must be taken to reduce the problem because the additional length means more of the total weight is unsupported by - Ryobi AP1305 | User Manual 5 - Page 15
. To Replace: I Unplug your planer. WARNING: Failure to turn the planer off, remove the switch key, and unplug the planer before servicing or making adjustments could result in accidental starting causing possible serious personal injury. I Lower the cutter head assembly. I From the back of - Ryobi AP1305 | User Manual 5 - Page 16
across it. Paste wax can also be used on infeed and outfeed support surfaces but be careful not to use so much that it will and reliability, all repairs should be performed by a qualified service technician at a Ryobi Authorized Service Center to avoid risk of personal injury. BRUSH BRUSH CAP 11 - Ryobi AP1305 | User Manual 5 - Page 17
Problem Snipe (depressions at ends of workpiece) Torn grain Fuzzy/Rough grain Uneven depth of cut Board thickness does not match depth scale indicator Cutter head height difficult to adjust Will not start Interrupted operation TROUBLESHOOTING Cause Solution 1. Dull cutter blades 2. Incorrect - Ryobi AP1305 | User Manual 5 - Page 18
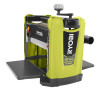
OPERATOR'S MANUAL 13 in. (330 mm) Portable Planer Model AP1300 EXTENSION CORD CAUTION call 1-800-525-2579 for your nearest Ryobi Authorized Service Center. You can also check our web site at www.ryobitools.com for a complete list of Authorized Service Centers. • MODEL NO. The model and serial
-
 1
1 -
 2
2 -
 3
3 -
 4
4 -
 5
5 -
 6
6 -
 7
7 -
8
-
9
-
10
-
11
-
12
-
13
-
14
-
15
-
16
-
17
-
18
 |
 |

OPERATOR'S MANUAL
13 in. (330 mm) Portable Planer
Model AP1300
THANK YOU FOR BUYING A RYOBI PORTABLE PLANER.
Your new planer has been engineered and manufactured to Ryobi's high standards for dependability, ease of operation,
and operator safety. Properly cared for, it will give you years of rugged, trouble-free performance.
CAUTION:
Carefully read through this entire operator's manual before using your new planer.
Pay close attention to the Rules for Safe Operation, Warnings, and Cautions. If you use your tool properly and only for
what it is intended, you will enjoy years of safe, reliable service.
Please fill out and return the Warranty Registration Card so we can be of future service to you.
Thank you again for buying Ryobi tools.
SAVE THIS MANUAL FOR FUTURE REFERENCE
1-3/4
1-1/2
1-1/4
1/4
0