Ryobi RY40250 Operation Manual 1
Ryobi RY40250 Manual
 |
View all Ryobi RY40250 manuals
Add to My Manuals
Save this manual to your list of manuals |
Ryobi RY40250 manual content summary:
- Ryobi RY40250 | Operation Manual 1 - Page 1
OF CONTENTS General Safety Rules 2 Specific Safety Rules 2 Grass Trimmer Safety Warnings..........3 Symbols 4 Features 5 Assembly 5-6 Operation 6-7 Maintenance 8-9 Troubleshooting 9 Parts Ordering/Service......... Back Page WARNING: To reduce the risk of injury, the - Ryobi RY40250 | Operation Manual 1 - Page 2
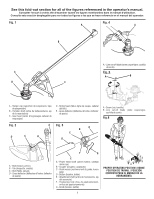
a las que se hace referencia en el manual del operador. Fig. 1 Fig. 4 A Trimmer shaft (arbre du taille-bordures, eje de la recortadora) C - Gear head (carter d'engrenages, cabezal de engranajes) D - String Guide recess (renfoncement du guide, hueco guía) D - Button (bouton, botón) E - Attachment - Ryobi RY40250 | Operation Manual 1 - Page 3
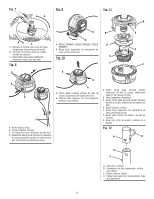
tira del hilo) D - Rotate the bump knob (tourner le capuchon du mécanisme de coup dans le sens horaire, gire a la derecha el perilla percusiva) B A A - String head housing (boîtier de tête de coupe, alojamiento del cabezal de hilo) B - Depress tabs (appuyer sur les languettes, presione los orejetas - Ryobi RY40250 | Operation Manual 1 - Page 4
parts. Correct before using the trimmer attachment. Failure to do so can cause serious injury. Use only original manufacturer's replacement parts string which can be thrown or become entangled in the cutting line. Save these instructions. Refer to them frequently and use them to instruct others - Ryobi RY40250 | Operation Manual 1 - Page 5
assembly are not damaged. Damaged parts increase the risk of injury. n Follow instructions Hold the grass trimmer by the insulated replacement parts may increase the risk of breakage and injury. n When clearing jammed material or servicing the machine, make sure the switch is off and the battery - Ryobi RY40250 | Operation Manual 1 - Page 6
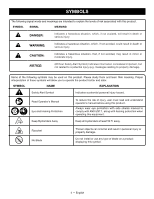
symbols will allow you to operate the product better and safer. SYMBOL NAME EXPLANATION Safety Alert Symbol Indicates a potential personal injury hazard. Read Operator's Manual Eye and Hearing Protection Keep Bystanders Away To reduce the risk of injury, user must read and understand operator - Ryobi RY40250 | Operation Manual 1 - Page 7
-860-4050 for assistance. PACKING LIST RYOBI EXPAND-IT Straight Shaft Trimmer Attachment Grass Deflector 0.080 in. Twisted Replacement Line SPEED WINDER Operator's Manual WARNING: If any parts are damaged or missing do not operate this product until the parts are replaced. Use of this product with - Ryobi RY40250 | Operation Manual 1 - Page 8
of the power head shaft. Push in the button located on the straight shaft trimmer attachment. Align the button with the guide recess on the power head coupler and slide the two shafts together. Rotate attachment shaft until button locks into the positioning hole. NOTE: If the buttons do not - Ryobi RY40250 | Operation Manual 1 - Page 9
heads, remove the battery pack for cordless power heads, or disconnect the plug from the power source for electric power heads, and remove the grass. Prolonged cutting at partial throttle will result in lubricant dripping from the muffler. WARNING: Always hold the string trimmer away from the body - Ryobi RY40250 | Operation Manual 1 - Page 10
from tangling. Push the bump knob down while pulling on line(s) to manually advance the line. CLEARING LINE JAM AND/OR REPLACING WARNING: When servicing, use only identical replacement parts. Use of any other parts could create a hazard or cause product damage. BUMP KNOB See Figures 10 - 11 - Ryobi RY40250 | Operation Manual 1 - Page 11
and deicing salts. REPLACEMENT PARTS 0.080 in. Twisted Replacement Line (Bulk AC04138 0.080 in. Twisted Replacement Line (Pre-cut)........AC04139 Available at homedepot.com TROUBLESHOOTING PROBLEM Line will not advance Grass wraps around boom housing and string head POSSIBLE CAUSE Line - Ryobi RY40250 | Operation Manual 1 - Page 12
shorts, bijoux quels qu'ils soient et ne pas travailler pieds nus. Attacher les cheveux longs pour les maintenir au-dessus des épaules, afin qu'ils ou de se prendre dans la ligne de coupe. Conserver ces instructions. Les consulter fréquemment et les utiliser pour instruire les autres utilisateurs - Ryobi RY40250 | Operation Manual 1 - Page 13
la lame et l'ensemble de ligne ou de lame ne sont pas endommagés. Les pièces endommagées augmentent le risque de blessure. n Suivre les instructions pour changer les accessoires. Les écrous ou les boulons retenant la lame mal serrés peuvent endommager la lame ou lui permettre de se détacher - Ryobi RY40250 | Operation Manual 1 - Page 14
SYMBOLES Les termes de mise en garde suivants et leur signification ont pour but d'expliquer le degré de risques associé à l'utilisation de ce produit. SYMBOLE SIGNAL SIGNIFICATION DANGER : Indique une situation dangereuse qui, si elle n'est pas évitée, aura pour conséquences des blessures - Ryobi RY40250 | Operation Manual 1 - Page 15
déjà assemblés. Certaines pièces figurant sur cette liste n'ont pas été assemblées D'EXPÉDITION Arbre droit accessoire Taille-bordures RYOBI EXPAND-IT Déflecteur d'herbe Fil de remplacement languette du support de montage dans la fente du déflecteur d'herbe. Aligner le trou du support de montage - Ryobi RY40250 | Operation Manual 1 - Page 16
trouvant sur l'accessoire de taille-bordures. Aligner le bouton sur la rainure guide du bloc moteur et emboîter les deux arbres. Tourner l'arbre de pas été remplacées. Pour obtenir de l'aide, veuillez communiquer avec le service à la clientèle ou un centre de réparations qualifié. APPLICATIONS Cet - Ryobi RY40250 | Operation Manual 1 - Page 17
UTILISATION Cette taille-bordure est actuellement réglée au 330 mm (13 po) largeur de coupe. Pour ajuster à une largeur de coupe de 381 mm (15 po) : Arrêter le moteur ou du moteur électrique. Desserrer la tornillo de la hojatourne alors la lame de sectionnement du fil 180°. Serrer la tornillo - Ryobi RY40250 | Operation Manual 1 - Page 18
ou débranchez la scie de l'alimentation. Le non-respect de ces instructions peut entraîner des blessures graves ou des dégâts matériels. pas été remplacées. Pour obtenir de l'aide, veuillez communiquer avec le Service à la clientèle ou un centre de réparations qualifié. ENTRETIEN GÉNÉRAL - Ryobi RY40250 | Operation Manual 1 - Page 19
800A-PPE8LERL6E 0-4050 NOUS APPELER D'ABORD Pour toute question concernant l'utilisation ou l'entretien utiliser ce produit, appeler le service d'assistance téléphonique Ryobi ! Le taille-bordures à été entièrement testé avant expédition pour assurer la complète satisfaction de l'utilisateur. Ce - Ryobi RY40250 | Operation Manual 1 - Page 20
control de la herramienta en situaciones inesperadas. Mantenga todas las partes del cuerpo alejadas de toda pieza móvil. No toque las que no esté identificado como apropiado para el uso con este producto en el manual del operador. Evite los entornos peligrosos de trabajo. No use el accesorio en - Ryobi RY40250 | Operation Manual 1 - Page 21
cambiar de dirección. Esto reduce el riesgo de pérdida de control, resbalos y caídas, que podrían resultar en lesiones personales graves. n Mantenga todas las partes del cuerpo alejadas de la línea de corte o cuchilla cuando use la máquina. Antes de iniciar la máquina, asegúrese de que la línea de - Ryobi RY40250 | Operation Manual 1 - Page 22
SÍMBOLOS Les termes de mise en garde suivants et leur signification ont pour but d'expliquer le degré de risques associé à l'utilisation de ce produit. SYMBOLE SIGNAL SIGNIFICATION DANGER : Indique une situation dangereuse qui, si elle n'est pas évitée, aura pour conséquences des blessures - Ryobi RY40250 | Operation Manual 1 - Page 23
Accesorio RYOBI EXPAND-IT para cortar de eje recto Deflector de pasto Linea de repuesto trenzada de 2 mm (0,08 pulg.) SPEED WINDER Manual del operador ADVERTENCIA: Si falta o está dañada alguna pieza, no utilice este producto sin haber reemplazado la pieza. Usar este producto con partes - Ryobi RY40250 | Operation Manual 1 - Page 24
, como tornillos, tuercas, pernos, tapas, etc. Apriete firmemente todos los sujetadores y las tapas y no accione este producto hasta que todas las partes faltantes o dañadas sean reemplazadas. Póngase en contacto con el servicio al cliente o con un centro de servicio calificado para obtener ayuda - Ryobi RY40250 | Operation Manual 1 - Page 25
esté en uso. No apoye ni coloque el brazo, la mano ni ninguna parte del cuerpo contra la carcasa del motor mientras la recortadora esté en uso. Só causadas por tocar superficies calientes, al utilizar esta unidad nunca coloque la parte inferior de la misma arriba del nivel de la cintura. Sujete la - Ryobi RY40250 | Operation Manual 1 - Page 26
ar el producto. AVISO: Inspeccione periódicamente todo el producto para detectar partes dañadas, faltantes o sueltas, como tornillos, tuercas, pernos, tapas, cabezales motores eléctricos. Presione las lengüetas en la parte lateral del alojamiento del cabezal de hilo para extraer el alojamiento del - Ryobi RY40250 | Operation Manual 1 - Page 27
hilo. Vea la sección Reemplazo del hilo arriba en este manual. Tire de los hilos a la vez que alternadamente presiona del suelo. Corte la hierba alta desde la parte superior hacia abajo. ¿NECESITA AYUDA? 1-800L-LA8MEA6L fono de atención al consumidor de Ryobi! La recortadora ha sido probada - Ryobi RY40250 | Operation Manual 1 - Page 28
NOTES / NOTAS - Ryobi RY40250 | Operation Manual 1 - Page 29
NOTES / NOTAS - Ryobi RY40250 | Operation Manual 1 - Page 30
OPERATOR'S MANUAL MANUEL D'UTILISATION / MANUAL DEL OPERADOR STRAIGHT SHAFT TRIMMER ATTACHMENT ARBRE DROIT ACCESSOIRE TAILLE-BORDURES ACCESORIO PARA RECORTAR DE EJE RECTO RY15523A/RY15523AVNM • PARTS AND SERVICE: Prior to requesting service or purchasing replacement parts, please obtain your item,
-
 1
1 -
 2
2 -
 3
3 -
 4
4 -
 5
5 -
 6
6 -
 7
7 -
8
-
9
-
10
-
11
-
12
-
13
-
14
-
15
-
16
-
17
-
18
-
19
-
20
-
21
-
22
-
23
-
24
-
25
-
26
-
27
-
28
-
29
-
30
 |
 |
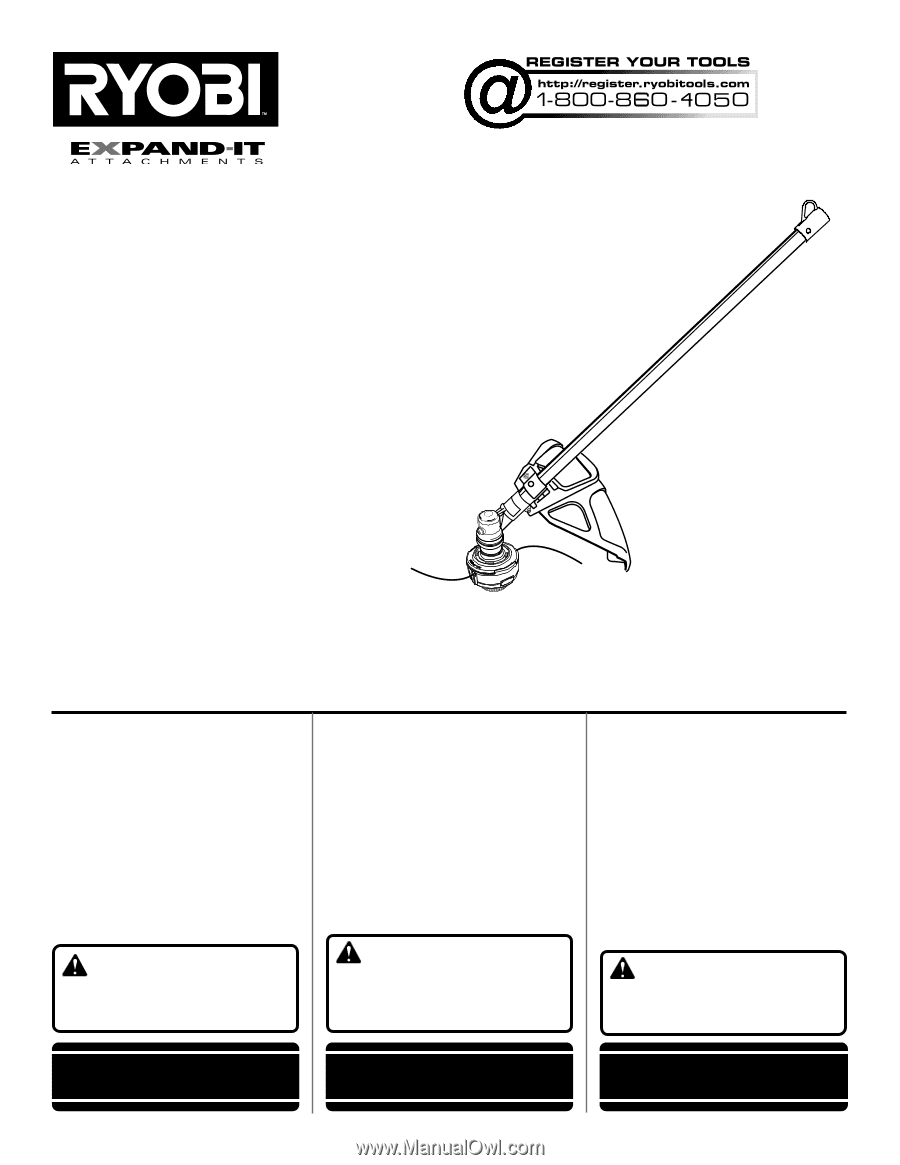
OPERATOR’S MANUAL
MANUEL D’UTILISATION
MANUAL DEL OPERADOR
STRAIGHT SHAFT
TRIMMER ATTACHMENT
ARBRE DROIT ACCESSOIRE
TAILLE-BORDURES
ACCESORIO PARA RECORTAR
DE EJE RECTO
RY15523A
RY15523AVNM
WARNING:
To reduce the
risk of injury, the user must read and
understand the operator’s manual
before using this product.
TABLE OF CONTENTS
General Safety Rules
..........................
2
Specific Safety Rules
..........................
2
Grass Trimmer Safety Warnings
.........
3
Symbols
..............................................
4
Features
..............................................
5
Assembly
........................................
5-6
Operation
........................................
6-7
Maintenance
...................................
8-9
Troubleshooting
..................................
9
Parts Ordering/Service
........
Back Page
AVERTISSEMENT :
Pour
réduire les risques de blessures,
l’utilisateur doit lire et veiller à bien
comprendre le manuel d’utilisation
avant d’employer ce produit.
TABLE DES MATIÈRES
Règles de sécurité générales
..............
2
Règles de sécurité particulières
..........
2
Avertissements de sécurité
pour
coupe-herbe
.......................................
3
Symboles
............................................
4
Caractéristiques
..................................
5
Assemblage
....................................
5-6
Utilisation
........................................
6-7
Entretien
..........................................
8-9
Dépannage
..........................................
9
Commande de pièces/
réparation
..........................
Páge arrière
ADVERTENCIA:
Para reducir
el riesgo de lesiones, el usuario debe
leer y comprender el manual del
operador antes de usar este producto.
ÍNDICE DE CONTENIDO
Reglas de seguridad generales
..........
2
Reglas de seguridad específicas
........
2
Advertencias de seguridad de la
recortadora de césped
.......................
3
Símbolos
.............................................
4
Características
....................................
5
Armado
...........................................
5-6
Funcionamiento
..............................
6-7
Mantenimiento
................................
8-9
Corrección de problemas
...................
9
Pedidos de piezas/
servicio
...........................
Pág. posterior
SAVE THIS MANUAL FOR
FUTURE REFERENCE
CONSERVER CE MANUEL
POUR FUTURE RÉFÉRENCE
GUARDE ESTE MANUAL
PARA FUTURAS CONSULTAS