Samsung SCD86 User Manual (user Manual) (ver.1.0) (English)
Samsung SCD86 Manual
 |
View all Samsung SCD86 manuals
Add to My Manuals
Save this manual to your list of manuals |
Samsung SCD86 manual content summary:
- Samsung SCD86 | User Manual (user Manual) (ver.1.0) (English) - Page 1
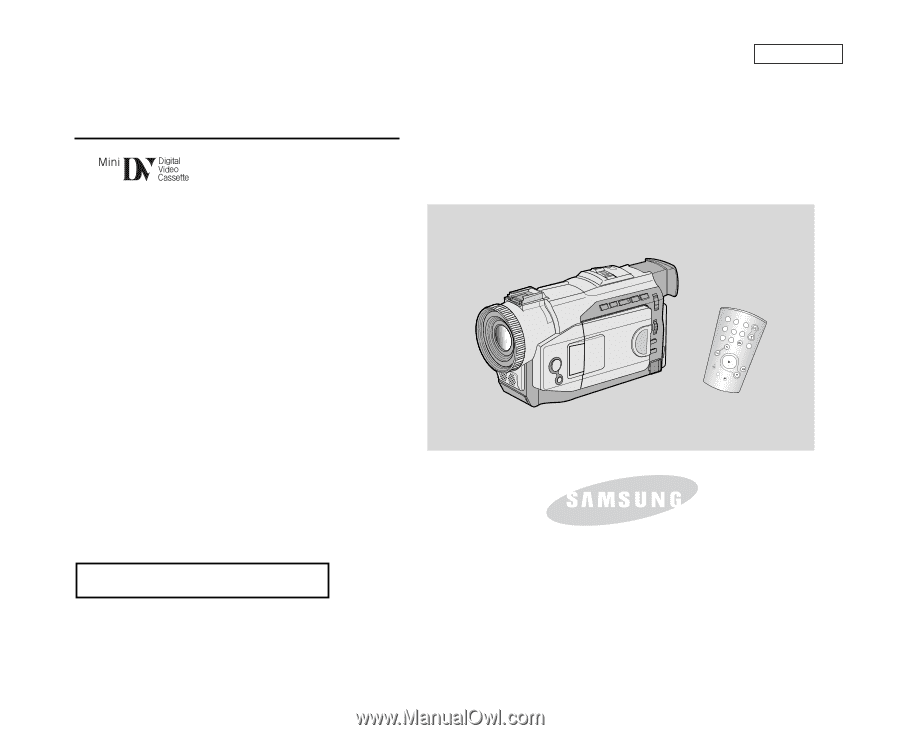
Digital Video Camcorder SCD86/D87 AF CCD LCD Auto Focus Charge Coupled Device Liquid Crystal Display Owner's Instruction Book Before operating the unit, please read this instruction book thoroughly, and retain it for future reference. US PATENT 4415844 ENGLISH SSTTAORPT/ PHOTO TISMEELRF - Samsung SCD86 | User Manual (user Manual) (ver.1.0) (English) - Page 2
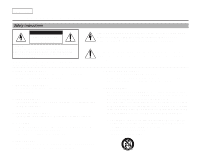
Instructions CAUTION RISK OF ELECTRIC SHOCK DO NOT OPEN CAUTION: TO REDUCE THE RISK OF ELECTRIC SHOCK, DO NOT REMOVE COVER(OR BACK). NO USER SERVICEABLE PARTS INSIDE, REFER SERVICING TO QUALIFIED SERVICE PERSONNEL. To prevent electric shock, match wide blade of plug to wide slot and fully insert - Samsung SCD86 | User Manual (user Manual) (ver.1.0) (English) - Page 3
your appliance dealer or local power company. A CAMCORDER is intended to be operated from battery power, or other sources, refer to the operating instructions. 11. GROUNDING OR POLARIZATION: This CAMCORDER may be equipped with either a polarized 2-wire AC line plug (a plug having one blade wider - Samsung SCD86 | User Manual (user Manual) (ver.1.0) (English) - Page 4
manufacturer and having the same characteristics as the original part. Unauthorized substitutions may result in fire, electric shock or other hazards. 21. SAFETY CHECK: Upon completion of any service or repairs to this CAMCORDER, ask the service technician to perform safety checks to determine that - Samsung SCD86 | User Manual (user Manual) (ver.1.0) (English) - Page 5
and Safety Instructions NOTE building as close to the point of cable entry as practical. USER INSTALLER CAUTION: Your authority to operate this FCC certified equipment could found to comply with the limits for a Class B digital device, pursuant to part 15 of the FCC Rules. These limits are designed - Samsung SCD86 | User Manual (user Manual) (ver.1.0) (English) - Page 6
use the AC Power adapter and DC Cable ...23 To select the CAMCORDER mode ...23 Using the Lithium Ion Battery Pack ...24 Charging the Lithium Ion Battery Pack ...24 Table of continuous recording time based on model and battery type ...25 Battery level display ...26 Inserting and Ejecting a Cassette - Samsung SCD86 | User Manual (user Manual) (ver.1.0) (English) - Page 7
ENGLISH Adjusting the Focus ...32 Playing back a tape you have recorded on the LCD ...33 Adjusting the LCD during PLAY ...34 Controlling Sound from the Speaker ...34 Advanced Recording ...35 Use of various Functions ...35 Setting menu items ...35 Set the camcorder to CAMERA or PLAYER mode and M.REC - Samsung SCD86 | User Manual (user Manual) (ver.1.0) (English) - Page 8
to a PC ...76 System requirements ...77 Recording with a DV connection cable ...77 USB interface ...78 Transferring a Digital Image through a USB Connection ...78 System Requirements ...78 Installing DVC Media 4.0 Program...79 Connecting to a PC ...81 Digital Still Camera mode ...82 MEMORY STICK - Samsung SCD86 | User Manual (user Manual) (ver.1.0) (English) - Page 9
94 Maintenance ...95 After finishing a recording ...95 Cleaning and Maintaining the Camcorder ...96 Cleaning the VIEWFINDER ...96 Cleaning the Video Heads ...96 Using Your Camcorder Abroad ...97 Power sources ...97 Color system ...97 Troubleshooting...98 Troubleshooting ...98 Self Diagnosis Display - Samsung SCD86 | User Manual (user Manual) (ver.1.0) (English) - Page 10
Notes and Safety Instructions Notes regarding the rotation of the LCD screen Please rotate the LCD screen carefully as illustrated. Over rotation may cause damage to the inside of the hinge that connects the LCD screen to the Camcorder. 1. LCD screen closed. 1 2. Standard recording using the LCD - Samsung SCD86 | User Manual (user Manual) (ver.1.0) (English) - Page 11
Instructions Notices regarding COPYRIGHT Television programs, video tapes opened and the battery removed. Notes regarding CAMCORDER 1. Do not leave the camcorder exposed to high camcorder get wet. Keep the camcorder away from rain, sea water, and any other form of moisture. If the camcorder - Samsung SCD86 | User Manual (user Manual) (ver.1.0) (English) - Page 12
ENGLISH Notes and Safety Instructions Notes regarding the battery pack - Make sure that the battery pack is fully charged before starting to record. - To preserve battery power, keep your camcorder turned off when you are not operating it. - If your camcorder is in CAMERA mode, and it is left in - Samsung SCD86 | User Manual (user Manual) (ver.1.0) (English) - Page 13
the inside of the viewfinder. Be careful when placing the camcorder under sunlight or near a window exposed to sunlight. 2. Do not pick up the camcorder from the viewfinder. 3. Over-rotating of the viewfinder may damage it. Notes regarding 'Record' or 'Playback' using the LCD 1. The LCD display has - Samsung SCD86 | User Manual (user Manual) (ver.1.0) (English) - Page 14
ENGLISH Notes and Safety Instructions Precautions regarding the Lithium battery 1. The lithium battery maintains the clock function and user settings; even if the battery pack or AC adapter is removed. 2. The lithium battery for the camcorder lasts about 6 months under normal operation from time of - Samsung SCD86 | User Manual (user Manual) (ver.1.0) (English) - Page 15
sharp images as well as the ability to review your recordings immediately. • Electronic Image Stabilizer (EIS) The EIS compensates for any handshake, reducing unstable images particularly at high magnification. • Various digital effects The DSE (Digital Special Effects) allows you to give your films - Samsung SCD86 | User Manual (user Manual) (ver.1.0) (English) - Page 16
Know Your Camcorder Accessories Supplied with camcorder Make sure that the following basic accessories are supplied with your digital video camera. Basic Accessories 1. Lithium Ion Battery pack 2. AC Power Adapter 3. AC Cord 4. AUDIO/VIDEO cable 5. Instruction Book 6. Lithium batteries for Remote - Samsung SCD86 | User Manual (user Manual) (ver.1.0) (English) - Page 17
Getting to Know Your Camcorder Front & Left View ENGLISH 1. Smart Shoe 2. Lens 3. Internal MIC 4. IR light 5. Remote Sensor 1. Smart Shoe (SCD87 only) Accessory Shoe (SCD86 only) 2. Lens 3. Internal MIC 4. IR (Infrared) light 5. Remote sensor 9. Viewfinder 8. TFT LCD monitor 7. EASY button 6. - Samsung SCD86 | User Manual (user Manual) (ver.1.0) (English) - Page 18
ENGLISH Getting to Know Your Camcorder Left Side View 1. Function buttons REV FWD S.SHOW DELETE REC SEARCH FADE BLC DISPLAY 2. Speaker 3. DV IN/OUT 1. Function buttons PLAYER button 4. DC jack 2. Speaker 3. DV IN/OUT 4. DC jack 5. MENU button 6. ENTER button 7. MENU dial 8. Mode switch - Samsung SCD86 | User Manual (user Manual) (ver.1.0) (English) - Page 19
Getting to Know Your Camcorder Right & Top View 1. Zoom lever 2. PHOTO button 3. Power switch 4. START/STOP button 1. Zoom lever 2. PHOTO button (see page 67) 3. Power switch (CAMERA or PLAYER) 4. START/STOP button 5. Hook for handstrap 6. S-VIDEO jack 7. USB jack 8. Audio/Video jack 9. External MIC - Samsung SCD86 | User Manual (user Manual) (ver.1.0) (English) - Page 20
Getting to Know Your Camcorder Rear & Bottom View CHARGE 1. Charging indicator 2. Hook for shoulder strap 3. Lithium battery cover 1. Charging indicator 2. Hook for shoulder strap 3. Lithium battery cover 4. Tripod receptacle 5. TAPE EJECT 6. Focus adjust knob 7. Battery Release 8. Memory Stick slot - Samsung SCD86 | User Manual (user Manual) (ver.1.0) (English) - Page 21
Getting to Know Your Camcorder Remote control 1. PHOTO 2. START/STOP 3. SELF TIMER 4. ZERO MEMORY 5. PHOTO SEARCH 13. A.DUB 6. (FF) 7. (REW) 8. (PLAY) 10. Direction START/ STOP PHOTO DISPLAY SELF ZERO TIMER - Samsung SCD86 | User Manual (user Manual) (ver.1.0) (English) - Page 22
ENGLISH Getting to Know Your Camcorder OSD (On Screen Display in CAMERA and PLAYER modes) 1. Battery level (see page 26) 2. Custom or Easy mode (see pages 60, 61) 3. DSE (Digital Special Effects) mode (see page 48) 4. Program AE (see page 42) 5. White Balance mode (see page 44) 6. BLC (Back Light - Samsung SCD86 | User Manual (user Manual) (ver.1.0) (English) - Page 23
Getting to Know Your Camcorder OSD (On Screen Display in M.REC/M.PLAY modes) A. Folder number-file number (see page 84) B. Image counter - Current still image/Total number of recordable still images. C. CARD (memory) indicator D. Image recording and loading indicator E. Quality F. ERASE PROTECTION - Samsung SCD86 | User Manual (user Manual) (ver.1.0) (English) - Page 24
1 You need to insert or replace the lithium battery when : - You purchase the camcorder. - The remote control doesn't work. 1 Ensure that you insert the lithium cell correctly, following the + and - markings. 1 Be careful not to reverse the polarity of the battery. Self Record using the Remote - Samsung SCD86 | User Manual (user Manual) (ver.1.0) (English) - Page 25
function and preset contents of the memory; even if the battery pack or AC power adapter is removed. 1 The lithium battery for the camcorder lasts about 6 months under normal operation from the time of installation. 1 When the lithium battery becomes weak or dead, the date/time indicator flashes for - Samsung SCD86 | User Manual (user Manual) (ver.1.0) (English) - Page 26
Strap hook on the camcorder. Insert the other end of strap into ring inside hand strap. 2. Thread each end into the buckle, adjust the length of the strap and then pull it tight in the buckle. Attaching the ring hood The ring hood helps you - Reduce glare when recording under sunlight. 1 Align - Samsung SCD86 | User Manual (user Manual) (ver.1.0) (English) - Page 27
that can be connected to your camcorder. - The AC Power Adapter and AC cord : used for indoor recording. - The Battery Pack : used for outdoor recording. To use the AC Power adapter and DC Cable 1. Connect the AC Power adapter to the AC cord. 4 2. Connect the AC cord to a wall socket. 2 Note - Samsung SCD86 | User Manual (user Manual) (ver.1.0) (English) - Page 28
function is used. It is recommended that you have several batteries available. Charging the Lithium Ion Battery Pack 1. Attach the battery pack to the camcorder. 2. Connect the AC Power adapter to an AC cord and connect 4 Power Switch the AC cord to a wall socket. 3. Connect the DC cable to - Samsung SCD86 | User Manual (user Manual) (ver.1.0) (English) - Page 29
, it switches off and the viewfinder switches on automatically. 1 The continuous recording times given in the table above are approximations. Actual recording time depends on usage. Time Charging Battery time Continuous recording time LCD ON EVF ON SB-L110 Approx. 2hr Approx. 1hr 30min - Samsung SCD86 | User Manual (user Manual) (ver.1.0) (English) - Page 30
and conditions may differ when you actually use the camcorder, the remaining battery time may not be the same as the approximate continuous recording times given in these instructions. Tips for Battery Identification A charge mark is provided on the battery pack to help you remember whether it has - Samsung SCD86 | User Manual (user Manual) (ver.1.0) (English) - Page 31
1 Do not use any tapes other than Mini DV cassettes. 1. Connect a power source and slide the TAPE EJECT switch and open the cassette door. - The cassette holding mechanism rises automatically. 1 2 2. Insert a tape into the cassette holder with the tape window facing outward and the protection - Samsung SCD86 | User Manual (user Manual) (ver.1.0) (English) - Page 32
Recording 1. Connect a Power source to the camcorder. (see page 23) 1 (A battery pack or a AC power adapter) 2 s Insert a cassette. (see page 27) 2. Remove the LENS CAP and hook it onto the hand strap. 3. Set the power switch to the CAMERA position. s Set the mode switch to TAPE position - Samsung SCD86 | User Manual (user Manual) (ver.1.0) (English) - Page 33
the camcorder is left in the STBY mode for more than 5 minutes without being used, it will switch off automatically. To use it again, push the START/STOP button or set the Power switch to OFF and then back to CAMERA. This Auto Power off feature is designed to save battery power. Record - Samsung SCD86 | User Manual (user Manual) (ver.1.0) (English) - Page 34
Use the LCD frame as a guide to determine the horizontal plane. 6. Whenever possible, use a tripod. Recording with the Viewfinder 1. Hold the camcorder firmly using the hand strap. 2. Place your right elbow against your side. 3. Place your left hand under the camcorder to support it. Be sure not to - Samsung SCD86 | User Manual (user Manual) (ver.1.0) (English) - Page 35
view what you are recording or playing back directly. 1 Depending on the conditions under which you are using the camcorder (indoors or outdoors ENTER button to enter the sub-menu. CAM MODE INITIAL CAMERA A/V MEMORY VIEWER LCD ADJUST DATE/TIME TV DISPLAY CAM MODE VIEWER SET LCD ADJUST DATE / - Samsung SCD86 | User Manual (user Manual) (ver.1.0) (English) - Page 36
ENGLISH Basic Recording 8. Press the ENTER button again. s You may select NORMAL or SUPER in the BRIGHT SELECT feature and press the ENTER button to save the setting. s - Samsung SCD86 | User Manual (user Manual) (ver.1.0) (English) - Page 37
Basic Recording Playing back a tape you have recorded on the LCD 1 You can monitor the playback picture on the LCD monitor. 1 Make sure that the battery pack is in place. 1. Hold down the power switch tab and turn it to the PLAYER position. ENGLISH 1 CAMERA OFF PLAYER 2. Insert the tape you wish - Samsung SCD86 | User Manual (user Manual) (ver.1.0) (English) - Page 38
for playback, you can hear the recorded sound from the built-in Speaker. - Follow the instructions below to decrease or mute speaker volume in the PLAYER mode. - Take the following steps to lower the volume or mute the sound while playing a tape on the camcorder. 1. Set the power switch to PLAYER - Samsung SCD86 | User Manual (user Manual) (ver.1.0) (English) - Page 39
Advanced Recording Use of various Functions q Setting menu items MENU SUB MENU INITIAL LCD ADJUST DATE/TIME TV DISPLAY Available mode CAMERA PLAYER Memory REC. Memory PLAY ENGLISH q Set the camcorder to CAMERA or PLAYER mode and M.REC or M.PLAY mode 1. Press the MENU button. The MENU - Samsung SCD86 | User Manual (user Manual) (ver.1.0) (English) - Page 40
ENGLISH Advanced Recording q Availability of functions in each mode Requested Operating Mode Mode EIS Digital functions EIS D.ZOOM O PHOTO O D.ZOOM O O PHOTO ! ! Digital Special Effects O O O NITE PIX O O O Digital special effects O O ! ! NITE PIX O O O O : The requested - Samsung SCD86 | User Manual (user Manual) (ver.1.0) (English) - Page 41
M.PLAY modes. 1 The DATE/TIME is automatically recorded onto a tape. Before recording, please set the DATE/TIME. 1. Press the CAM MODE INITIAL CAMERA A/V MEMORY VIEWER CLOCK SET REMOCON BEEP SOUND SHUT SOUND DEMO CAM MODE INITIAL SET CLOCK SET REMOCON BEEP SOUND SHUTTER SOUND DEMONSTRATION CAM - Samsung SCD86 | User Manual (user Manual) (ver.1.0) (English) - Page 42
Recording q REMOCON 1 THE REMOCON function works in CAMERA, PLAYER, M.REC, M.PLAY modes. 1 The REMOCON option allows you to enable or disable the remote control for use with the camcorder LCD. CAM MODE INITIAL CAMERA A/V MEMORY VIEWER CLOCK SET REMOCON BEEP SOUND SHUT SOUND DEMO CAM MODE INITIAL - Samsung SCD86 | User Manual (user Manual) (ver.1.0) (English) - Page 43
Sound when you select the ON setup. s When you press the START/STOP button to start recording, the BEEP SOUND is automatically set to OFF so you can't hear it any longer. 5. To exit, press the MENU button. CAM MODE INITIAL CAMERA A/V MEMORY VIEWER CLOCK SET REMOCON BEEP SOUND SHUT SOUND DEMO - Samsung SCD86 | User Manual (user Manual) (ver.1.0) (English) - Page 44
ENGLISH Advanced Recording q SHUTTER SOUND 1 You can hear SHUTTER SOUND only when the PHOTO function is working. 1 Determines whether or not you wish to hear a SHUTTER SOUND when - Samsung SCD86 | User Manual (user Manual) (ver.1.0) (English) - Page 45
Advanced Recording ENGLISH q DEMONSTRATION 1 Demonstration automatically shows you the major functions that are included with your camcorder so that you may use them more easily. 1 The DEMONSTRATION function may only be used in the CAMERA mode without a tape inserted in the camcorder. 1 The - Samsung SCD86 | User Manual (user Manual) (ver.1.0) (English) - Page 46
AE function works in CAMERA or M.REC mode only. 1 The PROGRAM AE mode allows you to adjust shutter speeds and apertures to suit different recording conditions. 1 They give you creative control over the depth of field. s AUTO mode - Auto balance between the subject and the background. - To be used - Samsung SCD86 | User Manual (user Manual) (ver.1.0) (English) - Page 47
Advanced Recording Setting the PROGRAM AE 1. Press the MENU button. s The menu list will PROGRAM AE mode. 6. To exit, press the MENU button. CAM MODE CAMERA SET PROGRAM AE WHT.BALANCE D.ZOOM EIS DSE SELECT CUSTOM ENGLISH CAM MODE INITIAL CAMERA A/V MEMORY VIEWER PROGRAM AE WHT. BALANCE D.ZOOM - Samsung SCD86 | User Manual (user Manual) (ver.1.0) (English) - Page 48
BALANCE according to the outdoor ambience. 1. Set the camcorder to CAMERA mode. 2. Press the MENU button. function will not operate in EASY mode. s Turn the digital zoom off (if necessary) to set a more accurate normal outdoor recording, setting to AUTO may provide better results. CAM MODE INITIAL - Samsung SCD86 | User Manual (user Manual) (ver.1.0) (English) - Page 49
Zooming In and Out with DIGITAL ZOOM 1 Zoom works in CAMERA/M.REC mode only. Zooming In and Out 1 Zooming is a recording technique that lets you change the size of the subject in a scene. For more professional looking recordings, do not use the zoom function too often. 1 You can zoom using variable - Samsung SCD86 | User Manual (user Manual) (ver.1.0) (English) - Page 50
ENGLISH Advanced Recording Digital Zoom 1 More than 10x zoom is achieved digitally. 1 The picture quality may deteriorate depending on how much you zoom in on the subject. 1 We recommend that you use the EIS feature with DIGITAL ZOOM for picture stability. (see page 47) 1. Set the camcorder to - Samsung SCD86 | User Manual (user Manual) (ver.1.0) (English) - Page 51
when: s Recording a small object close-up s Recording and walking at the same time s Recording through the window of a vehicle 1. Set the camcorder to CAMERA compensation function when using a tripod. CAM MODE INITIAL CAMERA A/V MEMORY VIEWER PROGRAM AE WHT. BALANCE D.ZOOM EIS DSE - Samsung SCD86 | User Manual (user Manual) (ver.1.0) (English) - Page 52
DSE function works in CAMERA and M.REC mode only. 1 The digital effects enable you to give a creative look to your recording by adding various special effects. 1 Select the appropriate digital effect for the type of picture that you wish to record and the effect you wish to create. 1 There are 9 DSE - Samsung SCD86 | User Manual (user Manual) (ver.1.0) (English) - Page 53
Advanced Recording Selecting an effect 1. Set the camcorder to CAMERA mode. 2. Press the MENU button. s The menu list will appear . s The DSE function will not operate in EASY mode. ENGLISH CAM MODE INITIAL CAMERA A/V MEMORY VIEWER PROGRAM AE WHT. BALANCE D.ZOOM EIS DSE SELECT FLASH SELECT CUSTOM - Samsung SCD86 | User Manual (user Manual) (ver.1.0) (English) - Page 54
Recording q FLASH SELECT (SCD87 only) 1 The Flash Select function works in CAMERA or M.REC mode only, when the Flash Light (not supplied) is connected to SmartShoe. 1. Install the Flash Light (optional accessory to OFF. CAM MODE INITIAL CAMERA A/V MEMORY VIEWER PROGRAM AE WHT. BALANCE D.ZOOM EIS - Samsung SCD86 | User Manual (user Manual) (ver.1.0) (English) - Page 55
Advanced Recording ENGLISH q CUSTOM.Q 1 You can customize settings and save them for future use. s The s The PROGRAM AE mode is automatically setup when the EXPOSURE is set on manual. CAM MODE INITIAL CAMERA A/V MEMORY VIEWER PROGRAM AE WHT. BALANCE D.ZOOM EIS DSE SELECT FLASH SELECT CUSTOM - Samsung SCD86 | User Manual (user Manual) (ver.1.0) (English) - Page 56
To exit, press the MENU button. Notes CAM MODE A / V SET REC MODE PHOTO SEARCH PHOTO COPY AUDIO MODE AUDIO SELECT WIND CUT 12 SOUND1 OFF s We recommend that you use this camcorder to play back any tapes recorded on this camcorder. Playing back a tape recorded in other equipment may produce mosaic - Samsung SCD86 | User Manual (user Manual) (ver.1.0) (English) - Page 57
camcorder records sound in two ways. (12bit, 16bit) s 12bit : You can record two 12bit stereo sound tracks. The original stereo sound can be recorded the MENU button. ENGLISH CAM MODE INITIAL CAMERA A/V MEMORY VIEWER REC MODE PHOTO SEARCH COPY AUDIO MODE 12 AUDIO SELECT WIND CUT CAM MODE A / V - Samsung SCD86 | User Manual (user Manual) (ver.1.0) (English) - Page 58
other noise while recording. - When the wind cut is on, some low sounds are eliminated along with the sound of the wind. 1. Set the camcorder to CAMERA press the MENU button. CAM MODE INITIAL CAMERA A/V MEMORY VIEWER REC MODE PHOTO SEARCH COPY AUDIO MODE 12 AUDIO SELECT WIND CUT CAM MODE A / V - Samsung SCD86 | User Manual (user Manual) (ver.1.0) (English) - Page 59
- If the tape was recorded before setting the DATE/TIME in the Camera's memory. - When the lithium battery becomes weak or dead. s Before you can use the DATE/TIME function, you must set the Clock. See CLOCK SET on page 37. ENGLISH CAM MODE INITIAL CAMERA A/V MEMORY VIEWER LCD ADJUST DATE / TIME - Samsung SCD86 | User Manual (user Manual) (ver.1.0) (English) - Page 60
ENGLISH Advanced Recording q at the left side of the camcorder to turn ON/OFF all of the OSD displayed on the LCD/EVF/TV. 1. Set the camcorder to CAMERA, PLAYER, M.REC, MENU button. CAM MODE INITIAL CAMERA A/V MEMORY VIEWER LCD ADJUST DATE / TIME TV DISPLAY CAM MODE VIEWER SET LCD ADJUST DATE - Samsung SCD86 | User Manual (user Manual) (ver.1.0) (English) - Page 61
Advanced Recording ENGLISH Using Quick Menu 1 Quick menu is available only - Each time you select EIS and press the ENTER button, the EIS icon is displayed or set to OFF. s DSE(Digital Special Effect) (see page 48) - Each time you select DSE and press the ENTER button, the DSE preset values are - Samsung SCD86 | User Manual (user Manual) (ver.1.0) (English) - Page 62
Recording s WHT. BALANCE (see page 44) - Each time you select WHT. BALANCE and press the ENTER button, you can choose between preset WHT.BALANCE values and AUTO. As in PROGRAM AE, you can't choose between Auto and WHT.BALANCE values it they have not been preset.. s FOCUS (Manual the camcorder to - Samsung SCD86 | User Manual (user Manual) (ver.1.0) (English) - Page 63
button. Notes s If you want to use the selected shutter speed and exposure value, you should begin the recording with the shutter speed and the exposure adjustment screens displayed on the LCD. s If you manually change the shutter speed and the exposure value when Auto-exposure option is selected - Samsung SCD86 | User Manual (user Manual) (ver.1.0) (English) - Page 64
set to off and the recording settings will be set to the following basic modes: s Battery level, recording mode, counter, DATE/ EASY mode settings are deleted when the battery pack is uninstalled from the camcorder and therefore, they must be reset when a battery pack has been replaced. EASY STOP 0 - Samsung SCD86 | User Manual (user Manual) (ver.1.0) (English) - Page 65
. s Recording will begin using the CUSTOM settings. 4. To switch CUSTOM mode off, press the CUSTOM button again. s The camcorder will revert to the settings that were set prior to custom mode being selected. Note s The CUSTOM mode settings are deleted when a battery pack is uninstalled and therefore - Samsung SCD86 | User Manual (user Manual) (ver.1.0) (English) - Page 66
it enables you to concentrate on the creative side of your recording. 1 Manual focusing may be necessary under certain conditions that make automatic focusing you are inexperienced in the use of camcorders, we recommend that you make use of Auto Focus. Manual Focusing 1 In the following cases you - Samsung SCD86 | User Manual (user Manual) (ver.1.0) (English) - Page 67
BLC works in CAMERA/M.REC mode. 1 Back lighting exists when the subject is darker than the background: s The subject is in front of a window. s The person to be recorded is wearing white or shiny clothes and is placed against a bright background; the person's face is too dark to distinguish his/her - Samsung SCD86 | User Manual (user Manual) (ver.1.0) (English) - Page 68
look by using special effects such as fading in at the beginning of a sequence or fading out at the end of a sequence. To Start Recording 1. Before recording, hold down the FADE button. The picture and sound gradually disappear (fade out). 2. Press the START/STOP button and at the same time release - Samsung SCD86 | User Manual (user Manual) (ver.1.0) (English) - Page 69
recorded tape, recorded in SP mode with 12bit sound. 1 Use the internal and external microphones or other audio equipment. 1 The original sound will not be erased. Dubbing sound 1. Set the camcorder camcorder by inserting the cable jack into the A/V in/out terminal at the left side of the camcorder. - Samsung SCD86 | User Manual (user Manual) (ver.1.0) (English) - Page 70
ENGLISH Advanced Recording Dubbed audio Playback 1. Insert the dubbed tape and press MENU button. 2. [ 2 ] MIX [ 1 + 2 ] 8. Press the (PLAY/STILL) button to playback the dubbed tape. Note When you playback added sound (SOUND2 or MIX mode), you may experience loss of sound quality. 12 SOUND1 - Samsung SCD86 | User Manual (user Manual) (ver.1.0) (English) - Page 71
the button. 2. Release the PHOTO button and press the PHOTO button again in 2 seconds. s The still picture is recorded for about 6~7 seconds. 3. After the PHOTO has been recorded, the camcorder returns to STBY mode. Searching for a PHOTO picture 1 The PHOTO SEARCH works in PLAYER, M.PLAY mode only - Samsung SCD86 | User Manual (user Manual) (ver.1.0) (English) - Page 72
) 1 The NITE PIX function works in CAMERA/M.REC mode. 1 The NITE PIX function enables you to record a subject in darkness. 1. Set the camcorder to CAMERA or M.REC mode. ON NITE PIX OFF 2. Slide the NITE PIX switch to ON. s (NITE PIX indicator) appears on the LCD monitor. s The - Samsung SCD86 | User Manual (user Manual) (ver.1.0) (English) - Page 73
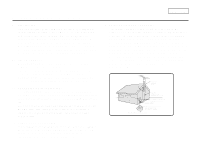
that connects the LCD screen to the Camcorder. 1. General recording. 2. Downward recording. Making a recording with a top view of the LCD screen. 1 2 3. Upward recording. Making a recording viewing the LCD screen from below. 4. Self recording. Making a recording viewing the LCD screen from the - Samsung SCD86 | User Manual (user Manual) (ver.1.0) (English) - Page 74
the TV/VIDEO selector on the TV to VIDEO. s Refer to the TV or VCR user's manual. 4. Play the tape back. Video inputYellow TV Audio input (left)-White Audio input (right)-Red S-VIDEO input S-VIDEO A/V Camcorder Notes s You may use the S-VIDEO cable (supplied with SCD87 only) to obtain better - Samsung SCD86 | User Manual (user Manual) (ver.1.0) (English) - Page 75
VCR on the TV set. 5. Play the tape back. VCR VIDEO AUDIO(L) AUDIO(R) S-VIDEO S-VIDEO A/V TV ANTENNA CAMCORDER Playback 1 You can play the recorded tape in PLAYER mode. 1. Connect a power source and set the power switch to PLAYER mode. 2. Insert the tape you wish to play back. 3. Using the - Samsung SCD86 | User Manual (user Manual) (ver.1.0) (English) - Page 76
and the Remote Control. 1 The F.ADV(Frame advance), X2, SLOW buttons are located on the Remote Control only. 1 To prevent tape and head-drum wear, your camcorder will automatically stop if it is left in STILL or SLOW modes for more than 5 minutes. Playback pause 1 Press the (PLAY/STILL) button - Samsung SCD86 | User Manual (user Manual) (ver.1.0) (English) - Page 77
may appear on the screen while in some of the various playback modes. - Mosaic shaped distortion or noise may be experienced when you play back tapes recorded in LP which contain various playback functions. s Sound will only be heard during regular playback. 73 - Samsung SCD86 | User Manual (user Manual) (ver.1.0) (English) - Page 78
control during playback or recording at the point you wish to return to. s The time code is changed to a tape counter that is set to tape is ejected. - When you remove the battery pack or power supply. s The zero memory may not function correctly where there is a break between recordings on the tape - Samsung SCD86 | User Manual (user Manual) (ver.1.0) (English) - Page 79
Audio/Video cable. 2. Set the power switch of the camcorder to PLAYER mode. 3. Turn on the VCR or TV. 4. Insert the blank tape with protection tab closed into the camcorder. s If you want to record from the connected VCR, insert a recorded VHS tape into the VCR. VCR VIDEO AUDIO(L) AUDIO(R) S-VIDEO - Samsung SCD86 | User Manual (user Manual) (ver.1.0) (English) - Page 80
DV ports, (4pin, 6pin). This camcorder has a 4pin terminal. 1 With a digital connection, video and audio signals are transmitted in digital The frame rate recorded for video capturing is dependent on the capacity of the PC. Note s When you transmit data from the camcorder to another DV device, some - Samsung SCD86 | User Manual (user Manual) (ver.1.0) (English) - Page 81
system : Windows® 98SE, ME, XP, Mac OS s Main memory : more than 64 MB RAM s IEEE1394 add-on card or built in IEEE1394 card Recording with a DV connection cable 1. Set the power switch to PLAYER mode. 2. Connect the DV cable (not supplied) from the DV IN/OUT port of the camcorder to the DV IN/OUT - Samsung SCD86 | User Manual (user Manual) (ver.1.0) (English) - Page 82
an image to a PC via a USB connection. 1 If you transfer data to a PC, you need to install the software (Driver, Editing software) supplied with the camcorder. System Requirements s CPU : Intel® Pentium II™ 400 processor compatible or better s Operating system : Windows® 98/98SE/ME/2000/XP s RAM - Samsung SCD86 | User Manual (user Manual) (ver.1.0) (English) - Page 83
USB interface Installing DVC Media 4.0 Program 1 Do not connect the camcorder to PC before installing the program. 1 If another camera or scanner is connected, please disconnect it in advance. 1 This explanation is based on Windows® 98SE OS. Program installation 1. 1. Insert the software CD into - Samsung SCD86 | User Manual (user Manual) (ver.1.0) (English) - Page 84
Install the USB Software (DVC media 4.0TM) 7. 4. Repeat steps 1~3. 5. When you see the Start window, click "DVC media 4.0TM" to Media 4.0 User's Manual is included on the accompanying CD in Adobe's Portable Document Format (PDF). The user's manual can be viewed using Acrobat Reader software - Samsung SCD86 | User Manual (user Manual) (ver.1.0) (English) - Page 85
interface Connecting to a PC 1. Connect a USB cable to the USB port on the PC. 2. Connect the other end of the USB cable into the proper terminal on the camcorder. (USB jack) ENGLISH Notes s If you disconnect the USB cable from the PC or the camcorder while transferring, the data transmission will - Samsung SCD86 | User Manual (user Manual) (ver.1.0) (English) - Page 86
to the Memory Stick. s" " appears on the screen while recording to the Memory Stick. s While recording or loading an image, do not eject or insert the Memory Stick. - Inserting or ejecting a Memory Stick while recording or loading an image can cause data damage. s If you want to save all - Samsung SCD86 | User Manual (user Manual) (ver.1.0) (English) - Page 87
Do not turn the power off while recording, loading, erasing or formatting. s Please turn the power off before you insert or eject the Memory Stick. You repair. Save important images separately. s Samsung is not responsible for data loss due to misuse. s If the USB cable is connected to the camcorder - Samsung SCD86 | User Manual (user Manual) (ver.1.0) (English) - Page 88
Still Camera (DSC). 1 You have to set the mode switch to MEMORY STICK position to use this camcorder as Digital Still Camera. s M.REC mode (Memory RECORD mode) 1. Set the mode switch to MEMORY STICK. 2. Set the power switch to CAMERA. s M.PLAY mode (Memory PLAYBACK mode) 1. Set the mode switch - Samsung SCD86 | User Manual (user Manual) (ver.1.0) (English) - Page 89
Digital Still Camera mode ENGLISH Selecting the image quality 1 You can select the quality of a still image to be recorded. Select the image quality 1. Set the mode switch to MEMORY STICK. 2. Set the power switch to the CAMERA mode. 3. Press the MENU button. s The menu - Samsung SCD86 | User Manual (user Manual) (ver.1.0) (English) - Page 90
Digital Still Camera mode Recording Still images to a Memory Stick in M.REC Mode. 1 You cannot record moving pictures onto a Memory Stick. 1 Audio cannot be recorded onto the Memory Stick. Recording The still image is recorded to the Memory Stick. s While the camcorder is recording the the still - Samsung SCD86 | User Manual (user Manual) (ver.1.0) (English) - Page 91
, use the COPY function. 1. Set the mode switch to TAPE. 2. Set the power switch to PLAYER mode. 3. Play back the cassette. ENGLISH 4. Press the PHOTO button and hold it. s The camcorder is set to playback pause(STILL) mode. s If you do not wish to record, release the button and wait for more than - Samsung SCD86 | User Manual (user Manual) (ver.1.0) (English) - Page 92
ENGLISH Digital Still Camera mode Viewing Still images 1 You can playback and view still images recorded on the Memory Stick. 1 There are 3 ways to view recorded images. s Single : To view an image frame by frame. s Slide show : To view all images automatically and in consecutive order. s Multi - Samsung SCD86 | User Manual (user Manual) (ver.1.0) (English) - Page 93
Digital Still Camera mode To view the Multi Screen 1. Set the mode switch to MEMORY STICK. 2. Set the power switch to PLAYER mode. s The last recorded image appears. 3. To view six stored images on single screen, press the PHOTO button. s A selection mark ( ) appears under the image. s Turn the menu - Samsung SCD86 | User Manual (user Manual) (ver.1.0) (English) - Page 94
ENGLISH Digital Still Camera mode Copying still images from a cassette to Memory Stick 1 You can copy still images recorded with PHOTO function on button. s All still images that recorded on a cassette will be copied to a Memory Stick. 5. The camcorder automatically performs the photo search to find - Samsung SCD86 | User Manual (user Manual) (ver.1.0) (English) - Page 95
Still Camera mode Marking images for printing 1 This camcorder supports the DPOF (Digital Print Order Format) print format. 1 You can automatically print images recorded on a Memory Stick with a printer supporting DPOF. 1 There are 2 ways to make a PRINT MARK. s THIS FILE : You can set a print - Samsung SCD86 | User Manual (user Manual) (ver.1.0) (English) - Page 96
Digital Still Camera mode Protection from accidental erasure 1 You can protect important images from accidental erasure. s If you execute FORMAT, all images including protected images will be erased. 1. Set the mode switch to MEMORY STICK. 2. Set the power switch to PLAYER. s The last recorded - Samsung SCD86 | User Manual (user Manual) (ver.1.0) (English) - Page 97
Digital Still Camera mode Deleting Still images 1 You can erase the still images recorded on the Memory Stick. 1 If you want to delete protected images, you must first deactivate the image protection. 1 An image which has been deleted cannot - Samsung SCD86 | User Manual (user Manual) (ver.1.0) (English) - Page 98
Digital initial states. 1 The Memory Stick supplied with this camcorder has been formatted already. Attention 1 If you execute the "Memory stick" formatted on the PC with the USB adaptor (not supplied) do not have a guaranteed compatibility with this camcorder. If you want to format the Memory Stick - Samsung SCD86 | User Manual (user Manual) (ver.1.0) (English) - Page 99
you must remove the power source. 1 When recording with a Lithium Ion Battery Pack, leaving the pack on the camcorder can reduce the life span of the battery. Hence, it should be removed from the camcorder. 1. Slide the TAPE EJECT switch in the direction of the arrow. s Opening the cassette - Samsung SCD86 | User Manual (user Manual) (ver.1.0) (English) - Page 100
normal recording and tape. 3. Press the (PLAY/STILL) button. 4. Press the (STOP) button after 10 seconds. Notes s Check the quality of the picture using a videocassette. If the picture quality has not improved, repeat the operation. If the problem continues, contact your local authorized service - Samsung SCD86 | User Manual (user Manual) (ver.1.0) (English) - Page 101
s You can use your camcorder in any country or area with the supplied AC Power Adapter within 100V to 240V, 50/60 Hz. s Use a commercially available AC plug Adapter, if necessary, depending on the design of the local wall outlet. Color system s You can view your recording in the viewfinder. However - Samsung SCD86 | User Manual (user Manual) (ver.1.0) (English) - Page 102
mechanical fault. moisture condensation has formed in the camcorder. If you want to record, release the protection. 1. Eject the tape. 2. Set to OFF. 3. Detach the battery. 4. Reattach the battery. * If unresolved contact your local service representative. see below. Moisture Condensation 1 If the - Samsung SCD86 | User Manual (user Manual) (ver.1.0) (English) - Page 103
new images. Release the write protect tab on the Memory Stick. Cancel the protect of image. Format a Memory Stick or insert Memory Stick recorded on this camcorder. Format a Memory Stick or change to a new Memory Stick. Format a Memory Stick. Wait until the end of deleting. Wait until the end of - Samsung SCD86 | User Manual (user Manual) (ver.1.0) (English) - Page 104
Troubleshooting 1 If these instructions do not solve your problem, contact your nearest Samsung authorized service centrer. Symptom Explanation/Solution You cannot switch the camcorder on. Check the battery pack or the AC Power Adapter. START/STOP button Check the POWER switch is set to CAM - Samsung SCD86 | User Manual (user Manual) (ver.1.0) (English) - Page 105
LCD monitor Method Viewfinder Connectors Video output S-video output Audio output DV input/output USB output External mic NTSC 2 rotary heads, Helical scanning system Rotary heads, PCM system Digital video tape (6.35mm width): Mini DV cassette SP: approx. 18.81mm/s LP: approx. 12.56mm/s SP: 60 - Samsung SCD86 | User Manual (user Manual) (ver.1.0) (English) - Page 106
Accessories 12 Audio dubbing 65 AUDIO MODE 53 - B Battery Pack 24 BEEP ...39 BLC ...63 - C Cassette ...27 Cleaning ...96 CLOCK SET 37 Connecting 71 CUSTOM Mode 61 CUSTOM.Q 51 - D - DATE/TIME 55 DC Cable 23 Deleting ...93 DEMONSTRATION 41 DSE ...48 DV U USB ...78 -V Viewfinder 30, 32 -W - Samsung SCD86 | User Manual (user Manual) (ver.1.0) (English) - Page 107
the product at it's option. All warranty repairs must be performed by a SEA authorized service center. The name and address of the location nearest you can be obtained by calling toll free: 1-800 SAMSUNG (1-800-726-7864). Labor 90 days carry-in Parts 1 year On carry-in models, transportation to - Samsung SCD86 | User Manual (user Manual) (ver.1.0) (English) - Page 108
ENGLISH THIS CAMCORDER IS MANUFACTURED BY: ELECTRONICS SERVICE DIVISION 400 Valley Road, Suite 201, Mt. Arlington N.J. 07856 Tel: 1-800-SAMSUNG (1-800-726-7864) *Samsung Electronics' Internet Home Page http://www.samsungusa.com AD68-00516B
-
 1
1 -
 2
2 -
 3
3 -
 4
4 -
 5
5 -
 6
6 -
 7
7 -
8
-
9
-
10
-
11
-
12
-
13
-
14
-
15
-
16
-
17
-
18
-
19
-
20
-
21
-
22
-
23
-
24
-
25
-
26
-
27
-
28
-
29
-
30
-
31
-
32
-
33
-
34
-
35
-
36
-
37
-
38
-
39
-
40
-
41
-
42
-
43
-
44
-
45
-
46
-
47
-
48
-
49
-
50
-
51
-
52
-
53
-
54
-
55
-
56
-
57
-
58
-
59
-
60
-
61
-
62
-
63
-
64
-
65
-
66
-
67
-
68
-
69
-
70
-
71
-
72
-
73
-
74
-
75
-
76
-
77
-
78
-
79
-
80
-
81
-
82
-
83
-
84
-
85
-
86
-
87
-
88
-
89
-
90
-
91
-
92
-
93
-
94
-
95
-
96
-
97
-
98
-
99
-
100
-
101
-
102
-
103
-
104
-
105
-
106
-
107
-
108
 |
 |
ENGLISH
START/
STOP
SELF
TIMER
A.DUB
ZERO
MEMORY
PHOTO
DISPLAY
X2
SLOW
F.ADV
PHOTO
SEARCH
DATE/
TIME
Digital Video Camcorder
Owner’s Instruction Book
Before operating the unit, please read this
instruction book thoroughly, and retain it for
future reference.
AF
Auto Focus
CCD
Charge Coupled Device
LCD
Liquid Crystal Display
SCD86/D87
ELECTRONICS
US PATENT 4415844