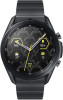
Samsung SM-R840NTKAXAR User Manual
Samsung SM-R840NTKAXAR Manual
 |
View all Samsung SM-R840NTKAXAR manuals
Add to My Manuals
Save this manual to your list of manuals |
Samsung SM-R840NTKAXAR manual content summary:
- Samsung SM-R840NTKAXAR | User Manual - Page 1
SI\MSUNG Galaxy Watch3 User manual - Samsung SM-R840NTKAXAR | User Manual - Page 2
| Change the watch face | Quick panel | Notifications | Water lock mode | Do not disturb | Goodnight mode | Theater mode | Daily briefing | Enter text Apps Navigate the apps screen | Messages | Phone | Contacts | Bixby | Samsung Health | Weather | Calendar | Galaxy Store | Samsung Pay | Reminder - Samsung SM-R840NTKAXAR | User Manual - Page 3
| Advanced settings | Text to speech Other: Screen wake-up | Touch sensitivity | Watch status | Watch info Learn More Videos | Tips | Samsung Care | Talk to an agent Legal information Samsung Knox | Maintaining water and dust resistance | Military Specification | Restricting children's access to - Samsung SM-R840NTKAXAR | User Manual - Page 4
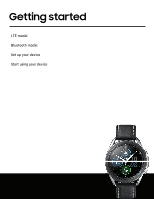
Getting started LTE model Bluetooth model Set up your device Start using your device 4 - Samsung SM-R840NTKAXAR | User Manual - Page 5
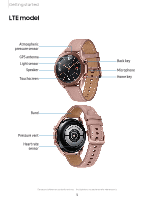
Getting started LTE model Atmospheric pressure sensor GPS antenna Light sensor Speaker Touchscreen Band Pressure vent Heart rate sensor Back key Microphone Home key Devices and software are constantly evolving - the illustrations you see here are for reference only. 5 - Samsung SM-R840NTKAXAR | User Manual - Page 6
Getting started Bluetooth model Atmospheric pressure sensor GPS antenna Light sensor Speaker Touchscreen Band Pressure vent Heart rate sensor Back key Microphone Home key Devices and software are constantly evolving - the illustrations you see here are for reference only. 6 - Samsung SM-R840NTKAXAR | User Manual - Page 7
CAUTION Do not insert sharp objects into the atmospheric pressure sensor, the pressure vent, speaker, or the microphone. Inner components of the watch may be damaged along with the water-resistance feature. Charge the battery Your device is powered by a rechargeable battery. 1. Connect the wireless - Samsung SM-R840NTKAXAR | User Manual - Page 8
of operation. Remove the device from the charger and wait for the device to cool down. For more information, visit https://www.samsung.com/us/support/answer/ANS00076952. NOTE Do not disassemble, modify, or repair your device. Placing objects, such as magnetic stripe cards, including credit cards - Samsung SM-R840NTKAXAR | User Manual - Page 9
Getting started Wireless PowerShare Wirelessly charge your device using a supported Samsung smartphone. Some features are not available while sharing power. 0 1. From the smartphone, open the Notification panel and, tap Wireless PowerShare to enable this feature. 2. With - Samsung SM-R840NTKAXAR | User Manual - Page 10
not work with some accessories, covers, or other manufacturer's devices. If you have trouble connecting or charging is slow, remove any cover from each device. May affect call reception or data services, depending on your network environment. For best results when using Wireless PowerShare, please - Samsung SM-R840NTKAXAR | User Manual - Page 11
the straps to very wet conditions. Wet straps can cause skin irritations. Dry the straps first. If you experience skin irritation when wearing the watch, stop wearing it and consult a physician. Devices and software are constantly evolving - the illustrations you see here are for reference only. 11 - Samsung SM-R840NTKAXAR | User Manual - Page 12
remove the strap: ◌ Slide the strap's spring bar inward and pull the strap away from the watch. To replace the strap: 1. Insert one end of the spring bar into the hole on the side of the watch. 2. Slide the other spring bar inward, and release it once the strap is in place - Samsung SM-R840NTKAXAR | User Manual - Page 13
Getting started Adjust the titanium strap You can make the titanium strap longer or shorter for a better fit. 1. Press the button on the strap. The pin will pop out. 2. Use the provided tool to remove the pin. 3. Remove or add links to adjust the strap to your desired length. 4. Replace the pin - Samsung SM-R840NTKAXAR | User Manual - Page 14
5.0 and later with at least 1.5 GB RAM. Supported devices may vary by carrier and device. Some features may not be available. For best results, connect with compatible Samsung Galaxy devices. Visit samsung.com/us/support/owners/app/galaxy-wearable-watch for a list of compatible smartphones. 14 - Samsung SM-R840NTKAXAR | User Manual - Page 15
is removed from its memory. Make sure you back up any important data stored on your watch. 1. From Galaxy Wearable, tap the Home tab. 2. Tap Account and backup > Back up data. Remote connection Set the watch to remotely connect to the smartphone when a Bluetooth connection between the devices is not - Samsung SM-R840NTKAXAR | User Manual - Page 16
By default your screen is not locked. You can use the screen lock feature to secure your device. See Set a screen lock. When enabled, your watch locks when you remove it from your wrist or when the screen times out while you are wearing it. To lock the - Samsung SM-R840NTKAXAR | User Manual - Page 17
Getting started Navigation The touchscreen responds best to a light touch from the pad of your finger. Using excessive force or a metallic object on the touchscreen may damage the tempered glass surface and void the warranty. Tap Lightly tap the screen to launch an app or select a menu item. Devices - Samsung SM-R840NTKAXAR | User Manual - Page 18
Getting started Swipe Lightly drag your finger vertically or horizontally across the screen to view panels. Devices and software are constantly evolving - the illustrations you see here are for reference only. 18 - Samsung SM-R840NTKAXAR | User Manual - Page 19
Getting started Drag Touch and hold an item, and then move it to a new location. Devices and software are constantly evolving - the illustrations you see here are for reference only. 19 - Samsung SM-R840NTKAXAR | User Manual - Page 20
Getting started Rotate Lightly press and drag your finger clockwise or counterclockwise using the digital bezel on the edge of the screen to move through a list. Devices and software are constantly evolving - the illustrations you see here are for reference only. 20 - Samsung SM-R840NTKAXAR | User Manual - Page 21
Getting started Change the watch face From the smartphone: 1. From Galaxy Wearable, tap the Watch faces tab. 2. Tap a watch face. 3. Tap Customize to select a background and items to display on the watch face. From the watch: ◌ Touch and hold the watch face. Swipe left or right to choose a new style - Samsung SM-R840NTKAXAR | User Manual - Page 22
Getting started Widgets You can instantly check your health and activity information and view app information, such as weather and schedules, for some connected mobile devices. Add Widgets To add more widgets on the Home screen: 1. Swipe to the end of the Widget screens, and tap Add widget. 2. - Samsung SM-R840NTKAXAR | User Manual - Page 23
, you can access commonly used settings through the Quick panel, where you can also view the Status bar. ◌ Swipe down from the top of the watch screen to open the Quick panel. • Tap a quick setting to open it. • Touch and hold a quick setting to edit the placement, remove a setting, or add - Samsung SM-R840NTKAXAR | User Manual - Page 24
Getting started Status bar Indicator icons display at the top of the screen in the Status bar. Swipe down from the top of the watch screen to view the Status bar. Indicator icons Battery full Bluetooth connected Bluetooth enabled, but not connected Wi-Fi connected LTE network connected (LTE model - Samsung SM-R840NTKAXAR | User Manual - Page 25
. When you receive a notification, information about the notification, such as its type, is displayed on the screen while the watch is vibrating. ◌ From the watch screen, swipe right and tap a notification to view details. App icon Notification Devices and software are constantly evolving - the - Samsung SM-R840NTKAXAR | User Manual - Page 26
choose to block notifications from some apps. Not all apps support Block notifications. 1. From the watch screen, swipe right to view notifications. 2. Tap a the notification feature. 1. From the Apps screen of the smartphone, tap Galaxy Wearable > Home tab > Notifications. 2. Tap C)to activate it, - Samsung SM-R840NTKAXAR | User Manual - Page 27
to remove any water from the pressure sensor. Eject water You can use the eject water feature to help clear out water from your watch. The watch will make sounds to help eject water from the speaker. 0 1. From Settings, tap Advanced > Water lock. 2. Tap Eject water with sound > Play sound. Do not - Samsung SM-R840NTKAXAR | User Manual - Page 28
sleep. 1. Swipe down from the top of the watch to open the Quick settings panel. 2. Tap to put the watch in Goodnight mode. TIP You can also access Goodnight Advanced > Daily briefing, and tap an option: • Set briefing times: Manually set up when you will receive briefings. • Help: Tap to view help - Samsung SM-R840NTKAXAR | User Manual - Page 29
Getting started Enter text Text can be entered by speaking or by using a keyboard. Voice input Keyboard Emojis Default keyboard Select a default keyboard type for text input. 0 ◌ From Settings, tap General > Input > Default keyboard and select your default keyboard. Devices and software are - Samsung SM-R840NTKAXAR | User Manual - Page 30
Input languages to change the language. Voice input is not supported in some languages. Emojis You can add emojis to your the keyboard mode options. Keyboard settings Change the Samsung keyboard settings. 0 ◌ From Settings, tap . • Key-tap feedback: Set the watch to vibrate when you tap a key - Samsung SM-R840NTKAXAR | User Manual - Page 31
Apps Navigate the apps screen Messages Phone Contacts Bixby Samsung Health Weather Calendar Galaxy Store Samsung Pay Reminder Microsoft Outlook Music Gallery Find My Phone Alarm World clock Timer Stopwatch Spotify PPT Controller Voice Recorder - Samsung SM-R840NTKAXAR | User Manual - Page 32
all preloaded and downloaded apps. Apps can be downloaded from the Galaxy Store. ◌ From the watch screen, press the Home key to open the Apps screen. • apps You can hide apps that you do not want to see on your watch. 1. From Galaxy Wearable on your phone, tap the Home tab > Apps > Manage apps. - Samsung SM-R840NTKAXAR | User Manual - Page 33
Apps Auto open apps Set an app to launch without tapping the app. When the indicator icon hovers over an app, the app will be launched automatically. 0 ◌ From Settings, tap Apps > Auto open apps to enable this feature. Sort apps Choose how to arrange the apps on the Apps screen. 0 ◌ From Settings, - Samsung SM-R840NTKAXAR | User Manual - Page 34
Apps e Messages View messages and reply to or call the sender using the watch. Tap a keyboard to compose a reply More options Swipe down to select a quick reply Devices and software are constantly evolving - the illustrations you see here are for reference only. 34 - Samsung SM-R840NTKAXAR | User Manual - Page 35
Quick messages Edit or add templates used for replying to messages. 0- 1. From Galaxy Wearable, tap the Home tab > Apps. 2. Tap Settings next to Messages. , tap Edit. Delete messages Delete messages from your watch. ◌ Swipe to the right on the watch screen to open a message, then drag the message - Samsung SM-R840NTKAXAR | User Manual - Page 36
SOS message when a hard fall is detected. TIP After you have set up SOS messages in the Galaxy Wearable app, you can enable SOS messages and Detect falls from the Settings menu on the watch. From Settings, tap Advanced > SOS to customize. Send SOS messages: ◌ Press the Home key quickly three times - Samsung SM-R840NTKAXAR | User Manual - Page 37
Apps 8 Phone Make and answer calls on your phone from your watch. Speaker Transfer to the phone End call More options Mute Make a call Make a call from your watch. 8 1. From Apps, tap Phone. e 2. Tap Keypad and enter a number or tap Contacts and select a contact to call. 3. Tap Call. 37 - Samsung SM-R840NTKAXAR | User Manual - Page 38
incoming calls. ◌ Tap Decline and drag it to the left to reject a call and send it to your voicemail. End a call End a call from your watch. ◌ Tap End when you are ready to end your call. e Contacts View your smartphone's contact list. Create a contact You can search for a contact or scroll - Samsung SM-R840NTKAXAR | User Manual - Page 39
Bixby is a voice service that helps you use your watch more conveniently. You can talk to Bixby to launch a function or provide you with information. To use Bixby, your mobile device must be connected to a Wi-Fi or mobile network, and you must sign in to your Samsung - Samsung SM-R840NTKAXAR | User Manual - Page 40
Health helps you manage your wellness and fitness. Set fitness goals and regularly record and check your progress. When the watch is synced with the Samsung Health app, you can save and manage health-related data and receive useful information about your health every day. Only your most recent - Samsung SM-R840NTKAXAR | User Manual - Page 41
unsure of your health status, have several health problems, or are pregnant, you should speak with your doctor before starting a new exercise program. Steps Your watch counts the number of steps you have taken and measures the distance traveled. ◌ From Samsung Health, tap Steps to view a graph of - Samsung SM-R840NTKAXAR | User Manual - Page 42
in place, and pacing around. Auto workout tracking The watch automatically recognizes workouts after 10 minutes of exercise and begins can view and enable or disable the exercises supported by the auto workout tracking feature. 0 1. From Samsung Health, tap Settings. 2. Tap Workout detection - Samsung SM-R840NTKAXAR | User Manual - Page 43
stress The watch can be configured to automatically measure and track your heart rate and stress. 0 1. From Samsung Health, watch measures your heart rate every ten minutes when you are relaxed. • Manual measurement only: The watch measures your heart rate or stress only when you check it manually - Samsung SM-R840NTKAXAR | User Manual - Page 44
between inhale and exhale prompts. - Sound: Enable or disable sound for the breathing exercise. Food Keep track of your calorie intake from food. 1. From Samsung Health, tap Food. 2. Tap Add when you eat something to enter the following information: • Meal type: Enter the type of meal you had. • Cal - Samsung SM-R840NTKAXAR | User Manual - Page 45
Health, tap Water. 0 2. Tap Add when you drink a glass of water. • To decrease the count, tap Remove. To set your daily water target: 0 1. From Samsung Health, tap Water. 0 2. Swipe down and tap Set target. 0 3. Tap to enable water tracking. 4. Tap Daily target and set the number. 5. Tap Done - Samsung SM-R840NTKAXAR | User Manual - Page 46
number. 5. Tap Done. Together Compete with other Samsung Health users. Steps leaderboard Add challenges through Samsung Health on your smartphone. 0 ◌ From Apps, tap Samsung Health > Together. Here you can add friends and challenges. View challenges on your Watch View your challenges and rank on the - Samsung SM-R840NTKAXAR | User Manual - Page 47
stress measurements. • Data permissions: Configure access permissions to your health data. 3. Tap Help for a description of Samsung Health. 0 Weather View weather information on the watch for locations set on the smartphone when the devices are connected. 0 ◌ From Apps, tap Weather. Swipe through - Samsung SM-R840NTKAXAR | User Manual - Page 48
. 2. Swipe right or left to view different months. Add events 1. From Calendar, tap a day. 2. Tap Add an event. 3. Enter the event information, and tap Save. 0 Galaxy Store Samsung Galaxy Store provides a quick and easy way to find and download free premium apps that are compatible with your - Samsung SM-R840NTKAXAR | User Manual - Page 49
accepts a debit, credit, or gift card. Samsung Pay supports Near Field Communication (NFC) to allow quick and secure payment through standard credit card readers. For more information, see samsung.com/us/samsung-pay. Set up Samsung Pay 1. From Apps, tap Samsung Pay. 2. Follow the prompts to complete - Samsung SM-R840NTKAXAR | User Manual - Page 50
the circle to mark it as complete with a check mark. Microsoft Outlook View emails and reply to them. Read emails View emails on your watch. 1. From Apps, tap Microsoft Outlook. 2. Tap a message to view its content. 3. Tap ••• More options for additional options: • Star: Mark the email as important - Samsung SM-R840NTKAXAR | User Manual - Page 51
an email to open the email screen. 2. Tap an icon or a quick reply to compose and send your message. Delete emails Delete emails on your watch. 1. From Microsoft Outlook, scroll through the inbox to the email you want to delete. 2. Tap ••• More options > Delete. 3. Select the email again, and then - Samsung SM-R840NTKAXAR | User Manual - Page 52
Apps 0 Music Play music from your watch. Volume Rewind Output Fast-forward Play/Pause Devices and software are constantly evolving - the illustrations you see here are for reference only. 52 - Samsung SM-R840NTKAXAR | User Manual - Page 53
on your smartphone. 3. The music plays on your smartphone and the watch displays the music controller screen. Import music Import music saved on your smartphone to your watch. 1. From Galaxy Wearable, tap the Home tab. 2. Tap Add content to your watch > Add tracks. 3. Select files and tap Done. 53 - Samsung SM-R840NTKAXAR | User Manual - Page 54
Apps To sync recently added music on your smartphone with your watch: 1. From Galaxy Wearable, tap the Home tab. 2. Tap Add content to your watch. 3. Tap Add tracks or tap Auto sync, music will be synced while the watch's battery power is at least fifteen percent. Gallery View and manage images - Samsung SM-R840NTKAXAR | User Manual - Page 55
Tap Dismiss on your smartphone or drag Stop to the right on the watch. Find your Watch You can also locate your watch by making it light up and make sounds from the c-t Galaxy Wearable app. 1. From Galaxy Wearable, tap the Home tab > Find My Watch. 2. Tap Start. 0 CD 3. Drag Stop to the right on the - Samsung SM-R840NTKAXAR | User Manual - Page 56
Apps Alarm Set an alarm to ring at a specific time. Create an alarm Create an alarm event. You can set one-time or recurring alarms. 1. From Apps, tap Alarm. 2. Tap Add and enter the time. 3. Tap Next, and select the days to repeat the alarm. 4. Tap Save when finished. Stop or snooze an alarm 0 - Samsung SM-R840NTKAXAR | User Manual - Page 57
Apps Remove cities To remove a City: 1. From World clock, tap ••• More options by the city you want to remove. 2. Tap Delete, and select the city again. 3. Tap Delete to confirm. Timer Set a countdown timer for up to 99 hours, 59 minutes, and 59 seconds. Set a timer Create an alarm event. You can - Samsung SM-R840NTKAXAR | User Manual - Page 58
Apps, tap PPT Controller. 2. Tap a device in the list to connect your watch. 3. Select your watch from the Bluetooth list on the device. 4. Follow the on-screen instructions to complete the connection. The watch and device will be connected by Bluetooth. To disconnect: ◌ From PPT Controller, tap - Samsung SM-R840NTKAXAR | User Manual - Page 59
Apps Presentation alerts You can set alerts on your watch to warn you when you are close to the end of your presentation time, or at various intervals during your presentation. Wrap-up alerts Receive a - Samsung SM-R840NTKAXAR | User Manual - Page 60
Settings Access Settings Display Sound and vibration Connections Device maintenance Accessibility Security and privacy Other settings 60 - Samsung SM-R840NTKAXAR | User Manual - Page 61
adjust the brightness of the display. 0 ◌ From Settings, tap Display and select an option: • Brightness: Manually adjust the brightness of the display. • Auto low brightness: Set the watch to automatically adjust the brightness depending on ambient light conditions. Set the screen timeout Set the - Samsung SM-R840NTKAXAR | User Manual - Page 62
screen. 0 ◌ From Settings, tap Display > Background style and select a background. Font style Customize the font style and size on your watch. 0 ◌ From Settings, tap Display > Font and choose an option to customize: • Font style: View and select a font. • Font size: Choose from small, medium, and - Samsung SM-R840NTKAXAR | User Manual - Page 63
ringtones or add your own. 0 1. From Settings, tap Sound and vibration. 2. Tap Ringtone. 3. Tap a ringtone to hear a preview, or tap Add from watch to use an audio file as a ringtone. 4. Tap OK to select it. Notification sound Choose from preset notification sounds. 0 1. From Settings, tap Sound and - Samsung SM-R840NTKAXAR | User Manual - Page 64
Settings Ringtone vibration Vibrate for calls. 0 1. From Settings, tap Sound and vibration. 2. Tap Ringtone vibration and select a vibration pattern. 3. Tap OK to confirm. Notification vibration Choose a vibration pattern for new notifications. 0 ◌ From Settings, tap Sound and vibration > - Samsung SM-R840NTKAXAR | User Manual - Page 65
dialing numbers on the Phone keypad. Vibration feedback Enable vibrations when the watch screen is tapped. 0 ◌ From Settings, tap Sound and vibration of networks and other devices. Bluetooth Use Bluetooth to connect the watch to a smartphone or an optional headset for playing music (headset not - Samsung SM-R840NTKAXAR | User Manual - Page 66
Settings, tap Connections > Wi-Fi. 2. Tap Auto, Always on, or Always off. Connect to a Wi-Fi network This feature is available when the watch is not connected to the smartphone through Bluetooth. 0 1. From Settings, tap Connections > Wi-Fi. 2. Tap Wi-Fi networks > Scan, and select a network from - Samsung SM-R840NTKAXAR | User Manual - Page 67
to sync the list of saved Wi-Fi networks with your watch. 1. From Galaxy Wearable, tap the Home tab. 2. Tap Sync phone settings the watch's touchscreen to the credit card reader. NOTE The payment services list may not include all available payment apps. Open with NFC You can select supported apps to - Samsung SM-R840NTKAXAR | User Manual - Page 68
memory. You can also automatically optimize your device's system resources. Date and time You can set the date and time manually. These options are only available when your watch is not connected to your mobile device. 0 ◌ From Settings, tap General > Date and time. • Automatic: Use the network to - Samsung SM-R840NTKAXAR | User Manual - Page 69
mode. 2. Tap Power saving, and then tap OK. To disable Power saving mode: ◌ From the Home screen, tap OFF, and then tap OK. Watch only mode Activate Watch only mode to save battery power by limiting the watch's functions to only showing the time. 0 1. From Settings, tap Battery > Power mode. 2. Tap - Samsung SM-R840NTKAXAR | User Manual - Page 70
to change the settings for that feature. Reset the Watch Reset settings to their factory default values and delete all data. 0 1. From Settings, tap General > Reset. 2. Tap Reset again to confirm. Location Some apps may require location services to be turned on for full functionality. 0 1. From - Samsung SM-R840NTKAXAR | User Manual - Page 71
settings | Text to speech Accessibility services are special features that make using the device easier for those with certain physical disabilities. For more information about Accessibility for Samsung products, please contact us at [email protected]. Screen Reader Use special controls - Samsung SM-R840NTKAXAR | User Manual - Page 72
settings You can configure Accessibility features. 0 ◌ From Settings, tap Accessibility > Advanced settings for the following options: • Vibration watch: The watch will use vibrations to communicate the time. • Notification reminder: Enable and customize notification reminders. • Two finger triple - Samsung SM-R840NTKAXAR | User Manual - Page 73
information about using the screen lock feature from Settings > Security and privacy > Lock, tap Help. Permission manager Apps might access features of your watch that you permit them to (like the sensors, microphone, or location) when they are running in the background, not just when you are using - Samsung SM-R840NTKAXAR | User Manual - Page 74
. TIP You can also enable touch sensitivity by holding down the Home key and tapping Touch sensitivity. Watch status Access information about the watch. 1. From Galaxy Wearable, tap the Home tab > About watch. 2. Tap an option below: • Battery: View battery life, usage information, and change your - Samsung SM-R840NTKAXAR | User Manual - Page 75
's software version and security status. • Battery: Check the watch's battery voltage and capacity. • Debugging: Activate or deactivate USB debugging mode when developing apps for the watch. TIP To view the user manual from the Galaxy Wearable app on your smartphone, tap the Home tab > Tips and user - Samsung SM-R840NTKAXAR | User Manual - Page 76
Learn more Videos youtube.com/samsungcare Tips samsung.com/us/support/tips Samsung Care samsung.com/us/support Talk to an agent Contact us on Facebook Messenger Find us on Facebook Follow us on Twitter 76 - Samsung SM-R840NTKAXAR | User Manual - Page 77
Communications Commission (FCC) approval, you can view the FCC certification on the watch by opening Settings > About watch > Device. Samsung Knox Samsung Knox is Samsung's security platform and is a mark for a Samsung device tested for security with enterprise use in mind. Additional licensing fee - Samsung SM-R840NTKAXAR | User Manual - Page 78
device. — Whenever your device gets wet, dry it thoroughly with a clean, soft cloth. Failure to rinse the device in fresh water and dry it as instructed may cause the device to suffer from operability or cosmetic issues. — Do not expose the device to water at high pressure. — If the device is - Samsung SM-R840NTKAXAR | User Manual - Page 79
Phone: 1-800-SAMSUNG (726-7864) Internet: samsung.com ©2020 Samsung Electronics America, Inc. Samsung, Samsung Galaxy, Samsung Health and Samsung Galaxy Watch are all trademarks of Samsung Electronics Co., when you upgrade the device. Please check with your service provider to verify qualifying
-
 1
1 -
 2
2 -
 3
3 -
 4
4 -
 5
5 -
 6
6 -
 7
7 -
8
-
9
-
10
-
11
-
12
-
13
-
14
-
15
-
16
-
17
-
18
-
19
-
20
-
21
-
22
-
23
-
24
-
25
-
26
-
27
-
28
-
29
-
30
-
31
-
32
-
33
-
34
-
35
-
36
-
37
-
38
-
39
-
40
-
41
-
42
-
43
-
44
-
45
-
46
-
47
-
48
-
49
-
50
-
51
-
52
-
53
-
54
-
55
-
56
-
57
-
58
-
59
-
60
-
61
-
62
-
63
-
64
-
65
-
66
-
67
-
68
-
69
-
70
-
71
-
72
-
73
-
74
-
75
-
76
-
77
-
78
-
79
 |
 |

SI\MSUNG
Galaxy
Watch3
User
manual