Sanyo FW32D06F Quick Start Guide
Sanyo FW32D06F Manual
 |
View all Sanyo FW32D06F manuals
Add to My Manuals
Save this manual to your list of manuals |
Sanyo FW32D06F manual content summary:
- Sanyo FW32D06F | Quick Start Guide - Page 1
-screen Menu d Selects Connected Devices e Turns the TV On and Off f Remote sanyo-av.com 1. What's in the Box ES Qué hay en la caja FR Contenu de la boîte M4 x 0.551" (14mm) *2EMN00416* AAA AAA Owner's Manual and Quick Start Guide libro de instrucciones e inicio rápido manuel d'instruction - Sanyo FW32D06F | Quick Start Guide - Page 2
2. Mount Base onto TV ES Acople la base al TV FR Montez le socle sur le Upgrade is, in most cases, handled by an Authorized Service person or in some circumstances the User may be asked If you need to Upgrade the Software, please visit : sanyo-av.com Nota para uso de Puerto USB La actualización
-
 1
1 -
 2
2
 |
 |
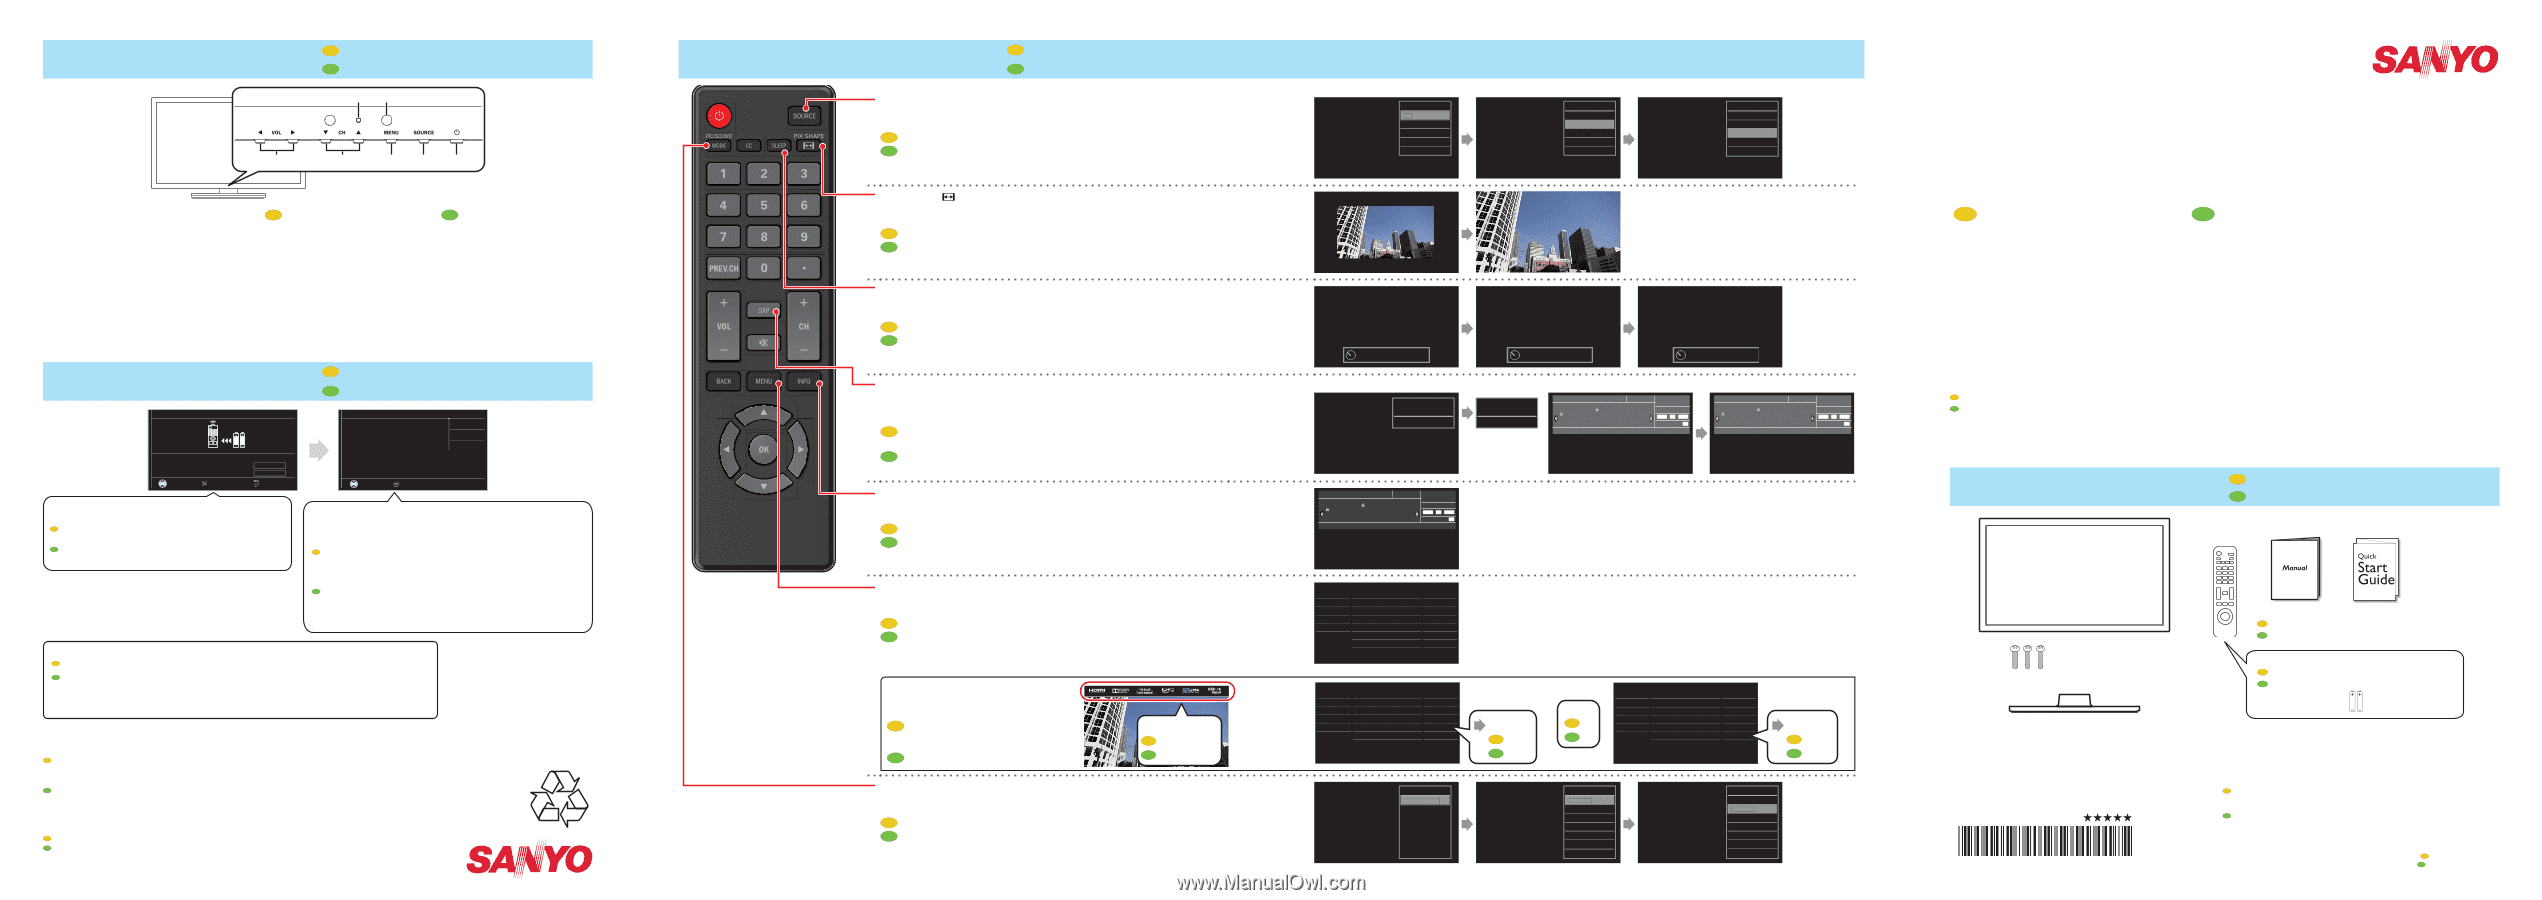
1.
What’s in the Box
ES
Qué hay en la caja
FR
Contenu de la boîte
Owner’s
Manual and Quick Start Guide
libro de instrucciones
e inicio rápido
manuel d’instruction
et démarrage rapide
M4 x 0.551”
(14mm)
a
b
c
d
e
g
f
ES
FR
a
Adjusts the Volume
Ajusta el volumen
Règler le volume
b
Selects a Channel
Selecciona un canal
Sélectionner une chaîne
c
Opens the Main On-screen Menu
Abre el menú principal en pantalla.
Ouvrir le menu principal à l’écran
d
Selects Connected Devices
Selecciona los dispositivos
conectados.
Sélectionner les appareils
connectés
e
Turns the TV On and Off
Enciende o Apaga la televisión
Allumer et Éteindre le téléviseur
f
Remote Control Sensor
Sensor de control remoto
Capteur de la télécommande
g
Power On/Standby Indicator
Indicador de encendido
Voyant d’alimentation
7.
Initial Setup
ES
Con
fi
guración inicial
FR
Première con
fi
guration
Initial setup
Please insert
batteries
Remote Control
Batteries
h
s
i
l
g
n
E
.
e
g
a
u
g
n
a
l
u
n
e
m
r
u
o
y
t
c
e
l
e
S
Seleccione el idioma para el menú.
Español
Sélectionnez la langue du menu.
Français
Select
OK
Skip
Initial setup
Location:
“Home” mode is optimized for efficient
energy usage for home use.
“Retail” mode is optimized for Store Demo
with fixed settings.
Retail
Home
Select
OK
Follow the On-screen Instructions to Complete
your TV Initial Setup.
Siga las instrucciones en pantalla para realizar la
con
fi
guración de la TV.
Suivez les instructions apparaissant à l’écran pour
terminer la con
fi
guration de votre téléviseur.
Selecting
Location
to
Retail
will display E-sticker
(Electronic POP) on the Screen. Refer to Step “8. Using
the Remote Control” and see “To turn Off the E-sticker
feature” on the next page.
Seleccionar
Ubicación
en
Tienda
. mostrará una etiqueta electrónica
(POP eléctrica) en la pantalla. Consulte “Para desactivar la
característica etiqueta electrónica” en El paso “8. Uso del mando a
distancia” en la siguiente página.
La sélection de
Région
à
Magasin
af
fi
chera la vignette
électronique (POP électrique) à l’écran. Reportez-vous à l’étape
« 8. Utilisez la télécommande » à la page suivante et voir
« Coupure de l’Étiquette E » .
Specifications are Subject to Change without Prior Notice.
Las especi
fi
caciones están sujetas a cambios sin previo aviso.
Les Spéci
fi
cations sont sujettes à modi
fi
cations sans préavis.
© 2016 Funai Electric Co., Ltd.
Need Help Connecting this LED TV? Call Us at
1 866 212 0436
¿Necesita ayuda para conectar esta TV LED? Llame al número
1 866 212 0436
Vous avez besoin d’aide pour connecter ce téléviseur LED? Appelez-nous au
1 866 212 0436
Model / Modelo / Modèle :
Serial / Serie / Série :
SOURCE
Selects Connected Devices.
ES
Selecciona los dispositivos conectados.
FR
Sélectionne les appareils connectés.
Source
TV
HDMI1
HDMI2
Video
PC
Source
TV
HDMI1
HDMI2
Video
PC
Source
TV
HDMI1
HDMI2
Video
PC
PIX SHAPE
Adjusts the Picture Size on the TV Screen.
ES
Ajusta el tamaño de imagen en la pantalla de televisión.
FR
Règle la taille de l’image sur l’écran du téléviseur.
SLEEP
Sets Sleep Timer.
ES
Ajusta el temporizador de apagado automático.
FR
Règle le minuteur de mise en veille.
Sleep timer
30min.
Sleep timer
60min.
Sleep timer
90min.
SAP
Selects Audio mode (MONO / STEREO / SAP) (Analog) / Audio Language
(Digital).
ES
Selecciona el modo de audio (MONO / ESTÉREO / SAP) (Analógico) / idioma de
audio (Digital).
FR
Sélectionne le mode audio (MONO / STÉRÉO / SAP) (Analogique) / la langue audio
(Numérique).
<Analog>
11
SAP
/ STEREO
11
SAP
/ MONO
<Digital>
11-1
English 1/3
Rating
1080i
16:9
HD
CC
A Day of Memories
Audio Imformation: English audio
Rating information:
US TV: TV-MA
US Movie: X
US TV: TV-14
US Movie: NC-17
US TV: TV-PC
US Movie: R
US TV: TV-G
US Movie: PG-13
KABC
11-1
Spanish 2/3
Rating
1080i
16:9
HD
CC
A Day of Memories
Audio Imformation: Spanish audio
Rating information:
US TV: TV-MA
US Movie: X
US TV: TV-14
US Movie: NC-17
US TV: TV-PC
US Movie: R
US TV: TV-G
US Movie: PG-13
KABC
INFO
Displays Information about the Current Program.
ES
Muestra información sobre el programa actual.
FR
Af
fi
che les renseignements sur l’émission en cours.
1080i
16:9
HD
CC
: TV-MA
: X
: TV-14
: NC-17
: TV-PC
: R
: TV-G
: PG-13
11.1
KABC
English audio
Rating
English
US movie
US movie
US movie
US movie
US TV
US TV
US TV
US TV
A Day of Memories
Audio information:
1/3
Rating information:
MENU
Opens the Main On-screen Menu.
ES
Abre el menú principal en pantalla.
FR
Ouvre le menu principal à l’écran.
Picture
Sound
Setup
Features
Language
USB
Auto picture
Backlight
Contrast
Brightness
Color
Tint
Advanced settings
Sharpness
18
Personal
50
30
30
0
2
To turn Off the E-sticker
feature
ES
Para desactivar la característica
etiqueta electrónica
FR
Coupure de l’Étiquette E
E-sticker
Etiqueta electrónica
Étiquette E
Picture
Sound
Setup
Features
Language
USB
Caption settings
Child lock
PC settings
HDMI-CEC
Location
E-sticker
Software upgrade
Retail
Top
Picture
Sound
Setup
Features
Language
USB
Caption settings
Child lock
PC settings
HDMI-CEC
Location
E-sticker
Software upgrade
Retail
Top
Home
Casa
Maison
Or
O
Ou
Off
Apagado
Arrêt
PIC/SOUND MODE
Optimizes Picture and Sound Quality.
ES
Optimiza la calidad de imagen y sonido.
FR
Optimise la qualité de l’image et du son.
Auto picture
Standard
Vivid
Sports
Movie
Game
Eco
Personal
Preset menu
Auto sound
Auto picture
Auto picture
Personal
Vivid
Sports
Movie
Game
Eco
Standard
8.
Using the Remote Control
ES
Uso del mando a distancia
FR
Utilisez la télécommande
6.
Control Panel
ES
Panel de control
FR
Panneau de commande
If you have any Questions or need a detailed Manual,
please visit our Support Website at
Si tiene cualquier pregunta o necesita un manual detallado, por
favor visite nuestro sitio web de soporte en
Si vous avez des questions ou avez besoin d’un manuel détaillé,
veuillez visiter notre site de soutien au
sanyo-av.com
Any liability related to SANYO products, including design and quality, is the sole responsibility of Funai Electric Co.,
Ltd. and Funai Corporation, Inc. Please contact Funai Corporation, Inc. for any questions or claims related to SANYO
products:sanyo-av.com
Cualquier responsabilidad relacionada con los productos SANYO, incluyendo el diseño y calidad, es responsabilidad
exclusiva de Funai Electric Co., Ltd. y Funai Corporation, Inc.Por favor póngase en contacto con Funai Corporation,
Inc. respecto a cualquier pregunta o reclamos relacionados con productos SANYO:sanyo-av.com
Toute responsabilité relative aux produits SANYO, incluant la conception et la qualité, relève uniquement de
Funai Electric Co., Ltd. et Funai Corporation, Inc.Veuillez contacter Funai Corporation, Inc. pour toute question
ou demande liées aux produits SANYO:sanyo-av.com
SANYO is a registered trademark of SANYO Electric Co., Ltd.
and is used by Funai Electric Co., Ltd. and Funai Corporation, Inc.
under license from SANYO Electric Co., Ltd.
SANYO es una marca comercial registrada de SANYO Electric Co., Ltd. y
es usada por Funai Electric Co., Ltd. y Funai Corporation, Inc. Bajo licencia
de SANYO Electric Co., Ltd.
SANYO est une marque déposé SANYO Electric Co., Ltd. et est utilisé par
Funai Electric Co., Ltd. et Funai Corporation, Inc. avec l’autorisation de
SANYO Electric Co., Ltd.
Printed in Thailand
Impreso en Tailandia
Imprimé en Thaïlande
*
2
E
M
N
0
0
4
1
6
*
Batteries not included, AAA 1.5V x 2 Required.
No se incluye pilas, AAA 1.5V x 2 Necesario.
Les piles n’ont pas inclus, l’AAA 1.5V x 2 Exigé.
AAA
AAA
Quick
Start Guide
ES
Guía de Inicio Rápido
FR
Guide de Démarrage Rapide