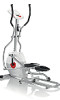
Schwinn A40 Elliptical Assembly Manual
Schwinn A40 Elliptical Manual
 |
View all Schwinn A40 Elliptical manuals
Add to My Manuals
Save this manual to your list of manuals |
Schwinn A40 Elliptical manual content summary:
- Schwinn A40 Elliptical | Assembly Manual - Page 1
003-3790.060112.D - Schwinn A40 Elliptical | Assembly Manual - Page 2
Inc. (www.NautilusInc.com) trademarks include NAUTILUS®, BOWFLEX®, SCHWINN® and UNIVERSAL® and respective logos. Other trademarks are the Manual. • Keep bystanders and children away from the product you are assembling at all times. • Do not connect power supply to the machine until instructed - Schwinn A40 Elliptical | Assembly Manual - Page 3
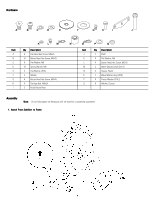
Specifications and Tools Parts Included #2 4mm 5mm 6mm (x2) Not Included (recommended) (recommended) A decal has been applied to all right ("R") and left ("L") parts to assist with assembly. Item Qty Description Item 1 1 Frame 9 2 1 Front Stabilizer 10 3 1 Water Bottle Holder 11 4 - Schwinn A40 Elliptical | Assembly Manual - Page 4
Hardware Item Qty Description A 6 Flat Head Hex Screw, M8x25 B 18 Button Head Hex Screw, M8x15 C 8 Flat Washer, M8 D 18 Spring Washer, M8 E 4 Flat Washer, Wide F 2 Washer G 6 Button Head Hex Screw, M6x15 H 4 Carriage Bolt, M6x25 I 2 Pedal Mount Plate Item Qty Description J 2 - Schwinn A40 Elliptical | Assembly Manual - Page 5
2. Attach Rail Assembly to Frame Assembly 3. Connect the Console Cable Note: The cables must be fully connected for the Console to operate. Do not crimp the Console Cable. 5 - Schwinn A40 Elliptical | Assembly Manual - Page 6
4. Attach Console Mast to Frame Assembly Note: Do not crimp the Console Cable. 5. Attach Lower Handlebar Arms to Frame Assembly Note: Only tighten this Hardware until secure. 6 - Schwinn A40 Elliptical | Assembly Manual - Page 7
6. Attach Upper Handlebar Arms to Frame Assembly 7. Attach Pedal Arms to Frame Assembly Note: Only tighten this Hardware until secure. 7 - Schwinn A40 Elliptical | Assembly Manual - Page 8
8. Attach Legs to Frame Assembly 9. Attach Pedals to Legs 8 - Schwinn A40 Elliptical | Assembly Manual - Page 9
10. Attach Console to Frame Assembly Note: Be sure the switch on the back of the Console is set to E. The cables must be fully connected for the Console to operate. Do not crimp the Console Cable. * Hardware is pre-installed on Console and not on the Hardware Card. 11. Attach Water Bottle Holder to - Schwinn A40 Elliptical | Assembly Manual - Page 10
and components are properly assembled. Do not use until the machine has been fully assembled and inspected for correct performance in accordance with the Owner's Manual. 10 - Schwinn A40 Elliptical | Assembly Manual - Page 11
the console and the wall outlet. NOTICE: If you use a power adapter for your elliptical, make sure that the cord stays clear of the path of the arms and pedals. and, if not installed and used in accordance with the instructions, may cause harmful interference to radio communications. However, there - Schwinn A40 Elliptical | Assembly Manual - Page 12
Adjustments Moving the Machine Do not move the machine without aid. Injury to you or damage to the machine can occur. 1. Remove the power cord (if equipped). 2. Use the back of the Rail Assembly to carefully lift the machine onto the transport rollers. 3. Push the machine into position. 4. Carefully - Schwinn A40 Elliptical | Assembly Manual - Page 13
13 - Schwinn A40 Elliptical | Assembly Manual - Page 14
14 - Schwinn A40 Elliptical | Assembly Manual - Page 15
15 - Schwinn A40 Elliptical | Assembly Manual - Page 16
Printed in China
-
 1
1 -
 2
2 -
 3
3 -
 4
4 -
 5
5 -
 6
6 -
 7
7 -
8
-
9
-
10
-
11
-
12
-
13
-
14
-
15
-
16
 |
 |

003-3790.0
60
11
2
.
D