Sharp KB-3300JS Installation Manual
Sharp KB-3300JS Manual
 |
View all Sharp KB-3300JS manuals
Add to My Manuals
Save this manual to your list of manuals |
Sharp KB-3300JS manual content summary:
- Sharp KB-3300JS | Installation Manual - Page 1
WITH MICROWAVE DRAWER 30" Freestanding Range INSTALLATION MANUAL SPECIAL WARNING INSTALLATION AND SERVICE MUST BE PERFORMED BY A QUALIFIED INSTALLER. IMPORTANT: SAVE THIS INSTALLATION MANUAL FOR LOCAL ELECTRICAL INSPECTOR'S USE. READ AND SAVE THESE INSTRUCTIONS FOR FUTURE REFERENCE. CLEARANCES - Sharp KB-3300JS | Installation Manual - Page 2
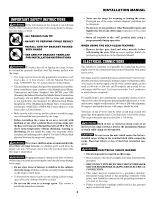
follow. These are listed in the Operation Manual. Read all and follow carefully. • Be sure your range is installed and grounded properly by a qualified installer or service technician. • To eliminate the need to reach over the cooktop, cabinet storage space above the cooktop should be avoided or - Sharp KB-3300JS | Installation Manual - Page 3
: • Remove broiler pan, food and other utensils before self-cleaning the oven. Wipe up excess spillage. Follow the precleaning instructions in the Operation Manual. ELECTRICAL CONNECTIONS To reduce the risk of tipping the range, it must be secured by properly installed Anti-Tip bracket packed with - Sharp KB-3300JS | Installation Manual - Page 4
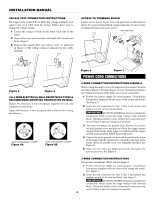
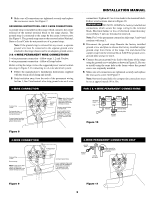
the range. 2 Remove the screw and rotate the switch plate 180˚ as indicated in the Figure 3. 3 Reinsert the switch plate and replace screw Figure 7 POWER CORD CONNECTIONS 4-WIRE CONNECTION INSTRUCTIONS-FIGURE 8 Before wiring the range, review the suggested power source location drawing in Figure - Sharp KB-3300JS | Installation Manual - Page 5
sure all connections are tightened securely and replace the rear access cover. See Figure 7. GROUNDING INSTRUCTIONS- ONLY 3-WIRE CONNECTIONS: A ground strap is installed on this range which connects the center terminal of the neutral terminal block to the range chassis. The ground strap is connected - Sharp KB-3300JS | Installation Manual - Page 6
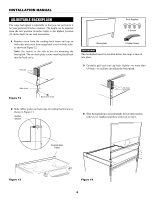
This backsplash must be installed before the range is moved into place. 3 Carefully pull each end cap back slightly-no more than 1/8-inch-to facilitate installing the backsplash. Parts Supplied Back cover Figure 12 Back cover1scBraewcksplash 4 Screws Cooktop Back Frame 1 Rubber Gasket No more - Sharp KB-3300JS | Installation Manual - Page 7
is placed on an open door or if a child climbs upon it. Serious injury might result from spilled hot liquids or from the range itself. If range is ever moved to a different location, the Anti-Tip bracket must also be moved and installed with the range. Instructions are provided for installation in - Sharp KB-3300JS | Installation Manual - Page 8
in your Operation Manual for our toll-free service number and address. Please call or write if you have inquiries about your range product and/or need to order parts. NOTE Please do not open or close the lower oven door for 30 seconds after plugged in. TINSEB390MRR0 SHARP ELECTRONICS CORPORATION
-
 1
1 -
 2
2 -
 3
3 -
 4
4 -
 5
5 -
 6
6 -
 7
7 -
8
 |
 |

1
INSTALLATION MANUAL
SPECIAL WARNING
INSTALLATION AND SERVICE MUST BE PERFORMED BY A QUALIFIED INSTALLER.
IMPORTANT: SAVE THIS INSTALLATION MANUAL FOR LOCAL ELECTRICAL
INSPECTOR’S USE.
READ AND SAVE THESE INSTRUCTIONS FOR FUTURE REFERENCE.
CLEARANCES & DIMENSIONS
For SAFETY CONSIDERATIONS do not install a range in any combustible cabinetry which is not in
accord with the stated clearances and dimensions on page 2. See Figures 1 and 2.
CLEARANCES AND DIMENSIONS
..............................
2
IMPORTANT NOTES
.............................................
3
IMPORTANT SAFETY INSTRUCTIONS
.........................
3
ELECTRICAL CONNECTIONS
................................
3-5
BACKSPLASH INSTALLATION
..................................
6
ANTI-TIP
.......................................................
7
MODEL AND SERIAL NUMBER
.................................
8
CARE, CLEANING AND MAINTENANCE
......................
8
E
LECTRIC
R
ANGE
W
ITH
M
ICROWAVE
D
RAWER
30” Freestanding Range