Sharp XG-MB70XA Setup Guide
Sharp XG-MB70XA Manual
 |
View all Sharp XG-MB70XA manuals
Add to My Manuals
Save this manual to your list of manuals |
Sharp XG-MB70XA manual content summary:
- Sharp XG-MB70XA | Setup Guide - Page 1
PROJECTOR MODEL XG-MB70X SETUP GUIDE Screen Size and Projection Distance 2 Connecting Pin Assignments 3 RS-232C Specifications and Commands .......... 4 Setting up the Projector Network Environment ... 6 1. Connecting the Projector [Q]Return to Main Menu 26 Troubleshooting 27 Dimensions 30 - Sharp XG-MB70XA | Setup Guide - Page 2
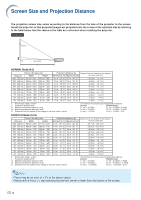
screen at the optimum size by referring to the table below. Use the values in the table as a reference when installing the projector. Side View Screen H Lens center L NORMAL Mode (4:3) Picture (Screen) size Diag. [χ] Width Height Projection distance [L] Distance from the bottom of the image - Sharp XG-MB70XA | Setup Guide - Page 3
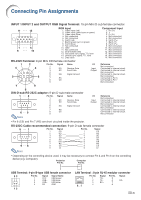
Not connected Connected to internal circuit Connected to internal circuit Not connected • Pin 8 (CS) and Pin 7 (RS) are short circuited inside the projector. RS-232C Cable recommended connection: 9-pin D-sub female connector 5 1 96 Pin No. 1 2 3 4 5 6 7 8 9 Signal CD RD SD ER SG DR RS CS CI - Sharp XG-MB70XA | Setup Guide - Page 4
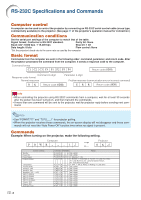
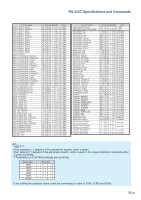
type, commercially available) to the projector. (See page 27 of the projector's operation manual for connection.) Communication conditions Set the Problem response (communication error or incorrect command) O K Return code (0DH) E R R Return code (0DH) Info • When controlling the projector - Sharp XG-MB70XA | Setup Guide - Page 5
Projector Name Setting 1 (First four characters)*2 Projector Name Setting 2 (Middle four characters)*2 Projector Name Setting 3 (Last four characters)*2 Projector _ _ _ 1 XG-MB70X P J N 1 * * * * OK or ERR P J N 2 * * * * OK or ERR P J N 3 * * * * OK or ERR P J N 0 _ _ _ 1 XG-MB70X Note • If an - Sharp XG-MB70XA | Setup Guide - Page 6
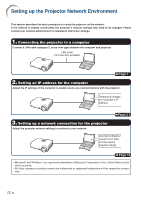
IP settings of the computer to enable one-to-one communications with the projector. Temporarily change the computer's IP address. 3. Setting up a network connection for the projector Adjust the projector network settings to conform to your network. Pages 8, 9 Use Internet Explorer (version 5.0 or - Sharp XG-MB70XA | Setup Guide - Page 7
network LAN cable (cross-over type, commercially available) ON 4 Turn on the Computer. ON Info Confirm that the LINK LED on the rear of the projector illuminates. If the LINK LED does not illuminate, check the following : • The LAN cable is properly connected. • The power switches of both the - Sharp XG-MB70XA | Setup Guide - Page 8
Setting up the Projector Network Environment 2. Setting an IP Address for the Computer The and Internet Con- nections", and click "Network Connections" in the new win- dow. 1 • This manual uses examples to explain the operations in Category View. If you are using Classic View, double-click " - Sharp XG-MB70XA | Setup Guide - Page 9
Setting up the Projector Network Environment 5 Click "Internet Protocol (TCP/IP)", and click the " and Subnet mask as you will be required to reset it later. 2 The factory default setting for the projector IP address is "192.168.150.2". Set an IP address temporarily as follows : IP Address : 192 - Sharp XG-MB70XA | Setup Guide - Page 10
Network Environment 3. Setting up a Network Connection for the Projector Settings for such items as the projector's IP address and subnet mask are compatible with the existing network. 1 Start Internet Explorer (version 5.0 or later) on the computer, and enter "http://192.168. - Sharp XG-MB70XA | Setup Guide - Page 11
. If "192.168.150.2" is not used in the network having an IP address of "192.168.150.XXX", you don't have to change the projector IP address. • For details about each setting, consult your network administrator. 5 Click the "Apply" button. 6 The set values appear. Confirm that the values are set - Sharp XG-MB70XA | Setup Guide - Page 12
to external equipment before starting the operation. (See pages 2128 of the projector's operation manual.) Complete the AC cord connection. (See page 29 of the projector's operation manual.) Note • When connecting the projector to the LAN, use a LAN cable (Category 5). When connecting the - Sharp XG-MB70XA | Setup Guide - Page 13
Error") will be displayed. Wait for a moment and then operate again. • For details about each item, refer to the projector's operation manual. On this screen, you can perform projector control. You can control the following items : • Power • Input Select • Volume • AV Mute [OFF] [ON] Note • If you - Sharp XG-MB70XA | Setup Guide - Page 14
be displayed. Wait for a moment and then operate again. • You cannot operate this page while the projector is warming up. • For details about each item, refer to the projector's operation manual. -14 On this screen, you can make settings relating to security. Items Description User Name Setting - Sharp XG-MB70XA | Setup Guide - Page 15
Remarks Setting an SMTP server address for e-mail transmission. e.g.1 : 192.168.150.253 e.g.2 : smtp123.sharp.co.jp * When using a domain name, make settings for the DNS server. Setting the projector's e-mail address. The e-mail address set here becomes Originator E-mail Address. Setting the sender - Sharp XG-MB70XA | Setup Guide - Page 16
Controlling the Projector via LAN Setting Error Items and Destination Addresses to which E-mail is to be Sent when an Error Occurs (Mail can input the characters below : a-z, A-Z, 0-9 You can input "@" just one time.) • For details about error items, refer to the projector's operation manual. -16 - Sharp XG-MB70XA | Setup Guide - Page 17
to a computer using RS-232C or Telnet, and open the SETUP MENU on the computer to carry out various settings for the projector. When Connecting Using RS-232C 1 Launch general purpose terminal emulator. 2 Input settings for the RS-232C port of the terminal emulator as follows. Baud Rate - Sharp XG-MB70XA | Setup Guide - Page 18
theWindows® desk- top and select "Run". 2 Enter"telnet 192.168.150.2"in the text box that opens up. (If the IP address of the projector is 192.168.150.2.) 3 Click the "OK" button. ▼SETUP MENU SETUP MENU [1]IP Address [2]Subnet Mask [3]Default Gateway [4]User Name [5]Password [6]RS-232C - Sharp XG-MB70XA | Setup Guide - Page 19
Addr (Factory default setting : Ac- cept All) For improved security, it is possible to set up to three IP addresses allowing connection to the projector. Set IP addresses can be cancelled using [9] Accept All IP Addr. (Page 25) [0] Search Port (Factory default setting : 5006) Setting the port number - Sharp XG-MB70XA | Setup Guide - Page 20
Name [A]Advanced Setup [D]Disconnect All [V]View All Setting [S]Save & Quit [Q]Quit Unchanged setup>v 1 Model Name : XG-MB70X Projector Name : XG-MB70X MAC Address : 08:00:1f:b1:b7:74 IP Address : 192.168.150.2 Subnet Mask : 255.255.255.0 Default Gateway : Not Used RS-232 Baud - Sharp XG-MB70XA | Setup Guide - Page 21
and quit menu. ▼SETUP MENU SETUP MENU [1]IP Address [2]Subnet Mask [3]Default Gateway [4]User Name [5]Password [6]RS-232C Baud Rate [7]Projector Name [A]Advanced Setup [D]Disconnect All [V]View All Setting [S]Save & Quit [Q]Quit Unchanged setup>s 1 All Connection will be disconnect - Sharp XG-MB70XA | Setup Guide - Page 22
Controlling the Projector Using RS-232C or Telnet The setting procedure for each item will be explained. For the mask after change (*). Note • If the values for IP Address, Subnet Mask or Gateway of the projector have been changed via Telnet, the computer for controlling cannot be connected to the - Sharp XG-MB70XA | Setup Guide - Page 23
Name) It is possible to assign a projector name. setup>7 1 Projector Name : XG-MB70X Please Enter : MY XG-MB70X 2 (change) -> MY XG-MB70X * 1 Enter "7" and press the "Enter" key. 2 Enter projector name. Display set projector name (*). Note • Projector name can be up to 12 characters - Sharp XG-MB70XA | Setup Guide - Page 24
([D]Disconnect All) It is possible to disconnect all the TCP/IP connections currently recognized by the projector. Even if the COM Redirect port is fixed in the Busy status due to a problem, it is possible to force the Ready status back by carrying out this disconnection. setup>d 1 Disconnect - Sharp XG-MB70XA | Setup Guide - Page 25
RS-232C or Telnet Carrying out Network Ping Test (ADVANCED[5]Network Ping Test) It is possible to confirm that a network connection between the projector and a computer etc. is working normally. advanced>5 1 Ping dest IP addr :192.168.150.1 Please Enter :192.168.150.152 2 (change) -> 192 - Sharp XG-MB70XA | Setup Guide - Page 26
RS-232C or Telnet Setting of Search Port (ADVANCED[0]Search Port) Sets the port number used when searching for the projector from the network. advanced>0 1 Please Enter Port Number for Search from Computer. Valid range : 1025 to 65535 Search Port : 5006 Please Enter : 5004 2 (change - Sharp XG-MB70XA | Setup Guide - Page 27
Troubleshooting Communication cannot be established with the projector When connecting the projector using serial-connection \ Check that the RS-232C terminal of the projector and a computer or the commercially available controller are connected correctly. \ Check that the RS-232C cable is a cross- - Sharp XG-MB70XA | Setup Guide - Page 28
Troubleshooting \ Take the following steps for checking the network settings for the computer. 1. Open a command prompt (MS-DOS Prompt). • In the case of Windows 98 or - Sharp XG-MB70XA | Setup Guide - Page 29
Troubleshooting \ Check if the "TCP/IP" protocol is operating correctly using the "PING" "XXX.XXX.XXX.XXX" should be entered with an IP address to be connected to, such as the projector. 3. When connecting normally, the display will be as follows. (The screen may be slightly different depending on - Sharp XG-MB70XA | Setup Guide - Page 30
Dimensions Units: inches (mm) Side View Rear View Top View Side View 1/16 (1.5) 11 7/64 (282) 1/8 (3.25) Front View Bottom View -30 35/64 (14) 13/64 (5) 3 1/2 (89) 12 13/64 (310) 2 11/64 (55.05) 1 29/32 (48.5) 2 3/16 (55.5) 5 3/32 (129.5) 3 15/16 (99.95) 5 3/32 (129.5) 1 9/64 1 7/32
-
 1
1 -
 2
2 -
 3
3 -
 4
4 -
 5
5 -
 6
6 -
 7
7 -
8
-
9
-
10
-
11
-
12
-
13
-
14
-
15
-
16
-
17
-
18
-
19
-
20
-
21
-
22
-
23
-
24
-
25
-
26
-
27
-
28
-
29
-
30
 |
 |

MODEL
XG-MB70X
MULTIMEDIA PROJECTOR
SETUP GUIDE
Screen Size and Projection Distance
................
2
Connecting Pin Assignments
.............................
3
RS-232C Specifications and Commands
..........
4
Setting up the Projector Network Environment ...
6
1. Connecting the Projector to a Computer
...........
7
2. Setting an IP Address for the Computer
............
8
3. Setting up a Network Connection for the Projector ..
10
Controlling the Projecter via LAN
....................
12
Controlling the Projector Using Internet Explorer
(Version 5.0 or later)
...................................
12
Confirming the Projector Status (Status)
.............
13
Controlling the Projector (Control)
.......................
13
Setting and Adjusting the Projector
(Setting & Adjustment)
...............................
14
Setting the Security (Network – Security)
............
14
Making General Settings for the Network
(Network – General)
..................................
15
Setting for Sending E-mail when an Error Occurs
(Mail – Originator)
.....................................
15
Setting Error Items and Destination Addresses
to which E-mail is to be Sent when an
Error Occurs (Mail – Recipient Setting)
.....
16
Setting the Projector Using RS-232C or Telnet
......
17
When Connecting Using RS-232C
.......................
17
When Connecting Using Telnet
............................
18
SETUP MENU (Main Menu)
.................................
19
ADVANCED SETUP MENU
.................................
19
Controlling the Projector Using RS-232C or Telnet
......
20
View Setting Detail List ([V]View All Setting)
.......
20
Set Items
...............................................................
20
Save Settings and Quit ([S]Save & Quit)
.............
21
Quit without Saving Settings ([Q]Quit Unchanged) ..
21
IP Address Setting ([1]IP Address)
.......................
22
Subnet Mask Setting ([2]Subnet Mask)
...............
22
Default Gateway Setting ([3]Default Gateway)
....
22
User Name Setting ([4]User Name)
.....................
23
Password Setting ([5]Password)
..........................
23
RS-232C Baud Rate Setting
([6]RS-232C Baud Rate)
............................
23
Projector Name Setting ([7]Projector Name)
.......
23
Disconnecting All Connections
([D]Disconnect All)
......................................
24
Entering ADVANCED SETUP MENU
([A]Advanced Setup)
..................................
24
Setting Auto Logout Time
(ADVANCED[1]Auto Logout Time)
.............
24
Data Port Setting (ADVANCED[2]Data Port)
.......
24
Carrying out Network Ping Test
(ADVANCED[5]Network Ping Test)
............
25
Setting of Accept IP Address (ADVANCED[6]Accept
IP Addr(1) – [8]Accept IP Addr(3))
.................
25
Accepting All IP Addresses
(ADVANCED[9]Accept All IP Addr)
............
25
Setting of Search Port
(ADVANCED[0]Search Port)
......................
26
Return to Default Settings
(ADVANCED[!]Restore Default Setting)
............
26
Return to Main Menu
(ADVANCED[Q]Return to Main Menu)
..............
26
Troubleshooting
.................................................
27
Dimensions
........................................................
30