Singer 9960 Quantum Stylist Instruction Manual
Singer 9960 Quantum Stylist Manual
 |
View all Singer 9960 Quantum Stylist manuals
Add to My Manuals
Save this manual to your list of manuals |
Singer 9960 Quantum Stylist manual content summary:
- Singer 9960 Quantum Stylist | Instruction Manual - Page 1
INSTRUCTION MANUAL 9960 - Singer 9960 Quantum Stylist | Instruction Manual - Page 2
area, such as threading needle, changing needle, threading bobbin, or changing presser foot. 15. Always unplug sewing machine from the electrical outlet when removing covers, lubricating, or when making any other user servicing adjustments mentioned in the instruction manual. 16. Handle the foot - Singer 9960 Quantum Stylist | Instruction Manual - Page 3
CONTENTS IMPORTANT SAFETY INSTRUCTIONS 2 MODEL 9960 4 FOR EUROPEAN AND SIMILAR TERRITORIES: ...... 4 MAIN PARTS 5 ACCESSORIES 6 DUST COVER 6 EXTENSION TABLE 7 a. REMOVING THE EXTENSION TABLE 7 b. OPENING THE ACCESSORY CASE 7 CHANGING THE PRESSER FOOT 7 A. Changing the presser foot 7 B. - Singer 9960 Quantum Stylist | Instruction Manual - Page 4
refer to this booklet for proper use and optimum service. To get the most out of your sewing machine, read the entire instruction manual before attempting to operate the machine. Then familiarize yourself with the machine by following the instruction manual page by page. To ensure that you are - Singer 9960 Quantum Stylist | Instruction Manual - Page 5
4.Face Plate 5.Thread Cutter Button 6.Speed Control Button 7.Needle Up-Down / Slow Button 8.Reverse Stitch Button 9.Start/Stop Button 10.Extension Table (Accessories) 11.Presser Foot Lifter 12.Forward / Reverse Adjusting Screw (underneath machine) 13.Foot Controller 14.Power Line Cord 15.Hand Wheel - Singer 9960 Quantum Stylist | Instruction Manual - Page 6
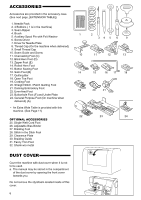
ACCESSORIES Accessories are provided in the accessory case. (See next page, [EXTENSION TABLE]) 7 1. Needle Pack 2. 4 Bobbins ( 1 is in the machine) 3. Seam Ripper 8 4. Brush 5. Auxiliary Spool Pin with Felt Washer 6. Screw Driver 1 2 34 5 6 9 7. Driver for Needle Plate 8. Thread Cap (On - Singer 9960 Quantum Stylist | Instruction Manual - Page 7
extension table and slide it to the left. To attach, insert to the right. b. OPENING THE ACCESSORY CASE Hook your finger to the left side of accessory case and pull toward you. CHANGING THE PRESSER FOOT The presser foot must be changed according to the stitch you sew cleaning the machine, you should - Singer 9960 Quantum Stylist | Instruction Manual - Page 8
- double knit, tricot, spandex, jersey Syn 50 - 80 Silk 50 Polyester 2001 11/80-14/90 green shank Needle for knit and synthetic fabric Sweatshirt, Swimwear, Double Knit, Polyester Sweater Knit 2001 green shank Leather 2032 Leather Use a Singer brand needle for better sewing results. 8 - Singer 9960 Quantum Stylist | Instruction Manual - Page 9
cord. 1. Place machine on stable table. 2. Connect the power line cord to the machine by inserting the 2- FOR UNITED STATES AND CANADA USERS: POLARIZED PLUG INFORMATION This appliance has a the foot controller, the faster the machine will sew. The machine will stop when foot controller is released - Singer 9960 Quantum Stylist | Instruction Manual - Page 10
PART A. START/STOP BUTTON The machine will start running when start/stop button is pressed and will stop when pressed the second time. The machine will rotate slowly at start of sewing. MONITOR LAMP Green Light "ON" Ready to sew or bobbin REVERSE STITCH BUTTON The machine will continue to sew in - Singer 9960 Quantum Stylist | Instruction Manual - Page 11
By turning the hand wheel, the needle will raise or lower. You should turn hand wheel toward you. EXTRA WIDE TABLE If you need wide sewing space, attach the extra wide table as below. Set the machine and extra wide table on the stable table. 1. Remove the extension table (See Page 7) 2. Stand up the - Singer 9960 Quantum Stylist | Instruction Manual - Page 12
CONTROL PANEL When you turn on the power, machine will select the straight stitch and indicate information of stitch on the L.C.D. A. L.C.D. DISPLAY Stitch information is indicated on this display. According to the pattern or mode, information will be changed. B. L.C.D. CONTRAST CONTROL The contrast - Singer 9960 Quantum Stylist | Instruction Manual - Page 13
and at the end of a stitch. (SEE PAGE 19) DECORATIVE & LETTER STITCH SEWING If this button is pressed at the end of a decorative stitch pattern, machine will stop automatically at the end of the stitch pattern and tie off the stitch with a locking stitch. M. TWIN NEEDLE BUTTON If you attach the twin - Singer 9960 Quantum Stylist | Instruction Manual - Page 14
. Leave small opening between cap and spool as illustration. C. WINDING THE BOBBIN 1.Hold thread in both hands and hook thread to the guide from front opening. 2.Bring thread towards the rear of the machine and pass through the thread guide from left to right. 3.Bring thread to the right and pass - Singer 9960 Quantum Stylist | Instruction Manual - Page 15
slips into notch (c) making sure that thread does not slip out of notch (a). 4. Pull thread out about 10 cm (4 inches). Replace the bobbin cover. Set the left tab into the hole in needle plate and push the right side of bobbin cover down until it clicks into place. NOTE: Use Singer bobbins only. 15 - Singer 9960 Quantum Stylist | Instruction Manual - Page 16
thread up and bring thread back down again from right to left along the slit. 6. Pull thread downward along the slit. 7. Draw thread through thread guide from right side opening. 8. Pass through needle eye from front to back. Refer to next page for instructions on how to use needle threader. 16 - Singer 9960 Quantum Stylist | Instruction Manual - Page 17
EYE CAUTION: To prevent accidents. 1. Keep fingers away from all moving parts. Special care is required around the needle. 2. Do not lower the threader lever while machine is operating. Note:The needle threader is used for needle sizes 11/80, 14/90, and 16/100. 1. Lower the presser foot. 2. Check - Singer 9960 Quantum Stylist | Instruction Manual - Page 18
STARTING TO SEW The machine will be set to sew straight stitch when power switch is turned on. CAUTION: To prevent accidents. While sewing, special care is required around the needle. Machine automatically feeds the fabric, do not pull or push the fabric. A. START AND END OF SEAM 1. Check the - Singer 9960 Quantum Stylist | Instruction Manual - Page 19
. This function can be used with all utility patterns. 1. Press the Tack button. Tack mark " " will appear on the L.C.D.. 2. Start to sew. Machine will sew tacking stitches automatically and then start to sew the selected pattern. 3. When you reach the end of seam, press the reverse button once - Singer 9960 Quantum Stylist | Instruction Manual - Page 20
with your hand when sewing over overlapped areas. G.WIDTH OF SEAM ALLOWANCE Guide lines on the needle plate indicate the distance from the center needle positon. To keep the width of seam allowance, guide fabric edge aligning this guide line. Seam Guide Use the seam guide to guide the fabric. Attach - Singer 9960 Quantum Stylist | Instruction Manual - Page 21
THREAD TENSION This machine adjusts the thread tension automatically when pattern is Stitch information mode). When another stitch pattern is selected, thread tension will return to pre-set. You can start sewing at this mode and change tension while sewing. A. Preset thread tension Upper and bobbin - Singer 9960 Quantum Stylist | Instruction Manual - Page 22
machine, straight stitch will be selected automatically. Select utility stitch pattern as follows. A. DIRECT STITCH PATTERN You can select basic utility stitch patterns directly by pressing the Direct Stitch indicate the information of selected pattern. (Stitch information mode) a. Stitch Number and - Singer 9960 Quantum Stylist | Instruction Manual - Page 23
button, machine will return to preset stitch width and length. When you press the return button (F1), LCD will indicate previous mode (Stitch Information mode). a. For straight stitch patterns (No. 1, 2, 3, 4, 6, 8), Stitch width buttons will change the needle position. To shift the needle to the - Singer 9960 Quantum Stylist | Instruction Manual - Page 24
USE EACH STITCH 01. Straight stitch center needle positon • For top stitching, zipper sewing etc. 02. Straight stitch left needle position • For top stitching etc. 03. Straight stitch with auto-reverse stitch center needle position 04. Straight stitch with auto-reverse stitch left needle position 05 - Singer 9960 Quantum Stylist | Instruction Manual - Page 25
the upper thread and bobbin thread loosely and start sewing. Machine will sew 4-5 stitches forward and sew 4-5 stitches backward and continue sewing forward. 3. When you reach the end of seam, press the reverse button. Machine will sew a few stitches backward and sew a few stitches forward and stop - Singer 9960 Quantum Stylist | Instruction Manual - Page 26
Place the fabric under the presser foot and lower it. 2. Hold the upper thread and bobbin thread loosely and start to sew. Machine will make one stitch only. 3. Pull the fabric required amount to the rear and sew one stitch. 4. Repeat this as many times as you need to finish the seam. 5. Raise the - Singer 9960 Quantum Stylist | Instruction Manual - Page 27
nylon sewing thread or very lightweight thread that matches the fabric on top. Place thread that contrasts to the color of the fabric on the bobbin. Set the upper tension to maximum. When you sew, bobbin thread will pull to the top and give the appearance of a traditional hand quilting stitch. 27 - Singer 9960 Quantum Stylist | Instruction Manual - Page 28
in front and back of needle while sewing. B. Overcast Stitching Used for easy to ravel and knit fabrics. Needle should fall on extreme edge of fabric. Refer to next page for overcasting. FREE ARM SEWING By simply removing the extension table, machine becomes a free arm machine making hard to reach - Singer 9960 Quantum Stylist | Instruction Manual - Page 29
Width 5.0-7.0) Overcasting Foot (C) Press fabric against the guide plate of the overcasting foot so that needle falls near the edge of seam. a. No. 9 (Width=5.0) is used for preventing raveling of fabrics. b-d. No. 15, 16, 30 can sew overcasting and regular stitches at the same time. Therefore it is - Singer 9960 Quantum Stylist | Instruction Manual - Page 30
) are on the protruding hem edge and the large zigzag stitches just catch one thread of the folded edge (g). Turn the screw so that the needle barely touches the folded edge of fabric. 4. Lower the presser foot and sew hem, guiding fabric evenly along the guide. 5. Turn the fabric over when you have - Singer 9960 Quantum Stylist | Instruction Manual - Page 31
could hit the presser foot and break. 1. Fix applique on fabric with fabric glue, fusible iron-on or basting stitches. 2. Sew edge of applique, while dropping the needle as close to the edge as possible. The straight stitch is almost entirely sinkstitched and a hand-made effect is obtained. a. When - Singer 9960 Quantum Stylist | Instruction Manual - Page 32
Position) Zipper Foot (E) CAUTION: To prevent accidents. Zipper foot should be used for sewing center needle position straight stitch No. 1 only. It is possible that needle could hit the presser foot and break when sewing other patterns. 1. Baste the zipper opening to the seam line. a: Straight - Singer 9960 Quantum Stylist | Instruction Manual - Page 33
Position) Zipper Foot (E) CAUTION: To prevent accidents. Zipper foot should be used for sewing center needle position straight stitch No. 1 only. It is possible that needle could hit the presser foot and break when sewing other patterns. 1. Baste the zipper opening to the seam line. a: Straight - Singer 9960 Quantum Stylist | Instruction Manual - Page 34
Density of buttonhole legs may be adjusted with stitch length control. 1. Mark position and length of the hole of buttonhole foot and bring upper and bobbin threads to the left. 4. Position fabric under presser lever completely. Note: Machine will not start to sew if buttonhole lever is not - Singer 9960 Quantum Stylist | Instruction Manual - Page 35
the thread cutter button and raise the presser foot to remove the fabric. b. To sew over same buttonhole, raise presser foot to return to original position. 9. Cut center of buttonhole being careful not to cut stitches on either side. Use a pin as a stopper. CAUTION: To prevent accidents. When using - Singer 9960 Quantum Stylist | Instruction Manual - Page 36
. a. Right side of fabric b. Wrong side of patch 2. Lower the buttonhole lever and sew buttonhole. (See previous page) Machine will sew the buttonhole in the order as shown and stop automatically after sewing. 3. Press the thread cutter button and raise the presser foot to remove the fabric - Singer 9960 Quantum Stylist | Instruction Manual - Page 37
. 101 Eyelet Satin Foot (B) You can choose 3 sizes of eyelets by changing the stitch length. 1. Place the fabric under the presser foot and lower the presser foot. Start the machine. Machine will sew the eyelet and stop automatically. 2. Press the thread cutter button and raise the presser - Singer 9960 Quantum Stylist | Instruction Manual - Page 38
and bobbin threads to the left. 3. Position fabric under presser foot so that the starting point comes depth side. Lower the foot. b. Sewing bar-tack upper thread lightly and start the machine. 6. Machine will sew bar-tack or darning stitch as shown. Machine will stop automatically when the pattern - Singer 9960 Quantum Stylist | Instruction Manual - Page 39
should have a thread shank to make them stand away from the fabric. Insert a straight pin or sewing machine needle under the center slit of the foot from the front. Sew over the pin or needle. Pull thread to back of button and wind around stitches to form a firm shank. Tie thread ends securely. 39 - Singer 9960 Quantum Stylist | Instruction Manual - Page 40
Insert needle into the fold by rotating the hand wheel toward you, and lower the presser foot. Sew several stitches and stitch width so that the stitches are just cover the cord. Lower the foot and sew slowly, guiding the cord. B. TRIPLE CORDING Set the stitch pattern to No. 12 and set the stitch - Singer 9960 Quantum Stylist | Instruction Manual - Page 41
stitches and fabric to feed freely under foot. No. 19-100 Satin foot (B) To tailor the continuous decorative stitch SEWING THIN FABRICS When sewing thin fabrics, it is suggested that you use stabilizer on the backside of the fabric. USING THE EVEN-FEED FOOT The Even-feed foot accessory the needle - Singer 9960 Quantum Stylist | Instruction Manual - Page 42
Operate machine, moving fabric by hand forward and backward with an even motion, stitching in embroidery hoop. Note: Embroidery hoop is not included with this machine. 3. Set embroidery hoop under needle and lower the foot. 4. Start the machine at medium speed, guiding hoop carefully so needle - Singer 9960 Quantum Stylist | Instruction Manual - Page 43
. CAUTION: To prevent accidents. a. Use only needle designed for this machine (Singer Style 2025). Other needles may break. b. The needle threader cannot be used. Thread each needle eye by hand. 1. Remove the single needle and insert twin needle. 2. Thread the first thread as usual, following - Singer 9960 Quantum Stylist | Instruction Manual - Page 44
you can check them by pressing the cursor buttons. (See next page) NOTE: Machine can memorize a maximum of 60 patterns. You can combine the tack stitch by pressing the tack button. This is used for sewing a single combination of patterns. (See next page 48) B. SHIFTING THE CURSOR Additional patterns - Singer 9960 Quantum Stylist | Instruction Manual - Page 45
the length of the string increases, patterns will disappear from sight. You can check patterns by shifting cursor to the left. D. INSERTING PATTERN D 1. Machine will insert a pattern to the left of the highlighted letter or pattern. 2. Using the cursor buttons, move the cursor to highlight the - Singer 9960 Quantum Stylist | Instruction Manual - Page 46
a-d. 4. After you have completed the editing, press the return button (F1) or EDIT button. Machine will return to selecting mode. Note: Letter stitches cannot change settings. (except for thread tension) a. Mirror / Reverse stitch Press the function button (F2) directly under mirror/reverse icon - Singer 9960 Quantum Stylist | Instruction Manual - Page 47
RECALL THE SELECTED PATTERNS If you change the pattern to utility stitch, machine will retain the combination of patterns until the machine is turned off. To recall these patterns, press the decorative & letter stitch button. Machine will recall the selected patterns. (Thread tension will return to - Singer 9960 Quantum Stylist | Instruction Manual - Page 48
tack button at selecting mode. When you combined the tack stitch or letter stitch at the end of pattern, machine will stop automatically after sewing selected patterns. b. Repeat sewing The pattern combination will sew repeatedly without combining the tack stitch at the end of the pattern sequence - Singer 9960 Quantum Stylist | Instruction Manual - Page 49
ADJUSTING THE FORWARD AND REVERSE STITCHES Depending on the type of fabric you sew, it may be necessary to adjust the forward and reverse stitches. The adjustment is needed when the decorative or letter stitch is distorted. Turn screw which is located bottom of the machine in either direction as may - Singer 9960 Quantum Stylist | Instruction Manual - Page 50
operation of the machine. Check regularly and clean the stitching mechanism when need. A. Bobbin Holder Remove the bobbin cover and bobbin. Clean the bobbin holder with a brush. B. Hook Race and Feed Dog 1. Remove the needle, presser foot and holder. Remove the bobbin cover and bobbin. Remove the - Singer 9960 Quantum Stylist | Instruction Manual - Page 51
tension. 21 Forward and reverse stitch is not balanced. Adjust the forward and reverse 49 Threader does not thread needle eye Needle is not raised. Needle inserted incorrectly. Bent needle. Raise the needle. 10 Re-insert needle. 8 Insert new needle. 8 Machine does Feed dogs are lowered - Singer 9960 Quantum Stylist | Instruction Manual - Page 52
on LCD 1. Winding the bobbin. 1 2. Lower the buttonhole lever. 2 3. After sewing buttonhole, raise the presser foot 3 lifter and set the frame of buttonhole foot to starting position. 4. Release the foot controller pedal. 4 5. Lower the presser foot. 5 6. Machine cannot memory any more - Singer 9960 Quantum Stylist | Instruction Manual - Page 53
53 - Singer 9960 Quantum Stylist | Instruction Manual - Page 54
54 - Singer 9960 Quantum Stylist | Instruction Manual - Page 55
55 - Singer 9960 Quantum Stylist | Instruction Manual - Page 56
9960English 34108 B0
-
 1
1 -
 2
2 -
 3
3 -
 4
4 -
 5
5 -
 6
6 -
 7
7 -
8
-
9
-
10
-
11
-
12
-
13
-
14
-
15
-
16
-
17
-
18
-
19
-
20
-
21
-
22
-
23
-
24
-
25
-
26
-
27
-
28
-
29
-
30
-
31
-
32
-
33
-
34
-
35
-
36
-
37
-
38
-
39
-
40
-
41
-
42
-
43
-
44
-
45
-
46
-
47
-
48
-
49
-
50
-
51
-
52
-
53
-
54
-
55
-
56
 |
 |

INSTRUCTION MANUAL
9960