Sony CDX-GT350MP Operating Instructions
Sony CDX-GT350MP - Fm/am Compact Disc Player Manual
 |
UPC - 027242795969
View all Sony CDX-GT350MP manuals
Add to My Manuals
Save this manual to your list of manuals |
Sony CDX-GT350MP manual content summary:
- Sony CDX-GT350MP | Operating Instructions - Page 1
(1) FM/AM Compact Disc Player Operating Instructions US Mode d'emploi FR Owner's Record The model and serial numbers are located on the bottom of the unit. Record these numbers in the spaces provided below. Refer to these numbers whenever you call upon your Sony dealer regarding this product - Sony CDX-GT350MP | Operating Instructions - Page 2
installation. This equipment generates, uses, and can radiate radio frequency energy and, if not installed and used in accordance with the instructions, may cause harmful interference to radio and Thomson. Warning if your car's ignition has no ACC position Be sure to set the Auto Off function (page - Sony CDX-GT350MP | Operating Instructions - Page 3
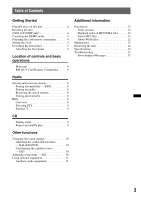
unit 4 Resetting the unit (CDX-GT350MP only 4 Canceling the DEMO mode 4 Preparing the card remote commander 4 Setting the clock 4 Detaching the front panel 5 Attaching the front panel 5 Location of controls and basic operations Main unit 6 RM-X151 Card Remote Commander 6 Radio Storing and - Sony CDX-GT350MP | Operating Instructions - Page 4
the car battery or changing the connections, you must reset the unit. Detach the front panel (page 5) and press the RESET button (page 6) with a pointed object, such as a ball-point pen. Note Pressing the RESET button will erase the clock setting and some stored contents. Canceling the DEMO mode You - Sony CDX-GT350MP | Operating Instructions - Page 5
pressure on the front panel and display window. • Do not subject the front panel to heat/high temperature or moisture. Avoid leaving it in a parked car or on a dashboard/rear tray. Note Do not put anything on the inner surface of the front panel. 5 - Sony CDX-GT350MP | Operating Instructions - Page 6
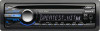
and hold); reverse/fastforward a track (press and hold). B EQ3 (equalizer) button page 10 To select an equalizer type (XPLOD, VOCAL, EDGE, CRUISE, SPACE, GRAVITY, CUSTOM or OFF). C SOURCE/OFF button*1 Press to turn on the power/change the source (Radio/CD/AUX). Press for 1 second to turn off the - Sony CDX-GT350MP | Operating Instructions - Page 7
PTY in RDS. PTY button (CDX-GT250MP) page 8 To select PTY in RDS. M RESET button (located behind the front panel) (CDX-GT350MP only) page 4 N Number buttons Radio: To receive stored stations (press); store stations (press and hold). CD: (1)/(2): ALBUM -/+ (during MP3/WMA playback) To skip albums - Sony CDX-GT350MP | Operating Instructions - Page 8
adjust to the desired frequency (manual tuning). RDS Overview FM stations with Radio Data System (RDS) service send inaudible digital information along with the regular radio program signal. Display items Example: CDX-GT350MP Program service name, Clock, Frequency*, Preset number * While receiving - Sony CDX-GT350MP | Operating Instructions - Page 9
the time set by the CT function and the actual time. CD Display items Example: CDX-GT350MP A B A Source (CDX-GT350MP only) B Track name*1, Disc/artist name*1, Artist name*1, Album number*2, Album name*1, Track number/Elapsed playing time, Clock *1 The information of a CD TEXT, MP3/WMA is - Sony CDX-GT350MP | Operating Instructions - Page 10
button. The setup display appears. 2 Rotate the control dial until the desired item appears, then press it. 3 Rotate the control dial to select the setting, then press it.* The setting is complete. 4 Press (BACK). The display returns to normal reception/play mode. * For CLOCK-ADJ and BTM settings - Sony CDX-GT350MP | Operating Instructions - Page 11
is set to "SUB-OUT." Using optional equipment Auxiliary audio equipment By connecting an optional portable audio device to the AUX input jack (stereo mini audio device at a moderate volume. 4 Set your usual listening volume on the unit. 5 Press the select button repeatedly until "AUX" appears, and - Sony CDX-GT350MP | Operating Instructions - Page 12
playing time may not display accurately. * only for 64 kbps Note Playback of the following WMA files is not supported. - lossless compression - copyright-protected If you have any questions or problems concerning your unit that are not covered in this manual, consult your nearest Sony dealer. - Sony CDX-GT350MP | Operating Instructions - Page 13
approximately 1 year. (The service life may be shorter, a good contact. • Be sure to observe the correct polarity when installing the the connectors may be damaged. Main unit Back of the front panel Notes • For safety, If the fuse blows, check the power connection and replace the fuse. If the - Sony CDX-GT350MP | Operating Instructions - Page 14
) Sub/Rear switchable Power antenna (aerial) relay control terminal Power amplifier control terminal Inputs: BUS control input terminal (CDX-GT350MP only) BUS audio input terminal (CDX-GT350MP only) Remote controller input terminal Antenna (aerial) input terminal AUX input jack (stereo mini jack) - Sony CDX-GT350MP | Operating Instructions - Page 15
switched. The leads are not matched correctly with the car's accessory power connector. During playback or reception, demonstration mode starts. If no operation is performed for 5 minutes with "DEMO-ON" set, demonstration mode starts. t Set "DEMO-OFF" (page 10). The display disappears from/does not - Sony CDX-GT350MP | Operating Instructions - Page 16
. • Installation is not correct. t Install the unit at an angle of less than 45° in a sturdy part of the car. • Defective or dirty disc. The operation buttons do not function.*1 The disc will not eject. Press the RESET button (page 4).*1 Press Z (eject) (page 6).*2 *1 CDX-GT350MP only *2 CDX-GT250MP - Sony CDX-GT350MP | Operating Instructions - Page 17
been inserted. • The disc cannot play due to a problem. t Insert another disc. • Press Z (eject) to remove the disc. FAILURE (Illuminates until any button is pressed.) The connection of speakers/amplifiers is incorrect. t See the installation/connections manual of this model to check the connection - Sony CDX-GT350MP | Operating Instructions - Page 18
reportez-vous au manuel d'installation et de raccordement fourni. ATTENTION L'utilisation d'instruments optiques avec ce produit augmente les risques pour les yeux. CDX-GT350MP uniquement HD RadioTM est une marque propriétaire d'iBiquity Digital Corp. CDX-GT350MP uniquement Le logo « SAT Radio Ready - Sony CDX-GT350MP | Operating Instructions - Page 19
-GT350MP uniquement 4 Annulation du mode DEMO 4 Préparation de la mini-télécommande 4 Réglage de l'horloge 4 Retrait de la façade 5 Installation de la façade 5 Emplacement des commandes et opérations de base Appareil principal 6 Mini-télécommande RM-X151 6 Radio Mémorisation et réception des - Sony CDX-GT350MP | Operating Instructions - Page 20
BACK). La fenêtre d'affichage retourne au mode de réception/lecture normal. Préparation de la minitélécommande Retirez la feuille de protection. CD-DA MP3 WMA Réinitialisation de l'appareil (CDX RESET remet l'heure à zéro et efface certaines informations mémorisées. Annulation du mode DEMO CLOCK- - Sony CDX-GT350MP | Operating Instructions - Page 21
é est utilisé. 1 Appuyez sur la touche (SOURCE/OFF) et maintenez-la enfoncée. L'appareil s'éteint. 2 Appuyez sur , puis sortez la façade en tirant vers vous. Installation de la façade Insérez la partie A de la façade dans la partie B de l'appareil, tel qu'illustré, puis poussez sur le côté gauche - Sony CDX-GT350MP | Operating Instructions - Page 22
principal Mini-télécommande RM-X151 6 Cette section contient les instructions relatives à l'emplacement des commandes et aux opérations de (XPLOD, VOCAL, EDGE, CRUISE, SPACE, GRAVITY, CUSTOM ou OFF). C Touche SOURCE/OFF*1 Appuyez pour mettre l'appareil en marche/ changer la source (Radio/CD/ - Sony CDX-GT350MP | Operating Instructions - Page 23
J Touche (BACK) Permet de retourner à l'écran précédent. K Touche MODE*1 page 8 Permet de sélectionner la bande radio (FM/ AM). L Touche PTY/CAT*2 (CDX-GT350MP) page 9 Permet de sélectionner PTY en mode RDS. Touche PTY (CDX-GT250MP) page 9 Permet de sélectionner PTY en mode RDS. M Touche RESET (situ - Sony CDX-GT350MP | Operating Instructions - Page 24
Pour changer de bande, appuyez plusieurs fois sur (MODE). Vous pouvez sélectionner FM1, FM2, FM3, AM1 lorsque le réglage est mémorisé. Mémorisation manuelle 1 Lorsque vous captez la station que vous d'émission de radio ordinaire. Éléments d'affichage Exemple : CDX-GT350MP Nom du service de l'émission - Sony CDX-GT350MP | Operating Instructions - Page 25
service de données PTY n'est disponible. • Il se peut que l'émission de radio l'heure réelle. A B A Source (CDX-GT350MP uniquement) B Nom de plage*1, nom Les informations d'un CD TEXT, MP3/WMA sont affichées MP3/WMA. Pour retourner au mode de lecture normal, sélectionnez « OFF » ou « SHUF OFF ». 9 - Sony CDX-GT350MP | Operating Instructions - Page 26
à +10 dB. Exemple : CDX-GT350MP Répétez les étapes 2 mode de réception/ lecture normal. Conseil D'autres types d'égaliseurs peuvent aussi être réglés. Réglage des paramètres de configuration - SET BACK). La fenêtre d'affichage retourne au mode de réception/lecture normal. * Pour les réglages CLOCK - Sony CDX-GT350MP | Operating Instructions - Page 27
- « SA » : pour afficher les motifs animés et l'analyseur de spectre. - « OFF » : pour désactiver l'affichage animé. CDX-GT250MP - « ON » : pour afficher les motifs animés. - « OFF » : pour désactiver l'affichage animé. AUTO SCR (Défilement automatique) Permet de faire défiler automatiquement - Sony CDX-GT350MP | Operating Instructions - Page 28
lus sur cet appareil - CD-R/CD-RW dont la qualité d'enregistrement est mauvaise. - CD-R/CD-RW enregistrés avec un appareil d'enregistrement non compatible. - CD-R/CD-RW n'ayant pas été finalisés correctement. - CD-R/CD-RW autres que ceux enregistrés au format CD audio ou MP3 conformément à la norme - Sony CDX-GT350MP | Operating Instructions - Page 29
lecture d'un fichier MP3 à haut débit Elle permet la compression des données de CD audio à environ 1/22e* de leur taille d' dans ce mode d'emploi, contactez votre détaillant Sony. Entretien Remplacement de l'installation de la pile. • Ne tenez pas la pile avec des pinces métalliques, car cela - Sony CDX-GT350MP | Operating Instructions - Page 30
support. Caractéristiques techniques Radio CD Rapport CDX-GT350MP uniquement) Borne d'entrée de télécommande Borne d'entrée de l'antenne Prise d'entrée AUX (mini-prise stéréo) Commandes de tonalité : Graves : ±10 dB à 60 Hz (XPLOD) Médiums : ±10 dB à 1 kHz (XPLOD) Aigus : ±10 dB à 10 kHz (XPLOD - Sony CDX-GT350MP | Operating Instructions - Page 31
CDX-GT350MP Câble BUS (fourni avec un câble à broche RCA) : RC-61 (1 m), RC-62 (2 m) Adaptateur d'interface pour iPod : XA-120IP Récepteur HD Radio effacé. • La touche RESET a été enfoncée.*1 t DEMO-ON » est sélectionné, l'écran du mode de démonstration apparaît. t Sélectionnez le réglage « DEMO - Sony CDX-GT350MP | Operating Instructions - Page 32
endroit stable du véhicule. • Le disque est défectueux ou sale. Les touches de commande ne fonctionnent pas.*1 Impossible d'éjecter le disque. Appuyez sur la touche RESET (page 4).*1 Appuyez sur Z (éjecter) (page 6).*2 *1 CDX-GT350MP uniquement *2 CDX-GT250MP uniquement 16 - Sony CDX-GT350MP | Operating Instructions - Page 33
manuel d'installation/ raccordement de ce modèle pour vérifier les raccordements. FAILURE (Reste allumé pendant 1 seconde environ.) (CDX-GT350MP uniquement) La mémorisation d'une station radio , contactez votre détaillant Sony le plus proche. PUSH EJT (CDX-GT250MP uniquement) Impossible d'éjecter - Sony CDX-GT350MP | Operating Instructions - Page 34
- Sony CDX-GT350MP | Operating Instructions - Page 35
- Sony CDX-GT350MP | Operating Instructions - Page 36
/problems regarding this product, try the following: 1 Read Troubleshooting in these Operating Instructions. 2 Reset the unit. (Only for models with a RESET button.) Note: Stored data may be erased. 3 Please contact (U.S.A. only); Call 1-800-222-7669 URL http://www.SONY.com http://www.sony.net/ Sony
-
 1
1 -
 2
2 -
 3
3 -
 4
4 -
 5
5 -
 6
6 -
 7
7 -
8
-
9
-
10
-
11
-
12
-
13
-
14
-
15
-
16
-
17
-
18
-
19
-
20
-
21
-
22
-
23
-
24
-
25
-
26
-
27
-
28
-
29
-
30
-
31
-
32
-
33
-
34
-
35
-
36
 |
 |

Operating Instructions
Mode d’emploi
Owner’s Record
The model and serial numbers are located on the bottom of the unit.
Record these numbers in the spaces provided below.
Refer to these numbers whenever you call upon your Sony dealer regarding this product.
Model No.
Serial No.
To cancel the demonstration (DEMO) display, see page 4.
Pour annuler l’affichage de démonstration (DEMO), reportez-vous à la page 4.
FR
US
4-191-888-
21
(1)
CDX-GT350MP
CDX-GT250MP
©2010 Sony Corporation
FM/AM
Compact Disc Player