Sony CDX-GT650UI Operating Instructions
Sony CDX-GT650UI - Fm/am Compact Disc Player Manual
 |
UPC - 027242796003
View all Sony CDX-GT650UI manuals
Add to My Manuals
Save this manual to your list of manuals |
Sony CDX-GT650UI manual content summary:
- Sony CDX-GT650UI | Operating Instructions - Page 1
Player Operating Instructions US Mode d'emploi FR Owner's Record The model and serial numbers are located on the bottom of the unit. Record the serial number in the space provided below. Refer to these numbers whenever you call upon your Sony dealer regarding this product. Model No. CDX-GT650UI - Sony CDX-GT650UI | Operating Instructions - Page 2
, INCLUDING IN THE PROVINCE OF QUEBEC. POUR LES CONSOMMATEURS AUX ÉTATS-UNIS. NON APPLICABLE AU CANADA, Y COMPRIS LA PROVINCE DE QUÉBEC. This equipment has been tested and found to comply with the limits for a Class B digital device, pursuant to Part 15 of the FCC Rules. These limits are designed - Sony CDX-GT650UI | Operating Instructions - Page 3
prohibited without a license from Microsoft or an authorized Microsoft subsidiary. iPhone, iPod, iPod classic, iPod nano, and iPod touch are Layer-3 audio coding technology and patents licensed from Fraunhofer IIS and Thomson. Warning if your car's ignition has no ACC position Be sure to set the - Sony CDX-GT650UI | Operating Instructions - Page 4
12 Setting CT 12 CD Playing a disc 12 Display items 12 Repeat and shuffle play 12 USB devices Playing back a USB device 13 Display items 13 Repeat and shuffle play 14 Enjoying music according to your mood - SensMe 14 Before using the SensMe™ function . . . . . 14 Installing "SensMe™ Setup - Sony CDX-GT650UI | Operating Instructions - Page 5
information on this product, please visit the web site below: http://esupport.sony.com http://www.sony.com/mobileAV Provides information on: • Models and manufacturers of compatible digital audio players • Supported MP3/WMA/AAC files • System requirements for the software in the supplied CD-ROM 5 - Sony CDX-GT650UI | Operating Instructions - Page 6
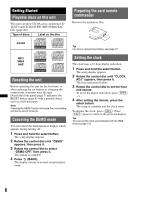
the card remote commander Remove the insulation film. CD-DA Tip For how to replace the battery, see page 27. MP3 WMA AAC Resetting the unit Before operating the unit for the first time, or after replacing the car battery or changing the connections, you must reset the unit. Detach the front panel - Sony CDX-GT650UI | Operating Instructions - Page 7
put excessive pressure on the front panel and display window. • Do not subject the front panel to heat/high temperature or moisture. Avoid leaving it in a parked car or on a dashboard/rear tray. • Do not detach the front panel during playback of the USB device, otherwise USB data may be damaged. 7 - Sony CDX-GT650UI | Operating Instructions - Page 8
To skip tracks (press); reverse/fastforward a track (press and hold). B SOURCE/OFF button*1 Press to turn on the power/change the source (Radio/CD/USB/SensMe™*2/AUX). Press for 1 second to turn off the power. Press for more than 2 seconds to turn off the power and the display disappears. C (BROWSE - Sony CDX-GT650UI | Operating Instructions - Page 9
*3 button page 12 To select PTY in RDS. M Number buttons Radio: To receive stored stations (press); store stations (press and hold). CD/USB/SensMe™: (1)/(2): ALBUM -/+ (during MP3/WMA/ AAC playback) To skip albums/change SensMe™ channels (press); skip albums continuously (press and hold). (3): REP - Sony CDX-GT650UI | Operating Instructions - Page 10
A OFF button To turn off the power; stop the source. B SOURCE button*1 To turn on the power; change the source (Radio/CD/USB/SensMe™*2/AUX). C buttons To control Radio/CD/USB/SensMe™, the same as (SEEK) -/+ on the unit. Setup, sound setting, etc., can be operated by < ,. D DSPL (display) button To - Sony CDX-GT650UI | Operating Instructions - Page 11
desired frequency (manual tuning). RDS Overview FM stations with Radio Data System (RDS) service send inaudible digital information along with the regular radio program signal. Display items A Radio band, Function B Program service name, Clock, Frequency*, Preset number * While receiving the RDS - Sony CDX-GT650UI | Operating Instructions - Page 12
time, Clock *1 The information of a CD TEXT, MP3/WMA/AAC is displayed. *2 Album number is displayed only when the album is changed. To change display items B, press (DSPL). Tip Displayed items may differ depending on the disc type, recording format and settings. Repeat and shuffle play 1 During - Sony CDX-GT650UI | Operating Instructions - Page 13
, Track number/Elapsed playing time, Clock * Album number is displayed only when the album is changed. To change display items B, press (DSPL). Notes • Displayed items will differ, depending on the USB device, recorded format and settings. For details, visit the support site. • The maximum number of - Sony CDX-GT650UI | Operating Instructions - Page 14
tracks will be performed by "Content Transfer." Content Transfer 4 Connecting the USB device and enjoying the SensMe™ function on the unit Connect the set up USB device. You can then enjoy "SensMe™ channels" on this unit. Installing "SensMe™ Setup" and "Content Transfer" in your computer Use of the - Sony CDX-GT650UI | Operating Instructions - Page 15
along with the installation procedure, follow the steps below. 1 Start "SensMe™ Setup" on your computer. 2 Connect a USB device to your computer. 3 Complete registration following the on-screen instructions. Tip If you connect a registered USB device containing analyzed tracks, the USB device can be - Sony CDX-GT650UI | Operating Instructions - Page 16
" (page 26) or visit the support site. In these Operating Instructions, "iPod" is used as a general reference for the iPod functions on the iPod and iPhone, unless otherwise specified by the text or illustrations. Support site http://esupport.sony.com http://www.sony.com/mobileAV Playing back iPod - Sony CDX-GT650UI | Operating Instructions - Page 17
. genre in random order. device in random order. After 3 seconds, the setting is complete. To return to normal play mode, select " OFF" or "SHUF OFF." A Source (iPod) indication B Track name, Artist name, Album name, Track number/Elapsed playing time, Clock To change display items B, press (DSPL - Sony CDX-GT650UI | Operating Instructions - Page 18
the play mode will change to resuming mode. Notes • The volume can be adjusted only by the unit. • If this mode is canceled, the repeat setting will be turned off. Searching for a track Searching a track by name - Quick-BrowZer™ You can search for a track in a CD or USB device easily by category - Sony CDX-GT650UI | Operating Instructions - Page 19
to track passages - ZAPPIN™ While playing back short track passages in a CD or USB device in sequence, you can search for a track you want to listen to. ZAPPIN mode is suitable for searching for a track in shuffle or shuffle repeat mode. 1 Press (ZAP) during playback. After "ZAPPIN" appears in the - Sony CDX-GT650UI | Operating Instructions - Page 20
Color Illuminator allows you to change the color of the display and buttons on the main unit to match the car's interior. You can select display varies according to the DIMMER setting. To change the DAY/NIGHT color mode, see page 20. 2 Rotate the control dial until "BASE COLOR" appears, then press it - Sony CDX-GT650UI | Operating Instructions - Page 21
the preset color/pattern settings. The color/ pattern setting changes to the preset color/pattern if you turn off SensMe™ Channels Color or change the source to other than SensMe™. Changing the color with sound synchronization - Sound Synchronization The color changes according to synchronization of - Sony CDX-GT650UI | Operating Instructions - Page 22
level between sources. *1 Hidden when "POSITION" is set to "OFF." *2 When AUX source is activated (page 25). 22 Enjoying sophisticated sound functions - Advanced Sound Engine Advanced Sound Engine, Sony's new sound engine, creates an ideal in-car sound field with digital signal processing. Advanced - Sony CDX-GT650UI | Operating Instructions - Page 23
simulate a natural sound field with the feeling of being in the center of it wherever you sit in the car. The options for "POSITION" are indicated below. "FRONT L" (1): Front left "FRONT R" (2): Front right "FRONT" (3): Center front "ALL" (4): In the center of your car "OFF": No position set You can - Sony CDX-GT650UI | Operating Instructions - Page 24
. The following items can be set (follow the page reference for details): CLOCK ADJ (Clock Adjust) (page 6) CT (Clock Time) Activates the CT function: "ON," "OFF" (page 11, 12). BEEP Activates the beep sound: "ON," "OFF." AUX-A*1 (AUX Audio) Activates the AUX source display: "ON," "OFF" (page 25 - Sony CDX-GT650UI | Operating Instructions - Page 25
bass and treble for clear sound at low volume levels: "ON," "OFF." BTM (page 11) *1 When the unit is turned off. *2 When FM is received. Other functions Using optional equipment Auxiliary audio equipment By connecting an optional portable audio device to the AUX input jack (stereo mini jack) on the - Sony CDX-GT650UI | Operating Instructions - Page 26
to connect specifically to iPod or iPhone respectively, and has been certified by the developer to meet Apple performance standards. • Apple is not responsible for the operation of this device or its compliance with safety and regulatory standards. If you have any questions or problems concerning - Sony CDX-GT650UI | Operating Instructions - Page 27
service life may be shorter, depending on the conditions of use.) When the battery becomes weak, the range of the card remote the correct polarity when installing the battery. • Do unit Back of the front panel Notes • For with any metal device. Fuse replacement When Sony dealer. Fuse (10 A) 27 - Sony CDX-GT650UI | Operating Instructions - Page 28
limit USB Player section Interface: USB (Full-speed) Maximum current: 500 mA Power amplifier section Output: Speaker outputs Speaker impedance: 4 - 8 ohms Maximum power output: 52 W × 4 (at 4 ohms) General Outputs: Audio outputs terminal (front/rear) Subwoofer output terminal (mono) Power antenna - Sony CDX-GT650UI | Operating Instructions - Page 29
(2 lb 14 oz) Supplied accessories: Card remote commander: RM-X151 Parts for installation and connections (1 set) Optional accessories/equipment: BUS cable (supplied with an RCA pin cord): RC-61 (1 m), RC-62 (2 m) USB connection cable for iPod: RC-100IP HD Radio™ tuner: XT-100HD Your dealer may not - Sony CDX-GT650UI | Operating Instructions - Page 30
The Auto Off function activates after turning off the unit. t Turn off the unit. Radio reception The stations cannot be received. The sound is hampered by noises. • The connection is not correct. t Connect a power antenna (aerial) control lead (blue) or accessory power supply lead (red) to the power - Sony CDX-GT650UI | Operating Instructions - Page 31
is connected, storing an SAT radio channel into a preset failed. t Be sure to receive the channel that you want to store, then try it again. HUBS NO SUPRT USB hub is not supported on this unit. INVALID The connected USB device does not contain a music file for the SensMe™ function. L. SEEK +/- The - Sony CDX-GT650UI | Operating Instructions - Page 32
Radio Inc. et de XM Satellite Radio Inc. ZAPPIN et Quick-BrowZer sont des marques de commerce de Sony Corporation. 12 TONE ANALYSIS et son logo sont des marques de commerce de Sony Corporation. SensMe et le logo SensMe com. CD et et ce service sont protégés Gracenote homologuées aux États-Unis et - Sony CDX-GT650UI | Operating Instructions - Page 33
iPhone, iPod, iPod classic, iPod nano, et iPod touch sont des marques d'Apple Inc., déposées aux Etats-Unis et dans d'autres pays. Apple, Macintosh et iTunes sont des marques commerciales de Apple Inc., déposées aux Etats-Unis et dans d'autres pays. Licence de la technologie de codage audio MPEG - Sony CDX-GT650UI | Operating Instructions - Page 34
de la mini-télécommande 6 Réglage de l'horloge 6 Retrait de la façade 7 Installation de la façade 7 Emplacement des commandes et opérations de base Appareil principal 8 Mini-télécommande RM-X151 10 Radio Mémorisation et réception des stations 11 Mémorisation automatique - BTM. . . . . . 11 - Sony CDX-GT650UI | Operating Instructions - Page 35
du son 24 Pour apprécier les fonctions sonores sophistiquées - Advanced Sound Engine . . . 24 Sélection de la qualité sonore - Préré sony.com http://www.sony.com/mobileAV Fournissent des informations sur : • Les modèles et les fabricants de lecteurs audio numériques compatibles • Les fichiers MP3 - Sony CDX-GT650UI | Operating Instructions - Page 36
Préparation de la minitélécommande Retirez la feuille de protection. CD-DA MP3 WMA AAC Réinitialisation de l'appareil Avant la première utilisation de apparaît. 2 Tournez la molette de réglage jusqu'à ce que « CLOCK ADJ » apparaisse, puis appuyez dessus. L'indication des heures clignote. 3 - Sony CDX-GT650UI | Operating Instructions - Page 37
tirez doucement vers vous l'extrémité gauche de la façade. Installation de la façade Placez l'orifice A de la façade sur la disque) pour le faire fonctionner. Remarque Ne posez rien sur la face interne de la façade. Remarques • N'exercez pas de pression USB, car cela pourrait endommager les données - Sony CDX-GT650UI | Operating Instructions - Page 38
instructions relatives à l'emplacement des commandes et aux opérations de base. Pour plus de détails, reportez-vous aux pages correspondantes. A Touches SEEK +/- Radio mettre l'appareil en marche/ changer la source (Radio/CD/USB/ SensMe™*2/AUX). Appuyez pendant 1 seconde pour éteindre l'appareil. - Sony CDX-GT650UI | Operating Instructions - Page 39
Radio : Permettent de capter les stations enregistrées (appuyez) ; de mémoriser des stations (appuyez sur la touche et maintenez-la enfoncée). CD/USB/SensMe™ : (1)/(2) : ALBUM -/+ (pendant la lecture de fichiers MP3 Prise d'entrée AUX page 28 Permet de raccorder un appareil audio portatif. P Touche - Sony CDX-GT650UI | Operating Instructions - Page 40
; d'arrêter la source. B Touche SOURCE*1 Permet de mettre l'appareil en marche ; de changer la source (Radio/CD/USB/ SensMe™*2/AUX). C Touches Permettent de commander la source Radio/ CD/USB/SensMe™ de la même façon que les touches (SEEK) -/+ de l'appareil. La configuration, le réglage du son - Sony CDX-GT650UI | Operating Instructions - Page 41
puis appuyez plusieurs fois sur (SEEK) +/- pour régler la fréquence souhaitée avec précision (syntonisation manuelle). RDS Aperçu Les stations de radio FM dotées des services RDS (Système de radiocommunication de données) transmettent des données numériques inaudibles en plus du signal d'émission de - Sony CDX-GT650UI | Operating Instructions - Page 42
dans les pays ou régions où aucun service de données PTY n'est disponible. • Il se peut que l'émission de radio captée diffère de celle que vous avez éro de plage/temps de lecture écoulé, horloge *1 Les informations d'un CD TEXT, MP3/WMA/AAC sont affichées. *2 Le numéro d'album s'affiche uniquement - Sony CDX-GT650UI | Operating Instructions - Page 43
d'assistance. Sites d'assistance http://esupport.sony.com http://www.sony.com/mobileAV • Vous pouvez utiliser des périphériques USB de type MSC (stockage de masse) et MTP (protocole de transfert des médias) conformes à la norme USB. • Le codec correspondant est MP3 (.mp3), WMA (.wma), AAC (.m4a) et - Sony CDX-GT650UI | Operating Instructions - Page 44
USB, car cela pourrait endommager les données USB. • Cet appareil ne peut pas reconnaître les périphériques USB raccordés au moyen d'un concentrateur USB. Éléments d'affichage • Pendant la lecture ou l'avance/le retour rapide dans un fichier MP3 ALBUM SHUF ALBUM SHUF DEVICE Pour lire une plage en - Sony CDX-GT650UI | Operating Instructions - Page 45
la fonction SensMe™ Cette procédure de base est requise pour permettre l'utilisation de la fonction SensMe™ sur l'appareil. 1 Installation de « SensMe™ Setup » et « Content Transfer » sur votre ordinateur Commencez par installer « SensMe™ Setup » et « Content Transfer » à partir du CD-ROM fourni - Sony CDX-GT650UI | Operating Instructions - Page 46
n'a pas été effectué pendant la procédure d'installation, suivez les étapes cidessous. 1 Démarrez « SensMe™ Setup » sur votre ordinateur. 2 Raccordez un périphérique USB à votre ordinateur. 3 Terminez l'enregistrement en suivant les instructions à l'écran. Conseil Si vous raccordez un périph - Sony CDX-GT650UI | Operating Instructions - Page 47
de s'afficher correctement. « SHUFFLE ALL » : lecture de toutes les plages analysées dans un ordre aléatoire. x Canaux de base Lecture des plages en iPod et iPhone, sauf mention contraire dans le texte ou les illustrations. Sites d'assistance http://esupport.sony.com http://www.sony.com/mobileAV - Sony CDX-GT650UI | Operating Instructions - Page 48
un iPhone au moyen d'un câble USB, le volume du téléphone est contrôlé par le iPhone lui-même. Afin d'éviter une hausse soudaine du son après un appel, n'augmentez pas le volume de l'appareil pendant un appel téléphonique. Remarques • Ne retirez pas la façade pendant la lecture du iPod, car cela - Sony CDX-GT650UI | Operating Instructions - Page 49
GENRE SHUF ALBUM SHUF PODCAST SHUF ARTIST SHUF PLAYLIST SHUF GENRE SHUF DEVICE Pour lire une plage en boucle. un album en boucle. une passager Appuyez sur la touche (MODE) et maintenez-la enfoncée. L'indication « MODE AUDIO » apparaît et le mode de lecture passe au mode de reprise. Remarques • Le - Sony CDX-GT650UI | Operating Instructions - Page 50
Recherche d'une plage Recherche d'une plage par nom - Quick-BrowZer™ Vous pouvez facilement rechercher une plage par catégorie sur un CD ou périphérique USB. 1 Appuyez sur (BROWSE). L'appareil passe en mode Quick-BrowZer et la liste des catégories de recherche apparaît. 2 Tournez la molette de ré - Sony CDX-GT650UI | Operating Instructions - Page 51
coutant successivement de courts passages des plages d'un CD ou périphérique USB. Le mode ZAPPIN est approprié pour rechercher tez les étapes 1 et 2. Pendant la lecture de « SensMe™ channels » Si la plage que vous recherchez est transférée change de la façon suivante en mode de couleur DAY/NIGHT. - Sony CDX-GT650UI | Operating Instructions - Page 52
la page 22. 2 Tournez la molette de réglage jusqu'à ce que « BASE COLOR » apparaisse, puis appuyez dessus.* Vous pouvez sélectionner une couleur prérégl SensMe™ - Couleur des canaux SensMe™ La couleur de la fenêtre d'affichage et des touches de l'appareil principal change en fonction du canal SensMe - Sony CDX-GT650UI | Operating Instructions - Page 53
sélectionnez un motif préréglé ou écoutez des plages du canal SensMe, la synchronisation sonore est activée. 1 Appuyez sur la touche de cran de configuration apparaît. 2 Tournez la molette de réglage jusqu'à ce que « SOUND SYNC » s'affiche, puis appuyez dessus. 3 Tournez la molette de réglage pour - Sony CDX-GT650UI | Operating Instructions - Page 54
(page 24) EQ7 SETTING (page 25) POSITION POSITION 15 ». FADER Permet de régler le niveau relatif : « FRONT-15 » - « CENTER » - « REAR-15 ». AUX est activée (page 28). Pour apprécier les fonctions sonores sophistiquées - Advanced Sound Engine Advanced Sound Engine, le nouveau moteur sonore de Sony - Sony CDX-GT650UI | Operating Instructions - Page 55
jusqu'à ce que « EQ7 SETTING » s'affiche, puis appuyez dessus. 3 Tournez la molette de réglage jusqu'à ce que « BASE » s'affiche, puis appuyez SW POSITION » s'affiche, puis appuyez dessus. Lorsque vous sélectionnez « FRONT L », « FRONT R », « FRONT » ou « ALL » à l'étape 3 ci-dessus, vous pouvez - Sony CDX-GT650UI | Operating Instructions - Page 56
de graves à l'arrière La fonction Amplificateur de graves à l'arrière accentue les graves en appliquant le réglage de filtre passe-bas (page 27) aux haut-parleurs arrière. Cette fonction permet d'utiliser les hautparleurs arrière comme caisson de graves si vous n'en raccordez aucun. 1 Pendant la - Sony CDX-GT650UI | Operating Instructions - Page 57
SET la page indiquée pour plus de détails) : CLOCK ADJ (Réglage de l'horloge) (page 6) CT « OFF ». AUX-A*1 (AUX Audio) Permet d'activer ou de désactiver l'affichage de la source AUX : « ON SENSME COLR (Couleur SensMe) Permet de changer la couleur en fonction des canaux SensMe : « ON », « OFF ». SOUND - Sony CDX-GT650UI | Operating Instructions - Page 58
le volume de l'appareil. 2 Appuyez plusieurs fois sur (SOURCE/OFF) jusqu'à ce que l'indication « AUX » apparaisse. L'indication « AUX FRONT IN » apparaît ensuite. 3 Démarrez la lecture sur l'appareil audio portatif, avec un niveau de volume modéré. 4 Réglez votre appareil sur le volume d'écoute - Sony CDX-GT650UI | Operating Instructions - Page 59
lus sur cet appareil - CD-R/CD-RW dont la qualité d'enregistrement est mauvaise. - CD-R/CD-RW enregistrés avec un appareil d'enregistrement non compatible. - CD-R/CD-RW n'ayant pas été finalisés correctement. - CD-R/CD-RW autres que ceux enregistrés au format CD audio ou MP3 conformément à la norme - Sony CDX-GT650UI | Operating Instructions - Page 60
iPhone et a été certifié par le développeur afin de répondre aux normes de performance Apple. • Apple n'est pas responsable du fonctionnement de cet appareil ou de sa conformité aux installation de la pile. • Ne tenez pas la pile avec des pinces métalliques car votre détaillant Sony le plus proche - Sony CDX-GT650UI | Operating Instructions - Page 61
support. Caractéristiques techniques Radio Lecteur CD Rapport signal audio BUS Borne d'entrée de télécommande Borne d'entrée de l'antenne Borne de commande ATT téléphone Prise d'entrée AUX (mini-prise stéréo) Connecteur d'entrée du signal USB destinés à l'installation et aux raccordements (1 jeu) - Sony CDX-GT650UI | Operating Instructions - Page 62
raccordement USB pour iPod : RC-100IP Récepteur HD Radio™ CD-ROM • Port USB Système d'exploitation Windows XP, Windows Vista, Windows 7 Pour plus de détails sur les éditions ou Service Pack compatibles, visitez le site d'assistance suivant : http://esupport.sony.com http://www.sony édier aux problè - Sony CDX-GT650UI | Operating Instructions - Page 63
. Réception radio Impossible de CD-R/CD-RW ne sont pas destinés à un usage audio (page 29). Impossible de lire des fichiers MP3/WMA/AAC. Le disque n'est pas compatible avec le format et la version MP3 enfoncée. Le son est saccadé. • L'installation est incorrecte. t Installez l'appareil suivant un - Sony CDX-GT650UI | Operating Instructions - Page 64
déconnecté en cours de lecture. t Raccordez un périphérique USB et un câble USB. NO MUSIC Le disque ou le périphérique USB ne contient pas de fichiers de musique. t Insérez un CD audio dans cet appareil. t Raccordez un périphérique USB contenant des fichiers de musique. NO NAME Aucun nom de disque - Sony CDX-GT650UI | Operating Instructions - Page 65
- Sony CDX-GT650UI | Operating Instructions - Page 66
- Sony CDX-GT650UI | Operating Instructions - Page 67
- Sony CDX-GT650UI | Operating Instructions - Page 68
have any questions/problems regarding this product, try the following: 1 Read Troubleshooting in these Operating Instructions. 2 Reset the unit. Note: Stored data may be erased. 3 Please contact (U.S.A. only); Call 1-800-222-7669 URL http://www.SONY.com http://www.sony.net/ Sony Corporation Printed
-
 1
1 -
 2
2 -
 3
3 -
 4
4 -
 5
5 -
 6
6 -
 7
7 -
8
-
9
-
10
-
11
-
12
-
13
-
14
-
15
-
16
-
17
-
18
-
19
-
20
-
21
-
22
-
23
-
24
-
25
-
26
-
27
-
28
-
29
-
30
-
31
-
32
-
33
-
34
-
35
-
36
-
37
-
38
-
39
-
40
-
41
-
42
-
43
-
44
-
45
-
46
-
47
-
48
-
49
-
50
-
51
-
52
-
53
-
54
-
55
-
56
-
57
-
58
-
59
-
60
-
61
-
62
-
63
-
64
-
65
-
66
-
67
-
68
 |
 |
©2010 Sony Corporation
Operating Instructions
Mode d’emploi
Owner’s Record
The model and serial numbers are located on the bottom of the unit.
Record the serial number in the space provided below.
Refer to these numbers whenever you call upon your Sony dealer regarding this product.
Model No. CDX-GT650UI
Serial No.
To cancel the demonstration (DEMO) display, see page 6.
Pour annuler l’affichage de démonstration (DEMO), reportez-vous à la page 6.
FR
US
4-193-831-
11
(1)
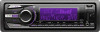
CDX-GT650UI
FM/AM
Compact Disc Player