Sony CFD-S50BLK Operating Instructions
Sony CFD-S50BLK Manual
 |
View all Sony CFD-S50BLK manuals
Add to My Manuals
Save this manual to your list of manuals |
Sony CFD-S50BLK manual content summary:
- Sony CFD-S50BLK | Operating Instructions - Page 1
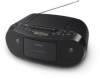
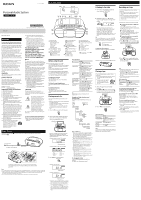
Personal Audio System Operating Instructions 4-474-842-11(1) Basic Operations Rear Listening to the radio 1 Press RADIO FM/AM repeatedly to select the band "FM" or "AM." 2 Hold down TUNE + or until the frequency digits begin to change on the display. CFD-S50 ©2013 Sony Corporation Printed - Sony CFD-S50BLK | Operating Instructions - Page 2
instruction manual of the component to be connected. Audio connection cable (not supplied) To AUDIO IN jack To component (e.g.,portable digital music player) 1 Connect the AUDIO any questions or problems concerning your unit, consult your nearest Sony dealer. Troubleshooting General The power
-
 1
1 -
 2
2
 |
 |

4-474-842-
11
(1)
Personal Audio System
Operating Instructions
©2013 Sony Corporation
Printed in China
CFD-S50
Rear
13) Unplug this apparatus during lightning
storms or when unused for long periods of
time.
14) Refer all servicing to qualified service
personnel. Servicing is required when the
apparatus has been damaged in any way,
such as power-supply cord or plug is
damaged, liquid has been spilled or objects
have fallen into the apparatus, the apparatus
has been exposed to rain or moisture, does
not operate normally, or has been dropped.
The following FCC/IC
statement applies only to the
version of this model
manufactured for sale in the
U.S.A. and Canada. Other
versions may not comply with
FCC/IC technical regulations.
NOTE:
This equipment has been tested and found to
comply with the limits for a Class B digital device,
pursuant to Part 15 of the FCC Rules. These limits
are designed to provide reasonable protection
against harmful interference in a residential
installation.
This equipment generates, uses and can radiate
radio frequency energy and, if not installed and
used in accordance with the instructions, may
cause harmful interference to radio
communications. However, there is no guarantee
that interference will not occur in a particular
installation. If this equipment does cause
harmful interference to radio or television
reception, which can be determined by turning
the equipment off and on, the user is
encouraged to try to correct the interference by
one or more of the following measures:
Reorient or relocate the receiving antenna.
Increase the separation between the
equipment and receiver.
Connect the equipment into an outlet on a
circuit different from that to which the
receiver is connected.
Consult the dealer or an experienced radio/
TV technician for help.
CAUTION
You are cautioned that any changes or
modifications not expressly approved in this
manual could void your authority to operate this
equipment.
This symbol is intended to alert
the user to the presence of
uninsulated “dangerous voltage”
within the product’s enclosure
that may be of sufficient
magnitude to constitute a risk of
electric shock to persons.
This symbol is intended to alert
the user to the presence of
important operating and
maintenance (servicing)
instructions in the literature
accompanying the appliance.
This graphical symbol is located on the bottom
of the unit.
Licence and Trademark Notice
MPEG Layer-3 audio coding technology and
patents licensed from Fraunhofer IIS and
Thomson.
Basic Operations
Before using the unit
To turn the power on or off
Press POWER
. You can also turn on the power
of this unit using the direct power-on function
(below).
In this manual, operations are mainly explained
using the direct power-on function.
To use the direct power-on function
Press CD
, TAPE
, RADIO FM/AM
or AUDIO
IN
while the unit is turned off. The power
turns on with the relevant function selected.
To adjust the volume
Press VOLUME + or
.
The volume level of this unit is adjustable in
steps from 0 to 31.
To listen through headphones
Connect headphones to the
(headphones) jack
.
To reinforce the bass
Press MEGA BASS
.
“MEGA BASS” lights up on the display.
To return to normal sound, press the button
again.
Playing a music disc
You can play the following types of discs with
this unit.
Audio CDs on which CD-DA tracks are recorded
in CD-DA disc format
CD-R/CD-RW discs on which CD-DA tracks are
recorded in CD-DA disc format
CD-R/CD-RW discs on which MP3 audio files
are recorded in ISO 9660 Level 1/Level 2 or
Joliet
1
Press CD
to turn on the CD function.
2
Press PUSH OPEN/CLOSE
, place a
disc in the CD compartment and then
close the compartment cover.
Label side up
The disc is loaded and the disc information
appears on the display. The information
displayed varies depending on the disc type
(audio CD/MP3 disc).
(Example: when an audio CD is loaded)
Total playing time
(Example: when an MP3 disc is loaded)
Total
number of
folders
Total
number of
tracks
3
Press
to start playback.
(Example: an audio CD)
Playing time*
1
(Example: an MP3 disc)
Playing time*
2
*
3
*
1
Each time you press DISPLAY
, the playback
screen switches between showing the playing
time and showing the current track number.
*
2
If the playing time is longer than 100 minutes,
“--:--” appears on the display.
*
3
Each time you press DISPLAY
, the playback
screen switches between showing the playing
time and showing the current track number
and the number of the folder containing that
track.
Listening to the radio
1
Press RADIO FM/AM
repeatedly to
select the band “FM” or “AM.”
2
Hold down TUNE + or
until the
frequency digits begin to change on the
display.
The unit automatically scans the radio
frequencies and stops when it finds a clear
station. When an FM stereo broadcast is
received, “ST” lights up on the display.
If you cannot tune to a station using
automatic tuning mode, press TUNE + or
repeatedly to change the frequency step by
step.
Tip
If the stereo FM reception is noisy, press MODE
repeatedly until “Mono” appears on the display. You
will lose the stereo effect, but the broadcast will
improve.
To improve radio reception
Reorient the antenna to improve FM reception.
Reorient the unit itself to improve AM reception.
Playing a tape
Check the following items before starting
operation.
Use a type I (normal) tape only. You cannot
use any other types of tape with this
system.
If there is tape slack, rewind
the slack using a pencil to
avoid damaging the tape or
the unit.
1
Press TAPE
to turn on the tape
function.
2
Press
(
), insert a cassette tape
into the cassette tape compartment (
)
and then close the compartment cover.
3
Press
to start playback.
Other operations
To
Do this
Stop playback
Press
.
Pause playback
Press
. To resume
playback, press the button
again.
Fast-forward or
rewind
Press
or
.
Eject the
cassette
Press
.
Note
Do not turn off the power during the tape playback.
Doing so may cause malfunction. Make sure to stop
playback before turning off the power.
Other operations
To
Do this
Pause playback
Press
. To return to
playback, press the button
again.
Stop playback
Press
. When you press
after playback is
stopped, playback starts from
the beginning of the track/
file you were last playing
(Resume Play).
Cancel Resume
Play
Press
twice. When you
press
after you cancel
Resume Play, playback starts
from the beginning of the
first track/file.
Select a folder
on an MP3 disc
Press
+ or
.
Select a track/
file
Press
or
. You can
skip tracks/files one by one.
Find a point in a
track/file
Hold down
or
during playback, and release
the button at the desired
point. When locating a point
while paused, press
to
start playback after the
desired point is found.
Tip
Resume Play is cancelled if you open the CD
compartment.
Example of folder structure and
playing order
The playing order of the folders and files is as
follows:
Folder
MP3 file
Notes on MP3 discs
When a disc is loaded, the unit reads all the files
on that disc. During this time, “READ” is blinking. If
there are many folders or non-MP3 files on the
disc, it may take a long time for play to begin or
for the next MP3 file to start to play.
We recommend that non-MP3 files or unnecessary
folders are excluded when creating MP3 discs.
During playback, folders that contain no MP3 files
are skipped.
This system can only play MP3 files that have a file
extension of “.mp3”.
Note that even if the file name has the correct file
extension but the actual file was created in a
different audio format, this unit may produce
noise or may malfunction.
MP3 PRO format is not supported.
This unit cannot play audio files on a disc in the
following cases:
When the total number of audio files exceeds
413.
When the total number of folders on a single
disc exceeds 99.
When the directory level (folder depths) exceeds
9 (including the “ROOT” folder).
To change play modes
Press MODE
repeatedly while the disc is
stopped.
For details, see “Selecting play mode.”
WARNING
To reduce the risk of fire or electric shock, do
not expose this apparatus to rain or moisture.
To reduce the risk of fire or electric shock, do not
expose this apparatus to dripping or splashing,
and do not place objects filled with liquids, such
as vases, on the apparatus.
As the main plug is used to disconnect the unit
from the mains, connect the unit to an easily
accessible AC outlet. Should you notice an
abnormality in the unit, disconnect the main plug
from the AC outlet immediately.
The unit is not disconnected from the AC power
source (mains) as long as it is connected to the
wall outlet, even if the unit itself has been turned
off.
Do not install the appliance in a confined space,
such as a bookcase or built-in cabinet.
Excessive sound pressure from earphones and
headphones can cause hearing loss.
Do not expose the batteries (battery pack or
batteries installed) to excessive heat such as
sunshine, fire or the like for a long time.
The nameplate and important information
concerning safety are located on the bottom
exterior.
CAUTION
The use of optical instruments with this product
will increase eye hazard.
Owner’s Record
The model number is located on the bottom of
the unit, and the serial number is located inside
the battery compartment of the unit. Record
these numbers in the space provided below.
Refer to them whenever you call upon your Sony
dealer regarding this product.
Model No. CFD-S50
Serial No.
Important Safety Instructions
1) Read these instructions.
2) Keep these instructions.
3) Heed all warnings.
4) Follow all instructions.
5)
Do not use this apparatus near water.
6) Clean only with dry cloth.
7)
Do not block any ventilation openings. Install
in accordance with the manufacturer’s
instructions.
8)
Do not install near any heat sources such as
radiators, heat registers, stoves, or other
apparatus (including amplifiers) that produce
heat.
9)
Do not defeat the safety purpose of the
polarized or grounding-type plug. A polarized
plug has two blades with one wider than the
other. A grounding type plug has two blades
and a third grounding prong. The wide blade
or the third prong are provided for your
safety. If the provided plug does not fit into
your outlet, consult an electrician for
replacement of the obsolete outlet.
10) Protect the power cord from being walked on
or pinched particularly at plugs, convenience
receptacles, and the point where they exit
from the apparatus.
11) Only use attachments/accessories specified
by the manufacturer.
12) Use only with the cart, stand, tripod,
bracket, or table specified by the
manufacturer, or sold with the
apparatus. When a cart is used, use
caution when moving the cart/
apparatus combination to avoid
injury from tip-over.
Power Sources
Connect the AC power cord
, or insert six R14 (size C) batteries (not supplied) into the battery
compartment
.
Use alkaline batteries with this unit. The use of manganese batteries
is not recommended, since this type of battery has an extremely short
usage time.
To a wall outlet
AC power cord (supplied)
Bottom
To AC IN jack
Notes
In standby mode with the AC power cord connected, “STANDBY” appears on the display (Canadian model only).
Replace the batteries when the OPR/BATT indicator
dims, or when the unit becomes inoperable. Replace all
of the batteries with new ones. Before you replace the batteries, be sure to remove any CD or tape and
disconnect any optional component from the unit.
To use the unit on batteries, disconnect the AC power cord from the unit and the wall outlet.
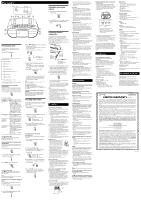
POWER button
Function buttons
RADIO FM/AM–AUTO
PRESET button
TAPE button
CD button
AUDIO IN button
TUNE/
(folder) + button
TUNE/
(folder)
button
CD compartment cover
Tape operation buttons
(pause) button
(stop/open) button
(fast forward) button
(rewind) button
(play) button*
(record) button
PUSH OPEN/CLOSE
(go backward)/PRESET
button
(go forward)/PRESET +
button
(play/pause)/MANUAL
PRESET button*
(stop) button
VOLUME
button
VOLUME + button*
MEGA BASS button
DISPLAY/ENTER button
Cassette tape compartment
cover
OPR/BATT indicator
MODE button
AC IN jack
(headphones) jack
AUDIO IN jack
*
, VOLUME +
and
have a tactile dot.
Recording on a tape
Check the following items before starting
operation.
Use a type I (normal) tape only. You cannot
use any other types of tape with this
system.
Make sure that the overwrite protection tab
has not been removed. If the tab has been
removed, cover the broken tab using
adhesive tape.
1
Prepare the source you want to record.
To record CD-DA tracks or MP3 files
on a disc
Press CD
and place a disc in the CD
compartment. Make sure not to start playback.
See “Playing a music disc.”
To record a radio program
Press RADIO FM/AM
repeatedly to select a
band and tune to the desired station. See
“Listening to the radio.”
To record sound from a connected
optional component
Press AUDIO IN
and connect an optional
component, and then start playback.
2
Press
(
), insert a cassette tape
into the cassette tape compartment (
)
and then close the compartment cover.
3
Press
to start recording (the play
button
will depress automatically
at the same time).
Tips
Adjusting the volume or the audio emphasis will
not affect the recording level.
If the AM program makes whistling sound after
you have press
in step 3, press MODE
repeatedly to select the position of ISS
(Interference Suppress Switch) that may decreases
the noise.
Use AC power as the power source for recording
for best recording results.
Other operations
To
Do this
Stop recording
Press
.
Pause
recording
Press
. To resume
recording, press the button
again.
To record from partway through the
current CD-DA track or MP3 file
Press
to pause playback where you want
to start recording, then press
.
To record favorite CD-DA tracks or MP3
files on a disc
Create a program (see “Creating your own
program (Program Play)”), then press
to
start recording.
To erase recorded cassette tapes
To erase a cassette tape, you need to record
silence over the previous recording.
1
Press TAPE
to turn on the tape
function.
2
Insert a recorded tape into the cassette
tape compartment.
3
Press
.
Erasing process starts, and previous recording
is overwritten with silent data.