Sony DSC-T77/T Instruction Manual
Sony DSC-T77/T - Cyber-shot Digital Still Camera Manual
 |
View all Sony DSC-T77/T manuals
Add to My Manuals
Save this manual to your list of manuals |
Sony DSC-T77/T manual content summary:
- Sony DSC-T77/T | Instruction Manual - Page 1
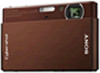
Camera Cámara fotografía digital DSC-T77 Instruction Manual GB Before operating the unit, please read this manual thoroughly, and retain it for future reference. Manual de instrucciones ES Antes de operar la unidad, lea este manual atentamente, y guárdelo para futuras referencias. © 2008 Sony - Sony DSC-T77/T | Instruction Manual - Page 2
call upon your Sony dealer regarding this product. Model No. DSC-T77 Serial No servicing) instructions in the literature accompanying the appliance. IMPORTANT SAFEGUARDS For your protection, please read these safety instructions completely before operating the appliance, and keep this manual - Sony DSC-T77/T | Instruction Manual - Page 3
wet Accessories instructions. Improper adjustment of other controls may result in damage and will often require extensive work by a qualified technician to restore the set to normal operation. - When the set exhibits a distinct change in performance - this indicates a need for service. [ Servicing - Sony DSC-T77/T | Instruction Manual - Page 4
batteries, call toll free 1-800-822-8837, or visit http://www.rbrc.org/ Caution: Do not handle damaged or leaking Lithium-Ion batteries. Battery charger Conformity Trade Name: SONY Model No.: DSC-T77 Responsible Party: Sony Electronics Inc. Address: manual could void your authority to operate this - Sony DSC-T77/T | Instruction Manual - Page 5
and, if not installed and used in accordance with the instructions, may cause harmful interference to radio communications. However, there must be used with the equipment in order to comply with the limits for a digital device pursuant to Subpart B of Part 15 of FCC Rules. For Customers in Europe - Sony DSC-T77/T | Instruction Manual - Page 6
help to conserve natural resources. In case of products that for safety, performance or data integrity reasons require a permanent connection with an incorporated battery, this battery should be replaced by qualified service staff only. To ensure that the battery will be treated properly, hand over - Sony DSC-T77/T | Instruction Manual - Page 7
Japan. The Authorized Representative for EMC and product safety is Sony Deutschland GmbH, Hedelfinger Strasse 61, 70327 Stuttgart, Germany. For any service or guarantee matters please refer to the addresses given in separate service or guarantee documents. Notice for customers in the United Kingdom - Sony DSC-T77/T | Instruction Manual - Page 8
IMPORTANT SAFEGUARDS 2 Read this first 4 Notes on using the camera 10 Getting started 11 Checking the accessories supplied 11 Identifying parts 12 Charging the battery pack 13 Inserting the battery pack/a "Memory Stick Duo" (not supplied 15 Setting the clock 17 Shooting/viewing images - Sony DSC-T77/T | Instruction Manual - Page 9
38 Changing camera settings 42 Changing the screen display 42 Changing the operation sounds 42 Using the HOME screen 43 Using the MENU items 45 Using functions in Program Auto mode 47 Others 48 Viewing "Cyber-shot Handbook 48 List of icons displayed on the screen 49 Troubleshooting 51 - Sony DSC-T77/T | Instruction Manual - Page 10
x Notes on using the camera Internal memory and "Memory Stick Duo" back up Do not turn off the camera, remove the battery pack, or remove the "Memory Stick Duo" while the access lamp is lit. Otherwise, the internal memory data or "Memory Stick Duo" may be damaged. Be sure to make a backup copy to - Sony DSC-T77/T | Instruction Manual - Page 11
Getting started Getting started Checking the accessories supplied • Battery charger BC-CSD (1) • CD-ROM (1) - Cyber-shot application software - "Cyber-shot Handbook" - "Cyber-shot Step-up Guide" • Instruction Manual (this manual) (1) • Power cord (mains lead) (1) (not supplied in the USA and - Sony DSC-T77/T | Instruction Manual - Page 12
L Speaker M Battery/"Memory Stick Duo" cover N Tripod receptacle • Use a tripod with a screw less than 5.5 mm (7/32 inch) long. Otherwise, you cannot firmly secure the camera, and damage to the camera may occur. O Battery eject lever P Access lamp Q "Memory Stick Duo" slot R Battery insertion slot - Sony DSC-T77/T | Instruction Manual - Page 13
Getting started Charging the battery pack 1 Insert the battery pack into the battery charger. • You can charge the battery even when it is partially charged. Battery pack 2 Connect the battery charger to the wall outlet (wall socket). If you continue charging the battery pack for about one more - Sony DSC-T77/T | Instruction Manual - Page 14
and remove the battery pack from the battery charger. • Designed for use with compatible Sony batteries. x Battery life and number may vary depending on the camera settings. zUsing the camera abroad You can use the camera, the battery charger (supplied), and the AC-LS5K AC Adaptor (not supplied) in - Sony DSC-T77/T | Instruction Manual - Page 15
the battery pack/a "Memory Stick Duo" (not supplied) 1 Open the cover. 2 Insert the "Memory Stick Duo" (not supplied). With the terminal side facing the lens, insert the "Memory Stick Duo" until it clicks into place. 3 Insert the battery pack. Align the v mark on the battery with the battery eject - Sony DSC-T77/T | Instruction Manual - Page 16
use "Memory Stick Duo" You can also use a "Memory Stick PRO Duo" or "Memory Stick PRO-HG Duo" with the camera. For details on the number of images/time that can be recorded, see pages 26, 29. Other types of "Memory Stick" or memory card are not compatible with the camera. "Memory Stick" You cannot - Sony DSC-T77/T | Instruction Manual - Page 17
item, then touch v/V to set its numeric value. • Midnight is indicated as 12:00 AM, and noon as 12:00 PM. 4 Touch [OK]. Notes • The camera does not have a feature for superimposing dates on images. By using "PMB" in the CD-ROM (supplied), you can print or save images with the - Sony DSC-T77/T | Instruction Manual - Page 18
/viewing images Shooting images 1 Lower the lens cover. The camera is turned on. Shooting/viewing images 2 Hold the camera steady as illustrated. • Slide the zoom (W/T) lever to the lens). 4 Press the shutter button fully down. The image is shot. 18 Shutter button SteadyShot mark AE/AF lock - Sony DSC-T77/T | Instruction Manual - Page 19
Viewing images 1 Press the (Playback) button. The last image shot is displayed. • When images on the "Memory Stick Duo" recorded with other cameras cannot be played back on this camera, view the images in [Folder View] (page 32). x Selecting next/previous image Touch (Next)/ (Previous) on the screen - Sony DSC-T77/T | Instruction Manual - Page 20
a smile. When the smile level exceeds the b point on the indicator, the camera shoots images automatically. When you touch (Smile icon) again, Smile Shutter ends. • eyes with the bangs. 2 Try to orient the face in front of the camera and be as level as possible. The detection rate is higher when the - Sony DSC-T77/T | Instruction Manual - Page 21
recognizes the scene. (Twilight), (Twilight Portrait), (Twilight using a tripod), (Backlight), (Backlight Portrait), (Landscape), (Macro) or (Portrait) appears. When the camera does not recognize the scene, the image is shot as Scene Recognition [Off]. Scene Recognition icon Setting value icon 21 - Sony DSC-T77/T | Instruction Manual - Page 22
camera adjusts the focus automatically from distant subjects to close-up. Normally, put the camera in this mode. (Macro On): The camera adjusts (Off): Not using the self-timer. (Self-Timer 10sec): Shooting starts after a 10-second delay. Use this setting if you want to include yourself in the image. - Sony DSC-T77/T | Instruction Manual - Page 23
Using shooting functions Selecting a flash mode 1 Touch (Flash) t desired mode t . (Flash Auto): Flashes when there is insufficient light or backlight (Flash On): Flash always operates. (Slow Synchro): Flash always operates. The shutter speed is slow in a dark place to clearly shoot the background - Sony DSC-T77/T | Instruction Manual - Page 24
you wish to focus on to change the focus position. 1 Point the camera at the subject, then touch the point of the frame you want to focus area with a face is touched on the screen. (Auto): Selects the face the camera is to automatically focus on. (Child Priority): Detects and shoots with priority on a - Sony DSC-T77/T | Instruction Manual - Page 25
16:9 (7M) For viewing on a high-definition TV. (3648×2056) 16:9 (2M) (1920×1080) Images will fill the entire screen. Note • When you print images shot with 16:9 aspect ratio, both edges may be cut off. 25 - Sony DSC-T77/T | Instruction Manual - Page 26
memory "Memory Stick Duo" formatted with this camera Size Approx. 15 MB 256 MB 512 MB 1 GB 2 GB 4 GB 8 GB 16 GB 10M 3 56 118 242 493 972 1963 3991 5M 6 89 188 384 781 1541 3111 6324 3M 10 shot with other cameras is played back on this camera, the image may - Sony DSC-T77/T | Instruction Manual - Page 27
without losing the nighttime atmosphere. (Fireworks): Shoots fireworks in all their splendor. (Underwater): Shoots underwater in natural colors when the water-proof case is attached. (Hi-Speed Shutter): Shoots moving subjects in bright places. Note • The flash does not operate in some modes. 27 - Sony DSC-T77/T | Instruction Manual - Page 28
Shooting movies 1 Touch (REC Mode) t (Movie Mode) t . 2 Press the shutter button fully down to start recording. 3 Press the shutter button fully down again to stop recording. x Viewing movies Press the (Playback) button and touch the a movie to view. (Next) / (Previous) buttons to select Button - Sony DSC-T77/T | Instruction Manual - Page 29
:10:20 320 0:02:50 0:41:30 1:25:20 2:57:40 6:01:00 11:52:00 23:57:30 48:41:50 Notes • The recording time may vary depending on the shooting conditions and the recording media. • Movies with the size set to [640(Fine)] can only be recorded on a "Memory Stick PRO Duo". • This camera - Sony DSC-T77/T | Instruction Manual - Page 30
Using viewing functions Viewing an enlarged image (Playback zoom) 1 Press the (Playback) button to display an image, then touch the area you want to enlarge. The image is enlarged at twice the size, with the area you touched at the center. When is set to [Image Only], touch the center of the - Sony DSC-T77/T | Instruction Manual - Page 31
. To transfer music files, install the "Music Transfer" software (supplied) to your computer (page 39), then follow the steps below. 1 Touch t (Slideshow) t [Music Tool] t [Download Music]. 2 Make a USB connection between the camera and your computer. 3 Start and operate "Music Transfer - Sony DSC-T77/T | Instruction Manual - Page 32
format for viewing multiple images when using "Memory Stick Duo". 1 Press the (Playback) button to display an image, then touch (Image Index) t (View Mode) t desired mode. (Date View): Displays images by the date. (Event View): Analyzes the dates shots - Sony DSC-T77/T | Instruction Manual - Page 33
to be displayed When set to Date View/Event View/Folder View: When using a "Memory Stick Duo", touch (Date List), Folder) to easily locate the desired images. (Event List) or When you cannot play back images recorded with other cameras, view the images in [Folder View]. Using viewing functions 33 - Sony DSC-T77/T | Instruction Manual - Page 34
or folder units t (Delete) t (All in Date Range), (All in Event) or Folder) t t [OK]. • The images is displayed in [Folder View] when using the internal memory. (All in This 34 - Sony DSC-T77/T | Instruction Manual - Page 35
You can delete all data stored on "Memory Stick Duo" or the internal memory. If a "Memory Stick Duo" is inserted, all data stored on the "Memory Stick Duo" are deleted. If no "Memory Stick Duo" is inserted, all data stored in the internal memory are deleted. Formatting permanently deletes all data - Sony DSC-T77/T | Instruction Manual - Page 36
zViewing images on a HD (High Definition) TV • You can view images recorded on the camera by connecting the camera to an HD (High Definition) TV with the HD Output Adaptor Cable (not supplied) or Cyber-shot station (not supplied). • Set [COMPONENT] to [HD(1080i)] in [Main Settings 2] by selecting - Sony DSC-T77/T | Instruction Manual - Page 37
You cannot print images stored in the internal memory at a print shop directly from the camera. Copy the images to a "Memory Stick Duo", then take the "Memory Stick Duo" to the print shop. How to copy: Touch t t [OK]. t (Manage Memory) t [Memory Tool] t t [Copy] When you want to superimpose - Sony DSC-T77/T | Instruction Manual - Page 38
PMB Guide". Import to computer Media service Uploading the image to the media service. Print Printing images with date stamps. Calendar Viewing images in a calendar. DVD Creating a data disc using a CD burner drive or DVD burner drive. Export to camera When using the "Memory Stick Duo", exporting - Sony DSC-T77/T | Instruction Manual - Page 39
can install the software (supplied) using Intel Pentium III 800 MHz or faster) Memory: 256 MB or more (Recommended: 512 editions and Starter (Edition) are not supported. 2 Turn on your computer, and insert Language" screen appears. 4 Follow the instructions on the screen to complete the installation - Sony DSC-T77/T | Instruction Manual - Page 40
] t [All Programs] t [Sony Picture Utility] t [Help] t [PMB Guide]. Notes • Do not disconnect the cable for multi-use terminal from the camera while the camera is operating or while "Accessing..." appears on the screen of the camera. Doing so may corrupt the data. • When using a battery with little - Sony DSC-T77/T | Instruction Manual - Page 41
Transfer" on your Macintosh computer. When images is exported to the camera, view them in [Folder View]. Recommended computer environment The following for using "Music Transfer" OS (pre-installed): Mac OS X (v10.3 to v10.5) Memory: 64 MB or more (128 MB or more is recommended) Hard Disk: Disk space - Sony DSC-T77/T | Instruction Manual - Page 42
in bright outside light, reset to [Bright]. However, the battery power may decrease faster under such condition. Changing the operation sounds You can set the sound produced when you operate the camera. 1 Touch t (Settings) t [Main Settings] t t [Beep] t - Sony DSC-T77/T | Instruction Manual - Page 43
images by folders. * These items are displayed only when "Memory Stick Duo" is inserted into the camera. x Slideshow Item Slideshow Music Tool Description Plays back images in succession along with effects and music. Download Music: Format Music: Changes the slideshow music. Deletes all - Sony DSC-T77/T | Instruction Manual - Page 44
memory to a "Memory Stick Duo." Formats the internal memory. x Settings Item Main Settings - Main Settings 1 Main Settings - Main Settings 2 Shooting Settings Shooting Settings 1 Shooting Settings Shooting Settings 2 Clock Settings Language Setting Description Beep: Function Guide: Initialize - Sony DSC-T77/T | Instruction Manual - Page 45
setting when the camera is in shooting Recognition Automatically detects the shooting conditions and then takes the shot. ( Off/ Auto/ Advanced) Face Detection Selects Burst/BRK±0.3EV, BRK±0.7EV, BRK±1.0EV) EV Adjusts exposure manually. (-2.0EV to +2.0EV) Metering Mode Sets which part of - Sony DSC-T77/T | Instruction Manual - Page 46
Item Flash Level Anti Blink Red Eye Reduction DRO Color Mode SteadyShot Shooting Settings Description Adjusts the amount of flash light. ( / Standard/ ) Sets Anti Blink function. ( Auto/ Off) Sets to reduce the red-eye phenomenon. ( Auto/ On/ Off) Optimizes the brightness and contrast. ( Off/ DRO - Sony DSC-T77/T | Instruction Manual - Page 47
Adds a Print order mark to the image you want to print in a "Memory Stick Duo". ( This Image/ Multiple Images/ Set All in Date Range*/ Remove All and EV settings when [REC Mode] is set to (Program Auto). Changing camera settings Item (Focus) (Metering Mode) (ISO) (EV) Description Changes the - Sony DSC-T77/T | Instruction Manual - Page 48
it for in-depth instructions on the many functions of the camera. x For Windows users 1 Turn on your computer, and insert the CD-ROM (supplied) into the CD-ROM drive. 2 Click "Cyber-shot Handbook". "Cyber-shot Step-up Guide", which contains information on accessories for the camera, is installed at - Sony DSC-T77/T | Instruction Manual - Page 49
are displayed on the screen to indicate the camera status. You can select the display settings by touching the indication on the bottom right of the screen (page 42). When shooting still images A Display Indication Battery remaining Low battery warning Image size • The icons are limited in - Sony DSC-T77/T | Instruction Manual - Page 50
Display C Display Indication Recording/Playback Media ("Memory Stick Duo", internal memory) PictBridge connecting Changing folder Scene Recognition Red-eye reduction Flash level Flash charging Recording mode Face Detection Metering Mode Focus AF illuminator Vibration warning Touch - Sony DSC-T77/T | Instruction Manual - Page 51
Troubleshooting If you experience trouble with the camera, try the following solutions. 1 Check the items below, and refer to "Cyber-shot Handbook" (PDF). If a code such as "C/E:ss:ss" appears on the screen, refer to "Cyber-shot Handbook." 2 Remove the battery pack, wait for about one minute, re- - Sony DSC-T77/T | Instruction Manual - Page 52
camera. • You cannot charge the battery pack using the AC Adaptor (not supplied). Use the battery charger (supplied) to charge the battery. Shooting still images/movies Cannot record images. • Check the free capacity of the internal memory or "Memory Stick Duo a "Memory Stick PRO Duo." Vertical - Sony DSC-T77/T | Instruction Manual - Page 53
at all for about one month it becomes completely discharged. In this case, be sure to charge this rechargeable battery before using the camera. However, even if this rechargeable battery is not charged, you can still use the camera, but the date and time will not be indicated. Charging method of - Sony DSC-T77/T | Instruction Manual - Page 54
pixel number of camera: Approx. 10.3 Megapixels Effective pixel number of camera: Approx. 10.1 Megapixels Memory (approx. 15 MB), "Memory Stick Duo" battery pack NP-BD1, 3.6 V NP-FD1 (not supplied), 3.6 V AC-LS5K AC Adaptor PictBridge: Compatible BC-CSD battery charger Power requirements: AC 100 - Sony DSC-T77/T | Instruction Manual - Page 55
Sony Corporation. , "Cyber-shot," "Memory Stick," , "Memory Stick PRO," , "Memory Stick Duo," , "Memory Stick PRO Duo," , "Memory Stick PRO-HG Duo," , "Memory Stick • In addition, system and product names used in this manual are, in general, trademarks or registered trademarks of their - Sony DSC-T77/T | Instruction Manual - Page 56
Español Nombre del producto: Cámara Digital Modelo: DSC-T77 POR FAVOR LEA DETALLADAMENTE ESTE MANUAL DE INSTRUCCIONES ANTES DE CONECTAR Y OPERAR ESTE EQUIPO. RECUERDE QUE UN MAL USO DE SU APARATO PODRÍA ANULAR LA GARANTÍA. AVISO Para reducir el riesgo - Sony DSC-T77/T | Instruction Manual - Page 57
el producto. [ Aviso para los clientes de países en los que se aplican las directivas de la UE El fabricante de este producto es Sony Corporation, 1-7-1 Konan Minato-ku Tokyo, 1080075, Japón. El representante autorizado en lo referente al cumplimiento de la directiva EMC y a la seguridad de los - Sony DSC-T77/T | Instruction Manual - Page 58
cámara 6 Preparativos 7 Comprobación de los accesorios suministrados 7 Identificación de las partes 8 Carga de la batería 9 Inserción de la batería/un "Memory Stick Duo" (no suministrado).......... 11 Ajuste del reloj 13 Toma/visionado de imágenes 14 Toma de imágenes 14 Visualización de im - Sony DSC-T77/T | Instruction Manual - Page 59
Utilización de los elementos de MENU 41 Utilización de funciones en modo Programa automático 44 Otros ...45 Visionado de la "Guía práctica de Cyber-shot 45 Lista de iconos visualizados en la pantalla 46 Solución de problemas 48 Precauciones 50 Especificaciones 51 5 - Sony DSC-T77/T | Instruction Manual - Page 60
de la memoria interna y del "Memory Stick Duo" No apague la cámara, extraiga la batería, ni retire el "Memory Stick Duo" mientras está encendida la lámpara rule for Camera File system) establecida por la JEITA (Japan Electronics and Information Technology Industries Association). • Sony no garantiza - Sony DSC-T77/T | Instruction Manual - Page 61
de los accesorios suministrados • Cargador de batería BC-CSD (1) • CD-ROM (1) - Software de aplicación del Cyber-shot - "Guía práctica de Cyber-shot" - "Guía avanzada de Cyber-shot" • Manual de instrucciones (este manual) (1) • Cable de alimentación (1) (no suministrado en EE.UU.y Canadá) • Bater - Sony DSC-T77/T | Instruction Manual - Page 62
H Tapa del objetivo I Pantalla LCD/Panel táctil J Botón (Reproducción) K Enganche para la correa de muñeca/ Empuñadura L Altavoz M Tapa de la batería/"Memory Stick Duo" N Rosca para trípode • Utilice un trípode con un tornillo de menos de 5,5 mm de largo. De lo contrario, no podrá sujetar firmemente - Sony DSC-T77/T | Instruction Manual - Page 63
Preparativos Carga de la batería 1 Inserte la batería en el cargador de batería. • Puede cargar la batería incluso cuando esté parcialmente cargada. Batería 2 Conecte el cargador de batería a la toma de corriente de la pared. Si continúa cargando la batería durante aproximadamente una hora más - Sony DSC-T77/T | Instruction Manual - Page 64
la batería del cargador de batería. • Diseñado para utilizarse con baterías Sony compatibles. x Duración de la batería y número de imágenes que se • El método de medición está basado en el estándar CIPA. (CIPA: Camera & Imaging Products Association) Nota • La duración de la batería y el número 10 - Sony DSC-T77/T | Instruction Manual - Page 65
Preparativos Inserción de la batería/un "Memory Stick Duo" (no suministrado) 1 Abra la tapa. 2 Inserte el "Memory Stick Duo" (no suministrado). Con el lado del terminal orientado hacia el objetivo, inserte el "Memory Stick Duo" hasta que produzca un chasquido al encajar en su sitio. 3 Inserte la - Sony DSC-T77/T | Instruction Manual - Page 66
Preparativos x "Memory Stick" que puede utilizar "Memory Stick Duo" También puede utilizar un "Memory Stick PRO Duo" o "Memory Stick PRO-HG Duo" con la cámara. Para más detalles sobre el número de imágenes/tiempo que se pueden grabar, consulte las páginas 22, 25. Otros tipos de "Memory Stick" o - Sony DSC-T77/T | Instruction Manual - Page 67
Ajuste del reloj 1 Baje la tapa del objetivo. La cámara se enciende. • También puede encender la cámara pulsando el botón POWER. • Es posible que lleve algún tiempo en conectarse la alimentación y permitir realizar operaciones. 2 Toque el formato de visualización de fecha deseado, y después toque . - Sony DSC-T77/T | Instruction Manual - Page 68
Toma/visionado de imágenes Toma de imágenes 1 Baje la tapa del objetivo. La cámara se enciende. Toma/visionado de imágenes 2 Sujete la cámara sin moverla como se muestra en la ilustración. • Deslice la palanca del zoom (W/T) hacia el lado T para acercar con zoom. Deslice hacia el lado W para - Sony DSC-T77/T | Instruction Manual - Page 69
Visualización de imágenes 1 Pulse el botón (Reproducción). Se visualiza la última imagen tomada. • Cuando imágenes del "Memory Stick Duo" grabadas con otras cámaras no puedan reproducirse en esta cámara, vea las imágenes en [Ver carpetas] (página 28). x Selección de la imagen siguiente/anterior - Sony DSC-T77/T | Instruction Manual - Page 70
Utilización de las funciones de toma de imagen Detección de sonrisas y toma automática (Captador de sonrisas) 1 Toque (Modo Grabación) t (Ajuste automático) t o t (Icono de sonrisa). 2 Espere mientras se detecta una sonrisa. Cuando el nivel de sonrisa excede el punto b del indicador, la cámara - Sony DSC-T77/T | Instruction Manual - Page 71
Detección de las condiciones de la toma de imagen automáticamente (Reconocimiento de escena) La cámara detecta automáticamente las condiciones de la toma de imagen, y después toma la imagen. 1 Toque (Modo Grabación) t (Ajuste automático) t o . Utilización de las funciones de toma de imagen 2 Toque - Sony DSC-T77/T | Instruction Manual - Page 72
1 a 20 cm Utilización del autodisparador 1 Toque (Autodisparador) t modo deseado t . (Desactivar): Sin utilizar el autodisparador. (Autodisparador 10 s): La toma se inicia tras un retardo de 10 s (segundo). Utilice este ajuste si quiere incluirse en la imagen. Para cancelar, toque . (Autodisparador - Sony DSC-T77/T | Instruction Manual - Page 73
Utilización de las funciones de toma de imagen Selección de un modo de flash 1 Toque (Flash) t modo deseado t . (Flash automático): Destella cuando hay insuficiente luz o contraluz. (Flash activado): El flash funciona siempre. (Sinc lenta): El flash funciona siempre. En un lugar oscuro la velocidad - Sony DSC-T77/T | Instruction Manual - Page 74
Enfoque de un punto específico del cuadro Simplemente toque el punto del cuadro que quiere enfocar para cambiar la posición de enfoque. 1 Oriente la cámara hacia el motivo, después toque el punto del cuadro que quiere enfocar. • Puede cambiar el punto de enfoque cuantas veces lo desee antes de - Sony DSC-T77/T | Instruction Manual - Page 75
Selección del tamaño de imagen para coincidir con la utilización El tamaño de imagen determina el tamaño del archivo de imagen que se graba cuando toma una imagen. Cuanto más grande sea el tamaño de imagen, más detalles se reproducirán cuando la imagen sea impresa en papel de formato grande. Cuanto - Sony DSC-T77/T | Instruction Manual - Page 76
está ajustado a [Normal]. (Unidades: Imágenes) Capacidad Memoria interna "Memory Stick Duo" formateado con esta cámara Tamaño Aprox. 15 MB 256 MB 512 MB 991 5M 6 89 188 384 781 1 541 3 111 6 324 3M 10 144 301 617 1 253 2 472 4 991 10 140 VGA 96 1 385 2 898 5 925 12 030 23 730 47 - Sony DSC-T77/T | Instruction Manual - Page 77
Utilización del modo de toma que coincide con la escena (Selección escena) 1 Seleccione el modo de toma de imagen. Para seleccionar / / / / : Toque (Modo Grabación) t modo deseado t . Para seleccionar Toque (Modo Grabación) t t modo deseado t . (Selección escena) (Alta sensibilidad): Toma imá - Sony DSC-T77/T | Instruction Manual - Page 78
Toma de películas 1 Toque (Modo Grabación) t (Modo película) t . 2 Pulse el botón del disparador a fondo para iniciar la grabación. 3 Pulse el botón del disparador a fondo otra vez para detener la grabación. x Visionado de películas Pulse el botón (Reproducción) y toque los botones para - Sony DSC-T77/T | Instruction Manual - Page 79
1:39:40 3:22:50 640(Estándar) 0:00:40 0:10:20 0:21:40 0:44:20 1:30:10 2:58:00 5:59:20 12:10:20 320 0:02:50 0:41:30 1:25:20 2:57 con el tamaño ajustado a [640(Fina)] sólo pueden grabarse en un "Memory Stick PRO Duo". • Esta cámara no admite grabaciones ni reproducciones HD para películas. - Sony DSC-T77/T | Instruction Manual - Page 80
Utilización de las funciones de visionado Visionado de una imagen ampliada (Zoom de reproducción) 1 Pulse el botón (Reproducción) para visualizar una imagen, después toque el área que quiere ampliar. La imagen se amplía al doble del tamaño, con el área que tocó en el centro. Cuando está - Sony DSC-T77/T | Instruction Manual - Page 81
de su CD o archivos MP3 a la cámara para reproducirlo durante el pase de diapositivas. Para transferir archivos de música, instale el software "Music Transfer" (suministrado) en su ordenador (página 35), después siga los pasos de abajo. 1 Toque t (Diapositivas) t [Herramienta música] t [Desc - Sony DSC-T77/T | Instruction Manual - Page 82
de visualización (Modo visualización) Le permite seleccionar el formato de visualización para ver múltiples imágenes cuando se utiliza "Memory Stick Duo". 1 Pulse el botón (Reproducción) para visualizar una imagen, después toque (Índice de imágenes) t (Modo visualización) t modo deseado. (Ver - Sony DSC-T77/T | Instruction Manual - Page 83
visionado x Localización fácil de imágenes que va a visualizar Cuando está ajustado a Ver fecha/Ver evento/Ver carpetas: Cuando utilice un "Memory Stick Duo", toque (Lista Fecha), (Lista de evento) o (Seleccionar carpeta) para localizar fácilmente las imágenes que desea. Lista Fecha: Visualiza una - Sony DSC-T77/T | Instruction Manual - Page 84
Borrado de imágenes Eliminación de la imagen visualizada actualmente 1 Toque (Borrar) t [OK] (página 15). Eliminación de múltiples imágenes 1 Toque (Índice de imágenes) t (Borrar). 2 Seleccione imágenes para borrar. 1 Toque / para pasar las páginas, después toque las imágenes que quiere eliminar. - Sony DSC-T77/T | Instruction Manual - Page 85
Formatear) Puede eliminar todos los datos almacenados en el "Memory Stick Duo" o la memoria interna. Si hay insertado un "Memory Stick Duo", se eliminarán todos los datos almacenados en el "Memory Stick Duo". Si no hay insertado un "Memory Stick Duo", se eliminarán todos los datos almacenados en la - Sony DSC-T77/T | Instruction Manual - Page 86
en la cámara conectando la cámara a un televisor HD (Alta definición) con el cable de adaptador de salida HD (no suministrado) o el Cyber-shot station (no suministrado). • Ajuste [COMPONENT] a [HD(1080i)] en [Ajustes principales 2] seleccionando (Ajustes) en la pantalla HOME. • No se pueden ver pel - Sony DSC-T77/T | Instruction Manual - Page 87
en un establecimiento de servicio de impresión directamente desde la cámara. Copie las imágenes a un "Memory Stick Duo", después lleve el "Memory Stick Duo" al establecimiento. Cómo copiar: Toque t (Gestión de memoria) t [Herrta. Memoria] t t [Copiar] t t [OK]. Cuando quiera superponer fechas - Sony DSC-T77/T | Instruction Manual - Page 88
Motion Browser)" Puede disfrutar de las imágenes grabadas más que nunca aprovechando las ventajas del software, y "PMB" incluidos en el CD-ROM (suministrado). Hay más funciones, además de de imágenes cuando se utiliza el "Memory Stick Duo". Nota • "PMB" no es compatible con ordenadores Macintosh. 34 - Sony DSC-T77/T | Instruction Manual - Page 89
x Etapa 1: Instalación de "PMB" (suministrado) Puede instalar el software (suministrado) utilizando el procedimiento siguiente. Cuando instale "PMB", también se instalará "Music Transfer". • Inicie la sesión como Administrador. 1 Compruebe el entorno de su ordenador. Entorno - Sony DSC-T77/T | Instruction Manual - Page 90
) del escritorio. • Para acceder a la "Guía de PMB" desde el menú de inicio: Haga clic en [Start] (Inicio) t [All Programs] (Todos los programas) t [Sony Picture Utility] t [Help] (Ayuda) t [Guía de PMB]. Notas • No desconecte el cable para terminal de usos múltiples de la cámara mientras la cámara - Sony DSC-T77/T | Instruction Manual - Page 91
x Utilización de la cámara con su ordenador Macintosh Puede copiar imágenes a su ordenador Macintosh. "PMB" no es compatible, pero puede instalar "Music Transfer" en su ordenador Macintosh. Cuando las imágenes sean exportadas a la cámara, véalas en [Ver carpetas]. Entorno de ordenador recomendado - Sony DSC-T77/T | Instruction Manual - Page 92
Cambio de los ajustes de la cámara Cambio de la visualización en pantalla 1 Toque t modo deseado t . (Normal): Visualiza botones e iconos (Simple): Visualiza botones solamente (Sólo imag.): Oculta botones e iconos Nota • Si se selecciona la reproducción [Sólo imag.], desaparecerá de la - Sony DSC-T77/T | Instruction Manual - Page 93
como Favoritos. Ver carpetas Visualiza y organiza imágenes por carpetas. * Estos elementos se visualizan solamente cuando hay "Memory Stick Duo" insertado en la cámara. x Diapositivas Elemento Diapositivas Herramienta música Descripción Reproduce imágenes sucesivamente junto con efectos - Sony DSC-T77/T | Instruction Manual - Page 94
.memoria interna Formatear: Formatea un "Memory Stick Duo". Crea una carpeta nueva en un "Memory Stick Duo". Cambia la carpeta utilizada para grabar que se va a conectar. Iluminador AF: Cuadrícula: Modo AF: Zoom digital: Destella la luz de relleno cuando se enfoca en poca luz. Visualiza líneas - Sony DSC-T77/T | Instruction Manual - Page 95
Utilización de los elementos de MENU Visualiza funciones disponibles para ajustarlas fácilmente cuando la cámara está en modo de toma de imagen o reproducción. En la pantalla solamente se visualizan los elementos disponibles. x MENU en modo de toma de imagen Elemento Descripción Tamaño imag - Sony DSC-T77/T | Instruction Manual - Page 96
Elemento Descripción Balance Blanco submarino Ajusta los colores cuando se hacen tomas submarinas. ( Auto/ Submarino 1, Submarino 2/ Flash) Nivel flash Ajusta la cantidad de luz del flash. ( / Estándar/ ) Reducción de ojos cerrados Establece la función Reducción de ojos cerrados. ( Auto/ - Sony DSC-T77/T | Instruction Manual - Page 97
visualizado varía de acuerdo con cada modo de visualización. Añade una marca de orden de impresión a la imagen que quiere imprimir de un "Memory Stick Duo". ( Esta imagen/ Múltiples imágenes/ Ajusta todo de rango fecha*/ Quita todo de rango fecha*) * El texto visualizado varía de acuerdo con cada - Sony DSC-T77/T | Instruction Manual - Page 98
Utilización de funciones en modo Programa automático Puede cambiar los ajustes de enfoque, modo de medición, ISO, y EV cuando [Modo Grabación] está ajustado a (Programa automático). Elemento (Enfoque) (Modo medición) (ISO) (EV) Descripción Cambia el método de enfoque. ( Multi AF/ AF centro/ - Sony DSC-T77/T | Instruction Manual - Page 99
Otros Visionado de la "Guía práctica de Cybershot" La "Guía práctica de Cyber-shot", que explica cómo utilizar la cámara en detalle, está incluida en el CD-ROM (suministrado). Consúltela para ver instrucciones exhaustivas sobre las muchas funciones - Sony DSC-T77/T | Instruction Manual - Page 100
Lista de iconos visualizados en la pantalla Los iconos se visualizan en la pantalla para indicar el estado de la cámara. Puede seleccionar los ajustes de visualización tocando la indicación de la parte inferior derecha de la pantalla (página 38). Cuando se toman imágenes fijas A Visualización - Sony DSC-T77/T | Instruction Manual - Page 101
Visualización 00:25:05 Indicación Tiempo que se puede grabar (h:min:s) Soporte de grabación/ Reproducción ("Memory Stick Duo", memoria interna) Conexión PictBridge Cambio de carpeta Reconocimiento de escena Reducción del efecto ojos rojos Nivel de flash Carga del flash Modo de grabación Detección - Sony DSC-T77/T | Instruction Manual - Page 102
pantalla, consulte la "Guía práctica de Cyber-shot". 2 Extraiga la batería, espere un min (minuto) aproximadamente, vuelva a insertarla y, a continuación, conecte la alimentación. 3 Inicialice los ajustes (página 40). 4 Consulte con el distribuidor Sony o con la oficina de servicio local autorizada - Sony DSC-T77/T | Instruction Manual - Page 103
está grabando películas. Realice uno de lo siguiente: - Ajuste el tamaño de imagen a uno distinto de [640(Fina)]. - Inserte un "Memory Stick PRO Duo". Aparecen rayas verticales al tomar un motivo muy brillante. • Se está produciendo el fenómeno de borrosidad y aparecen rayas blancas, negras, rojas - Sony DSC-T77/T | Instruction Manual - Page 104
Precauciones No utilice o almacene la cámara en los siguientes lugares • En un lugar muy caluroso, frío o húmedo En lugares tales como en un automóvil aparcado al sol, es posible que el cuerpo de la cámara se deforme y esto podrá ocasionar un mal funcionamiento. • Bajo la luz solar directa o cerca - Sony DSC-T77/T | Instruction Manual - Page 105
total de píxeles de la cámara: Aprox. 10,3 Megapíxeles Número efectivo de píxeles de la cámara: Aprox. 10,1 Megapíxeles Objetivo: Objetivo zoom Carl Zeiss Vario ) Soporte de grabación: Memoria interna (aprox. 15 MB) "Memory Stick Duo" Flash: Alcance del flash (sensibilidad ISO (Índice de exposición - Sony DSC-T77/T | Instruction Manual - Page 106
Sony Corporation. , "Cyber-shot", "Memory Stick", , "Memory Stick PRO", , "Memory Stick Duo", , "Memory Stick PRO Duo", , "Memory Stick PRO-HG Duo", , "Memory Stick los nombres de sistemas y productos utilizados en este manual son, en general, marcas comerciales o marcas comerciales - Sony DSC-T77/T | Instruction Manual - Page 107
53 Otros - Sony DSC-T77/T | Instruction Manual - Page 108
and answers to frequently asked questions can be found at our Customer Support Website. En la página Web de atención al cliente puede encontrar . Printed on 70% or more recycled paper using VOC (Volatile Organic Compound)-free vegetable oil based ink. Impreso en papel reciclado en un 70% o más
-
 1
1 -
 2
2 -
 3
3 -
 4
4 -
 5
5 -
 6
6 -
 7
7 -
8
-
9
-
10
-
11
-
12
-
13
-
14
-
15
-
16
-
17
-
18
-
19
-
20
-
21
-
22
-
23
-
24
-
25
-
26
-
27
-
28
-
29
-
30
-
31
-
32
-
33
-
34
-
35
-
36
-
37
-
38
-
39
-
40
-
41
-
42
-
43
-
44
-
45
-
46
-
47
-
48
-
49
-
50
-
51
-
52
-
53
-
54
-
55
-
56
-
57
-
58
-
59
-
60
-
61
-
62
-
63
-
64
-
65
-
66
-
67
-
68
-
69
-
70
-
71
-
72
-
73
-
74
-
75
-
76
-
77
-
78
-
79
-
80
-
81
-
82
-
83
-
84
-
85
-
86
-
87
-
88
-
89
-
90
-
91
-
92
-
93
-
94
-
95
-
96
-
97
-
98
-
99
-
100
-
101
-
102
-
103
-
104
-
105
-
106
-
107
-
108
 |
 |

© 2008 Sony Corporation
4-000-950-
62
(1)
Digital Still Camera
Cámara fotografía digital
DSC-T77
Instruction Manual
······················································································
Before operating the unit, please read this manual thoroughly, and retain it for
future reference.
Manual de instrucciones
····························································
Antes de operar la unidad, lea este manual atentamente, y guárdelo para
futuras referencias.
GB
ES