Sony HT-DDW870 Operating Instructions
Sony HT-DDW870 Manual
 |
View all Sony HT-DDW870 manuals
Add to My Manuals
Save this manual to your list of manuals |
Sony HT-DDW870 manual content summary:
- Sony HT-DDW870 | Operating Instructions - Page 1
(1) Home Theatre System Operating Instructions Owner's Record The model and serial numbers are located on the rear of the unit. Record the serial number in the space provided below. Refer to them whenever you call upon your Sony dealer regarding this product. Model No. Serial No. HT-DDW870 - Sony HT-DDW870 | Operating Instructions - Page 2
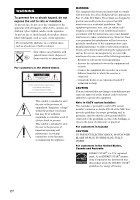
electric shock to persons. This symbol is intended to alert the user to the presence of important operating and maintenance (servicing) instructions in the literature accompanying the appliance. WARNING This equipment has been tested and found to comply with the limits for a Class B digital device - Sony HT-DDW870 | Operating Instructions - Page 3
stated otherwise. • The instructions in this manual describe the controls on the receiver. You can also use the controls on the supplied remote if they have the same or similar names as those on the receiver. For details on the use of your remote, see pages 42-50. The HT-DDW870 consists of: Models - Sony HT-DDW870 | Operating Instructions - Page 4
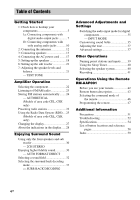
Selecting the speaker system 40 Recording 41 Operations Using the Remote RM-AAP001 Before you use your remote 42 Remote button description 42 Selecting the command mode of the remote 46 Programming the remote 47 Additional Information Precautions 51 Troubleshooting 52 Specifications 54 List - Sony HT-DDW870 | Operating Instructions - Page 5
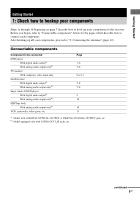
Getting Started 1: Check how to hookup your components Steps 1a through 1b beginning on page 7 describe how to hook up your components to this receiver. Before you begin, refer to "Connectable components" below for the pages which describe how to connect each component. After hooking up all your - Sony HT-DDW870 | Operating Instructions - Page 6
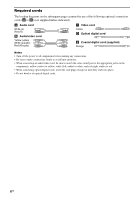
Required cords The hookup diagrams on the subsequent pages assume the use of the following optional connection cords (A to E) (not supplied unless indicated). A Audio cord White (L) Red (R) B Audio/video cord Yellow (video) White (L/audio) Red (R/audio) C Video cord Yellow D Optical digital cord - Sony HT-DDW870 | Operating Instructions - Page 7
You can also listen to the sound of your TV by connecting your TV's audio output jacks to the VIDEO 2 AUDIO IN jacks on the receiver. In this case, do not connect the TV's video output jack to the VIDEO 2 VIDEO IN jack on the - Sony HT-DDW870 | Operating Instructions - Page 8
2 Connect the video jacks. Satellite tuner OUTPUT VIDEO C TV monitor INPUT VIDEO C DIGITAL OPTICAL VIDEO 2 IN SA-CD/ CD IN DVD IN COAXIAL ANTENNA AM MONITOR VIDEO IN VIDEO IN VIDEO OUT VIDEO IN VIDEO OUT L L L L R IN SA-CD/CD R OUT IN MD/TAPE R R AUDIO IN AUDIO IN AUDIO OUT AUDIO IN - Sony HT-DDW870 | Operating Instructions - Page 9
is output when you play a Super Audio CD disc on a Super Audio CD player connected to the SA-CD/CD OPTICAL IN jack on this receiver. Connect the player to the analog input jacks (SA-CD/CD IN jacks). Refer to the operating instructions supplied with the Super Audio CD player. 9GB - Sony HT-DDW870 | Operating Instructions - Page 10
1b: Connecting components with only analog audio jacks Hooking up audio components For details on the required cords (A-E), see page 6. DIGITAL OPTICAL VIDEO 2 IN SA-CD/ CD IN DVD IN COAXIAL ANTENNA AM MONITOR VIDEO IN VIDEO IN VIDEO OUT VIDEO IN VIDEO OUT L L L L R IN SA-CD/CD R OUT IN - Sony HT-DDW870 | Operating Instructions - Page 11
Getting Started L Hooking up video components If you connect your TV to the MONITOR VIDEO OUT jack, you can watch the video from the selected input (page 22). For details on the required cords (A-E), see page 6. VCR OUTPUT VIDEO OUT AUDIO OUT L R B TV monitor INPUT VIDEO C DIGITAL OPTICAL VIDEO - Sony HT-DDW870 | Operating Instructions - Page 12
* * The shape of the connector varies depending on the area code. Notes • To prevent noise pickup, keep the AM loop antenna away from the receiver and other components. • Be sure to fully extend the FM wire antenna. • After connecting the FM wire antenna, keep it as horizontal as possible. 12GB - Sony HT-DDW870 | Operating Instructions - Page 13
Getting Started 3: Connecting speakers Connect your speakers to the receiver. This receiver allows you to use a 6.1 channel speaker system. To fully enjoy theater-like multi channel surround sound requires five speakers (two front speakers, a center speaker, and two surround speakers) and a sub - Sony HT-DDW870 | Operating Instructions - Page 14
Attaching foot pads To prevent speaker vibration or movement, attach the supplied foot pads to the speaker as shown in the illustration below. Note Be sure to attach the supplied foot pads to the sub woofer as well. 14GB - Sony HT-DDW870 | Operating Instructions - Page 15
R SURROUND L SPEAKERS A SPEAKERS FRONT B* e B INPUT Sub woofer A E Surround speaker (right) e A E Surround speaker (left) * If you have an additional front speaker system, connect them to the SPEAKERS FRONT B terminals. You can select the front speakers you want to use with the SPEAKERS (OFF - Sony HT-DDW870 | Operating Instructions - Page 16
and flat wall where reinforcement is applied. • Contact a screw shop or installer regarding the wall material or screws to be used. • Sony is not responsible for accident or damage caused by improper installation, insufficient wall strength or improper screw installation, natural calamity, etc - Sony HT-DDW870 | Operating Instructions - Page 17
selector on the rear panel, check that the voltage selector is set to the local power supply voltage. If not, use a screwdriver to set the selector to the correct position before connecting the AC power cord to a wall outlet. Receiver Connecting the AC power cord Connect the AC power cord to - Sony HT-DDW870 | Operating Instructions - Page 18
names for inputs and preset stations. • MASTER VOLUME -/+ is set to "VOL MIN". 5: Setting up the speakers You can use the SPEAKER SET UP menu to set the distance and location of the speakers connected to this receiver. 1 Press ?/1 to turn on the receiver. 2 Press MAIN MENU repeatedly to select - Sony HT-DDW870 | Operating Instructions - Page 19
) closer to your listening position (D). * For models of area code U and CA, "XX ft." is displayed. Tip The receiver lets you to input the speaker position in terms of distance. However, it is not possible to set the center speaker further than the front speakers. Also, the center speaker cannot be - Sony HT-DDW870 | Operating Instructions - Page 20
B and D. Tip Surround speaker position is designed specifically for implementation of the Cinema Studio EX modes. For other sound fields, speaker and right of the listening position, the surround effects becomes unclear unless set to "SIDE/LO" or "SIDE/HI". Nevertheless, each listening environment - Sony HT-DDW870 | Operating Instructions - Page 21
details on the LEVEL menu settings, see page 35. Tips • The adjusted value are shown in the display during adjustment. • To adjust the level of all speakers at the same time, press MASTER VOL +/- on the remote or turn MASTER VOLUME -/+ on the receiver. 4 Press TEST TONE again after adjustment. The - Sony HT-DDW870 | Operating Instructions - Page 22
component and start playback. Note If you select any video components, set the TV's video input to match the component you selected. 3 receiver. To mute the sound Press MUTING on the remote. The muting function will be canceled when you do the following. • Press MUTING on the remote THEATER) 22GB - Sony HT-DDW870 | Operating Instructions - Page 23
stereo mode, press FM MODE again. Direct tuning You can enter the frequency of the station you want directly. Use the remote for the operation. 1 Press TUNER repeatedly to select the FM or AM band. The last received station is tuned in. Tip You can also use FM or AM on the - Sony HT-DDW870 | Operating Instructions - Page 24
momentarily and the receiver returns to the normal operation. Notes • Do not press any button on the receiver or supplied remote during autobetical you move the antenna after storing stations with this procedure, the stored settings may no longer be valid. If this happens, repeat this procedure - Sony HT-DDW870 | Operating Instructions - Page 25
remote to change the memory page. Using the Radio Data System (RDS) (Models of area code CEL, CEK only) This receiver also allows you to use RDS (Radio Data System tune in a station that provides RDS services, the RDS indicator lights up and the program service name appears in the display. Note RDS - Sony HT-DDW870 | Operating Instructions - Page 26
scrolls across the display. • If a station does not provide a particular RDS service, "NO XXXX" (such as "NO TEXT") appears in the display. Description of members of the public express their views by phone or in a public forum Programs about travel. Not for announcements that are located by TP/TA - Sony HT-DDW870 | Operating Instructions - Page 27
input t Sound field currently applied When the tuner is selected Program Service name** or preset station name* t Frequency t Program Type indication** t Radio Text indication** t Current Time indication (in 24-hour system)** t Sound field currently applied * Index name appears only when you have - Sony HT-DDW870 | Operating Instructions - Page 28
being reproduced. C SP A/SP B: Lights up in accordance with the speaker system being used (A or B). Turns off when speaker output is turned off set to "ANALOG" (page 35). G NEO:6: Lights up when DTS Neo:6 Cinema/ Music mode decoding is activated. H Tuner indicators: Lights up when using the receiver - Sony HT-DDW870 | Operating Instructions - Page 29
Amplifier Operation M Playback channel indicators: The letters (L, C, R, etc.) indicate the channels being played back. The boxes around the letters vary to show how the receiver downmixes the source sound. L (Front Left), R (Front Right), C (Center (monaural)), SL (Surround Left), SR (Surround - Sony HT-DDW870 | Operating Instructions - Page 30
from the sub woofer. Press 2CH. "2CH ST." appears in the display and the receiver switches to the 2CH STEREO mode. Enjoying higher fidelity sound - AUTO FORMAT DIRECT The Auto PRO LOGIC IIx GAME (PLIIX GM) Neo:6 Cinema (NEO6 CIN) DTS Neo:6 Neo:6 Music (NEO6 MUS) MULTI STEREO (MULTI ST.) 30GB - Sony HT-DDW870 | Operating Instructions - Page 31
you specify the type of decoding for 2 channel audio sources. This receiver can reproduce 2 channel sound in 5 channels through Dolby Pro Logic CIN (Neo:6 Cinema) Performs DTS Neo:6 Cinema mode decoding. x NEO6 MUS (Neo:6 Music) Performs DTS Neo:6 Music mode decoding. This setting is ideal for - Sony HT-DDW870 | Operating Instructions - Page 32
receiver's preprogrammed sound fields. They bring the exciting and powerful sound of movie theaters and concert halls into your home. Sony Pictures Entertainment's dubbing studio in your home. The CINEMA STUDIO EX modes consist of the following three elements. • Virtual Multi Dimension Creates 5 sets - Sony HT-DDW870 | Operating Instructions - Page 33
theater-like environment while listening through a pair of headphones. Note If you connect a pair of headphones while a sound field is operating, the system to select "A.F.D. AUTO". Tips • The receiver lets you apply the last selected sound at the logo on the package. - : Dolby Digital discs - Sony HT-DDW870 | Operating Instructions - Page 34
channel signals and an extension stream designed for returning those signals to 6.1 discrete channels. Discrete 6.1 channel signals are DVD specific signals not used in movie theaters. e) This decoder can be used for all 6.1 formats (Dolby Digital EX, DTS-ES Matrix 6.1, DTS-ES Discrete 6.1). Note - Sony HT-DDW870 | Operating Instructions - Page 35
Advanced Adjustments and Settings Advanced Adjustments and Settings Switching the audio input mode for digital components - INPUT MODE You can switch the audio input mode for components for which this receiver have digital audio input jacks. 1 Press input buttons to select the input. 2 Press INPUT - Sony HT-DDW870 | Operating Instructions - Page 36
SB XXX dB (Surround back speaker level) x S.W. XXX dB (Sub woofer level) Initial setting: 0 dB You can adjust from -10 dB to +10 dB in 1 dB steps. MOVIE or MUSIC buttons. Resetting sound fields to the initial settings Use the buttons on the receiver for the operation. 1 Press ?/1 to turn off the - Sony HT-DDW870 | Operating Instructions - Page 37
bass level) x TREB. XX dB (Front speaker treble level) Initial setting: 0 dB You can adjust from -6 dB to +6 dB in 1 dB steps. Advanced settings Using the CUSTOMIZE menu to adjust the receiver You can adjust various receiver settings using the CUSTOMIZE menu. 1 Press MAIN MENU repeatedly to select - Sony HT-DDW870 | Operating Instructions - Page 38
(to prevent the interruption when playback starts). Even when other signals are input, the sound is output. However, this receiver cannot decode DTS-CD when set to "DEC. PCM". Note When set to "DEC. AUTO" and the sound from the digital audio jacks (for CD, etc.) is interrupted when playback starts - Sony HT-DDW870 | Operating Instructions - Page 39
8 characters for preset stations and inputs selected with input buttons, and display it in the receiver's display. 1 To index a preset station Press FM or AM to select the FM or in the station, the Program Service name appears instead of the name you entered. (You cannot change the name of a Program - Sony HT-DDW870 | Operating Instructions - Page 40
set the receiver to turn off automatically at a specified time. Press SLEEP repeatedly while the power is on. Each time you press SLEEP, the display changes cyclically as follows: 2-00-00 t 1-30-00 t 1-00-00 t 0-30-00 t OFF While using Sleep Timer, "SLEEP" lights up in the display. Using the remote - Sony HT-DDW870 | Operating Instructions - Page 41
you have connected all components properly. Recording on an audio tape or MiniDisc You can record on a cassette tape or MiniDisc using the receiver. See the operating instructions of your cassette deck or MD deck if you need help. 1 Select the component to be recorded. 2 Prepare the component for - Sony HT-DDW870 | Operating Instructions - Page 42
corrosion. Remote button description 1 2 3 4 5 6 7 8 9 *q; qa ENTER *qs *qd TV ?/1 AV ?/1 ?/1 RM SET UP P SYSTEM STANDBY SLEEP MODE H X x TOP MENU/ GUIDE MUTING AV MENU V B b MASTER VOL v O DISPLAY TV VOL RETURN/EXIT TV/ MAIN TV CH VIDEO MENU WIDE TEST TONE ef ed es ea e; wl - Sony HT-DDW870 | Operating Instructions - Page 43
The tables below show the settings of each button. Remote Button A.F.D. 7 ALT wd Operations Receiver Remote Function Selects the decoding mode for audio sound. When ALT button lights up, it changes the remote key function to activate those buttons with orange printing. ANGLE 7 DVD player/ - Sony HT-DDW870 | Operating Instructions - Page 44
the same time) Receiver/ Turns off the receiver TV/VCR/ and other Sony audio/ Satellite tuner/ video components. CD player/ VCD player/ LD player/ DVD player/ MD deck/ DAT deck TEST Receiver TONE qg Outputs test tone. TOP MENU/ DVD player Displays DVD title. GUIDE qa Satellite tuner/ Displays - Sony HT-DDW870 | Operating Instructions - Page 45
Turns the receiver on or off. VCR/ Skips tracks. CD player/ VCD player/ LD player/ DVD player/ MD deck/ DAT deck/ Tape deck/ Blu-ray disc recorder/Hard disc recorder/ PSX Remote Button m/M 9 N q; X w; x wa Operations Function CD player/ Searches tracks in the VCD player/ forward - Sony HT-DDW870 | Operating Instructions - Page 46
the command mode of the remote Set the remote command mode using the RM SET UP button and the remote command mode buttons. Selecting the command mode You can switch the command mode (AV1 and AV2) of the remote. If the command mode of the receiver and the remote is different, you cannot use - Sony HT-DDW870 | Operating Instructions - Page 47
components as part of your system. Furthermore, you can also program the remote for Sony components that the remote is unable to control. Note that the remote can only control components that accept infrared wireless control signals. 1 Press AV ?/1 while holding down RM SET UP. The indicator lights - Sony HT-DDW870 | Operating Instructions - Page 48
component and the maker of the component Use the numeric codes in the tables below to control non-Sony components and also Sony components that the remote is normally unable to control. Since the remote signal that a component accepts differs depending on the model and year of the component, more - Sony HT-DDW870 | Operating Instructions - Page 49
Operations Using the Remote RM-AAP001 To control a VCR Maker SONY AIWA* AKAI BLAUPUNKT , 547 535 523, 536, 537, 538 530, 537, 539 535, 540, 541 542, 543 To control a satellite tuner or cable box Maker SONY JERROLD/G.I. PANASONIC RCA S. ATLANTA Code(s) 801, 802, 803, 804 806, 807, 808, 809, 810, - Sony HT-DDW870 | Operating Instructions - Page 50
To control a hard disc recorder Maker SONY Code(s) 307, 308, 309 To control a blu-ray disc recorder Maker SONY Code(s) 310, 311, 312 To control a PSX Maker SONY Code(s) 313, 314, 315 50GB - Sony HT-DDW870 | Operating Instructions - Page 51
the cabinet, panel and controls with a soft cloth slightly moistened with a mild detergent solution. Do not use any type of abrasive pad, scouring powder or solvent such as alcohol or benzine. If you have any question or problem concerning your receiver, please consult your nearest Sony dealer. 51GB - Sony HT-DDW870 | Operating Instructions - Page 52
If you experience any of the following difficulties while using the receiver, use this troubleshooting guide to help you remedy the problem. There is no sound or only a very low-level sound no matter which component is selected. • Check that the speakers and components are connected correctly - Sony HT-DDW870 | Operating Instructions - Page 53
appears on the TV screen or monitor. • Select the appropriate input on the receiver. • Set your TV to the appropriate input mode. • Move your TV away from the audio components. * Models of area code CEL, CEK only. Remote control The remote does not function. • The AUX, MULTI CH and 12 buttons on the - Sony HT-DDW870 | Operating Instructions - Page 54
and turn on the power again. If this problem persists, consult your nearest Sony dealer. If you are unable to remedy the problem using the troubleshooting guide Clearing the receiver's memory may remedy the problem (page 18). However, note that all memorized settings will be reset to their factory - Sony HT-DDW870 | Operating Instructions - Page 55
V AC, 50 Hz AU, E51 240 V AC, 50 Hz 2) Depending on the sound field settings and the source, there may be no sound output. Inputs (Analog) SA-CD/CD, MD/TAPE kHz or 10 kHz. After tuning in any AM station, turn off the receiver. While holding down PRESET TUNING + or TUNING +, press ?/1. All preset - Sony HT-DDW870 | Operating Instructions - Page 56
Dimensions (w/h/d) (Approx.) 430 × 157.5 × 310 mm (17 × 6 1/4 × 12 1/4 inches) including projecting parts and controls other area code (SA-WMSP87) AUDIO POWER SPECIFICATIONS POWER OUTPUT AND TOTAL HARMONIC DISTORTION: (Models of to rated output. Speaker system Speaker unit Enclosure type - Sony HT-DDW870 | Operating Instructions - Page 57
AC, 50/60 Hz 120/220/240 V AC, 50/60 Hz Power consumption 95 W Dimensions (w/h/d) (Approx.) 270 × 325 × 398 mm (10 5/8 × 12 3/4 × 15 5/8 (24) Foot pads (subwoofer) (4) Remote commander RM-AAP001 (1) R6 (size-AA specifications are subject to change without notice. Additional Information 57GB - Sony HT-DDW870 | Operating Instructions - Page 58
List of button locations and reference pages How to use this page Use this page to find the location of buttons that are mentioned in the text. Illustration number r DISPLAY 5 (25, 27, 53) R R Name of button/part Reference page Main unit ALPHABETICAL ORDER A - H A.F.D. (button/indicator) qs - Sony HT-DDW870 | Operating Instructions - Page 59
SET UP parameters 19 TONE parameters 37 Automatic tuning 23 C Changing display 27 Clearing receiver's memory 18 CUSTOMIZE menu 37 D Digital Cinema field 32-33 speaker system 40 Sleep Timer 40 Sound field customizing 35 pre-programmed 32-33 resetting 36 selecting 32-33 SPEAKER SET UP menu 19 - Sony HT-DDW870 | Operating Instructions - Page 60
Sony Corporation Printed in Malaysia
-
 1
1 -
 2
2 -
 3
3 -
 4
4 -
 5
5 -
 6
6 -
 7
7 -
8
-
9
-
10
-
11
-
12
-
13
-
14
-
15
-
16
-
17
-
18
-
19
-
20
-
21
-
22
-
23
-
24
-
25
-
26
-
27
-
28
-
29
-
30
-
31
-
32
-
33
-
34
-
35
-
36
-
37
-
38
-
39
-
40
-
41
-
42
-
43
-
44
-
45
-
46
-
47
-
48
-
49
-
50
-
51
-
52
-
53
-
54
-
55
-
56
-
57
-
58
-
59
-
60
 |
 |
©2005 Sony Corporation
2-549-734-
12
(1)
Home Theatre
System
Operating Instructions
Owner’s Record
The model and serial numbers are located on the rear of the unit. Record the serial
number in the space provided below. Refer to them whenever you call upon your
Sony dealer regarding this product.
Model No.
Serial No.
HT-DDW870