Sony HXCUTX70 Operating Instructions
Sony HXCUTX70 Manual
 |
View all Sony HXCUTX70 manuals
Add to My Manuals
Save this manual to your list of manuals |
Sony HXCUTX70 manual content summary:
- Sony HXCUTX70 | Operating Instructions - Page 1
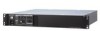
4-479-642-11 (1) HD Camera Control Unit Operating Instructions Before operating the unit, please read this manual thoroughly and retain it for future reference. HXCU-TX70 © 2013 Sony Corporation - Sony HXCUTX70 | Operating Instructions - Page 2
11 Status Display Screen 11 Setup Menu 14 Changing Menu Item Settings 14 Menu Tree 16 Menu List 18 Appendix 28 Notes on Use 28 Digital Triax Transmission 28 Error messages 29 License Declarations 29 Specifications 29 2 Table of Contents - Sony HXCUTX70 | Operating Instructions - Page 3
The HXCU-TX70 HD Camera Control Unit (CCU) connects to the CA-TX70 HD Camera Adaptor that is attached to the HXC-D70 HD Color Camera or PMW-500/400/350/320 SolidState Memory Camcorder. It performs signal processing, provides an interface for external equipment, and supplies power to the camera. The - Sony HXCUTX70 | Operating Instructions - Page 4
Optional accessories You can add new functions by incorporating the following optional accessories. For information about installing optional accessories, contact a Sony service or sales representative. HKCU-FP2 CCU Control Panel This control panel can be mounted on the CCU in place of the front - Sony HXCUTX70 | Operating Instructions - Page 5
and parts that may be used with the HXCU-TX70 are shown below. Intercom Headset Picture Monitor Return Video Input HXC-D70 HD Color Camera CAC-6 Return Video Selector Prompter Sync Input Video Input Triax Cable CA-TX70 HD Camera Adaptor or HXCU-TX70 HD Camera Control Unit HD SDI/SD SDI/VBS - Sony HXCUTX70 | Operating Instructions - Page 6
on when there is an overcurrent condition (short circuit) on the triax cable. While on, the CCU does not supply any power to the camera. • INTERCOM (intercom adjustment) knob Adjusts the headset audio level. • MIC/PGM (microphone/program) switch ON: Turns the headset microphone on. OFF: Turns the - Sony HXCUTX70 | Operating Instructions - Page 7
power is supplied to the camera. MAIN: Turns on when the CCU power supply is turned on. It flashes when there is a problem with the fan. g level. a b c d ef g h i j k Memory stick slot (for use by service personnel only) l m no p a REFERENCE IN/OUT (reference input) connectors (BNC type) Inputs - Sony HXCUTX70 | Operating Instructions - Page 8
25-pin) Supports the following functions. • Microphone remote Connects to an external control device, such as an audio mixer, which can select the camera microphone gain Panel. For connection details, refer to the waveform monitor manual. • Waveform monitor mode output Connects to a waveform monitor - Sony HXCUTX70 | Operating Instructions - Page 9
or DOWN advances the setting in that direction. g ALARM indicator Lights up red to indicate an error in the CCU or camera system. h CALL button Sends a call signal to the camera connected to the CCU and any external controller (such as the RCP-1000-series Remote Control Panel). The CALL button is - Sony HXCUTX70 | Operating Instructions - Page 10
indicator Turns on to indicate that the lens extender is in-use on the camera. • AUTO (auto iris) button Switches the lens auto iris adjustment function on light level. When the button is not lit, the iris is adjusted manually. • IRIS/MB ACTIVE (iris/master black active) indicator Indicates, when - Sony HXCUTX70 | Operating Instructions - Page 11
screen Set the DISP/MENU lever to the DISP position. The most recently viewed status screen page is displayed (when first powered on, the camera settings page is displayed). Turning the control knob changes the displayed page. To exit the status screen display In status screen display mode, set - Sony HXCUTX70 | Operating Instructions - Page 12
D70 1080/59.94I Reference:Free Lock SDI-1/2 :1080/59.94I SDI-3/4 :525/59.94I Component:SD YCD Return1 :1080/59.94I Return2 :525/59.94I Return3 :NTSC Return4 :NTSC The camera HKCU-FP2 is mounted) Camera system diagnostics Page 1 *System Diag 1/3* 3/13 TRIAX Type Digital Cable Connect Comp. Auto - Sony HXCUTX70 | Operating Instructions - Page 13
to the SW2 button Assignable/Custom VOLUME: Function assigned to the CUSTOM knob SW Bright: Button lights LED brightness setting IIC: IIC bus control status Camera hardware diagnostics *CAMERA Diag* 12/13 ALL BOARD OK Displays the - Sony HXCUTX70 | Operating Instructions - Page 14
ROM Version Information *ROM Version* 13/13 CAMERA HXC-D70 1.00 13.10.01 CCU HXCU-TX70 1.00 13.10.01 CAMERA: Camera model name and ROM version CCU: CCU model name and ROM version Setup Menu The CCU system and peripheral settings can be modified using a picture - Sony HXCUTX70 | Operating Instructions - Page 15
to the page number, then press the control knob. The , arrow changes to a flashing ? question mark. Flashing ?S01 TOP OUTPUT:*CAMERA BAR TEST1 TEST2 PIX:*ENC R&G WF :*ENC R&G R G B G&B R&B RGB R G B SEQ G&B R&B RGB 2 Turn the control knob to change the displayed page to the - Sony HXCUTX70 | Operating Instructions - Page 16
OUTPUT PIX WF REFERENCE GENLOCK H STEP COARSE SC PHASE V PHASE SYNC OUT FREQUENCY CAMERA FORMAT SLOT NO 1-1&2 3&4 COMPONENT HD-SD DELAY SD ASPECT SD LB SEL MIC GAIN CH1 CH2 MIC REMOTE MIC OUT DELAY MIC1 LEVEL MIC2 LEVEL CAMERA SYSTEM I/F TERMINATION PGM1 INPUT PGM2 INPUT INCOM MIC MIC TYPE MIC GAIN - Sony HXCUTX70 | Operating Instructions - Page 17
MENU SETTINGS (C11) DISPLAY (C12) DATE (C13) OTHERS (C14) FRONT PANEL 1 (C15) FRONT PANEL 2 (C16) RESUME RE DIRECTION CATEGORY PAGE ITEM DATA MESSAGE ALARM JUMP MASTER GAIN ECS/SHUTTER ND FILTER IRIS EXTENDER DATE/TIME TIME ZONE REAR PREVIEW REAR DSUB I/F WF/MIC REMOTE WFM SEQ SYNC/WFM-OUT - Sony HXCUTX70 | Operating Instructions - Page 18
OUT S03 FREQUENCY Note FREQUENCY or CAMERA FORMAT mode setting changes take effect only after the CCU power supply is selection TEST1 and TEST2 are not selectable if there is no communication with the camera. ENC, R, G, B, R&G, G&B, R&B, RGB PIX connector output signal selection - Sony HXCUTX70 | Operating Instructions - Page 19
FORMAT is 1080 HD signal to SD signal delay mode selection system format: 0-Delay, Line (90H), Frame (1F) When CAMERA FORMAT is 720 system format: 0-Delay, Line (120H), Frame (2F) When GENLOCK is HD: 0 to -71.1 µs When GENLOCK is SD: 0 to -51.7 µs SQUEEZE, EDGE CROP, - Sony HXCUTX70 | Operating Instructions - Page 20
, 95%, PAL100%, Y/C-RAMP, Y -RAMP ON, OFF Character superimposed on color bar signal ON, OFF ON: Gray screen output when camera power supply is off OFF: Color bar signal output when camera power supply is off Settings for strings 1 to 11 that are superimposed on the color bar signal ENTER to - Sony HXCUTX70 | Operating Instructions - Page 21
dBu (ENG/MIC ON), (---/MIC OFF), (PROD/MIC ON) CLEAR COM, 4 WIRE, RTS (OFF), ON, OFF -20, 0, +4 dBu -20, 0, +4 dBu MIC OUT 1, 2 delay setting Camera settings D-sub 25-pin intercom interface settings 200 Ω, termination when 2WIRE is set to ON. (OFF): When SYSTEM I/F is 4WIRE (read only) PGM1 input - Sony HXCUTX70 | Operating Instructions - Page 22
transmitted as low resolution simplified images on the VBS Y line only with delay less than 1 frame VBS: VBS signal from PROMPTER connector sent to camera as teleprompter (VBS Y Only): Displayed when MODE is LOW LATENCY (read only) Number of prompter circuits setting ON: Setup on VBS and SD YCD - Sony HXCUTX70 | Operating Instructions - Page 23
ON, OFF RE DIRECTION CATEGORY STD, RVS PAGE STD, RVS ITEM STD, RVS DATA STD, RVS C12 Camera messages and switch settings on/off. Displayed on the camera diagnostics screen. MESSAGE ALARM JUMP MASTER GAIN ECS/SHUTTER ND FILTER IRIS EXTENDER C13 DATE/TIME TIME ZONE - Sony HXCUTX70 | Operating Instructions - Page 24
Page name Page No. C14 Item REAR PREVIEW Settings MOMENTARY, TOGGLE REAR DSUB I/F MIC REM, WF REM WF/MIC REMOTE WFM SEQ SYNC/WFM-OUT REMOTE, OFF PNP, NPN SYNC, WFM Indication REMOTE device preview operation switching MOMENTARY: Display preview while PREVIEW button on REMOTE device is - Sony HXCUTX70 | Operating Instructions - Page 25
Auto knee on when indicator on 5600K: 5600K on when indicator on CAM POWER: Camera power on when indicator on SW2 NOT ASSIGN, GAMMA OFF, HD DTL OFF, knee on when indicator on 5600K: 5600K on when indicator on CAM POWER: Camera power on when indicator on VOLUME NOT ASSIGN, HD GAMMA, SD HKCU-FP2 - Sony HXCUTX70 | Operating Instructions - Page 26
Page name Page No. C16 Displayed only when the HKCU-FP2 CCU Control Panel is fitted Item Settings VOLUME REL COEFF IRIS 1/1, 1/2, 1/4 M BLACK 1/1, 1/2, 1/4 R/B BLACK 1/1, 1/2, 1/4, (FLARE) R/B WHITE 1/1, 1/2, 1/4 CUSTOM 1/1, 1/2, 1/4 SW BRIGHT NORMAL, LOW Indication - Sony HXCUTX70 | Operating Instructions - Page 27
NETWORK SETTINGS menu Page name Page No. N01 N02 N03 N04 Item Settings Indication IP ADDRESS 0.0.0.0 to 255.255.255.255 IP address setting SUBNET MASK 0.0.0.0 to 255.255.255.255 Subnet mask display DEFAULT GATEWAY 0.0.0.0 to - Sony HXCUTX70 | Operating Instructions - Page 28
, then wipe dry. Do not use volatile solvents such as alcohol or thinners, as these may damage the finish. Digital Triax Transmission Digital transmission between camera and CCU with powerful error correction function built-in. However, some errors, for example errors due to external noise in - Sony HXCUTX70 | Operating Instructions - Page 29
300, DENVER, COLORADO 80206 http://www.mpegla.com Specifications HXCU-TX70 General Power supply AC 100 to 240 V, 50/60 to +140 °F) Weight Approx. 7.9 kg (17 lb 6.7 oz) Input/output connectors CAMERA Triax connector (1) INTERCOM XLR 5-pin (1) INTERCOM/TALLY/ PGM D-sub 25-pin, female - Sony HXCUTX70 | Operating Instructions - Page 30
(1) Operating Instructions (CD-ROM manual Related equipment RCP-1000-series Remote Control Panel CA-TX70 Camera SONY WILL NOT BE LIABLE FOR CLAIMS OF ANY KIND MADE BY USERS OF THIS UNIT OR MADE BY THIRD PARTIES. • SONY WILL NOT BE LIABLE FOR THE TERMINATION OR DISCONTINUATION OF ANY SERVICES - Sony HXCUTX70 | Operating Instructions - Page 31
Corporation and is intended solely for use by the purchasers of the equipment described in this manual. Sony Corporation expressly prohibits the duplication of any portion of this manual or the use thereof for any purpose other than the operation or maintenance of the equipment described in this - Sony HXCUTX70 | Operating Instructions - Page 32
Sony Corporation
-
 1
1 -
 2
2 -
 3
3 -
 4
4 -
 5
5 -
 6
6 -
 7
7 -
8
-
9
-
10
-
11
-
12
-
13
-
14
-
15
-
16
-
17
-
18
-
19
-
20
-
21
-
22
-
23
-
24
-
25
-
26
-
27
-
28
-
29
-
30
-
31
-
32
 |
 |

HD Camera Control Unit
Operating Instructions
Before operating the unit, please read this manual thoroughly
and retain it for future reference.
HXCU-TX70
4-479-642-
11
(1)
© 2013 Sony Corporation