Sony PCV-RX570 Online Help Center
Sony PCV-RX570 - Vaio Desktop Computer Manual
 |
View all Sony PCV-RX570 manuals
Add to My Manuals
Save this manual to your list of manuals |
Sony PCV-RX570 manual content summary:
- Sony PCV-RX570 | Online Help Center - Page 1
Welcome Congratulations on your purchase of the Sony VAIO® Digital Studio computer! Your new, high-performance, multimedia computer combines state-of-the-art computer functionality with the latest audio/video and information technology features. Page 1 - Sony PCV-RX570 | Online Help Center - Page 2
Features Note: Your computer may not be equipped with all of the hardware features listed in this section. To view the specific hardware configuration for your system, see the Specifications sheet. Page 2 - Sony PCV-RX570 | Online Help Center - Page 3
VAIO AV Applications This suite of Sony original applications includes PictureGear , Smart Capture, DVgate , DigitalPrint, SonicStage, MovieShaker , VisualFlow , and Media Bar DVD Player. These software applications make it easy to use advanced - Sony PCV-RX570 | Online Help Center - Page 4
increased storage capacity and a dynamic multimedia computing experience. Your state-of-the-art DVD-RW drive writes to DVD-R/DVD-RW and CD-R/CD-RW media, and plays your favorite DVDs and CDs. This drive also functions as the ideal solution for making backups and archiving data, with the ability to - Sony PCV-RX570 | Online Help Center - Page 5
DVD-ROM drive (Not available on all models) This optical storage technology provides increased storage capacity and a rich multimedia computing experience. Your DVD-ROM drive plays both DVDs and CDs. Page 5 - Sony PCV-RX570 | Online Help Center - Page 6
available on all models) This drive is the ideal solution for making backups and archiving data, with the ability to store up to 650 MB of removable, rewritable storage on a single - Sony PCV-RX570 | Online Help Center - Page 7
CD-ROM drive (Not available on all models) You can play your favorite audio and video CDs using this high-quality CD-ROM drive. Page 7 - Sony PCV-RX570 | Online Help Center - Page 8
LINK® ports, located on the front and rear panels, provide you with digital connection capability. The i.LINK name and logo identify a high-speed communication interface, which allows you to easily connect compatible digital camcorders. Note: i.LINK is a trademark of Sony used only to designate that - Sony PCV-RX570 | Online Help Center - Page 9
VAIO Smart keyboard This PS/2® keyboard has programmable shortcut buttons for launching your favorite programs or accessing the Internet. Page 9 - Sony PCV-RX570 | Online Help Center - Page 10
Sony audio and video quality Take advantage of today's advanced multimedia applications, games, and entertainment software with the Sony high-fidelity audio system, high-powered 3-D graphics, and "Sony-Tuned" MPEG digital video playback. Page 10 - Sony PCV-RX570 | Online Help Center - Page 11
Microsoft Windows XP Home Edition operating system Your system includes this latest consumer operating system from Microsoft®. Page 11 - Sony PCV-RX570 | Online Help Center - Page 12
Preinstalled software All the software on your computer is preinstalled, configured, and ready for you to use right out of the box. Page 12 - Sony PCV-RX570 | Online Help Center - Page 13
Communications You have the choice of a variety of popular online services to browse the Internet, access e-mail, send faxes, and much more. Page 13 - Sony PCV-RX570 | Online Help Center - Page 14
Exceptional performance Your computer includes an Intel® processor, a 10Base-T/100Base-TX Fast Ethernet interface, and a V.90 data/fax modem.1 1 Actual upload and download speeds may vary due to line conditions, ISP support, and government regulations. Page 14 - Sony PCV-RX570 | Online Help Center - Page 15
Unpacking Your Computer Computer and accessories Page 15 - Sony PCV-RX570 | Online Help Center - Page 16
updates, support information, and software information. The VAIO Digital Studio Com puter User Guide is available electronically on your computer's hard drive. To access the online manual: 1. Click Start in the Windows Taskbar, then click VAIO Help and Support. 2. From the VAIO Help and Support - Sony PCV-RX570 | Online Help Center - Page 17
can only be used to restore the hard disk of the Sony computer you purchased. Application Recovery CD(s) - Enables you to reinstall individual applications if they become corrupted or are erased. Driver Recovery CD - Enables you to restore device drivers if they become corrupted or are erased - Sony PCV-RX570 | Online Help Center - Page 18
Software Library The Software Library contains the Microsoft software license agreement and the Sony end-user license agreement. Page 18 - Sony PCV-RX570 | Online Help Center - Page 19
To Choose an Ergonomic Location for your Computer Before you get started, find the best location for your new computer. Page 19 - Sony PCV-RX570 | Online Help Center - Page 20
or tendons. Furniture and posture - Sit in a chair with good back support and armrests. Adjust the level of the chair so your feet are flat on the Viewing angle of the display - Position the display 18 to 26 inches directly in front of you, with the top of the screen at or a little below eye - Sony PCV-RX570 | Online Help Center - Page 21
and Connectors The front panel of your VAIO Computer allows access to the optical and floppy disk drives. It also includes Universal Serial Bus (USB) and i.LINK® ports to connect compatible peripheral devices. The back panel of your computer contains the ports for supplied and optional accessories - Sony PCV-RX570 | Online Help Center - Page 22
Front Panel Overview Note: i.LINK is a trademark of Sony used only to designate that a product PC peripherals to your system, such as an optical or hard disk drive, confirm their operating system compatibility and required operating conditions. Front panel Note: Your computer may not be supplied - Sony PCV-RX570 | Online Help Center - Page 23
the power is on and amber when the computer is in Stand by mode. 8 i.LINK 4-pin port (IEEE1394) Connection for a compatible digital device. 9 Optical drive 1 eject button Ejects a disc from Optical drive 1. 10 Optical drive 2 eject button Ejects a disc from Optical drive 2. 11 Memory Stick - Sony PCV-RX570 | Online Help Center - Page 24
Overview Note: Your computer may not be supplied with all of the features listed, depending on the system configuration you purchased. Back panel 1 Mouse port Connection for a PS/2® mouse. 2 Keyboard port Connection for a PS/2 Keyboard. 3 Ethernet port 10Base-T/100Base-TX Fast Ethernet - Sony PCV-RX570 | Online Help Center - Page 25
Connection for the supplied power cord. 14 Telephone jack Connection for a phone cable (optional) to the computer. Note: i.LINK is a trademark of Sony used only to connecting compatible i.LINK PC peripherals to your system, such as an optical or hard disk drive, confirm their operating system - Sony PCV-RX570 | Online Help Center - Page 26
Setting Up Your VAIO Digital Studio Computer Your computer has many new and exciting features. This section contains information on setting up your computer and peripheral devices. Page 26 - Sony PCV-RX570 | Online Help Center - Page 27
To Set Up Your Computer This section illustrates how to set up your computer and install peripheral devices. Page 27 - Sony PCV-RX570 | Online Help Center - Page 28
Connecting a CRT display (monitor) 1. Plug the display cable into the Monitor port. 2. If necessary, plug the display cable into the rear of the display. Connecting a CRT display Note: Install your equipment so that you can easily reach the power outlet in the event of an emergency. Page 28 - Sony PCV-RX570 | Online Help Center - Page 29
adapter cord into the DC In jack on the back of the right speaker and plug the other end into a grounded AC wall outlet or power strip. Connecting the speakers Page 29 - Sony PCV-RX570 | Online Help Center - Page 30
Connecting the keyboard and mouse 1. Plug the keyboard cable into the Keyboard port on the back of the computer. 2. Plug the mouse cable into the Mouse port. Connecting the keyboard and mouse Page 30 - Sony PCV-RX570 | Online Help Center - Page 31
Connecting the modem cable and power cords 1. Unplug your phone's cable from the wall jack, and plug it into the Telephone jack on the computer. 2. Plug the modem cable (supplied) into the Line jack on the computer, and then plug the other end of the cable into the wall jack. Connecting the phone - Sony PCV-RX570 | Online Help Center - Page 32
Page 32 - Sony PCV-RX570 | Online Help Center - Page 33
To Turn On and Register Your Computer Note: When you start your system for the first time, your computer may detect new equipment and display a dialog box that asks you to restart your computer. Please respond to this request immediately. Page 33 - Sony PCV-RX570 | Online Help Center - Page 34
Turning on your computer 1. Press the power switch on the computer to turn on the power. 2. Press the power switch on the display to turn on the power. 3. Press the power switch on the right speaker to turn on the power. To turn on your computer Page 34 - Sony PCV-RX570 | Online Help Center - Page 35
a Support Representative to troubleshoot problems you may be having with your computer. Limited warranty - Protect your investment. See the Warranty Card for more details. Note: You are prompted to register your computer the first time you turn on the unit. Follow the on-screen instructions to - Sony PCV-RX570 | Online Help Center - Page 36
Setting up your dial-up connection The first time you turn your computer on, follow these steps to set up your dial-up connection: 1. Click Start from the Windows taskbar and select All Programs. 2. Point to Accessories, point to Communications, and then click New Connection Wizard. The Location - Sony PCV-RX570 | Online Help Center - Page 37
5. Follow the onscreen instructions to finish setting up your Internet connection. Page 37 - Sony PCV-RX570 | Online Help Center - Page 38
To Use the Stand by Mode When you plan to stop using your computer for a short period of time, you can put it in Stand by mode instead of turning it off completely. Putting the computer in Stand by mode saves energy and allows a quick return to normal computer use. You can use any of the following - Sony PCV-RX570 | Online Help Center - Page 39
Setting the computer to enter Stand by mode using the Stand by key Press the (Stand by) key on the top of the keyboard. The computer goes into Stand by mode. Page 39 - Sony PCV-RX570 | Online Help Center - Page 40
Setting the computer to enter Stand by mode using the Windows taskbar 1. Click Start in the Windows taskbar, then select Turn Off Computer. 2. Select Stand by. 3. Click OK. The computer goes into Stand by mode. Page 40 - Sony PCV-RX570 | Online Help Center - Page 41
Setting the computer to enter Stand by mode using the Power button Briefly press the Power button on the front panel to place your computer into Stand by mode. Page 41 - Sony PCV-RX570 | Online Help Center - Page 42
and Maintenance. The Performance and Maintenance dialog box appears. 2. Click the Control Panel icon for Power Options. The Power Options Properties dialog box appears. 3. Select the Power Schemes tab. Choose an option from the Power schemes drop-down list. Note: To save the settings under a name - Sony PCV-RX570 | Online Help Center - Page 43
Resuming from Stand by mode There are two ways to bring your computer back from Stand by mode: Press the space bar on your keyboard. Briefly press the power button on your computer. Page 43 - Sony PCV-RX570 | Online Help Center - Page 44
Stand by mode indicators You can identify which mode the computer is in by the color of the power indicator light. Color Mode Amber Computer is in Stand by mode. Blue Computer is in Normal mode, ready to use. No color Computer is turned off or in Hibernate mode. Page 44 - Sony PCV-RX570 | Online Help Center - Page 45
To Use the System Hibernate Mode System hibernate mode enables your computer to store everything in its memory to the hard disk drive before shutting down. When you bring the system out of hibernation mode, it returns to the previous state. Page 45 - Sony PCV-RX570 | Online Help Center - Page 46
The Performance and Maintenance dialog box appears. 2. Click the Control Panel icon for Power Options. The Power Options Properties dialog box appears. 3. In the section, Settings for Home/Office Desk (default Power scheme), select the Power Schemes tab. Click the System hibernate drop-down list and - Sony PCV-RX570 | Online Help Center - Page 47
To Shut Down Your Computer When you are ready to turn off your computer for an extended period of time, use this procedure. Caution: To avoid loss of data, do not use the Power switch to turn off the computer. Page 47 - Sony PCV-RX570 | Online Help Center - Page 48
Shut Down option and click OK. Note: Respond to any prompts about saving your documents. 3. Wait for your computer to turn off automatically--the power indicator light turns off. 4. Turn off any peripheral devices connected to your computer. Note: If you plan to turn off your computer for a short - Sony PCV-RX570 | Online Help Center - Page 49
About the Power switch If your system stops responding, press and hold the Power switch for more than four seconds to force your system to shut down. You may need to repeat this procedure if your system does not shut down on the first attempt. Page 49 - Sony PCV-RX570 | Online Help Center - Page 50
VAIO Action Setup VAIO Action Setup manages the settings for your computer's Shortcut keys (S Keys). Page 50 - Sony PCV-RX570 | Online Help Center - Page 51
the S keys to launch other applications. Note: i.LINK is a trademark of Sony used only to designate that a product contains an IEEE1394 connection. The i.LINK connection connecting compatible i.LINK PC peripherals to your system, such as an optical or hard disk drive, confirm their operating system - Sony PCV-RX570 | Online Help Center - Page 52
S Keys 1. Click Start in the Windows Taskbar and select All Programs. 2. Select VAIO Action Setup, then click VAIO Action Setup. Note: You can also double-click the VAIO Action Setup icon, located in the Windows taskbar, to launch VAIO Action Setup. 3. Click the S Key you want to change. 4. From the - Sony PCV-RX570 | Online Help Center - Page 53
To Change the Sony Software Window Design You can select from different window designs for your Sony software and create your own personal computing environment. Page 53 - Sony PCV-RX570 | Online Help Center - Page 54
. 2. Click Other Control Panel Options. 3. Click UI Design Selector. 4. Click > and select the desired design. 5. Click Apply. 6. The "UI Design Selector" window design changes. The window design for your Sony software will match the "UI Design Selector" window. 7. To try another selection - Sony PCV-RX570 | Online Help Center - Page 55
Configuring Your VAIO Computer This section provides information about maintaining your computer's hard disk drive performance, connecting a compatible i.LINK® device, and enabling an Ethernet connection. Page 55 - Sony PCV-RX570 | Online Help Center - Page 56
defragment your computer's D partition regularly. To improve the performance of Sony audio and video software applications, the hard disk drive on your computer has been formatted with two partitions, C and D. Some Sony software applications save files to the D partition. This prevents large video - Sony PCV-RX570 | Online Help Center - Page 57
If you encounter frame dropping while recording digital video onto your hard disk drive, defragmentation may be necessary. 1. Deactivate your screen saver and close other open applications, , depending on the data capacity and current utilization of your computer's hard disk drive(s). Page 57 - Sony PCV-RX570 | Online Help Center - Page 58
and proper connection. Before connecting compatible i.LINK PC peripherals to your system, such as an optical or hard disk drive, confirm their operating system compatibility and required operating conditions. A 6-pin i.LINK port can: supply power from the computer to the connected device if - Sony PCV-RX570 | Online Help Center - Page 59
cable connector into this port. 2. Plug the other end of the cable into the corresponding 4- or 6-pin i.LINK port on your computer. Note: See the instructions that came with your i.LINK device for more information on installation and use. Page 59 - Sony PCV-RX570 | Online Help Center - Page 60
To Enable Ethernet Connectivity Your computer comes with a preinstalled Ethernet port. To enable faster start-up time, your computer may ship with this function disabled. You can enable Ethernet connectivity by following the instructions below. Page 60 - Sony PCV-RX570 | Online Help Center - Page 61
. 11. Close Performance and Maintenance dialog box. Caution: Caution: Your computer has a protective sticker covering the Ethernet port located on the rear panel. Connect only 10Base-T and 100Base-TX cables to the Ethernet port. Using other cables or a telephone cable may result in an electric - Sony PCV-RX570 | Online Help Center - Page 62
About the Software on Your Computer Your VAIO® computer is ready to help you work, play, learn, and communicate as soon as you turn it on. This section provides an overview of the software titles preinstalled on your computer. Page 62 - Sony PCV-RX570 | Online Help Center - Page 63
Total Access EarthLink Network Inc. An Internet Service Provider that supplies access, information, and assistance to its customers support. Media Bar DVD Player Sony Electronics Inc. Media Bar DVD Player is created especially for high-quality DVD playback. You can enjoy the superior digital - Sony PCV-RX570 | Online Help Center - Page 64
continually integrate additional services into Office and Office XP you'll find a powerful new technology that will help you Sony Electronics Inc. This image management software displays images from your hard drive, a Sony digital still camera, or a Sony supports many digital media formats. The user- - Sony PCV-RX570 | Online Help Center - Page 65
via e-mail. Smart Capture manages the i.LINK connection between your notebook and a Sony Digital Handycam Camcorder that supports the i.LINK interface. It allows you to capture compressed video or still images and save them to your hard disk drive or share via e-mail. A smart solution for computer - Sony PCV-RX570 | Online Help Center - Page 66
the hard disk of the Sony computer you purchased. Application Recovery CD(s) Sony Electronics Inc. The Application Recovery CD program enables you to reinstall individual applications. Use it to restore corrupted or erased files. Driver Recovery CD Sony Electronics Inc. The Driver Recovery CD - Sony PCV-RX570 | Online Help Center - Page 67
or are erased. If you experience a problem with your computer, reinstalling an individual application or device driver may correct the problem.You may not need to recover the entire contents of your hard drive. Note: Use the Application Recovery CD(s) to reinstall individual applications. When you - Sony PCV-RX570 | Online Help Center - Page 68
Full restore with format The System Recovery utility formats your hard disk drive and then restores all the original software applications. Caution: You will lose any software you have installed and any other files you have created since - Sony PCV-RX570 | Online Help Center - Page 69
optical drive. 2. Turn off your computer. 3. Wait 30 seconds and turn on your computer. 4. Type the letter "O" to signify you have read and accepted the Microsoft End-User License Agreement. 5. When the System Recovery menu appears, follow the on-screen instructions to complete the recovery process - Sony PCV-RX570 | Online Help Center - Page 70
application may correct a problem that you are experiencing with your computer or specific application. You may not need to reinstall the entire contents of your hard drive. Note: If you need to reinstall all of the software that shipped with your computer, use the System Recovery CD(s). You must - Sony PCV-RX570 | Online Help Center - Page 71
desktop appears, insert the Application Recovery CD into your computer's optical drive. The Application Recovery utility drives, insert the Application Recovery CD into the upper optical drive. 3. When the Application Recovery menu appears, follow the on-screen instructions to complete the recovery - Sony PCV-RX570 | Online Help Center - Page 72
To Use the Driver Recovery CD The Driver Recovery CD utility enables you to reinstall individual drivers and repair software applications if they become corrupted or are erased. You can reinstall an individual driver to correct a problem that you are experiencing with your computer, peripheral - Sony PCV-RX570 | Online Help Center - Page 73
Windows desktop appears, insert the Driver Recovery CD into the optical disc drive. Note: If your system is equipped with two optical drives, insert the Driver Recovery CD into the upper optical drive. 3. Click Start in the Windows taskbar and click Control Panel. The Control Panel window appears - Sony PCV-RX570 | Online Help Center - Page 74
Troubleshooting This section describes how to solve common problems you may encounter when using your computer. Many problems have simple solutions, so try these suggestions before you call Sony Customer Support. Page 74 - Sony PCV-RX570 | Online Help Center - Page 75
lit on the front panel of the computer. Confirm that a disk is not in the floppy disk drive (unless you are using a bootable floppy disk). Confirm that the power cord and all cables are connected firmly. If you plugged the computer into a power strip or Uninterruptible Power Supply (UPS), make - Sony PCV-RX570 | Online Help Center - Page 76
When the Sony screen displays, according to the manufacturer's instructions. If your drive reads some DVDs or To Use the Application Recovery CD(s) for more Troubleshooting topic, How do I change the video resolution of my display? Note: If your computer's video memory is 11 MB shared system memory - Sony PCV-RX570 | Online Help Center - Page 77
drivers are installed properly, by following these steps: 1. Click Start in the Windows taskbar, then select Control Panel your computer, see To Use the Application Recovery CD(s) for more information. Topic: power source, verify that the power cord is plugged into a grounded wall outlet or power - Sony PCV-RX570 | Online Help Center - Page 78
If your modem is not working properly, click the troubleshoot button. The VAIO Help and Support Center window appears. 6. Follow the onscreen instructions to resolve the problem. Note: You may need to reinstall the modem drivers. See To Use the Driver Recovery CD for more information. Topic: How do - Sony PCV-RX570 | Online Help Center - Page 79
Use the Driver Recovery CD for more information. Topic: My m ouse needs to be set up for left- hand use. 1. Click Start in the Windows taskbar, then click Control Panel. 2. . Increasing the system memory may also help. For information on installing memory, please see the online VAIO PUasgeer 79 - Sony PCV-RX570 | Online Help Center - Page 80
choose an alternate printer driver that your printer may emulate. Refer to the manual that came with your printer for specific emulation information. Topic: My connected printer doesn't function after the com puter resum es from a power sav ing m ode. Clear the printer memory by turning the printer - Sony PCV-RX570 | Online Help Center - Page 81
To contact Sony for technical support For further technical assistance, call 1-888-4-SONY-PC (1-888-476-6972) or access the Web site at: http://www.sony.com/pcsupport. Page 81 - Sony PCV-RX570 | Online Help Center - Page 82
Notes on Use The information in this section provides basic procedures to follow when handling your computer, components and accessories. Page 82 - Sony PCV-RX570 | Online Help Center - Page 83
power surges. The battery backup safeguards your data during a brief period of power loss. The power control button on the front panel does not turn off the system AC power. To remove power to open the power supply. There are no user-serviceable parts in the power supply. To avoid personal injury or - Sony PCV-RX570 | Online Help Center - Page 84
or business trash may be prohibited. You can return your unwanted lithium batteries to your nearest Sony Service Center or Factory Service Center. For the Sony Service Center nearest you, call 1-888-4-SONY-PC (1-888-476-6972). Caution: Do not handle damaged or leaking lithium batteries. The lithium - Sony PCV-RX570 | Online Help Center - Page 85
call to your home or office and determines that your computer is responsible for the problem, the telephone company may bill you for the service call. If you do not disconnect your computer when it is adversely affecting the telephone line, the telephone company has the right to disconnect your - Sony PCV-RX570 | Online Help Center - Page 86
Moisture condensation If your computer is brought directly from a cold location to a warm one, moisture may condense inside your computer. In this case, allow at least an hour before turning on your computer. If any problem occurs, unplug your computer, and contact your Sony Service Center. Page 86 - Sony PCV-RX570 | Online Help Center - Page 87
in personal injury or equipment damage. Electrostatic discharge (ESD) can damage disk drives, add-on cards, and other components. Follow the procedures described in the online manual, Upgrading and Maintaining Your VAIO Digital Studio Computer, only at an ESD workstation. If such a station is not - Sony PCV-RX570 | Online Help Center - Page 88
Handling a CRT display Do not change the CRT display refresh rate to 85 Hz, as DVD playback and the DVgate software may not function correctly. Sony recommends that you keep your CRT display at the preset, optimal refresh rate (75 Hz). Do not place the display near a strong magnetic force. Do - Sony PCV-RX570 | Online Help Center - Page 89
the hard disk drive Do not place the computer in a location that is subject to vibration or shock. Do not move the computer during operation. Do not subject the computer to sudden changes in temperature. Do not turn off the power while the computer is accessing the hard disk drive. Page - Sony PCV-RX570 | Online Help Center - Page 90
Handling floppy disks Do not open the shutter manually and touch the surface of the floppy disk. Keep floppy disks away from magnets. Keep floppy disks away from direct sunlight and other heat sources. Page 90 - Sony PCV-RX570 | Online Help Center - Page 91
Handling CD or DVD media Do not touch the surface of the disc. Do not drop or bend the disc. Do not use adhesive labels to identify the disc. The label may come off while the disc is in use in the optical drive and damage the drive. Page 91 - Sony PCV-RX570 | Online Help Center - Page 92
Cleaning CD or DVD media Fingerprints and dust on the surface of a disc may cause read errors. Proper care of the disc is essential to maintain its reliability. Do not use solvents such as benzine, thinner, commercially available cleaners or anti-static spray, as they may cause damage to the disc. - Sony PCV-RX570 | Online Help Center - Page 93
information for your computer's preinstalled software applications. Check this software support listing to locate information from the Internet, by e-mail, or by telephone. Note: Your computer may not be supplied with all of the software applications listed, depending on the system configuration - Sony PCV-RX570 | Online Help Center - Page 94
Sony Service Center For the Sony Service Center nearest you, call 1-888-4-SONY-PC (1-888-476-6972), or visit the Web site at http://www.sony.com/pcsupport. This service is free of charge for 90 days after the original date of purchase. Page 94 - Sony PCV-RX570 | Online Help Center - Page 95
models) Office XP Small Business Edition (on selected models) (Microsoft Corporation) Web site http://www.sony.com/pcsupport phone 888-4-SONY-PC (888-476-6972)1 hours 7 days a week, 24 hours a day 1 Support from 888-4-SONY-PC is free of charge for 90 days after the original date of purchase - Sony PCV-RX570 | Online Help Center - Page 96
http://service.real.com/help/call.html (online email form) hours M - F, 8:00 AM - 6:00 PM PST Sat. - Sun, 7:30 AM - 4:00 PM PST Sony Applications (Sony Electronics Inc.) Web site http://www.sony.com/pcsupport phone 888-4-SONY-PC (888-476-6972)1 hours 7 days a week, 24 hours a day 1 Support - Sony PCV-RX570 | Online Help Center - Page 97
(Corel Corp.) Web site http://www.corel.com/support/product_specific/wp9.htm phone 716-871-2325 hours M- F, 8:30 AM - 7:30 PM ET Page 97 - Sony PCV-RX570 | Online Help Center - Page 98
hard drive. Two additional guides, Upgrading and Maintaining your VAIO Computer and the Troubleshooting Help are also available online. To access online documentation: 1. Click the Start button and point to VAIO Help and Support Center. 2. Click on the VAIO User Guide. Software application manuals - Sony PCV-RX570 | Online Help Center - Page 99
of your VAIO Digital Studio computer. This section describes how to open your computer and insert add-on cards, add memory, replace the lithium battery, and install an additional hard disk drive. For more information on upgrading your Sony computer, see the System Reference Manual. You can - Sony PCV-RX570 | Online Help Center - Page 100
Overview The procedures in this section assume that you are familiar with the general terminology associated with personal computers and with the regulatory compliance required for using and modifying electronic equipment. Page 100 - Sony PCV-RX570 | Online Help Center - Page 101
the computer system. Caution: Electrostatic discharge (ESD) can damage disk drives, add-on cards, and other components. Follow the procedures described here portion of the chassis while performing the procedure. Always turn the power off before you open the system or connect your computer to - Sony PCV-RX570 | Online Help Center - Page 102
To Remove the Side Cover Caution: If you remove the side cover immediately after you shut down your computer, the components may be too hot to touch. Wait until the internal parts of the system unit cool down before you attempt to remove the side cover. Page 102 - Sony PCV-RX570 | Online Help Center - Page 103
all peripheral devices, such as your printer. 2. Unplug your computer and any peripheral devices. 3. Locate the tab on the upper right side of the rear panel, and pull it back until the side cover releases. 4. Lift the side cover away from the unit and set aside. Removing the side cover Page - Sony PCV-RX570 | Online Help Center - Page 104
, such as Configure-to-Order (CTO) systems, may contain preinstalled add-on cards. Caution: Observe the proper safety precautions when you add cards to your Sony computer. See Upgrading the computer system. Page 104 - Sony PCV-RX570 | Online Help Center - Page 105
securing it with the screw from the expansion slot cover. Installing an add-on card 6. Attach any internal cables that the card requires. See the instructions that came with the add-on card. 7. Replace the side cover. See Replacing the side cover. 8. Reconnect all peripheral devices and the - Sony PCV-RX570 | Online Help Center - Page 106
use only 3.3V 64-bit PC-133 SDRAM Dual Inline Memory Modules (DIMM). Note: You can purchase additional memory modules, accessories, and peripheral equipment from your local retailer. Caution: Observe the proper safety precautions when you add or remove memory in your Sony computer. See Upgrading the - Sony PCV-RX570 | Online Help Center - Page 107
Removing Memory 1. Shut down your computer and turn off all peripheral devices, such as your printer. 2. Unplug your computer and any peripheral devices. 3. Remove slot. 7. Grasp one edge of the DIMM module and lift it out. Store the module in a static-free bag. Removing/Installing memory Page 107 - Sony PCV-RX570 | Online Help Center - Page 108
Installing Memory 1. Shut down your computer and turn off all peripheral devices, such . Reinstall any components or add-on cards you removed. 11. Reinstall the power supply by following these steps: Rotate the power supply down to its original position and slide it into the chassis until the tab - Sony PCV-RX570 | Online Help Center - Page 109
years and the system settings, such as the date and time stored in CMOS RAM, may become inaccurate. Replace the lithium battery when this occurs. Caution: There is with a CR2032-type lithium battery. For instructions on proper disposal of lithium batteries, see Disposal of the lithium battery. Page - Sony PCV-RX570 | Online Help Center - Page 110
the side cover. The values stored in the CMOS memory are now reset to the factory default values. Run BIOS settings. If you do not wish to customize your BIOS settings, you do not need to run the Setup utility. To reset your computer's date and time, see VAIO Help and Support for instructions - Sony PCV-RX570 | Online Help Center - Page 111
support ATA-33, ATA-66, or ATA-100 hard disk drives. Note: The hard disk drive access light blinks when either internal drive is active. For detailed information on how to install additional drives, see the System Reference Manual. You can download the System Reference Manual from: http://www.sony - Sony PCV-RX570 | Online Help Center - Page 112
side cover. 4. Configure the jumpers on the new drive as a slave. See the configuration instructions that came with your drive. 5. Detach the power and drive cables from the hard disk drive that is already installed in your computer. 6. Unlock the drive holder from the chassis by pulling down on the - Sony PCV-RX570 | Online Help Center - Page 113
side cover. See Replacing the side cover. 14. Reconnect the power to your computer. Your computer automatically recognizes the new hard disk drive and configures itself accordingly when you turn it on. Partition and format the new drive following the instructions provided with the drive. Page 113 - Sony PCV-RX570 | Online Help Center - Page 114
To Replace the Side Cover Page 114 - Sony PCV-RX570 | Online Help Center - Page 115
Replacing the side cover 1. Align the tabs on the side cover to the chassis rim. 2. Press the side cover firmly against the unit until it snaps into place. Replacing the side cover Page 115
-
 1
1 -
 2
2 -
 3
3 -
 4
4 -
 5
5 -
 6
6 -
 7
7 -
8
-
9
-
10
-
11
-
12
-
13
-
14
-
15
-
16
-
17
-
18
-
19
-
20
-
21
-
22
-
23
-
24
-
25
-
26
-
27
-
28
-
29
-
30
-
31
-
32
-
33
-
34
-
35
-
36
-
37
-
38
-
39
-
40
-
41
-
42
-
43
-
44
-
45
-
46
-
47
-
48
-
49
-
50
-
51
-
52
-
53
-
54
-
55
-
56
-
57
-
58
-
59
-
60
-
61
-
62
-
63
-
64
-
65
-
66
-
67
-
68
-
69
-
70
-
71
-
72
-
73
-
74
-
75
-
76
-
77
-
78
-
79
-
80
-
81
-
82
-
83
-
84
-
85
-
86
-
87
-
88
-
89
-
90
-
91
-
92
-
93
-
94
-
95
-
96
-
97
-
98
-
99
-
100
-
101
-
102
-
103
-
104
-
105
-
106
-
107
-
108
-
109
-
110
-
111
-
112
-
113
-
114
-
115
 |
 |

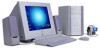
Welcome
Congratulations on your purchase of the Sony VAIO
®
Digital Studio
computer! Your new, high-performance, multimedia
computer combines state-of-the-art computer functionality with the latest audio/video and information technology features.
Page 1