Sony STR-ZA2000ES Startup Guide
Sony STR-ZA2000ES Manual
 |
View all Sony STR-ZA2000ES manuals
Add to My Manuals
Save this manual to your list of manuals |
Sony STR-ZA2000ES manual content summary:
- Sony STR-ZA2000ES | Startup Guide - Page 1
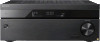
©2014 Sony Corporation Printed in Malaysia MULTI CHANNEL AV RECEIVER 4-537-101-12(1) STR-ZA3000ES/STR-ZA2000ES/STR-ZA1000ES Startup Guide US Guide de démarrage FR Guía de inicio ES - Sony STR-ZA2000ES | Startup Guide - Page 2
) HDMI (5 input, 2 output) (for STR-ZA1000ES only) Switching hub (for STR-ZA3000ES only) Multi-zone Description The receiver can output up to 7.2 channels. The receiver supports bi-amplifier connections for front speakers. The receiver is compatible with various audio formats, such as Dolby TrueHD - Sony STR-ZA2000ES | Startup Guide - Page 3
, and basic functions of the receiver. Visit the Help Guide for complete instructions. Help Guide (online manual) The Help Guide provides the following information and instructions online. Visit the Help Guide using a computer or mobile device. http://rd1.sony.net/help/ha/strza321/h_uc2/ Reference - Sony STR-ZA2000ES | Startup Guide - Page 4
panel cover Parts on/standby) Remote sensor MASTER VOLUME HDMI jack cover (for STR-ZA3000ES/STRZA2000ES only) Functions Turns the receiver on or sets it to standby mode. The indicator lights up according to the status of the receiver. Also, the color of the indicator changes depending on - Sony STR-ZA2000ES | Startup Guide - Page 5
panel of the receiver to operate the receiver. IN-CEILING SP Activates the In-Ceiling Speaker Mode. SOUND FIELD (2CH/ Selects the sound field you want. A.DIRECT, A.F.D., MOVIE, MULTI ST.) HDMI IN 6 (GAME) jack Connect to a video game console. The video (for STR-ZA3000ES/STR- and sound - Sony STR-ZA2000ES | Startup Guide - Page 6
the receiver. HOME Displays the home menu on the TV screen. AMP MENU Displays the menu on the display panel of the receiver to operate the receiver. connected to the HDMI OUT A and HDMI OUT B jacks. Select the device you want to use. When you press any of the input buttons, the receiver turns on. - Sony STR-ZA2000ES | Startup Guide - Page 7
Parts Functions SOUND FIELD (2CH/ Selects the sound field you want. A.DIRECT, A.F.D., MOVIE, MULTI ST.) Adjusts the volume level. * The + button has a tactile dot. Use the tactile dot as a reference when operating the receiver. 7US - Sony STR-ZA2000ES | Startup Guide - Page 8
Setup). Perform this step after removing the front cover. Batteries 2 Connect the supplied AC power cord (mains lead) to the AC IN terminal on the receiver firmly, then connect the AC power cord (mains lead) to a wall outlet. AC power cord (mains lead) (supplied) * AC IN terminal To the wall outlet - Sony STR-ZA2000ES | Startup Guide - Page 9
you want to display the Easy Setup screen manually, you can display it by selecting [Setup] - [Easy Setup] from the home menu. 1 Press to select the language for the messages on the screen, and then press . 2 Set up the receiver in accordance with the instructions on the Easy Setup screen. 9US - Sony STR-ZA2000ES | Startup Guide - Page 10
device 1 Turn the TV on, and then switch the input of the TV to that which the receiver is connected. 2 Press HOME. The home menu is displayed on the TV screen. HOME SOUND FIELD (2CH/ A.DIRECT, A.F.D., MOVIE, MULTI ST.) +/- 3 Press repeatedly to select [Watch] or [Listen], and then press - Sony STR-ZA2000ES | Startup Guide - Page 11
the TV screen You can display the menu of the receiver on the TV screen. 2 Press HOME. The home menu is displayed on the TV screen. OPTIONS RETURN HOME 1 Turn the TV on, and then switch the input of the TV to that which the receiver is connected. 3 Press repeatedly to select the menu you - Sony STR-ZA2000ES | Startup Guide - Page 12
settings 2 Press HOME. The home menu is displayed on the TV screen. HOME 1 Turn the TV on, and then switch the input of the TV to that which the receiver is connected. 3 IIx Neo:6 Multi Stereo For Details on each mode, visit the Help Guide. http://rd1.sony.net/help/ha/strza321/h_uc2/ 12US - Sony STR-ZA2000ES | Startup Guide - Page 13
can search by a keyword using the online troubleshooting guide. If you still cannot find a solution, consult your nearest Sony dealer. General The top of the receiver is hot. Phenomenon is specific to this amplifier. This is not a malfunction. If "Control for HDMI" or "Network Standby" is set to - Sony STR-ZA2000ES | Startup Guide - Page 14
Insert a USB flash drive on which the package file for updating the receiver is saved, and then turn the receiver off and turn it on again. List of messages after Auto Calibration measurements Display Explanation Code 31 Front speakers are not selected properly. Select the front speakers - Sony STR-ZA2000ES | Startup Guide - Page 15
SURROUND: 120 W + 120 W SURROUND BACK: 120 W + 120 W Reference Power Output (8 ohms 1 kHz, THD 0.9%) STR-ZA3000ES FRONT: 110 W + 110 W CENTER: 110 W SURROUND: 110 W + 110 W SURROUND BACK: 110 W + 110 W STR-ZA2000ES FRONT: 100 W + 100 W CENTER: 100 W SURROUND: 100 W + 100 W SURROUND BACK: 100 W + 100 - Sony STR-ZA2000ES | Startup Guide - Page 16
Through HDMI Video Input/Output (HDMI Repeater block) All HDMI IN/OUT jacks support 4K resolution. The following HDMI jacks support High-bandwidth Digital Content Protection System Revision 2.2 (HDCP 2.2). STR-ZA3000ES HDMI IN 2/IN 3, HDMI OUT A/OUT B STR-ZA2000ES/STR-ZA1000ES HDMI IN 2, HDMI OUT - Sony STR-ZA2000ES | Startup Guide - Page 17
and controls Mass (including the front cover) (Approx.) STR-ZA3000ES 13.4 kg (29 lb 9 oz) STR-ZA2000ES 13.0 kg (28 lb 11 oz) STR-ZA1000ES 12.3 kg (27 lb 2 oz) Supplied accessories Startup Guide (this manual) Quick Setup Guide (1) Reference Guide (1) Optimizer microphone (ECM-AC2) (1) FM wire antenna - Sony STR-ZA2000ES | Startup Guide - Page 18
chaque fonction. http://rd1.sony.net/help/ha/strza321 Dolby TrueHD, DTS-HD Master Audio, DSD et PCM linéaire multicanaux. HDMI (6 entrées (1 en Vous pouvez raccorder toute une gamme façade), 2 sorties) (uniquement pour le STR-ZA3000ES/STRZA2000ES) HDMI (5 entrées, 2 sorties) (uniquement pour le STR - Sony STR-ZA2000ES | Startup Guide - Page 19
(manuel en ligne) Ce Manuel d'aide fournit les informations et les instructions suivantes en ligne. Accédez au Manuel d'aide à l'aide d'un ordinateur ou d'un appareil mobile. http://rd1.sony.net/help/ha/strza321/h_uc2/ Guide de référence (document distinct) Ce manuel aborde les réglementations et - Sony STR-ZA2000ES | Startup Guide - Page 20
commandes principales Capot du panneau avant Pièces marche/veille) Capteur de télécommande MASTER VOLUME Capuchon de la prise HDMI (uniquement pour le STR-ZA3000ES/STRZA2000ES) Fonctions Permet d'allumer l'ampli-tuner ou de le régler en mode veille. Le témoin s'allume en fonction de l'état - Sony STR-ZA2000ES | Startup Guide - Page 21
HDMI OUT A et HDMI OUT B. SETTING ( port (USB)) Permet de procéder à la maintenance et au service et le panneau d'affichage de l'ampli-tuner. HOME Affiche le menu d'accueil sur l'écran du MULTI ST.) Prise HDMI IN 6 (GAME) (uniquement pour le STR-ZA3000ES/STRZA2000ES) Permet de connecter - Sony STR-ZA2000ES | Startup Guide - Page 22
sur l'écran du téléviseur et le panneau d'affichage de l'ampli-tuner. HOME Affiche le menu d'accueil sur l'écran du téléviseur. AMP MENU Affiche régler en mode veille. HDMI OUTPUT Commute la sortie pour deux moniteurs raccordés sur les prises HDMI OUT A et HDMI OUT B. Touches d'entrée - Sony STR-ZA2000ES | Startup Guide - Page 23
Pièces Fonctions TEST (PICTURE, TONE) Appuyez pour reproduire l'image test ou le son test. SOUND FIELD (2CH/ Permet de sélectionner le champ sonore A.DIRECT, A.F.D., MOVIE, souhaité. MULTI ST.) Permet de régler le niveau du volume. * La touche + possède un point tactile. Utilisez - Sony STR-ZA2000ES | Startup Guide - Page 24
Préparation 1 : Préparation de l'ampli-tuner et de la télécommande 1 Insérez des piles dans la télécommande. * Il reste un espace entre la fiche et le panneau arrière, même lorsque le cordon d'alimentation est fermement inséré. Il est prévu que le cordon soit branché de cette manière. Il ne s'agit - Sony STR-ZA2000ES | Startup Guide - Page 25
5 Mettez le téléviseur sous tension, puis commutez l'entrée du téléviseur sur celle sur laquelle l'ampli-tuner est raccordé. 9FR - Sony STR-ZA2000ES | Startup Guide - Page 26
[Setup] - [Easy Setup] depuis le menu d'accueil. 1 Appuyez sur pour sélectionner la langue des messages affichés à l'écran, puis sur . 2 Réglez l'ampli-tuner conformément aux instructions affichées sur l'écran Easy Setup. 10FR - Sony STR-ZA2000ES | Startup Guide - Page 27
ST.) +/- 1 Mettez le téléviseur sous tension, puis commutez l'entrée du téléviseur sur celle sur laquelle l'ampli-tuner est raccordé. 2 Appuyez sur HOME. Le menu d'accueil s'affiche sur l'écran du téléviseur. 3 Appuyez à plusieurs reprises sur pour sélectionner [Watch] ou [Listen], puis sur . La - Sony STR-ZA2000ES | Startup Guide - Page 28
du téléviseur Vous pouvez afficher le menu de l'ampli-tuner sur l'écran du téléviseur. 2 Appuyez sur HOME. Le menu d'accueil s'affiche sur l'écran du téléviseur. OPTIONS RETURN HOME 1 Mettez le téléviseur sous tension, puis commutez l'entrée du téléviseur sur celle sur laquelle l'ampli-tuner - Sony STR-ZA2000ES | Startup Guide - Page 29
Le menu d'accueil s'affiche sur l'écran du téléviseur. HOME 1 Mettez le téléviseur sous tension, puis commutez l'entrée du téléviseur sur celle sur laquelle l' Neo:6 Multi Stereo Pour en savoir plus sur chaque mode, consultez le Manuel d'aide. http://rd1.sony.net/help/ha/strza321/h_uc2/ 13FR - Sony STR-ZA2000ES | Startup Guide - Page 30
détaillés. http://rd1.sony.net/help/ha/strza321/h_uc2/ Vous pouvez rechercher à l'aide d'un mot-clé grâce au guide de dépannage en ligne depuis la prise HDMI OUT B. Image 4K Selon le téléviseur ou l'équipement vidéo, il est possible que des images 4K ne soient pas affichées. Vérifiez la - Sony STR-ZA2000ES | Startup Guide - Page 31
recouvre le panneau supérieur de l'ampli-tuner et remettez-le sous tension. UPDATE FAILED Insérez une clé USB sur laquelle est enregistré le à Auto Calibration (page 5). Code 32, Code 33 Les enceintes n'ont pas été détectées ou ne sont pas raccordées correctement. Aucune des enceintes - Sony STR-ZA2000ES | Startup Guide - Page 32
» est utilisé. Entrées (Numériques) IN (BD/DVD) (Coaxiale) IN 1 (AUX), IN 2 (TV) (Optique) Impédance : 75 ohms S/B : 96 dB (A, 20 kHz filtre passebas) S/B : 96 dB (A, 20 kHz filtre passe-bas) Sorties ZONE2, ZONE 3 (AUDIO OUT) Tension : 2 V Impédance : 1 kohm STR-ZA3000ES FRONT L/R, CENTER - Sony STR-ZA2000ES | Startup Guide - Page 33
Plage d'accord 530 kHz - 1 710 kHz 531 kHz - 1 710 kHz Section vidéo Entrées/sorties Vidéo : 1 Vc-c, 75 ohms COMPONENT VIDEO : Y : 1 Vc-c, 75 ohms levée, révision 2.2 (HDCP 2.2). STR-ZA3000ES HDMI IN 2/IN 3, HDMI OUT A/OUT B STR-ZA2000ES/STR-ZA1000ES HDMI IN 2, HDMI OUT A 3D Format 2D Paquet Cô - Sony STR-ZA2000ES | Startup Guide - Page 34
sur « Off » et si la zone 2/zone 3 est désactivée.) Dimensions 430 mm × 174 mm × 410 mm (17 po × 6 7/8 po × 16 1/4 po) (largeur/ auteur/profondeur) parties saillantes et commandes comprises Poids (y compris le capot avant) (environ) STR-ZA3000ES 13,4 kg (29 lb 9 oz) STR-ZA2000ES 13,0 kg (28 lb 11 oz - Sony STR-ZA2000ES | Startup Guide - Page 35
19FR - Sony STR-ZA2000ES | Startup Guide - Page 36
) Concentrador de conmutación (solo para STR-ZA3000ES) Descripción El receptor puede emitir sonido en hasta 7,2 canales. El receptor admite conexiones de biamplificador para altavoces frontales. El receptor es compatible con diversos formatos de audio, como Dolby TrueHD, DTS-HD Master Audio, DSD - Sony STR-ZA2000ES | Startup Guide - Page 37
en línea) La Guía de Ayuda proporciona la siguiente información e instrucciones en línea. Visite la Guía de Ayuda en una computadora o dispositivo móvil. http://rd1.sony.net/help/ha/strza321/h_uc2/ Guía de referencia (documento separado) Este manual cubre las normas y precauciones de seguridad. 3ES - Sony STR-ZA2000ES | Startup Guide - Page 38
Partes y controles principales Cubierta del panel frontal Partes encendido/en espera) Sensor remoto MASTER VOLUME Tapa de la toma HDMI (solo para STRZA3000ES/STRZA2000ES) Funciones Enciende el receptor o lo pone en modo de espera. El indicador se enciende según el estado del receptor. Adem - Sony STR-ZA2000ES | Startup Guide - Page 39
la pantalla del televisor y en el panel de visualización del receptor. HOME Muestra el menú de inicio en la pantalla del televisor. AMP MENU Muestra de sonido A.DIRECT, A.F.D., MOVIE, deseado. MULTI ST.) Toma HDMI IN 6 (GAME) (solo para STRZA3000ES/STRZA2000ES) Permite conectar el receptor - Sony STR-ZA2000ES | Startup Guide - Page 40
la pantalla del televisor y en el panel de visualización del receptor. HOME Muestra el menú de inicio en la pantalla del televisor. AMP MENU pone en modo de espera. HDMI OUTPUT Cambia la salida de dos monitores conectados a las tomas HDMI OUT A y HDMI OUT B. Botones de entrada Permiten - Sony STR-ZA2000ES | Startup Guide - Page 41
Partes Funciones CUSTOM PRESET (1, 2, 3, Guarda y permite reutilizar diversos ajustes 4) del receptor. SP SETUP Muestra el menú de configuración de altavoces. TEST (PICTURE, TONE) Presione para reproducir la imagen de prueba o el tono de prueba. SOUND FIELD (2CH/ Permite - Sony STR-ZA2000ES | Startup Guide - Page 42
Terminal AC IN Al tomacorriente * Queda un espacio entre el conector y el panel posterior incluso si el cable de alimentación está insertado correctamente. Es normal que sea así. No se trata de un defecto. 8ES Nota Inserte completamente el conector del micrófono optimizador en la toma AUTO CAL - Sony STR-ZA2000ES | Startup Guide - Page 43
Preparación 2: Procedimiento de Easy Setup La pantalla Easy Setup aparece en el televisor la primera vez que enciende el receptor o después de haber inicializado el receptor. Nota Si la pantalla Easy Setup no aparece o si desea abrir la pantalla Easy Setup manualmente, puede seleccionar [Setup] - [ - Sony STR-ZA2000ES | Startup Guide - Page 44
1 Encienda el televisor y seleccione la entrada del televisor donde está conectado el receptor. 2 Presione HOME. Aparece el menú de inicio en la pantalla del televisor. HOME SOUND FIELD (2CH/ A.DIRECT, A.F.D., MOVIE, MULTI ST.) +/- 3 Presione varias veces para seleccionar [Watch] o [Listen - Sony STR-ZA2000ES | Startup Guide - Page 45
la pantalla del televisor Puede ver el menú del receptor en la pantalla del televisor. 2 Presione HOME. Aparece el menú de inicio en la pantalla del televisor. OPTIONS RETURN HOME 1 Encienda el televisor y seleccione la entrada del televisor donde está conectado el receptor. 3 Presione varias - Sony STR-ZA2000ES | Startup Guide - Page 46
el menú de inicio en la pantalla del televisor. HOME 1 Encienda el televisor y seleccione la entrada del televisor donde está conectado el receptor. 3 Presione Neo:6 Multi Stereo Para obtener detalles sobre cada modo, visite la Guía de Ayuda. http://rd1.sony.net/help/ha/strza321/h_uc2/ 12ES - Sony STR-ZA2000ES | Startup Guide - Page 47
solución, consulte a su distribuidor Sony más cercano. General La parte superior del receptor se calienta. Este fenómeno es específico de este amplificador ón de entrada del control remoto o seleccionado el equipo que desee. Entrada HDMI Cuando se usa "2ch Analog Direct", no hay emisión de sonido - Sony STR-ZA2000ES | Startup Guide - Page 48
persiste, comuníquese con su distribuidor Sony más cercano. PROTECTOR El receptor del receptor y encienda el receptor nuevamente. UPDATE FAILED Inserte la unidad flash USB en (página 5). Code 32, Code 33 la posición del altavoz potenciador de graves. Es probable que esto se deba a un alto - Sony STR-ZA2000ES | Startup Guide - Page 49
ohms, 1 kHz, distorsión armónica total 0,9%) STR-ZA3000ES FRONT: 110 W + 110 W CENTER: 110 W SURROUND: 110 W + 110 W SURROUND BACK: 110 W + 110 W STR-ZA2000ES FRONT: 100 W + 100 W CENTER: de los ajustes del campo de sonido y de la fuente, es posible que no se emita sonido. 3) Salida de potencia de - Sony STR-ZA2000ES | Startup Guide - Page 50
Sistema de protección de contenido digital de alto ancho de banda, revisión 2.2 (HDCP 2.2). STR-ZA3000ES HDMI IN 2/IN 3, HDMI OUT A/OUT B STR-ZA2000ES/STR-ZA1000ES HDMI IN 2, HDMI OUT A 16ES 3D Formato 2D Empaqueta do de fotograma Lado a lado (medio) 4096 × 2160p @ 59,94/60 Hz*1 4096 - Sony STR-ZA2000ES | Startup Guide - Page 51
potencia (durante el modo en espera) 0,3 W (Cuando "Control for HDMI", "Pass Through", "Network Standby" y "External Control" están definidos en STR-ZA3000ES 13,4 kg (29 lb 9 oz) STR-ZA2000ES 13,0 kg (28 lb 11 oz) STR-ZA1000ES 12,3 kg (27 lb 2 oz) Accesorios suministrados Guía de inicio (este manual
-
 1
1 -
 2
2 -
 3
3 -
 4
4 -
 5
5 -
 6
6 -
 7
7 -
8
-
9
-
10
-
11
-
12
-
13
-
14
-
15
-
16
-
17
-
18
-
19
-
20
-
21
-
22
-
23
-
24
-
25
-
26
-
27
-
28
-
29
-
30
-
31
-
32
-
33
-
34
-
35
-
36
-
37
-
38
-
39
-
40
-
41
-
42
-
43
-
44
-
45
-
46
-
47
-
48
-
49
-
50
-
51
 |
 |

STR-ZA3000ES/STR-ZA2000ES/STR-ZA1000ES
Startup Guide
US
Guide de démarrage
FR
Guía de inicio
ES
MULTI CHANNEL
AV RECEIVER
©2014 Sony Corporation
Printed in Malaysia
4-537-101-
12
(1)