Stihl KM 90 R Product Instruction Manual
Stihl KM 90 R Manual
 |
View all Stihl KM 90 R manuals
Add to My Manuals
Save this manual to your list of manuals |
Stihl KM 90 R manual content summary:
- Stihl KM 90 R | Product Instruction Manual - Page 1
STIHL KM 90 R { Instruction Manual Manual de instrucciones Warning! Read and follow all safety precautions in Instruction Manual - improper use can cause serious or fatal injury. Advertencia! Lea y siga todas las precauciones de seguridad dadas en el manual de instrucciones - el uso incorrecto - Stihl KM 90 R | Product Instruction Manual - Page 2
Instruction Manual 1 - 35 Manual de instrucciones 37 - 74 - Stihl KM 90 R | Product Instruction Manual - Page 3
Handle 12 Adjusting the Throttle Cable 13 4-MIX Engine 13 Fuel 13 Fueling 14 Starting / Stopping the Engine 16 Operating Instructions 18 Cleaning the Air Filter 18 Engine Management 19 Adjusting the Carburetor 19 Spark Arresting Screen in Muffler 20 Spark Plug 21 Replacing the - Stihl KM 90 R | Product Instruction Manual - Page 4
. Fuel tank for gasoline and engine oil mixture Press to operate decompression valve Manual fuel pump Press to operate manual fuel pump Filler hole for gear lubricant Air intake summer mode Air intake winter mode Handle heating Symbols in Text Many operating and safety instructions are supported by - Stihl KM 90 R | Product Instruction Manual - Page 5
manuals for a description of the controls and the function of the parts of your model. Do not clean your machine with a pressure washer. The solid jet of water may damage parts of the machine. Safe use of a KombiEngine involves 1. the operator 2. the power tool 3. the use of the power tool KM 90 - Stihl KM 90 R | Product Instruction Manual - Page 6
please note the following: - Most STIHL power tools are available with an anti-vibration . Therefore, continual and regular users should closely monitor the condition instructions on proper clothing see the safety precautions in the instruction manual of the KombiTool you are using. 4 KM 90 - Stihl KM 90 R | Product Instruction Manual - Page 7
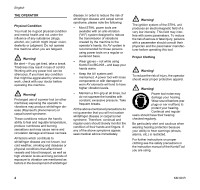
it to prevent turnover, fuel spillage and damage to the power tool. Fuel Your STIHL power tool uses an oilgasoline mixture for fuel (see the chapter on "Fuel" of your instruction manual). Warning! Gasoline is an extremely flammable fuel. If spilled and ignited by a spark or other ignition source - Stihl KM 90 R | Product Instruction Manual - Page 8
See also the "Fueling" chapter in your Instruction Manual for additional information. Before Starting Warning! Always check your power tool for proper condition and operation before starting, particularly the throttle trigger, throttle trigger lockout, stop switch, cutting attachment, deflector and - Stihl KM 90 R | Product Instruction Manual - Page 9
idle speed, see the appropriate section of your instruction manual. English If you cannot set the correct idle speed, have your STIHL dealer check your power tool and make proper adjustments and repairs. During Operation Holding and Controlling the Power Tool Always hold the unit firmly with both - Stihl KM 90 R | Product Instruction Manual - Page 10
power tool using the starting throttle lock, as you do not have control of the engine speed. In the event of an emergency, switch off the engine immediately - move the slide control / stop switch to 0 or STOP. Warning! The muffler and other parts of the engine (e.g. fins of the cylinder, spark plug - Stihl KM 90 R | Product Instruction Manual - Page 11
doing any maintenance or repair work or cleaning the power tool. Do not attempt any maintenance or repair work not described in your KombiEngine and KombiTool instruction manuals. Have such work performed by your STIHL servicing dealer only. Warning! Use the specified spark plug and make sure it - Stihl KM 90 R | Product Instruction Manual - Page 12
damaged. Remember that the risk of forest fires is greater in hot or dry weather. Store the power tool in a dry and high or locked location out of reach of children. Before storing for longer than a few days, always empty the fuel tank. See chapter "Storing the machine" in this manual. 10 KM 90 R - Stihl KM 90 R | Product Instruction Manual - Page 13
FS-KM FS-KM FSB-KM HL-KM 135° HL-KM 0° FH-KM 135° BG-KM HT-KM BF-KM FCB-KM FCS-KM KB-KM KW-KM Purpose Brushcutter with mowing head Brushcutter with grass cutting blade Brushcutter with mowing head Hedge trimmer, adjustable Hedge trimmer Power scythe Blower Pole pruner Pick tines Power edger Power - Stihl KM 90 R | Product Instruction Manual - Page 14
002BA098 KN 002BA099 KN 002BA353 KN English Mounting the Loop Handle A barrier bar is supplied with the machine. Attach the barrier bar to the loop handle. 4 2 3 5 2 6 7 1 1 N Insert square nuts (1) in the loop handle and control handle. Always leave the barrier bar attached. 12 KM 90 R - Stihl KM 90 R | Product Instruction Manual - Page 15
cause running problems and major damage in engines with a manually adjustable carburetor and should not be used in such engines. The ethanol content in gasoline affects engine running speed - it may be necessary to readjust the carburetor if you use fuels with various ethanol contents. KM 90 R 13 - Stihl KM 90 R | Product Instruction Manual - Page 16
idle adjustment, have your STIHL dealer check your power tool and make proper adjustments and repairs. The idle speed and maximum speed of the engine change if you switch from a fuel with a certain ethanol content to another fuel with a much higher or lower ethanol content. This problem can - Stihl KM 90 R | Product Instruction Manual - Page 17
it will go (approx. 1/4 turn). N Turn the cap counterclockwise until it can be removed from the tank opening. N Remove the filler cap. Refueling Take care not to spill fuel while fueling and do not overfill the tank. STIHL recommends use of the STIHL filling system (special accessory). 249BA056 KN - Stihl KM 90 R | Product Instruction Manual - Page 18
trigger lockout 2 Throttle lever 3 Slide control Positions of slide control 4 STOP-0 - engine off - the ignition is switched off 5 F - normal run position - the engine is running or can start 6 START - the ignition is switched on - the engine can start 9 8 N Set the choke knob (8) 16 KM 90 - Stihl KM 90 R | Product Instruction Manual - Page 19
bulb is already filled with fuel. Starting N Place the power tool on the ground so that it rests on the machine support: Check that the working tool is not touching the ground or any other obstacles - see also "Starting / Stopping the Engine" in the KombiTool instruction manual. N Make sure you have - Stihl KM 90 R | Product Instruction Manual - Page 20
N Refit the spark plug - see "Spark Plug". N Move the slide control to START. N Set the choke knob to e - even if the engine is cold. N Now start the engine. Throttle cable adjustment N Check adjustment of throttle cable - see chapter on "Adjusting the Throttle Cable". Fuel tank run until completely - Stihl KM 90 R | Product Instruction Manual - Page 21
low speed adjusting screw on this carburetor can only be set within narrow limits. Standard position 249BA051 KN N Switch off engine N Mount KombiTool with attached working or cutting tool N Check air filter - clean or replace it if necessary N Check throttle cable adjustment, adjust if necessary - Stihl KM 90 R | Product Instruction Manual - Page 22
to adjust the idle speed screw (LA). N Let the engine warm up for approx. 3 min Engine stops when idling N Slowly turn idle speed screw (LA) clockwise until the engine runs smoothly - the working tool must not move 2 2 N Take out the screws (2) and remove the shroud (3). 249BA060 KN 20 KM 90 R - Stihl KM 90 R | Product Instruction Manual - Page 23
fuel mix (too much engine oil in the gasoline), a dirty air filter and unfavorable running conditions (mostly at part throttle etc.) affect the condition of the spark plug. These factors cause deposits to form on the insulator nose which may result in trouble in operation. Removing the spark plug - Stihl KM 90 R | Product Instruction Manual - Page 24
Replacing the Starter Rope 2 1 1 2 3 Warning! To reduce the risk of fire and burn injury, use only spark plugs authorized by STIHL. Always press spark plug boot (1) snugly onto spark plug terminal (2) of the proper size. (Note: If terminal has detachable SAE adapter nut, it must be attached - Stihl KM 90 R | Product Instruction Manual - Page 25
the starter post and over the pawl's peg - the spring clip must point counterclockwise - as shown in the illustration. N Go to "Tensioning the Rewind Spring". Replacing a broken rewind spring N Remove the rope rotor as described in chapter on "Replacing the starter rope". KM 90 R 23 - Stihl KM 90 R | Product Instruction Manual - Page 26
"Tensioning the Rewind Spring". N If the spring pops out of the spring housing and uncoils: Refit it counterclockwise, starting outside and working inwards. N Make a loop in the unwound starter rope and use it to turn the rope and could break. Take one turn of the rope off the rotor. 24 KM 90 R - Stihl KM 90 R | Product Instruction Manual - Page 27
carburetor diaphragms sticking together. N Thoroughly clean the machine - pay special attention to the cylinder fins and air filter. N Remove, clean and inspect the working tool. N Store the machine in a dry, high or locked location, out of the reach of children and other unauthorized persons. KM 90 - Stihl KM 90 R | Product Instruction Manual - Page 28
machine Control handle Air filter Fuel pick-up body in fuel tank Fuel tank Carburetor Spark plug Intake port for cooling air Valve clearance Combustion chamber Spark arresting screen in muffler Visual inspection (condition, leaks) X X clean X check operation X X clean replace Have checked - Stihl KM 90 R | Product Instruction Manual - Page 29
have them replaced by a specialist dealer 1) Safety information sticker replace 1) STIHL recommends STIHL servicing dealers before starting work at the end of work and/or daily whenever tank is refilled weekly monthly yearly if faulty if damaged as required English X X X X X KM 90 R 27 - Stihl KM 90 R | Product Instruction Manual - Page 30
with Spark Arresting Screen 6 Coupling Sleeve 7 Wing Screw 8 Loop Handle 9 Barrier Bar 10 Carrying Ring 11 Slide Control 12 Throttle Trigger Lockout 13 Throttle Trigger 14 Spark Plug Boot 15 Choke Knob 16 Air Filter Cover 17 Fuel Tank 18 Machine Support # Serial Number 463BA004 KN 28 KM 90 R - Stihl KM 90 R | Product Instruction Manual - Page 31
13 Throttle Trigger Controls the speed of the engine. 14 Spark Plug Boot Connects the spark plug with the ignition lead. 15 Choke Knob Eases engine starting by enriching mixture. 16 Air Filter Cover Covers and protects the air filter element. 17 Fuel Tank For fuel and oil mixture. 18 Machine Support - Stihl KM 90 R | Product Instruction Manual - Page 32
Fuel tank capacity: 18.0 fl.oz (0.53 l) Weight without fuel. without KombiTool: KM 90 R 9.9 lb (4.5 kg) Maintenance and Repairs Users of this unit should carry out only the maintenance operations described in this manual. Other repair work may be performed only by authorized STIHL service - Stihl KM 90 R | Product Instruction Manual - Page 33
part on your engine is defective, the part will be repaired or replaced by STIHL Incorporated free of charge. Owner's Warranty Responsibilities As the small off-road equipment engine owner, you are responsible for the performance of the required maintenance listed in your instruction manual. STIHL - Stihl KM 90 R | Product Instruction Manual - Page 34
list specifically defines the emission-related warranted parts: - Air Filter - Carburetor - Fuel Pump - Choke (Cold Start Enrichment System) - Control Linkages - Intake Manifold - Magneto or Electronic Ignition System (Ignition Module) - Spark Plug - Catalytic Converter (if applicable) - Fuel Tank - Stihl KM 90 R | Product Instruction Manual - Page 35
system may include parts such as: Air Filter, Carburetor, Fuel Pump, Choke (Cold Start Enrichment System), Control Linkages, Intake Manifold, Magneto or Electronic Ignition System (Ignition Module), Spark Plug, Catalytic Converter (if applicable), Fuel Tank, Fuel Cap, Fuel Line, Fuel Line Fittings - Stihl KM 90 R | Product Instruction Manual - Page 36
. Emission Warranty Parts List Air Filter, Carburetor, Fuel Pump, Choke (Cold Start Enrichment System), Control Linkages, Intake Manifold, Magneto or Electronic Ignition System (Ignition Module), Spark Plug, Catalytic Converter (if applicable), Fuel Tank, Fuel Cap, Fuel Line, Fuel Line Fittings - Stihl KM 90 R | Product Instruction Manual - Page 37
® KM 90 R Some of STIHL's Common Law Trademarks BioPlus™ Easy2Start™ EasySpool™ ElastoStart™ Ematic™ FixCut™ HT Plus™ IntelliCarb™ Master Control Lever™ Micro™ Pro Mark™ Quad Power™ Quiet Line™ STIHL Compact™ STIHL HomeScaper Series™ STIHL Interchangeable Attachment Series™ STIHL M-Tronic™ STIHL - Stihl KM 90 R | Product Instruction Manual - Page 38
English 36 KM 90 R - Stihl KM 90 R | Product Instruction Manual - Page 39
en papel libre de cloro. Sistema KombiSystem 38 Acerca de este manual de instrucciones 38 Medidas de seguridad y técnicas de manejo 39 Herramientas KombiTool aprobadas 48 Montaje del mango tórico 49 Ajuste del cable del acelerador 50 Motor 4-MIX 50 Combustible 50 Llenado de - Stihl KM 90 R | Product Instruction Manual - Page 40
KombiSystem + .... + Con el sistema KombiSystem de STIHL, varios motores KombiEngine y accesorios KombiTool pueden combinarse para formar una herramienta motorizada. En este manual de instrucciones la unidad formada por el motor no evitarse, puede resultar en lesiones graves o mortales. 38 KM 90 R - Stihl KM 90 R | Product Instruction Manual - Page 41
motorizadas STIHL. Los distintos modelos pueden contar con piezas y controles diferentes. Vea la sección correspondiente de sus manuales de instrucciones del motor KombiEngine y accesorio KombiTool para tener una descripción de los controles y la función de los componentes de su modelo. KM 90 R 39 - Stihl KM 90 R | Product Instruction Manual - Page 42
puede dañar las piezas de la máquina. El uso seguro de un motor KombiEngine atañe a 1. el operador 2. la herramienta motorizada 3. el uso carpiano, sírvase notar lo siguiente: - La mayor parte de las herramientas motorizadas de STIHL se ofrecen con un sistema antivibración ("AV") cuyo . 40 KM 90 R - Stihl KM 90 R | Product Instruction Manual - Page 43
apoyar la herramienta motorizada en el suelo, siempre apague el motor y asegúrese de que el accesorio ha dejado de girar herramienta motorizada STIHL utiliza una mezcla de aceite-gasolina como combustible (vea el capítulo "Combustible" en el manual del propietario sistema de combustible. KM 90 R 41 - Stihl KM 90 R | Product Instruction Manual - Page 44
mientras el motor esté funcionando STIHL, levante la empuñadura en la parte superior de la tapa hasta dejarla vertical a un ángulo de 90 parte superior) hasta la posición cerrada. Tal desalineación puede ser resultado de la manipulación, limpieza o un intento incorrecto de apriete. 42 KM 90 - Stihl KM 90 R | Product Instruction Manual - Page 45
a un concesionario STIHL autorizado para repararla. capítulo "Combustible" del Manual manuales del motor y accesorio KombiTool. Coloque la herramienta motorizada sobre suelo firme u otra superficie sólida en un lugar abierto. Mantenga el equilibrio y elija un buen punto de apoyo para los pies. KM 90 - Stihl KM 90 R | Product Instruction Manual - Page 46
al arrancar el motor acelerado, su permitir que el motor se desacelere a no intente arrancar el motor de la herramienta "por arranque en el manual de instrucciones del manual de instrucciones. Si no puede regular correctamente el ralentí, pida a su concesionario STIHL solamente al aire libre en - Stihl KM 90 R | Product Instruction Manual - Page 47
o de grandes cantidades de polvo u otros contaminantes del aire, especialmente los de partículas pequeñas puede causar enfermedades respiratorias o de otro tipo ás, se podría dañar permanentemente el motor. Haga reparar el silenciador únicamente por el concesionario de servicio STIHL. KM 90 R 45 - Stihl KM 90 R | Product Instruction Manual - Page 48
para reducir el riesgo de incendio debido a la emisión de partículas calientes. Debido al calor de la reacción catalítica, manual de instrucciones del motor KombiEngine o del accesorio KombiTool. Este tipo de trabajo debe ser realizado únicamente por el concesionario de servicio de STIHL. 46 KM 90 - Stihl KM 90 R | Product Instruction Manual - Page 49
siempre vacíe el tanque de combustible. Consulte el capítulo "Almacenamiento de la máquina" en este manual. No pruebe nunca el sistema de encendido con el casquillo del cable de encendido desconectado de la bujía, o sin elevado o con llave lejos del alcance de los niños. KM 90 R español / EE.UU 47 - Stihl KM 90 R | Product Instruction Manual - Page 50
Herramientas KombiTool aprobadas FS-KM FS-KM FSB-KM FH-KM BF-KM HT-KM FCB-KM FCS-KM KB-KM BG-KM KW-KM 470BA018 KN Los siguientes accesorios KombiTool de STIHL pueden instalarse en el motor KombiEngine: Accesorio KombiTool el mango tórico - vea "Instalación del mango tórico". 48 KM 90 R - Stihl KM 90 R | Product Instruction Manual - Page 51
uso del manguito (9) depende del país, y el mismo debe colocarse entre el mango tórico y el mango de control. Siempre deje la barra de defensa conectada. KM 90 R 49 - Stihl KM 90 R | Product Instruction Manual - Page 52
vacío. N Ajuste el cable del acelerador solamente cuando la unidad esté completa y correctamente armada. Motor 4-MIX El motor STIHL 4-MIX se lubrica con gasolina y averías graves en motores con carburadores manualmente ajustables, por lo cual no debe utilizarse en este tipo de motores. 50 KM 90 R - Stihl KM 90 R | Product Instruction Manual - Page 53
motores de dos tiempos enfriados por aire. Se recomienda usar aceite STIHL HP Ultra para motores de 2 tiempos, puesto que éste ha sido formulado especialmente para uso en motores STIHL y la gasolina. Gasolina español / EE.UU Aceite (STIHL 50:1 ó aceite de alta calidad equivalente) gal EE.UU. - Stihl KM 90 R | Product Instruction Manual - Page 54
derramar el combustible al llenar el tanque y de tampoco llenarlo en exceso. STIHL recomienda el uso del sistema de llenado STIHL (accesorio especial). Cierre de la tapa de llenado sin herramientas 002BA420 KN Pliegue la empuñadura hacia abajo de modo que quede a ras con la superficie. KM 90 R - Stihl KM 90 R | Product Instruction Manual - Page 55
en exceso el tanque. STIHL recomienda el uso del sistema de llenado STIHL (accesorio especial). 1 motor apagado - el encendido está apagado 5 F - posición de funcionamiento normal - el motor está en marcha o puede arrancarse 6 START - el encendido está conectado y es posible arrancar el motor KM 90 - Stihl KM 90 R | Product Instruction Manual - Page 56
el soporte de la máquina. Asegúrese que la herramienta no está tocando el suelo ni otros obstáculos. Vea también el capítulo "Arranque / parada del motor" en el manual de instrucciones del accesorio KombiTool. N Asegúrese de tener los pies apoyados de modo seguro y firme. N Sujete la máquina con la - Stihl KM 90 R | Product Instruction Manual - Page 57
bujía - vea "Bujía". N Mueva el control deslizante a START. N Ponga la perilla del estrangulador en e - aun si el motor está frío. N Ahora arranque el motor. Ajuste del cable del acelerador N Revise el ajuste del cable del acelerador - vea el capítulo "Ajuste del cable del acelerador". KM 90 R 55 - Stihl KM 90 R | Product Instruction Manual - Page 58
motor. N Arranque el motor. motor es más elevada. El motor motor por un rato en ralentí de modo que el calor en el motor sea disipado por la corriente de aire de enfriamiento. Esto ayuda a evitar que los componentes montados en el motor que el motor se enfr - Stihl KM 90 R | Product Instruction Manual - Page 59
N Revise el ajuste del cable del acelerador, ajústelo de ser necesario - vea "Ajuste del cable del acelerador" N Revise el chispero - límpielo o sustitúyalo de ser necesario N Instale el elemento en la caja del filtro y coloque la cubierta. N Inserte el tornillo y apriételo bien firme. KM 90 R 57 - Stihl KM 90 R | Product Instruction Manual - Page 60
espere hasta que el motor se calienta N Con el motor Deje que el motor se calienta por motor se calienta por aprox 3 minutos El motor motor funcione de modo suave - la herramienta no debe girar El accesorio de corte gira con el motor con el motor en marcha ío, el motor se cala el motor funcione - Stihl KM 90 R | Product Instruction Manual - Page 61
En algunos países, el silenciador tiene un chispero. N Si el motor pierde potencia, revise el chispero del silenciador. N Espere hasta que el Limpie el chispero. Si el chispero está dañado o con depósitos gruesos de carbón, instale uno nuevo. N Vuelva a instalar el chispero. N Inserte el tornillo y - Stihl KM 90 R | Product Instruction Manual - Page 62
ía Si el motor pierde potencia, la gasolina), el filtro de aire está sucio, y las combustible. - Filtro de aire sucio. - Condiciones desfavorables utilice solamente las bujías autorizadas por STIHL. Siempre empuje el casquillo (1) de bujía y el conector del cable de encendido en el casquillo puede - Stihl KM 90 R | Product Instruction Manual - Page 63
arrancador. N Quite cuidadosamente el rotor de la cuerda con la arandela (4) y el trinquete (5). N Quite el resto de la cuerda del rotor y del mango de arranque. KM 90 R 61 - Stihl KM 90 R | Product Instruction Manual - Page 64
Haga un nudo de rizo sencillo en el extremo de la cuerda de arranque nueva y después pase la cuerda por la parte superior del mango y por el buje de la cuerda (6). N Pase la cuerda a través del rotor y fíjela (flechas). N Empuje la caja de resorte en la cubierta del arrancador KM 90 R 249BA018 KN - Stihl KM 90 R | Product Instruction Manual - Page 65
pase a "Tensado del resorte de rebobinado". N Si el resorte se sale y se desenrolla: vuélvalo a instalar en sentido contrahorario - empiece de la cuerda al rotor. N Instale la cubierta del arrancador en el motor. N Apriete los tornillos firmemente. español / EE.UU Almacenamiento de la KM 90 R 63 - Stihl KM 90 R | Product Instruction Manual - Page 66
distancia entre electrodos sustituir después de cada 100 horas de funcionamiento Lumbrera de admisión de aire de Inspección visual X enfriamiento Limpiar Juego de las válvulas Revisión y ajuste de falla si tiene daños según se requiera X X X X X X X X X X X X X X X X X KM 90 R - Stihl KM 90 R | Product Instruction Manual - Page 67
1) STIHL recomienda acudir a un concesionario STIHL para servicio antes de comenzar el trabajo al final del trabajo y/o diariamente al volver a cargar el tanque con combustible semanalmente mensualmente anualmente si falla si tiene daños según se requiera español / EE.UU X X X X X KM 90 - Stihl KM 90 R | Product Instruction Manual - Page 68
Control deslizante 12 Bloqueo de gatillo de aceleración 13 Gatillo de aceleración 14 Casquillo de bujía 15 Perilla de estrangulador 16 Tapa del filtro de aire 17 Tanque de combustible 18 Apoyo de la máquina # Número de serie 463BA004 KN 66 - Stihl KM 90 R | Product Instruction Manual - Page 69
horas C = 50 horas CARB El período de cumplimiento de emisiones empleado en la etiqueta del índice de aire CARB tiene las siguientes definiciones: Extended = 300 horas Intermediate = 125 horas Moderate = 50 horas Motor Motor STIHL de un cilindro, cuatro tiempos, lubricado por una mezcla KM 90 R 67 - Stihl KM 90 R | Product Instruction Manual - Page 70
K de piezas STIHL. En las piezas pequeñas el símbolo puede aparecer solo. Carburador de diafragma de todas posiciones con bomba de combustible integral Capacidad del tanque de 0,53 l combustible: (18,0 fl.oz) Peso sin combustible. sin accesorio KombiTool: KM 90 R 4,5 kg (9,9 lb) 68 KM 90 R - Stihl KM 90 R | Product Instruction Manual - Page 71
800-467-8445, o si lo prefiere puede escribir a STIHL Inc., 536 Viking Drive, P.O. Box 2015, Virginia Beach, VA 23450-2015 EE.UU. www.stihlusa.com Cobertura por STIHL Incorporated STIHL Incorporated garantiza al último comprador y a cada comprador subsiguiente que el motor pequeño para KM 90 R 69 - Stihl KM 90 R | Product Instruction Manual - Page 72
autorizado por STIHL y presente la tarjeta de garantía firmada. Requerimientos de mantenimiento Las instrucciones presentadas en este manual se basan en la aplicación de la mezcla recomendada para motores de 2 sistemas de control de emisiones no cubrirá ninguno de los puntos siguientes: 70 KM 90 R - Stihl KM 90 R | Product Instruction Manual - Page 73
en su manual de instrucciones. STIHL Incorporated le recomienda guardar todos los recibos comprobantes de los trabajos de mantenimiento hechos a su motor pequeño para equipo de uso fuera de carretera, pero STIHL Incorporated no puede negar garantía basado en el solo hecho de faltar los KM 90 R 71 - Stihl KM 90 R | Product Instruction Manual - Page 74
del Aire (CARB). El uso de cualquier componente adicional o modificado no eximido será motivo para la denegación del reclamo bajo garantía. STIHL Incorporated no sustitución programado, el fabricante del motor debe reparar o sustituir el mismo de acuerdo con la subsección (4) más 72 KM 90 R - Stihl KM 90 R | Product Instruction Manual - Page 75
emisiones, y la misma debe ser suministrada gratis al propietario. STIHL Incorporated es responsable por daños a otros componentes del motor causados por la falla de una pieza garantizada que todavía est en fábrica y funcionando correctamente no perjudicará la cobertura bajo garantía. KM 90 R 73 - Stihl KM 90 R | Product Instruction Manual - Page 76
™ HT Plus™ IntelliCarb™ Master Control Lever™ Micro™ Pro Mark™ Quad Power™ Quiet Line™ STIHL Compact™ STIHL HomeScaper Series™ STIHL Interchangeable Attachment Series™ STIHL M-Tronic™ STIHL Magnum™ STIHL MiniBoss™ STIHL MotoPlus 4™ STIHL Multi-Cut HomeScaper Series™ Stihl Outfitters™ STIHL PICCO - Stihl KM 90 R | Product Instruction Manual - Page 77
español / EE.UU KM 90 R 75 - Stihl KM 90 R | Product Instruction Manual - Page 78
español / EE.UU 76 KM 90 R - Stihl KM 90 R | Product Instruction Manual - Page 79
- Stihl KM 90 R | Product Instruction Manual - Page 80
State of California to cause cancer, birth defects or other reproductive harm. 0458-465-8621-B englisch / spanisch USA U G U www.stihl.com ! ADVERTENCIA! El gas de escape del motor de esta máquina contiene productos químicos que en el estado de California son considerados como causantes de cáncer
-
 1
1 -
 2
2 -
 3
3 -
 4
4 -
 5
5 -
 6
6 -
 7
7 -
8
-
9
-
10
-
11
-
12
-
13
-
14
-
15
-
16
-
17
-
18
-
19
-
20
-
21
-
22
-
23
-
24
-
25
-
26
-
27
-
28
-
29
-
30
-
31
-
32
-
33
-
34
-
35
-
36
-
37
-
38
-
39
-
40
-
41
-
42
-
43
-
44
-
45
-
46
-
47
-
48
-
49
-
50
-
51
-
52
-
53
-
54
-
55
-
56
-
57
-
58
-
59
-
60
-
61
-
62
-
63
-
64
-
65
-
66
-
67
-
68
-
69
-
70
-
71
-
72
-
73
-
74
-
75
-
76
-
77
-
78
-
79
-
80
 |
 |

{
STIHL KM 90 R
Warning!
Read and follow all safety
precautions in Instruction Manual –
improper use can cause serious or
fatal injury.
Advertencia!
Lea y siga todas las precauciones
de seguridad dadas en el manual
de instrucciones – el uso incorrecto
puede causar lesiones graves o
mortales.
Instruction Manual
Manual de instrucciones