Stihl SG 20 Product Instruction Manual
Stihl SG 20 Manual
 |
View all Stihl SG 20 manuals
Add to My Manuals
Save this manual to your list of manuals |
Stihl SG 20 manual content summary:
- Stihl SG 20 | Product Instruction Manual - Page 1
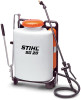
STIHL SG 20 { Instruction Manual Manual de instrucciones Warning! Read and follow all safety precautions in Instruction Manual - improper use can cause serious or fatal injury. Advertencia! Lea y siga todas las precauciones de seguridad dadas en el manual de instrucciones - el uso incorrecto puede - Stihl SG 20 | Product Instruction Manual - Page 2
Instruction Manual 1 - 13 Manual de instrucciones 15 - 28 - Stihl SG 20 | Product Instruction Manual - Page 3
10 Maintenance and Care 11 Main Parts 12 Specifications 13 Special Accessories 13 { SG 20 English Guide to Using this Manual Pictograms All the pictograms attached to the machine are shown and explained in this manual. Symbols in text The operating and safety instructions are supported by - Stihl SG 20 | Product Instruction Manual - Page 4
disposal regulations. Warning! Do not lend or rent your sprayer without the instruction manual. Be sure that anyone using it understands the information contained in this manual. Warning! The chemicals sprayed with your backpack sprayer may contain toxic and/or caustic substances. Such chemicals - Stihl SG 20 | Product Instruction Manual - Page 5
section of your instruction manual for a description of the controls and the function of the parts of your model. Safe use of a backpack sprayer involves 1. the operator 2. the backpack sprayer 3. the use of the backpack sprayer 4. the handling of the chemicals to be sprayed. THE OPERATOR Physical - Stihl SG 20 | Product Instruction Manual - Page 6
backpack sprayer if it is damaged. In case of doubt, have it checked by your STIHL servicing dealer. Warning! Make sure the hose is securely attached and in good condition before pressurizing the container. Never attempt to pressurize the unit by any other method than with the pump instructions SG 20 - Stihl SG 20 | Product Instruction Manual - Page 7
pressurize it and practice spraying. Also, check for any leaks at this time. When thoroughly familiar with the sprayer operation, follow normal operating procedures. Fill your backpack sprayer contact with your skin. Before Spraying Warning! Always inspect your sprayer before and after each use. - Stihl SG 20 | Product Instruction Manual - Page 8
support. Working Conditions Operate your backpack sprayer at issue, review the product lists of substances known to cause cancer, reproductive toxicity, etc. Operating instructions spray in the direction of humans, animals or property which might be injured or damaged by spray formula. 6 SG 20 - Stihl SG 20 | Product Instruction Manual - Page 9
out of the nozzle. Do not attempt any maintenance or repair work not described in your instruction manual. Have such work performed by your STIHL servicing dealer only. English Assembling the Unit N Connect the wand (1) to the spray gun (2). N Secure the nozzle holder (3) to the wand (1). SG 20 7 - Stihl SG 20 | Product Instruction Manual - Page 10
for leaks - do not use the sprayer if it is leaking. N Adjust the harness straps so that the backplate fits snugly and securely against your back. N Pull the ends of the straps downward. Loosening the harness straps 373BA003 KN 373BA004 KN N Lift the tabs of the sliding adjusters. 8 SG 20 - Stihl SG 20 | Product Instruction Manual - Page 11
down firmly. N Oil the pump piston (1). N Gasket (2) in the cap (3) must always be well lubricated with grease and in good condition. N Put the sprayer on your back. N Operate the hand lever (2) slowly and steadily with the gun closed - 8 to 10 strokes are required to build up pressure. SG 20 9 - Stihl SG 20 | Product Instruction Manual - Page 12
under pressure or with spray solution in the tank. N Rotate the nozzle (2) to adjust the spray pattern. For continuous operation: N After finishing work, clean the filter (1) in the spray gun. N Pull the trigger. N Engage the U-clip (3) in direction of the arrow - the trigger is locked. 10 SG 20 - Stihl SG 20 | Product Instruction Manual - Page 13
in spray gun Clean Tank, pipe and hose system Drain Clean Tank, pressure vessel, pipe and hose system Visual inspection (condition, leaks) Pump piston Lubricate with oil Gasket in cap Lubricate with grease Vent in cap Clean All accessible screws and nuts Retighten Safety labels Replace - Stihl SG 20 | Product Instruction Manual - Page 14
user's back. 2. Pressure Vessel. Stores pressure produced by pump and the pressurized spray solution. 3. Harness. For carrying the sprayer. 4. Spray Gun. Opens and closes the valve. Starts and stops spray jet. 5. Filter in Spray Gun. Helps prevent impurities entering and blocking the nozzle. SG 20 - Stihl SG 20 | Product Instruction Manual - Page 15
Holds spray gun when it is not in use. 15. Hand Lever. Pump lever for producing spray pressure. Specifications Spray rate: Tank capacity: Weight: 61 cu.in/min (1000 cm3/min) a = 31 in (80 cm) b = 39 in (1 m) 4.75 gal (18 l) 11.5 lbs (5.2 kg) English Special Accessories Contact your STIHL dealer - Stihl SG 20 | Product Instruction Manual - Page 16
English 14 SG 20 - Stihl SG 20 | Product Instruction Manual - Page 17
STIHL AG & Co. KG, 2009 0458-408-8621-A. M15.C9.FST. 0000000825_001_EA Impreso en papel libre de cloro. Manual de instrucciones original Las tintas contienen aceites vegetales, el papel es reciclable. Contenido Acerca de este manual { SG 20 español / EE.UU Acerca de este manual de - Stihl SG 20 | Product Instruction Manual - Page 18
Mejoramientos técnicos La filosofía de STIHL es mejorar continuamente todos sus productos. este manual, comuníquese con el concesionario STIHL para Lea el manual de instrucciones y Pida a su concesionario STIHL que le enseñe el sin entregar el manual de instrucciones. Aseg en este manual. Advertencia - Stihl SG 20 | Product Instruction Manual - Page 19
uso de todos los pulverizadores de mochila de STIHL. Los distintos modelos pueden contar con piezas y controles diferentes. Vea la sección correspondiente de su manual de instrucciones para tener una descripción de a los productos químicos cuando maneje el pulverizador de mochila. SG 20 17 - Stihl SG 20 | Product Instruction Manual - Page 20
mochila si el mismo está dañado. En caso de dudas, pida que el concesionario de servicio de STIHL la revise. Advertencia! Asegúrese que la manguera está bien fijada y en buenas condiciones antes de presurizar la palabra "Peligro" en la etiqueta son muy venenosos o irritantes. Deben usarse 18 SG 20 - Stihl SG 20 | Product Instruction Manual - Page 21
el funcionamiento del pulverizador, siga los procedimientos de trabajo normales. Llene el pulverizador de mochila en lugares al aire libre bien ventilados. Advertencia! No utilice: SG 20 19 - Stihl SG 20 | Product Instruction Manual - Page 22
con la mano derecha en la válvula de gatillo y la mano izquierda en la palanca de mano. Su pulverizador se lleva en forma de mochila. 20 SG 20 - Stihl SG 20 | Product Instruction Manual - Page 23
ás reglamentos gubernamentales acerca del caso. Nunca rocíe hacia las personas, animales u objetos que pueden sufrir lesiones o daños debido al efecto de la fórmula rociada. SG 20 21 - Stihl SG 20 | Product Instruction Manual - Page 24
o reparación que no esté descrito en su manual de instrucciones. Este tipo de trabajo debe ser realizado únicamente por el concesionario de servicio de STIHL. Armado de la máquina N Conecte la varilla (1) a la pistola rociadora (2). N Fije la portaboquilla (3) en la varilla (1). 22 SG 20 - Stihl SG 20 | Product Instruction Manual - Page 25
quede firme y cómoda contra su espalda. N Tire hacia abajo de los extremos de las correas. Soltado de las correas del arnés 373BA003 KN 373BA004 KN SG 20 N Levante las pestañas de los ajustadores deslizantes. 23 - Stihl SG 20 | Product Instruction Manual - Page 26
sobre la espalda. N Accione la palanca de mano (2) lenta y uniformemente con la pistola cerrada - se requieren de 8 a 10 acciones para producir la presión necesaria. 24 SG 20 - Stihl SG 20 | Product Instruction Manual - Page 27
boquilla (2) para ajustar el patrón de rocío. Para funcionamiento continuo: N Después de terminar el trabajo, limpie el filtro (1) en la pistola rociadora. N Comprima el gatillo. SG 20 25 - Stihl SG 20 | Product Instruction Manual - Page 28
comenzar el trabajo después de terminar el trabajo o diariamente semanalmente mensualmente cada 12 meses si hay problema si tiene daños si se requiere X X X X X 26 SG 20 - Stihl SG 20 | Product Instruction Manual - Page 29
Componentes importantes 5 6 7 4 2 3 1 # 9 8 11 10 12 13 14 15 SG 20 408BA018 KN español / EE.UU 1 Placa para la espalda 2 Recipiente presurizado 3 Arnés 4 Pistola rociadora 5 Filtro 6 Varilla rociadora 7 Portaboquilla con boquilla 8 Tapa 9 Orificio 10 Empaquetadura - Stihl SG 20 | Product Instruction Manual - Page 30
: 1000 cm3/min (61 pulg cúb./min) a = 80 cm (31 pulg) b = 1 m (39 pulg) 18 l (4,75 gal) 5,2 kg (11,5 lb) Accesorios especiales Comuníquese con su concesionario STIHL para información acerca de accesorios especiales que pueden estar disponibles para su producto. 28 SG 20 - Stihl SG 20 | Product Instruction Manual - Page 31
- Stihl SG 20 | Product Instruction Manual - Page 32
0458-408-8621-A englisch / spanisch USA U G U www.stihl.com
-
 1
1 -
 2
2 -
 3
3 -
 4
4 -
 5
5 -
 6
6 -
 7
7 -
8
-
9
-
10
-
11
-
12
-
13
-
14
-
15
-
16
-
17
-
18
-
19
-
20
-
21
-
22
-
23
-
24
-
25
-
26
-
27
-
28
-
29
-
30
-
31
-
32
 |
 |

{
STIHL SG 20
Warning!
Read and follow all safety precautions in
Instruction Manual – improper use can cause
serious or fatal injury.
Advertencia!
Lea y siga todas las precauciones de
seguridad dadas en el manual de
instrucciones – el uso incorrecto puede
causar lesiones graves o mortales.
Instruction Manual
Manual de instrucciones