TP-Link Auranet EAP110 EAP110 V1 User Guide
TP-Link Auranet EAP110 Manual
 |
View all TP-Link Auranet EAP110 manuals
Add to My Manuals
Save this manual to your list of manuals |
TP-Link Auranet EAP110 manual content summary:
- TP-Link Auranet EAP110 | EAP110 V1 User Guide - Page 1
User Guide Wireless N Access Point EAP110/EAP120/EAP220 REV1.0.0 1910011184 - TP-Link Auranet EAP110 | EAP110 V1 User Guide - Page 2
installation. This equipment generates, uses and can radiate radio frequency energy and, if not installed and used in accordance with the instructions, may cause harmful interference to radio communications. However, there is no guarantee that interference will not occur in a particular installation - TP-Link Auranet EAP110 | EAP110 V1 User Guide - Page 3
used in accordance with the instruction manual, may cause harmful interference to this grant is applicable to only Mobile Configurations. The antennas used for this transmitter must other antenna or transmitter." CE Mark Warning (EAP110/EAP120) (EAP220) This is a class A product. In a domestic - TP-Link Auranet EAP110 | EAP110 V1 User Guide - Page 4
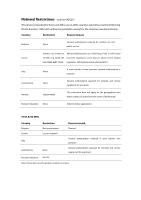
limitation except for the countries mentioned below: Country Restriction Reason/remark Bulgaria None General authorization required for outdoor use and public service France Outdoor use limited to Military Radiolocation use. Refarming of the 2.4 GHz band 10 mW e.i.r.p. within the has been - TP-Link Auranet EAP110 | EAP110 V1 User Guide - Page 5
power source. Don't disassemble the product, or make repairs yourself. You run the risk of electric shock and voiding the limited warranty. If you need service, please contact us. Avoid water and wet locations. NCC Notice & BSMI Notice 注意! - TP-Link Auranet EAP110 | EAP110 V1 User Guide - Page 6
This product can be used in the following countries: AT BG BY CA CZ DE DK EE ES FI FR GB GR HU IE IT LT LV MT NL NO PL PT RO RU SE SK TR UA US - TP-Link Auranet EAP110 | EAP110 V1 User Guide - Page 7
in Standalone mode. Refer to the EAP Controller User Guide when the EAP is managed by the EAP Controller software. Convention Unless otherwise noted, the EAP or the device mentioned in this guide stands for 300Mbps Wireless N Access Point EAP110, Wireless N Gigabit Access Point EAP120 and EAP220. - TP-Link Auranet EAP110 | EAP110 V1 User Guide - Page 8
Settings ...12 5.1.1 Wireless Basic Settings ...13 5.1.2 SSIDs...14 5.1.3 Wireless Advanced Settings 18 5.1.4 Load Balance ...19 5.2 Portal...19 5.2.1 Portal Configuration...20 5.2.2 Free Authentication Policy 25 5.3 MAC Filtering ...27 5.4 Scheduler ...29 5.5 QoS ...33 5.5.1 AP EDCA Parameters - TP-Link Auranet EAP110 | EAP110 V1 User Guide - Page 9
List...46 6.3.2 Portal Authenticated Guest 47 Access...52 7.4 LED ON/OFF ...53 7.5 SSH...53 7.6 SNMP ...54 Chapter 8 System ...57 8.1 User Account...57 8.2 Time Settings ...57 8.2.1 Time Settings ...58 8.2.2 Daylight Saving ...59 8.3 Reboot/Reset ...60 8.4 Backup & Restore ...61 8.5 Firmware Upgrade - TP-Link Auranet EAP110 | EAP110 V1 User Guide - Page 10
centrally managed by the EAP Controller software, providing a flexible, richly-functional but easily-configured enterprise-grade wireless network for that will provide power in a PoE setup. 1.2 Hardware Overview 1.2.1 LED EAP110, EAP120 and EAP220 have the same LED status and corresponding indications. - TP-Link Auranet EAP110 | EAP110 V1 User Guide - Page 11
working properly. System errors. RAM, flash, Ethernet, WLAN or firmware may be malfunctioning. Firmware update is in progress. Do not disconnect or power off the device. The device is being reset to its factory default settings. 1.2.2 Interface Panel EAP110: Figure 1-2 Interface Panel of EAP110 - TP-Link Auranet EAP110 | EAP110 V1 User Guide - Page 12
to factory default settings. CONSOLE: This port is used to connect to the serial port of a computer or a terminal to check and monitor system information of the EAP120/EAP220. Note: CLI commands are not available in current software version. We will release a new version supporting CLI commands - TP-Link Auranet EAP110 | EAP110 V1 User Guide - Page 13
Passive PoE Adapter: Power LED: The Power LED indicates the status of the electric current: green (0-0.8A), red (0.8A-1A). POE Port: This port is used to connect the ETHERNET port of the EAP110. LAN Port: This port is used to connect your LAN. 1.2.3 Mounting Bracket The following figure - TP-Link Auranet EAP110 | EAP110 V1 User Guide - Page 14
is a management software specially designed for the TP-LINK EAP devices on a local wireless network, allowing you to centrally configure and monitor mass EAP devices using a web browser on your PC. For more information about the EAP Controller, please refer to the EAP Controller User Guide in the - TP-Link Auranet EAP110 | EAP110 V1 User Guide - Page 15
by the EAP Controller software. 3.1 Standalone Mode By default, the EAP works independently as a standalone access point. By entering the IP address of the standalone EAP, you can log in to its web interface and perform configurations. The factory default IP address configuration of the EAP - TP-Link Auranet EAP110 | EAP110 V1 User Guide - Page 16
TIPS: Proceed to the following chapters for information on using the EAP in standalone mode. EAP110 is taken as the example. 9 - TP-Link Auranet EAP110 | EAP110 V1 User Guide - Page 17
4 Network On Network page you can configure the IP address of the standalone EAP. Figure 4-1 Network Page Dynamic/Static: By default, the EAP device obtains an IP address from a DHCP server (typically a router). Select Static to configure IP address manually. Fallback IP: If the EAP fails to get - TP-Link Auranet EAP110 | EAP110 V1 User Guide - Page 18
Chapter 5 Wireless Wireless page, consisting of Wireless Settings, Portal, MAC Filtering, Scheduler, QoS and Rogue AP Detection, is shown below. Figure 5-1 Wireless Page 11 - TP-Link Auranet EAP110 | EAP110 V1 User Guide - Page 19
5.1 Wireless Settings Following is the page of Wireless Settings. Figure 5-2 Wireless Settings Page 12 - TP-Link Auranet EAP110 | EAP110 V1 User Guide - Page 20
to select 802.11b/g/n, in which way clients supporting 11b, 11g or 11n mode can access your wireless network. EAP220 the wireless network can work within 2.4GHz and 5GHz frequency. Wireless network of EAP220 operating at 5GHz frequency band supports 802.11a/n, 802.11a and 802.11n standards - TP-Link Auranet EAP110 | EAP110 V1 User Guide - Page 21
together with switches supporting 802.1Q VLAN. The EAP can build up to eight virtual wireless networks per radio for users to access. At the to 32 characters as the SSID name. Wireless VLAN ID: Set a VLAN ID (ranges from 0 to 4094) for the wireless network. VLAN 0 means VLAN function is disabled - TP-Link Auranet EAP110 | EAP110 V1 User Guide - Page 22
the AP's SSID manually to connect to access the wireless network without password. Portal: Portal provides authentication service for the clients who want to access the wireless local area network. For more information, refer to 5.2 Portal. After Portal is enabled, the configurations in 5.2 Portal - TP-Link Auranet EAP110 | EAP110 V1 User Guide - Page 23
necessary for data transmission. Shared Key: After you select Shared Key, clients has to input password to pass the authentication, or it cannot associate with the wireless network or transmit data. You can configure four keys in advance and select one as the present valid key. Select the wep key - TP-Link Auranet EAP110 | EAP110 V1 User Guide - Page 24
AES. The default setting is supported in 802.11n mode. It is recommended to select AES as the encryption type. RADIUS Server IP/Port: Enter the IP address/port of the RADIUS server. RADIUS Password: Enter the shared secret of RADIUS server to access security and simple configuration, which suits - TP-Link Auranet EAP110 | EAP110 V1 User Guide - Page 25
supported in 802.11n mode. It is recommended to select AES as the encryption type. Wireless Password: Configure the WPA-PSK/WPA2-PSK password access point will release the buffered broadcast and/or multicast data, if any exists. You can specify the value between 1-255 Beacon Intervals. The default - TP-Link Auranet EAP110 | EAP110 V1 User Guide - Page 26
associated clients to control the wireless access. Maximum Enter the number of clients to be allowed for connection to the EAP. The Associated Clients: number ranges from 1 to 99. 5.2 Portal Portal authentication enhances the network security by providing authentication service to the clients - TP-Link Auranet EAP110 | EAP110 V1 User Guide - Page 27
in a wireless network, please go to Wireless→Wireless Settings→SSIDs to enable Portal of a selected SSID. 5.2.1 Portal Configuration Three authentication types are available: No Authentication, Local Password and External RADIUS Server. 1. No Authentication:Users are required to finish only two - TP-Link Auranet EAP110 | EAP110 V1 User Guide - Page 28
password again once authentication timeout is reached. By default, authentication timeout is one hour. Select Custom from the dropdown list to customize the parameter. Redirect: Disable by default. Redirect specifies that the portal should redirect the newly authenticated clients to the configured - TP-Link Auranet EAP110 | EAP110 V1 User Guide - Page 29
provided by the built-in portal server. The page configured below will be presented to users as the login page. Words can be filled in Input Box 1 and Input Box 2. Enter up to 31 characters as the title of the authentication login page in Input Box 1, like "Guest Portal of TP-LINK". Enter the terms - TP-Link Auranet EAP110 | EAP110 V1 User Guide - Page 30
. Username: Enter the user name for local authentication. Password: Enter the password for local authentication. Please refer to No Authentication to configure Authentication Timeout, Redirect, Redirect URL, and Portal Customization. External RADIUS Server External RADIUS Server provides - TP-Link Auranet EAP110 | EAP110 V1 User Guide - Page 31
IP: Enter the IP address of the RADIUS server. Port: Enter the port for authentication service. RADIUS Password: Enter the shared secret of RADIUS server to log in to the RADIUS server. Please refer to No Authentication to configure Authentication Timeout, Redirect, Redirect URL, and Portal - TP-Link Auranet EAP110 | EAP110 V1 User Guide - Page 32
Server. RADIUS Server IP: Enter the IP address of the RADIUS server. Port: Enter the port for authentication service. RADIUS Password: Enter the shared secret of RADIUS server to log in to the RADIUS server. Portal Customization: Select External Web Portal. External Web Portal URL: Enter - TP-Link Auranet EAP110 | EAP110 V1 User Guide - Page 33
all IP addresses can access the specific resources. Enter the destination IP address and subnet mask for free authentication policy. Leaving the field empty means all IP addresses can be visited. When External Radius Server is configured and External Web Portal is selected, please set the IP address - TP-Link Auranet EAP110 | EAP110 V1 User Guide - Page 34
able to visit IP range 10.10.10.0/24. Policy 1 is enabled. Click to edit the policy. Click to delete the policy. 5.3 MAC Filtering MAC Filtering uses MAC addresses to determine whether one host can access the wireless network or not. Thereby it can effectively control the user access in the wireless - TP-Link Auranet EAP110 | EAP110 V1 User Guide - Page 35
. Step 2: Click Figure 5-19 Station MAC Group and fill in a name for the MAC group. Step 3: Click Figure 5-20 Add a Group and input the MAC address you want to organize into this group. 28 - TP-Link Auranet EAP110 | EAP110 V1 User Guide - Page 36
to edit the MAC group name or MAC address. Click MAC group or group member. to access the wireless network. Allow: Allow the access of the stations specified in the MAC group. Deny: Deny the access of the stations specified in the MAC group. 5.4 Scheduler Scheduler allows you to configure - TP-Link Auranet EAP110 | EAP110 V1 User Guide - Page 37
box to enable Scheduler. Association Mode: Select Associated with SSID/AP, you can perform configurations on the SSIDs/AP. The display of Scheduler Association is based on your option here. Scheduler Profile Configuration Follow the steps below to add rules. Step 1: Click , two tables will be - TP-Link Auranet EAP110 | EAP110 V1 User Guide - Page 38
Step 2: Click and input a profile name for the rule. Step 3: Click Figure 5-25 Add a Profile and configure the recurring schedule for the rule. Figure 5-26 Add a Rule 31 - TP-Link Auranet EAP110 | EAP110 V1 User Guide - Page 39
5-28 Scheduler Association_Associated with AP Displays the name of the device. Displays the MAC address of the device. Select a profile name from the drop-down list. Profile name is configured in Scheduler Profile Configuration. Select Radio On/Off to turn on/off the wireless network during the time - TP-Link Auranet EAP110 | EAP110 V1 User Guide - Page 40
5.5 QoS The EAP supports Quality of Service (QoS) to prioritize voice and video traffic over other traffic types. In normal use, the default values for the EAP device and station EDCA should not need to be changed. Changing these values affects the QoS provided. Figure 5-29 QoS Page - TP-Link Auranet EAP110 | EAP110 V1 User Guide - Page 41
5.5.1 AP EDCA Parameters AP Enhanced Distributed Channel Access (EDCA) parameters affect traffic flowing from the EAP device to the client station. Queue: Arbitration InterFrame Space: Minimum Contention Window: Maximum Contention Window: Maximum Burst - TP-Link Auranet EAP110 | EAP110 V1 User Guide - Page 42
by 32. No Select Enable to specify that the EAP device should not acknowledge Acknowledgement: frames with QosNoAck as the service class value. By default, it is disabled. Unscheduled Automatic Power Save Delivery: Select Enable to enable APSD, which is a power management method. APSD is - TP-Link Auranet EAP110 | EAP110 V1 User Guide - Page 43
5.6 Rogue AP Detection A Rogue AP is an access point that has been installed on a secure network without explicit authorization from a system administrator. The EAP device can scan all channels to detect all APs in - TP-Link Auranet EAP110 | EAP110 V1 User Guide - Page 44
AP List Information about the detected rogue APs is displayed in the list. By default, the status of the detected rogue AP is unknown. You can click Known AP List. After the configurations are saved, the moved AP will not be displayed in the Detected Rogue AP List. The MAC address of the rogue AP. - TP-Link Auranet EAP110 | EAP110 V1 User Guide - Page 45
an AP at regular intervals to announce the existence of the wireless network. The default behavior is to send a beacon frame once every 100 milliseconds (or 10 to move the AP out of the Trusted AP List. MAC: The MAC address of the trusted AP. SSID: The SSID for the trusted AP. Band: Displays - TP-Link Auranet EAP110 | EAP110 V1 User Guide - Page 46
and add the APs in the imported file to the APs currently shown in the Trusted AP List NOTE: EAP device does not have any control over the APs in the Detected Rogue AP List. 39 - TP-Link Auranet EAP110 | EAP110 V1 User Guide - Page 47
running status and statistics based on AP, SSID and Client. 6.1 AP AP List on the Monitoring page displays the device name, its MAC address and the number of clients. Below the AP List the AP's detailed information will be shown, including Device Information, Wireless Settings, LAN Information - TP-Link Auranet EAP110 | EAP110 V1 User Guide - Page 48
Name: Displays the device name. Device Model: Displays the model of the device. Firmware Version: Displays the firmware version of the device. If you want to upgrade the firmware, please refer to 8.5 Firmware Upgrade. System Time: Displays the system time of the device. If you want to adjust - TP-Link Auranet EAP110 | EAP110 V1 User Guide - Page 49
power of the device. If you want to change it, refer to 5.1.1 Wireless Basic Settings. LAN Information Figure 6-5 LAN Information MAC Address: IP Address: Subnet Mask: Displays the MAC address of the device. Displays the IP address of the device. Displays the subnet mask of the device. 42 - TP-Link Auranet EAP110 | EAP110 V1 User Guide - Page 50
-duplex or full-duplex) of the port. Figure 6-6 Client MAC: Displays the MAC address of the client of the AP selected in AP List. SSID: Displays the SSID the and the theoretically maximum available bandwidth. CCQ reflects the actual link condition. Rate(Mbps): Displays the data rate at which - TP-Link Auranet EAP110 | EAP110 V1 User Guide - Page 51
Rx/Tx Packets: Rx/Tx Bytes: Rx/Tx Dropped Packets: Rx/Tx Errors: Displays the total amount of packets received/sent on the LAN port. Displays the total amount of data (in bytes) received/sent on the LAN port. Displays the total amount of dropped packets received/sent on the LAN port. Displays the - TP-Link Auranet EAP110 | EAP110 V1 User Guide - Page 52
: Displays the security mode the wireless network is applying. If you want to modify it, please refer to 5.1.2 SSIDs. Portal: Displays the enabling or disabling of Portal. If you want to modify it, please refer to 5.1.2 SSIDs. MAC Filtering: Displays the enabling or disabling of MAC Filtering - TP-Link Auranet EAP110 | EAP110 V1 User Guide - Page 53
the EAP including those who are authenticated. 6.3.1 User List Figure 6-11 Client Monitoring Figure 6-12 User List MAC: Displays the MAC address of the client. Access Point: Displays the name of the device to which the client is connected. SSID: Displays the SSID the client is connected to - TP-Link Auranet EAP110 | EAP110 V1 User Guide - Page 54
bandwidth and the theoretically maximum available bandwidth. CCQ reflects the actual link condition. Rate(Mbps): Displays the data rate at which the authentication. Figure 6-13 Portal Authenticated Guest MAC: Displays the MAC address of the authenticated client. Access Point: Displays the name - TP-Link Auranet EAP110 | EAP110 V1 User Guide - Page 55
Active Time: Displays the amount of time the authenticated client has been connected to the root AP. Action: Click Unauthorize to stop giving authorization to the clients connected to the wireless network. 48 - TP-Link Auranet EAP110 | EAP110 V1 User Guide - Page 56
Chapter 7 Management Management page is mainly used for device management and maintenance. 7.1 System Log System log records information about hardware, software as well as system issues and monitors system events. With the help of system log, you can get informed of system running status and detect - TP-Link Auranet EAP110 | EAP110 V1 User Guide - Page 57
the way to receive system logs in Log Settings zone, where these parameters can be configured: Enable Auto Mail, Enable Server and Enable Nvram. Figure 7-3 Log Settings Enable Auto Mail Enter the sender's email address. Enter the recipient's email address, which will receive the system logs. 50 - TP-Link Auranet EAP110 | EAP110 V1 User Guide - Page 58
enabled, the following content will be shown. Figure 7-5 Enable Server System Log Server IP: Enter the IP address of the remote server. System Log Server Port: Enter the port of the remote server. Enable Nvram By default, Nvram is disabled. Check the box to enable Nvram, system logs will be saved - TP-Link Auranet EAP110 | EAP110 V1 User Guide - Page 59
Protocol Secure) is enabled by default. Designate a secure server port for web server in HTTPS mode. By default the port is 443. Designate back to web management page. 7.3 Management Access Management Access Control allows you to configure up to four MAC addresses of the hosts that are allowed to - TP-Link Auranet EAP110 | EAP110 V1 User Guide - Page 60
manage the device. MAC1~MAC4: Enter the MAC addresses of the PCs which are authorized to log in the device. 7.4 LED ON/OFF Following is the page of LED ON/OFF. By default the LED is on. Figure 7-8 LED ON/OFF 7.5 SSH This device supports the SSH Server function that allows users to - TP-Link Auranet EAP110 | EAP110 V1 User Guide - Page 61
is not safe, because the password and data transmitted with plain-text default, it is port 22. Check the box to enable SSH Server. By default, it is disabled. 7.6 SNMP The device can be configured , configuration and testing. When networks have troubles, SNMP can detect and restore these troubles. - TP-Link Auranet EAP110 | EAP110 V1 User Guide - Page 62
The community name can be considered a group password. The default setting is public. Get Source: Defines the IP address (for example, 10.10.10.1) or subnet read/write access to the device's SNMP information. The community name can be considered a group password. The default setting is private. - TP-Link Auranet EAP110 | EAP110 V1 User Guide - Page 63
of this device. The format of subnet is "IP address/bit" (such as 10.10.10.0/24). The default is 0.0.0.0, which means all hosts can read and shared password of the network hosts group. Thus, for the security, we suggest modifying the default community name before enabling the SNMP Agent service. If - TP-Link Auranet EAP110 | EAP110 V1 User Guide - Page 64
to configure some basic information like user account and time, and realize functions including reboot, reset, backup, restore and upgrade the device. 8.1 User Account You can change the username and password to protect your device from unauthorized login. We recommend that you change the default - TP-Link Auranet EAP110 | EAP110 V1 User Guide - Page 65
Time Settings Figure 8-2 Time Settings Time zone: Date: Time: Figure 8-3 Time Settings Click the button and the device will obtain GMT time from NTP server. IP address of the NTP server has to be filled in. Click the button, your PC's time will be obtained as the device's system time. Select your - TP-Link Auranet EAP110 | EAP110 V1 User Guide - Page 66
address and an alternative NTP server address. 8.2.2 Daylight Saving Figure 8-4 Daylight Saving Daylight Saving: Mode: Enable or disable the DST. DST is disabled by default Country: Select a predefined DST configuration. Europe is the predefined country by default. USA: Second Sunday in - TP-Link Auranet EAP110 | EAP110 V1 User Guide - Page 67
Start/End: Figure 8-6 Recurring Mode Select Recurring Mode. The configuration is recurring in use. Specify the time adding in minutes when Saving Time. 8.3 Reboot/Reset Figure 8-8 Reboot & Reset Click Reboot to restart the device. Click Reset to restore the device to factory default settings. 60 - TP-Link Auranet EAP110 | EAP110 V1 User Guide - Page 68
the device or upload a new configuration file can prevent it from being lost. Restore function helps you to restore the device to previous settings by uploading a backup file. 8.5 Firmware Upgrade Figure 8-10 Firmware Upgrade Please log in http://www.tp-link.com/en/support/download/ to download the - TP-Link Auranet EAP110 | EAP110 V1 User Guide - Page 69
NOTE: 1. Please select the proper software version that matches your hardware to upgrade. 2. To avoid damage, please do not turn off the device while upgrading. 3. After upgrading, the device will reboot automatically. 62 - TP-Link Auranet EAP110 | EAP110 V1 User Guide - Page 70
Appendix A: Specifications HARDWARE FEATURES Model EAP110 EAP120 EAP220 Interface Kensington lock slot RESET button ETHERNET: ETHERNET: 10/100/1000Mbps Ethernet port to eight per radio Captive Portal Support Authentication Wireless Security WEP WPA/WPA2-personal WPA/WPA2-enterprise 63
-
 1
1 -
 2
2 -
 3
3 -
 4
4 -
 5
5 -
 6
6 -
 7
7 -
8
-
9
-
10
-
11
-
12
-
13
-
14
-
15
-
16
-
17
-
18
-
19
-
20
-
21
-
22
-
23
-
24
-
25
-
26
-
27
-
28
-
29
-
30
-
31
-
32
-
33
-
34
-
35
-
36
-
37
-
38
-
39
-
40
-
41
-
42
-
43
-
44
-
45
-
46
-
47
-
48
-
49
-
50
-
51
-
52
-
53
-
54
-
55
-
56
-
57
-
58
-
59
-
60
-
61
-
62
-
63
-
64
-
65
-
66
-
67
-
68
-
69
-
70
 |
 |

User Guide
Wireless N Access Point
EAP110/EAP120/EAP220
REV1.0.0
1910011184